
[AI] 从零到一:理解并上线你的第一个Skill
[AI] 从零到一:理解并上线你的第一个Skill
[AI] 从零到一:理解并上线你的第一个Skill
概念
Skills 本质上是 示例(Examples)+ 能力描述(Capability) 的组合。它的核心作用是告诉 AI:
- 这个技能叫什么、能做什么
- 遇到什么场景时应该调用
- 调用的具体方式是什么(脚本、工具)

参考文档:https://support.claude.com/en/articles/12512176-what-are-skills
实战
只要支持skills IDE都可,比如:Claude Code、Cursor、Trae、CodeBuddy等,我这里以CodeBuddy为例。
- CodeBuddy下载地址:https://www.codebuddy.cn/ide/
- Skill市场:https://skillhub.cn/
1. skills基础安装使用
因为腾讯自建了SkillHub,所以CodeBuddy内置了技能市场,skills安装和使用非常丝滑。
- 下载登录好CodeBuddy之后,来到技能市场,搜索对应技能,点击添加,即可安装该Skills
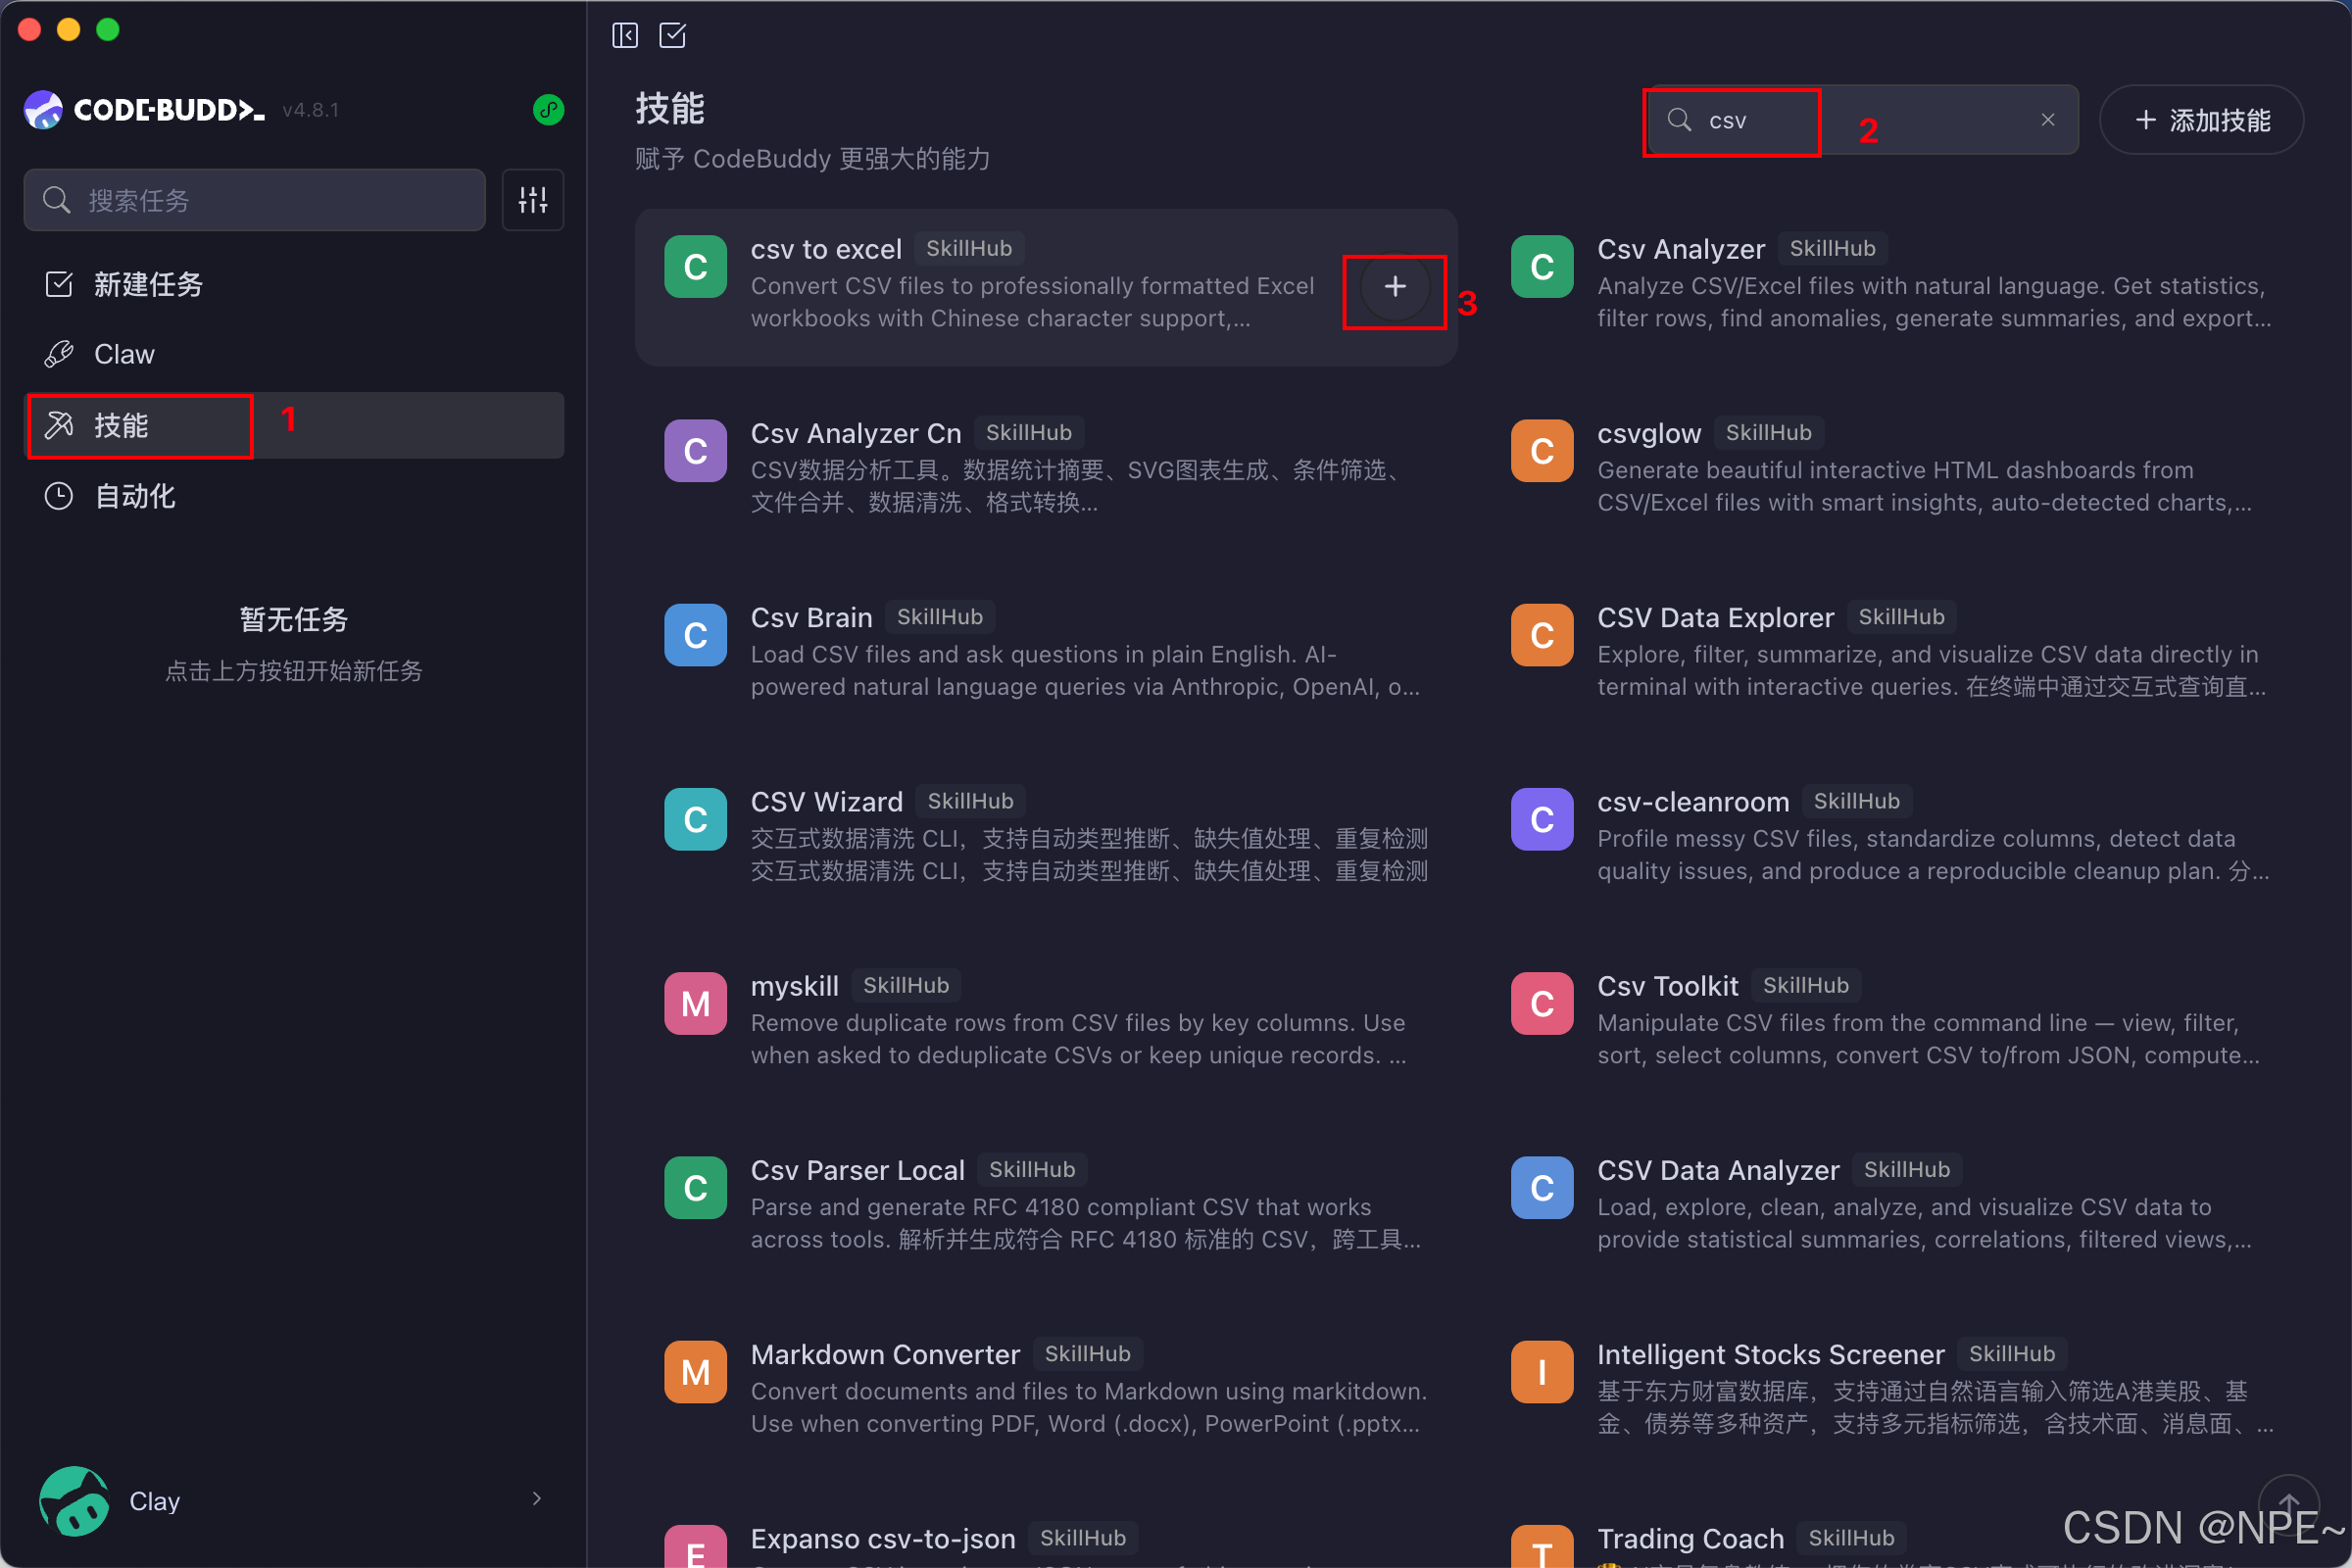
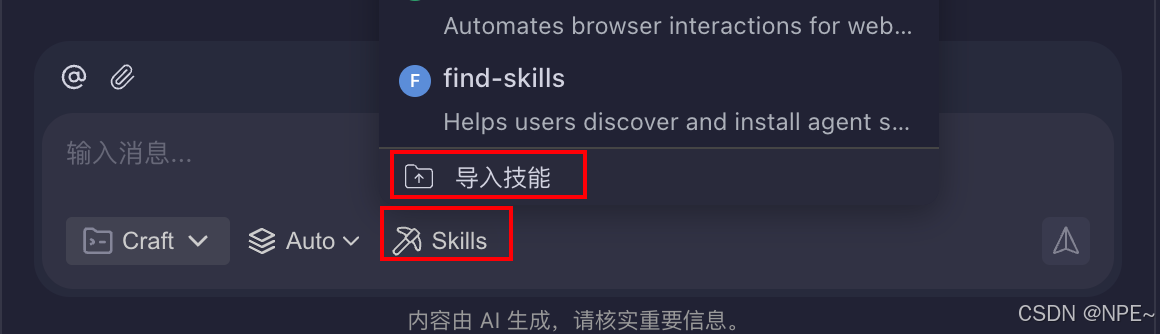
PS:当然除了在插件市场直接安装,CodeBuddy还提供了导入功能,我们可以通过上传文件夹安装自己的skill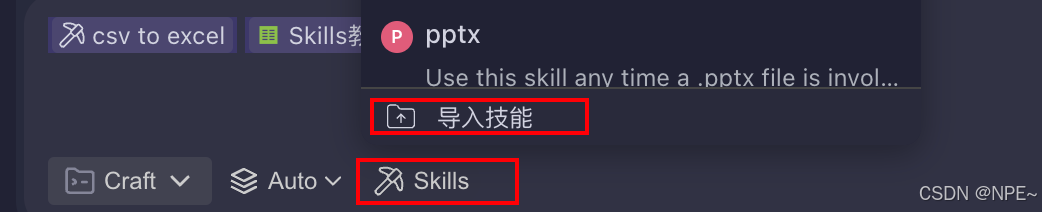
- 使用skills:比如我安装了
csv to excel这个skill,那么我直接给AI一个csv,并让它给我转换为excel,它就会自动识别可以使用的Skills,并调用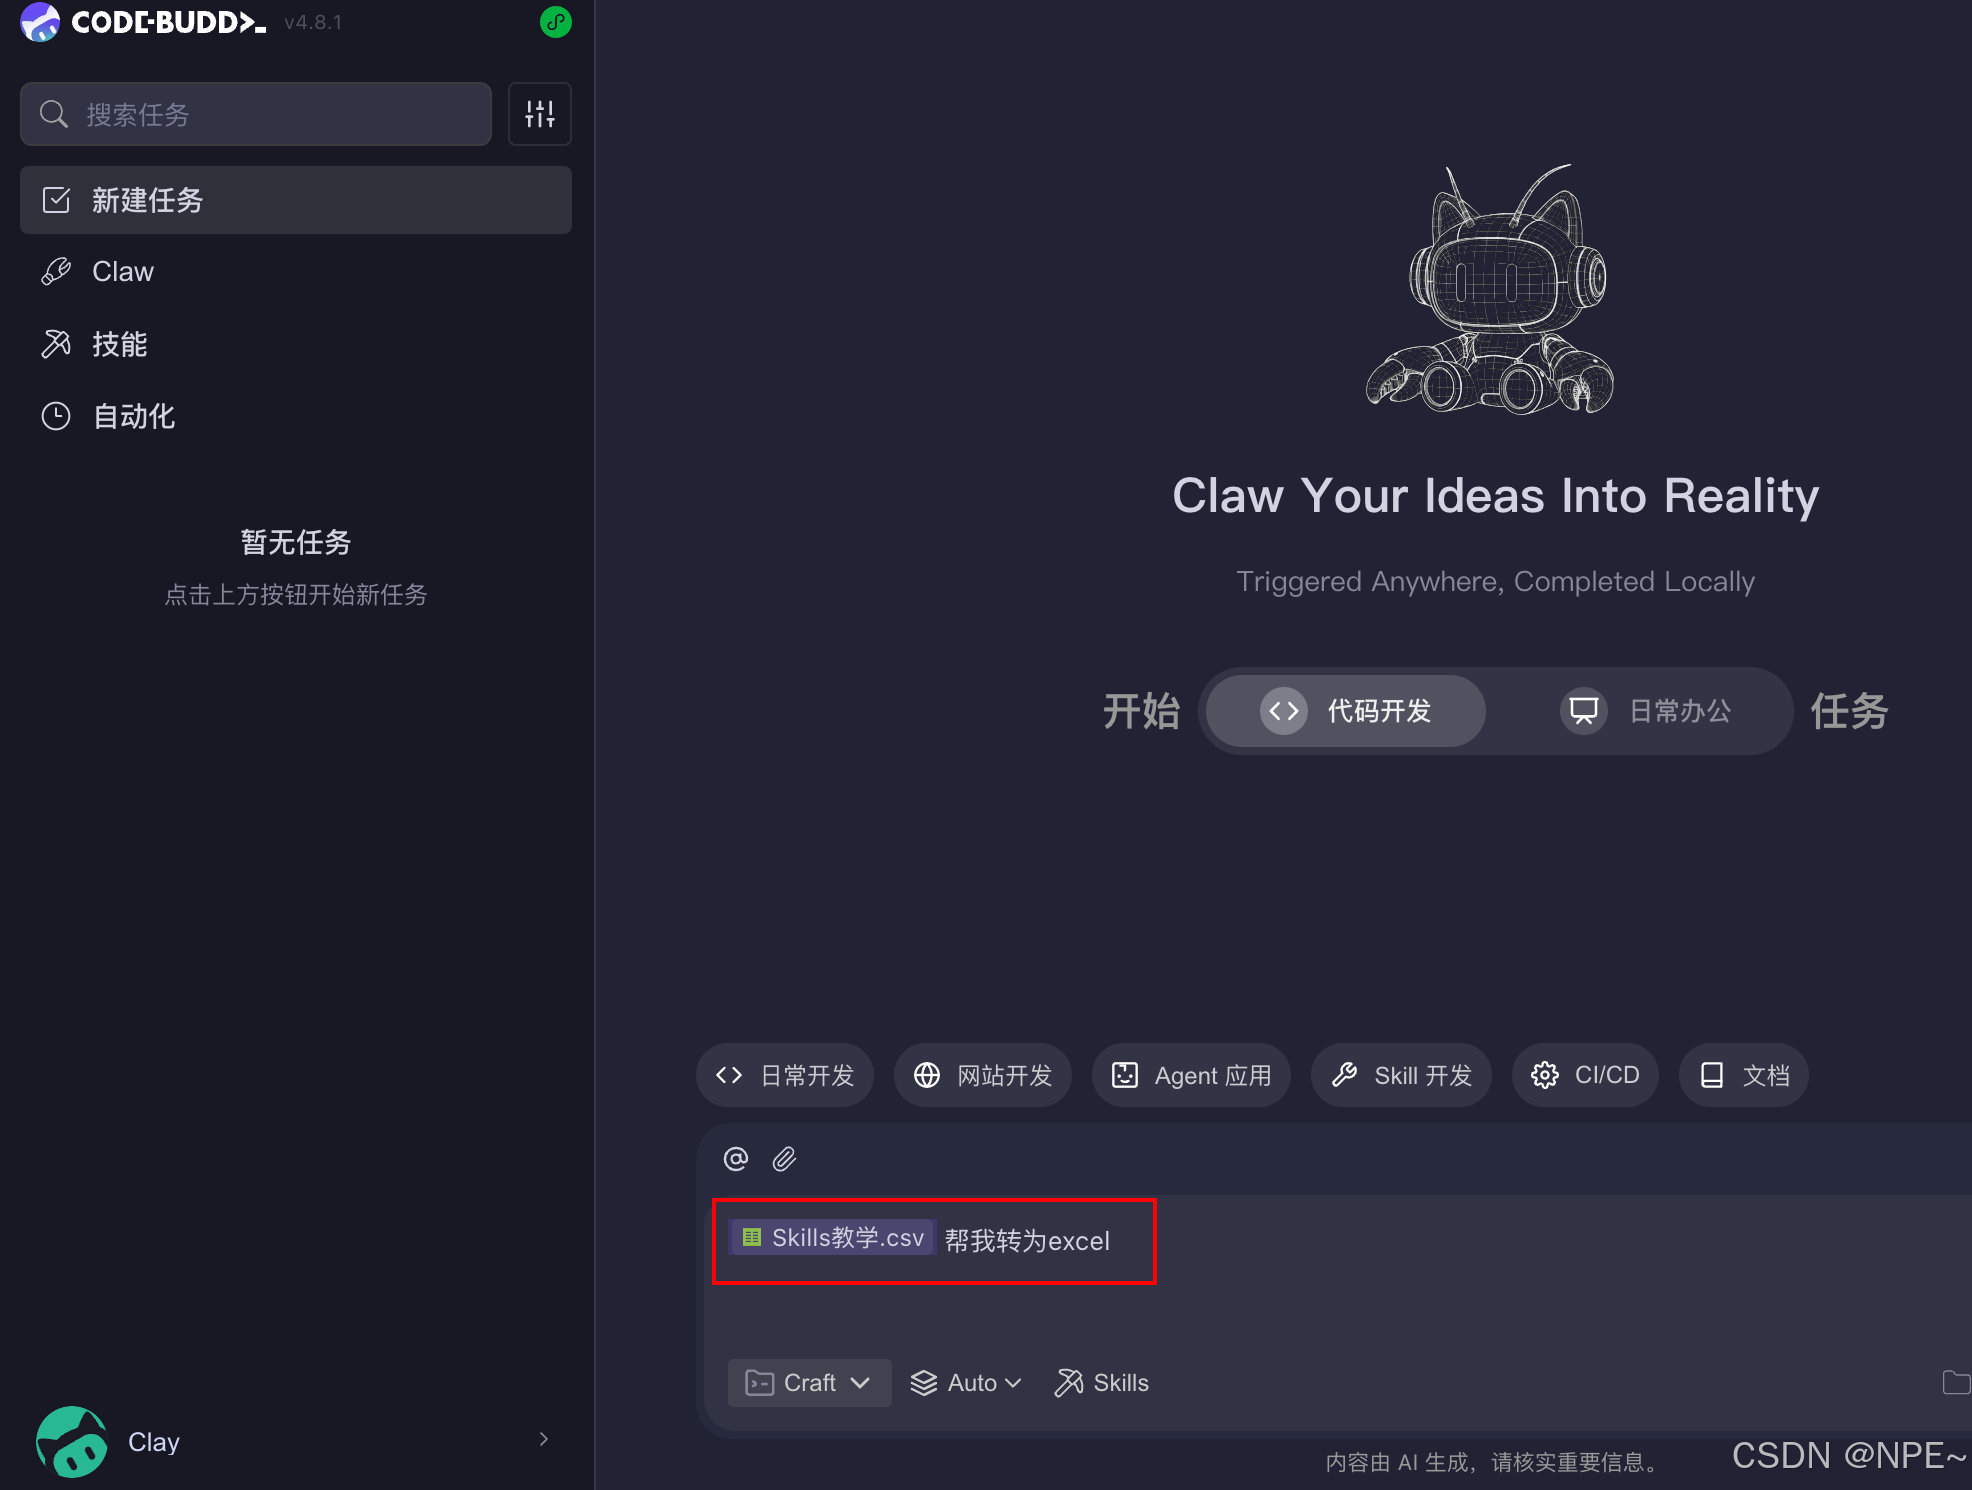

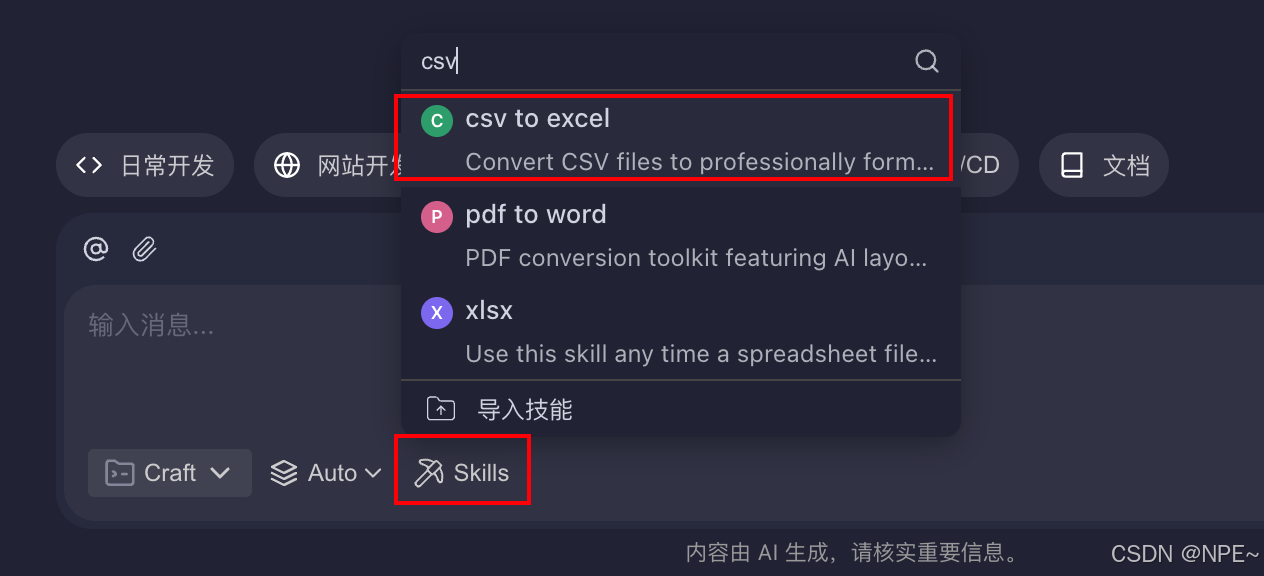
📢注意:如果AI识别不准,我们也可以指定AI使用哪个Skills
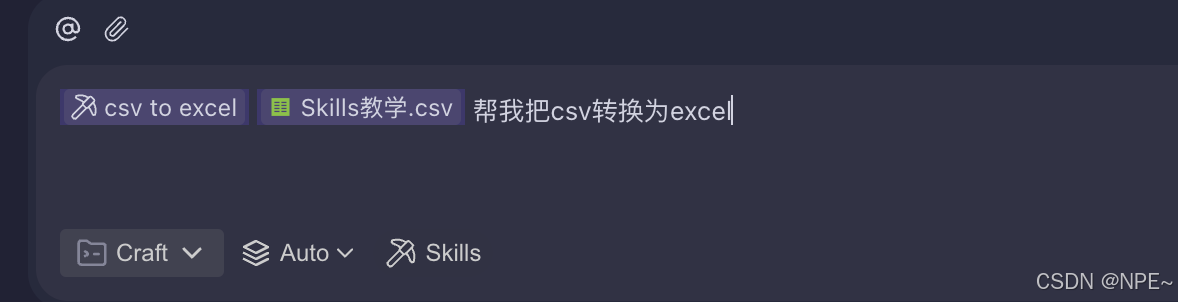
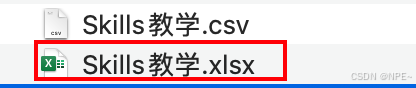
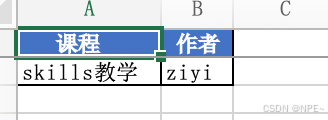
- 最终效果:成功转换并可正常打开文件
2. 从0到1开发上线并使用自己的skill
2.1 通用Skill源码拆解
首先我们可以观察一下,标准Skill的构成是什么,看看需要哪些文件夹和目录结构
# 可以直接在家目录的.codebuddy下找到自己安装的skills
# cd /Users/ziyi/.codebuddy/skills/csvtoexcel
cd ~/.codebuddy/skills/

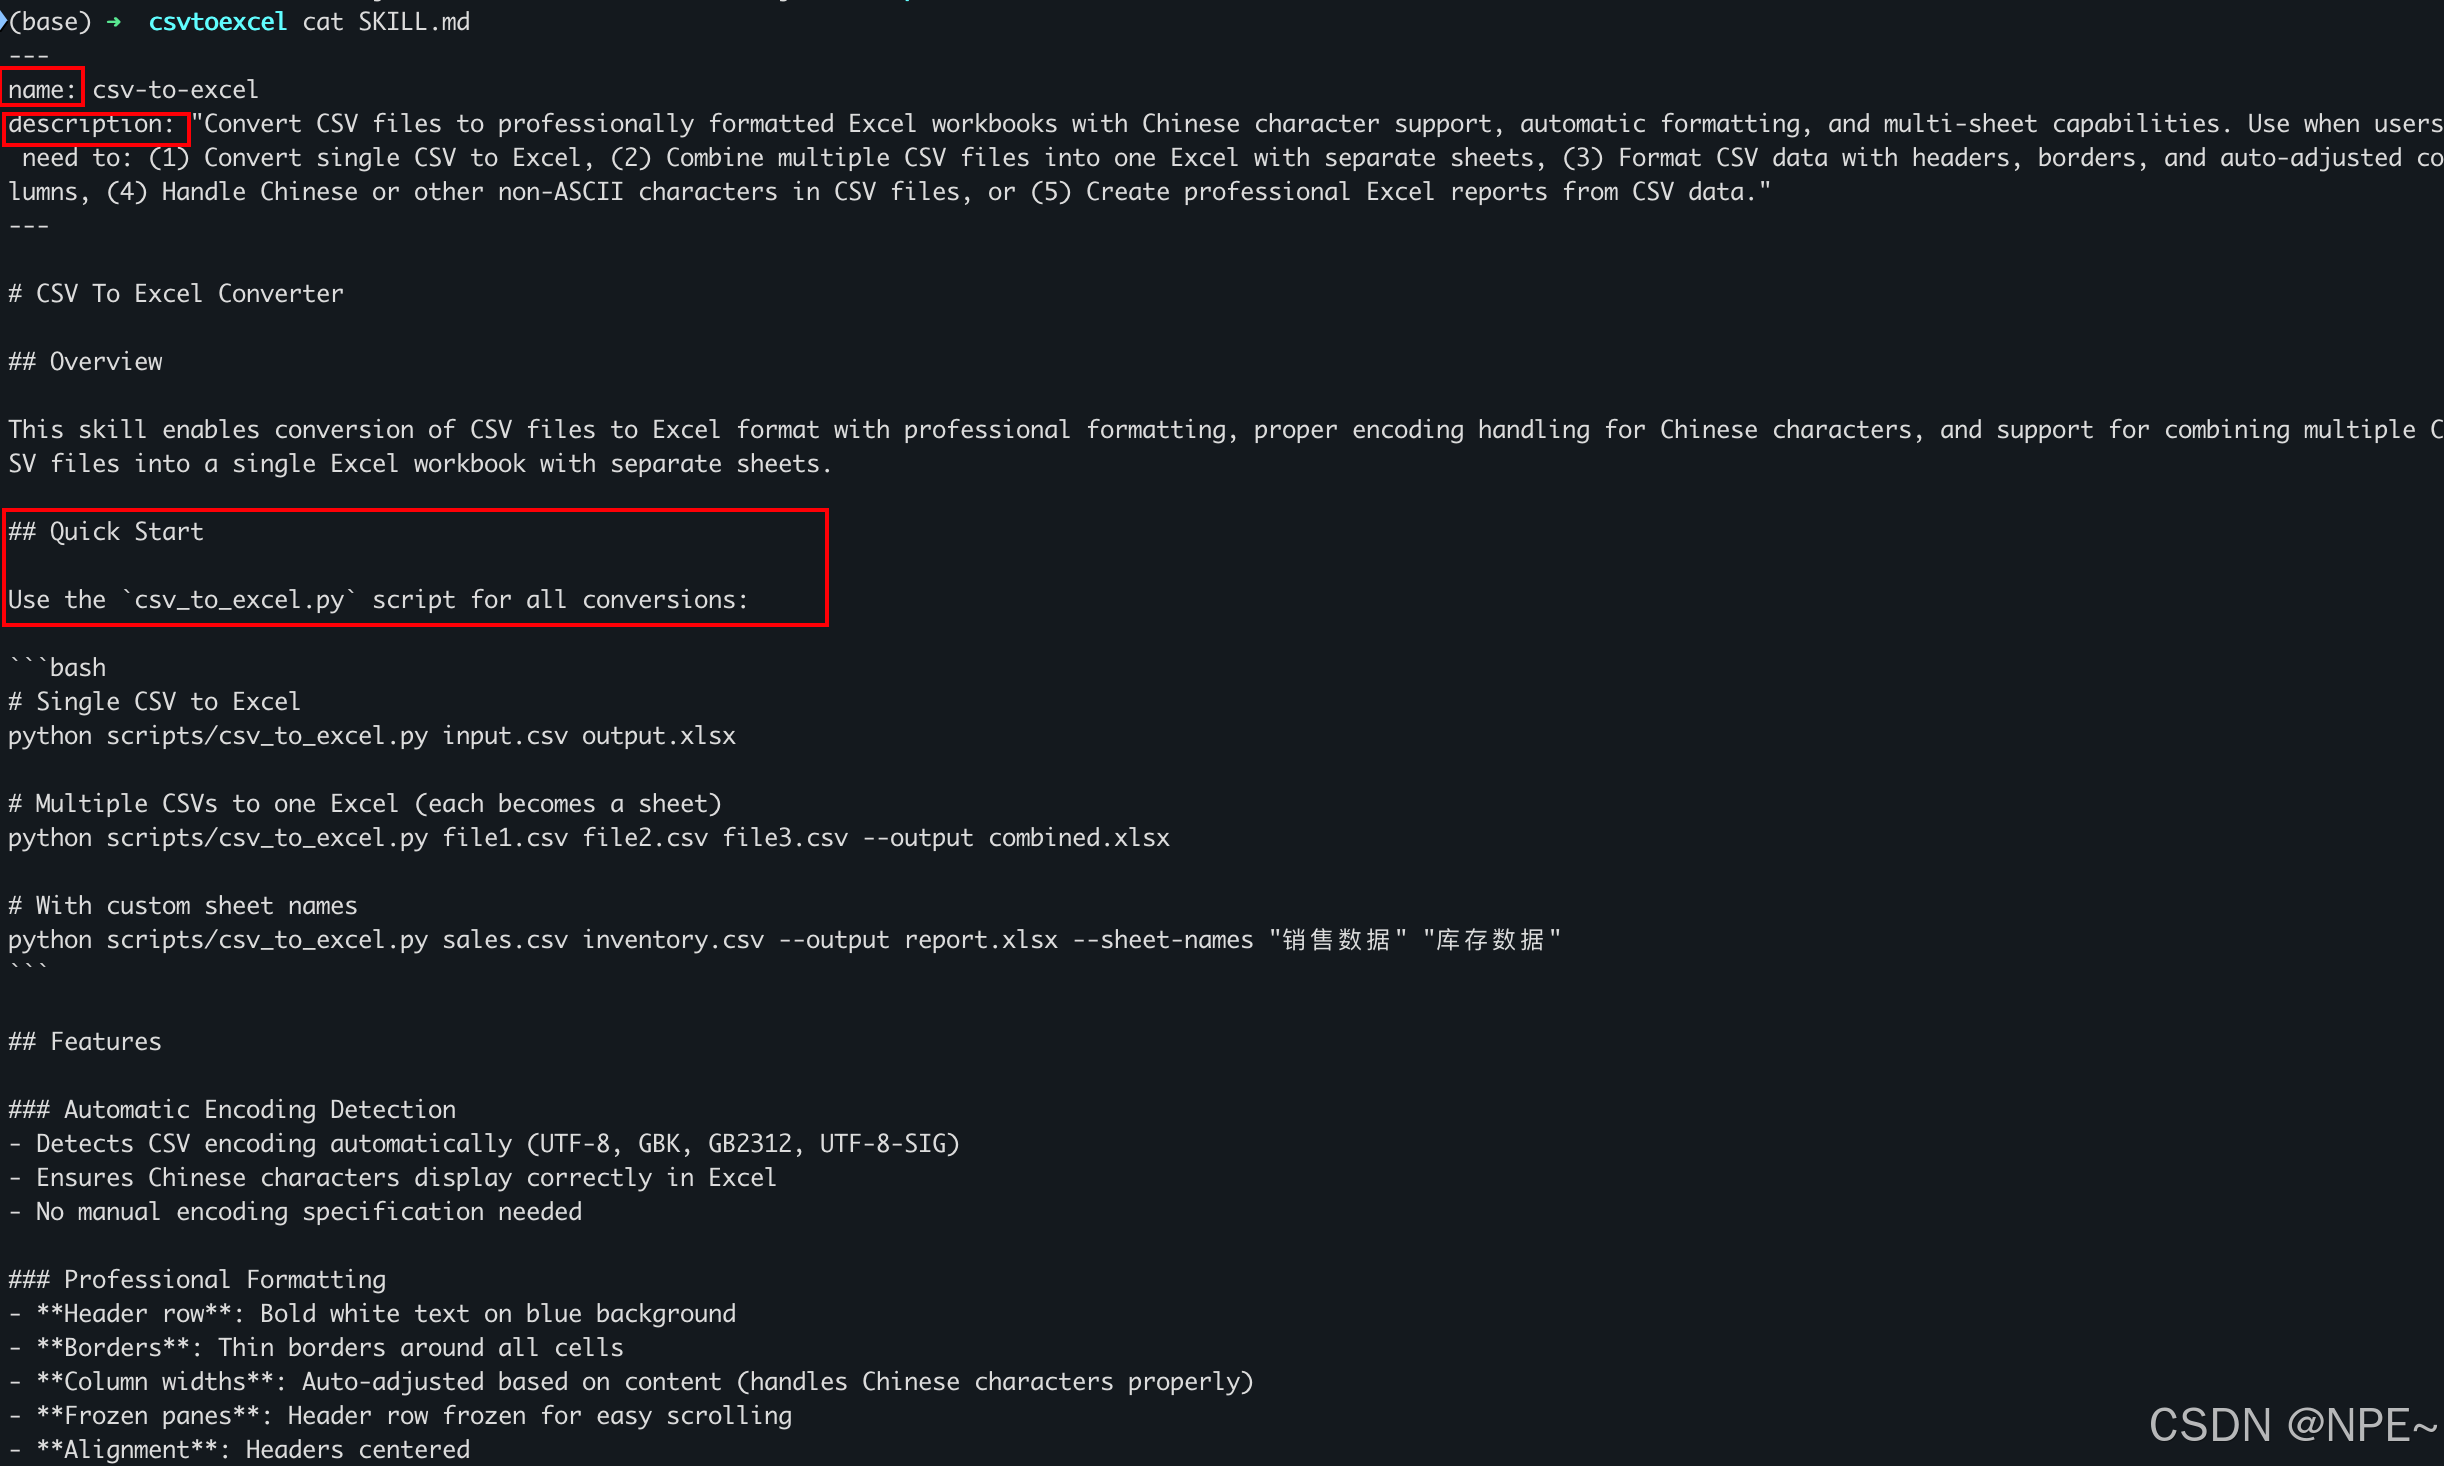
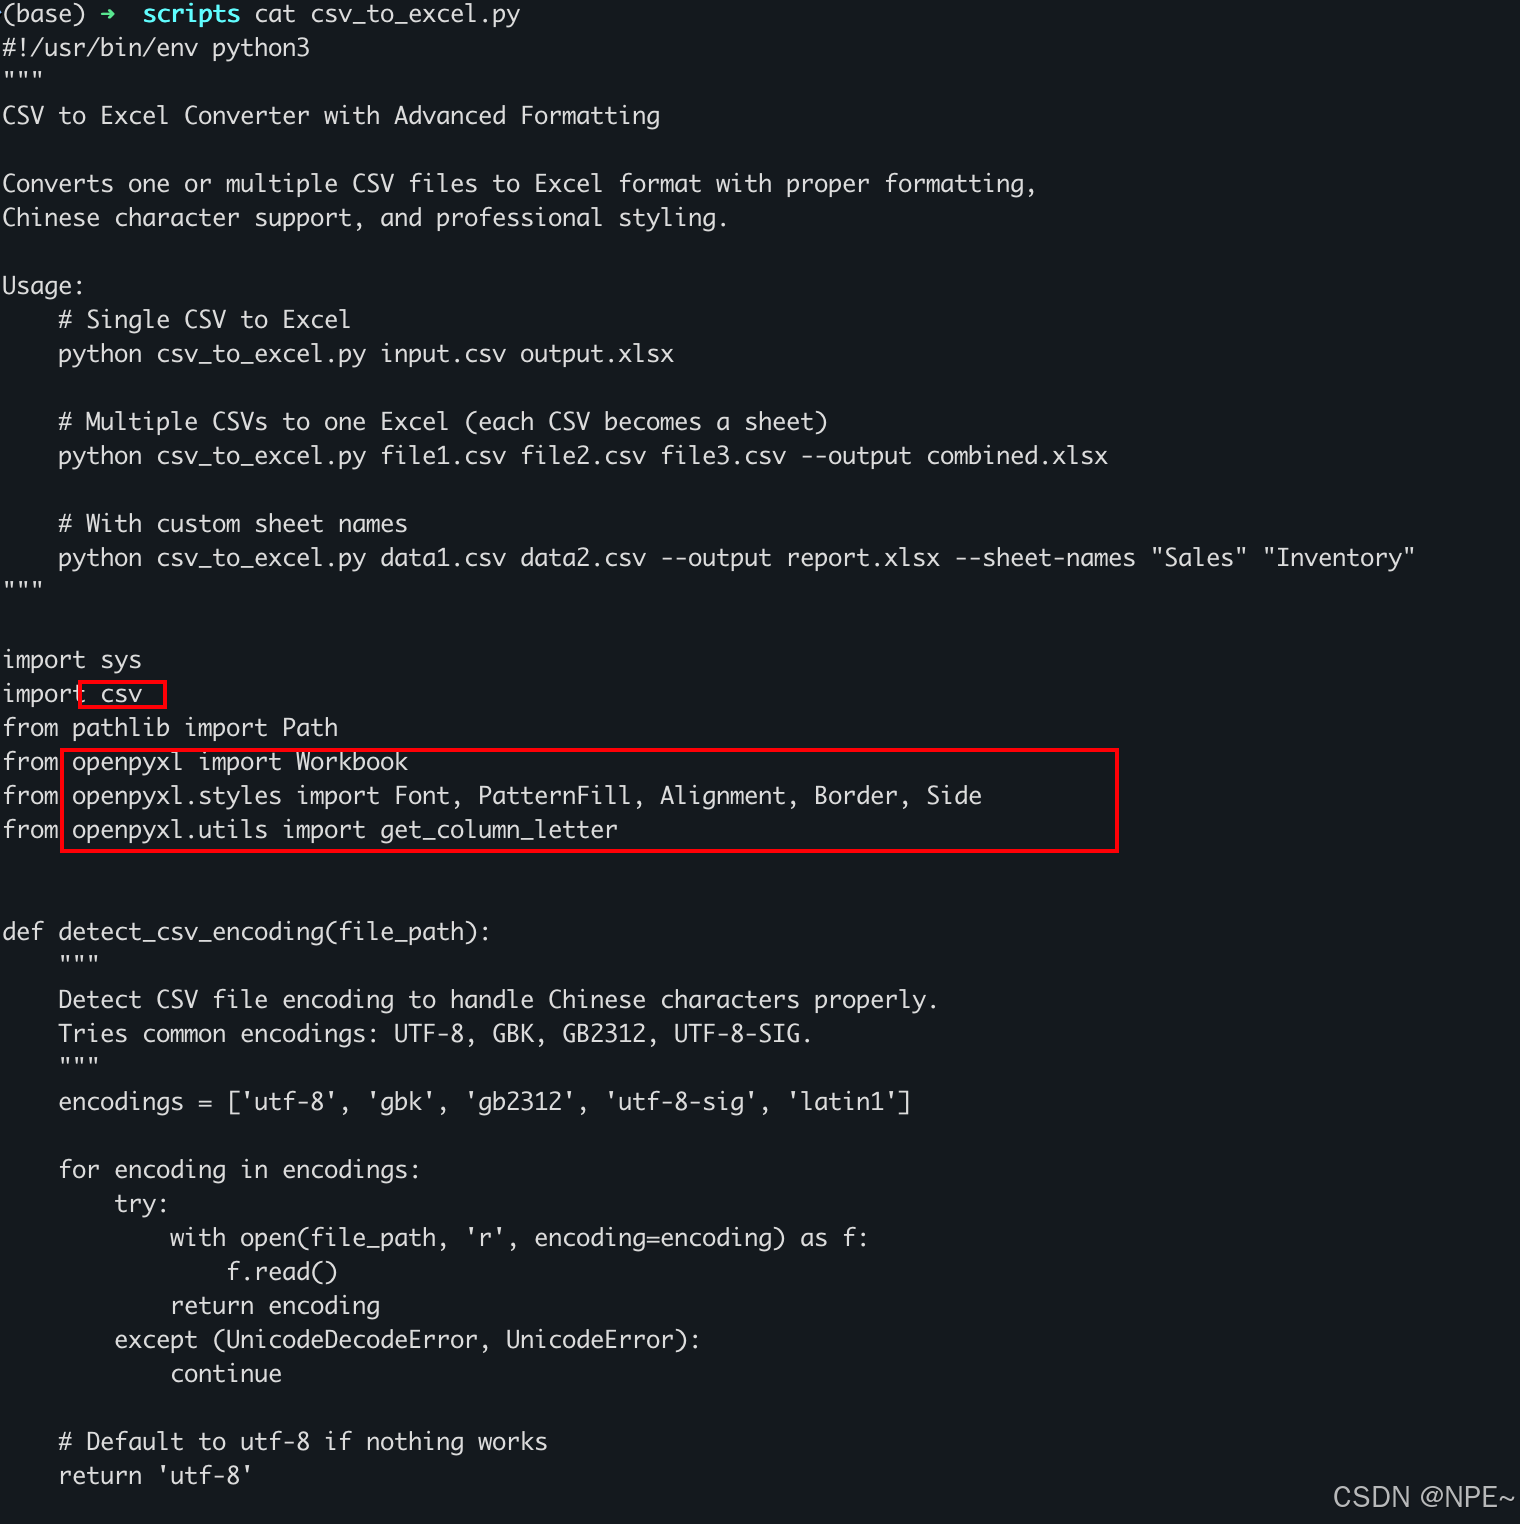
SKILL.md文件:介绍
可以看到该文件主要规范了该skill的名称和描述,可以用来做什么,以及给了一个案例,告诉模型怎么使用
scripts文件夹:具体实现逻辑
该文件夹下提供了对应脚本,是该Skills的核心实现,比如我需要将csv转换为excel,该脚本就通过python的方式,读取csv文件并调用了对应API将其转换为excel。

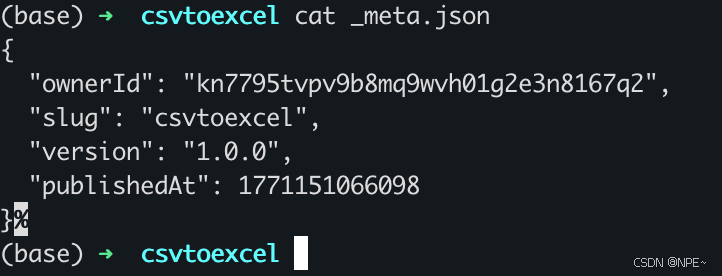
_meta.json:Skill版本
主要定义了这个skill的所属者是谁、版本号、发布时间等。该文件是安装/发布时由SkillHub平台自动生成,本地开发时无需创建。
{
  "ownerId": "kn7795tvpv9b8mq9wvh01g2e3n8167q2",
  "slug": "csvtoexcel",
  "version": "1.0.0",
  "publishedAt": 1771151066098
}
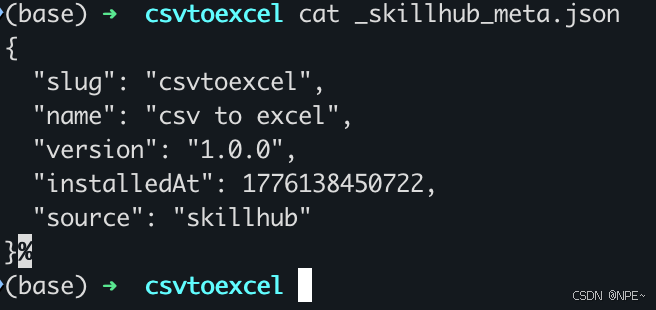
_skillhub_meta.json:Skill来源
主要定义了这个skill的从哪个市场安装、安装时间等。该文件是安装/发布时由SkillHub平台自动生成,本地开发时无需创建。
{
  "slug": "csvtoexcel",
  "name": "csv to excel",
  "version": "1.0.0",
  "installedAt": 1776138450722,
  "source": "skillhub"
}
2.2 Skill开发
我们日常生活中经常遇到有些平台,需要上传图片,但对图片大小有要求。那么现在我们就可以做一个skill,用于减少或者增加jpg图片大小。比如命名为jpg-resizer,最终目录结构如下:
jpg-resizer/
├── SKILL.md          ✅ 必须手动创建
├── scripts/          ⚙️ 可选
│   └── resize_jpg.py
├── _meta.json        🤖 SkillHub平台自动生成(无需手动创建)
├── _skillhub_meta.json  🤖 SkillHub平台自动生成(无需手动创建)
└── assets/           📦 可选
scripts:核心脚本/能力开发
作用:本地通过代码实现核心逻辑,比如python、js、bash等都可
是否必须:非必须
场景:需要通过代码实现某个能力时,会用到该文件夹
在本地新建jpg-resizer/scripts文件夹,然后在该文件夹下实现核心代码逻辑,resize_jpg.py:
#!/usr/bin/env python3
"""
JPG Image Resizer - 调整JPG图片大小,支持压缩或放大到目标尺寸范围
"""

import os
import sys
import argparse
from pathlib import Path
from PIL import Image
import math


def get_file_size_kb(path):
    """获取文件大小(KB)"""
    return os.path.getsize(path) / 1024


def resize_image(input_path, output_path, target_size_kb=None, quality=85,
                 max_dimension=None, scale_factor=None, preserve_aspect=True):
    """
    调整图片大小

    参数:
        input_path: 输入文件路径
        output_path: 输出文件路径
        target_size_kb: 目标文件大小(KB),None表示不限制
        quality: JPEG质量 (1-100)
        max_dimension: 最大边像素值
        scale_factor: 缩放因子 (如 2.0 表示放大2倍)
        preserve_aspect: 是否保持宽高比
    """
    img = Image.open(input_path)

    # 转换为RGB(处理PNG透明通道等)
    if img.mode in ('RGBA', 'P', 'LA'):
        background = Image.new('RGB', img.size, (255, 255, 255))
        if img.mode == 'P':
            img = img.convert('RGBA')
        background.paste(img, mask=img.split()[-1] if img.mode == 'RGBA' else None)
        img = background
    elif img.mode != 'RGB':
        img = img.convert('RGB')

    original_size = img.size

    # 计算缩放
    if max_dimension:
        # 根据最大边缩放
        width, height = img.size
        max_side = max(width, height)
        if max_side > max_dimension:
            ratio = max_dimension / max_side
            new_width = int(width * ratio)
            new_height = int(height * ratio)
            img = img.resize((new_width, new_height), Image.Resampling.LANCZOS)

    elif scale_factor:
        # 按比例缩放
        new_width = int(img.width * scale_factor)
        new_height = int(img.height * scale_factor)
        img = img.resize((new_width, new_height), Image.Resampling.LANCZOS)

    # 迭代调整质量以达到目标大小
    current_quality = quality
    min_quality = 10
    max_quality = 100
    tolerance = target_size_kb * 0.1 if target_size_kb else float('inf')  # 10%容差

    if target_size_kb:
        for iteration in range(20):  # 最多迭代20次
            img.save(output_path, 'JPEG', quality=current_quality, optimize=True)
            current_size = get_file_size_kb(output_path)

            diff = current_size - target_size_kb

            if abs(diff) <= tolerance:
                break

            # 根据差异调整质量
            if diff > 0:
                # 文件太大,降低质量
                max_quality = current_quality
                current_quality = (min_quality + current_quality) // 2
            else:
                # 文件太小,增加质量
                min_quality = current_quality
                current_quality = (current_quality + max_quality) // 2

            if current_quality == min_quality or current_quality == max_quality:
                break
    else:
        # 不需要目标大小,直接保存
        img.save(output_path, 'JPEG', quality=current_quality, optimize=True)

    final_size = get_file_size_kb(output_path)
    return {
        'original_size': original_size,
        'new_size': img.size,
        'file_size_kb': final_size,
        'quality': current_quality
    }


def process_single(input_file, output_file=None, target_size_kb=None, quality=85,
                   max_dimension=None, scale_factor=None, preserve_aspect=True):
    """处理单个文件"""
    if not os.path.exists(input_file):
        print(f"错误: 文件不存在 - {input_file}")
        return None

    if output_file is None:
        path = Path(input_file)
        output_file = path.stem + '_resized.jpg'

    print(f"\n处理文件: {input_file}")
    print(f"原始大小: {get_file_size_kb(input_file):.2f} KB")

    if target_size_kb:
        print(f"目标大小: {target_size_kb} KB")
    if max_dimension:
        print(f"最大边: {max_dimension}px")
    if scale_factor:
        print(f"缩放比例: {scale_factor}x")
    print(f"质量: {quality}")

    result = resize_image(
        input_file, output_file,
        target_size_kb=target_size_kb,
        quality=quality,
        max_dimension=max_dimension,
        scale_factor=scale_factor,
        preserve_aspect=preserve_aspect
    )

    print(f"新尺寸: {result['new_size'][0]}x{result['new_size'][1]}")
    print(f"最终质量: {result['quality']}")
    print(f"输出文件: {output_file}")
    print(f"文件大小: {result['file_size_kb']:.2f} KB")

    return result


def process_directory(input_dir, output_dir=None, target_size_kb=None, quality=85,
                      max_dimension=None, scale_factor=None, recursive=False, preserve_aspect=True):
    """批量处理目录"""
    input_path = Path(input_dir)

    if output_dir:
        output_path = Path(output_dir)
        output_path.mkdir(parents=True, exist_ok=True)
    else:
        output_path = input_path

    # 查找JPG文件
    patterns = ['*.jpg', '*.jpeg', '*.JPG', '*.JPEG']
    files = []

    for pattern in patterns:
        if recursive:
            files.extend(input_path.rglob(pattern))
        else:
            files.extend(input_path.glob(pattern))

    if not files:
        print(f"在 {input_dir} 中未找到JPG文件")
        return

    print(f"找到 {len(files)} 个JPG文件")

    results = []
    for i, file in enumerate(files, 1):
        print(f"\n[{i}/{len(files)}] 处理中...")

        if output_dir:
            relative = file.relative_to(input_path)
            output_file = output_path / relative.with_suffix('.jpg')
            output_file.parent.mkdir(parents=True, exist_ok=True)
        else:
            output_file = file.parent / (file.stem + '_resized.jpg')

        try:
            result = resize_image(
                str(file), str(output_file),
                target_size_kb=target_size_kb,
                quality=quality,
                max_dimension=max_dimension,
                scale_factor=scale_factor,
                preserve_aspect=preserve_aspect
            )
            results.append((str(file), str(output_file), result))
            print(f"✓ 完成: {result['file_size_kb']:.2f} KB")
        except Exception as e:
            print(f"✗ 失败: {file} - {e}")

    # 汇总统计
    if results:
        total_original = sum(get_file_size_kb(r[0]) for r in results)
        total_new = sum(r[2]['file_size_kb'] for r in results)
        print(f"\n========== 批量处理完成 ==========")
        print(f"处理文件数: {len(results)}")
        print(f"原始总大小: {total_original:.2f} KB")
        print(f"新总大小: {total_new:.2f} KB")
        print(f"变化: {(total_new - total_original) / total_original * 100:+.1f}%")


def main():
    parser = argparse.ArgumentParser(
        description='JPG图片大小调整工具 - 支持压缩和放大到目标尺寸',
        formatter_class=argparse.RawDescriptionHelpFormatter,
        epilog='''
示例:
  # 压缩图片到100KB
  resize_jpg.py photo.jpg --target-size 100

  # 放大图片2倍
  resize_jpg.py photo.jpg --scale 2

  # 设置最大边为1000px
  resize_jpg.py photo.jpg --max-dimension 1000

  # 批量处理目录
  resize_jpg.py ./photos --output-dir ./output --target-size 200
'''
    )

    parser.add_argument('input', help='输入文件或目录')
    parser.add_argument('output', nargs='?', help='输出文件(单文件模式)或目录(批量模式)')

    # 大小控制组(互斥)
    size_group = parser.add_mutually_exclusive_group()
    size_group.add_argument('--target-size', type=int, help='目标文件大小(KB)')
    size_group.add_argument('--max-dimension', type=int, help='最大边像素值')
    size_group.add_argument('--scale', type=float, help='缩放倍数 (如 2.0)')

    # 质量设置
    parser.add_argument('--quality', type=int, default=85, help='JPEG质量 1-100 (默认: 85)')
    parser.add_argument('--no-preserve-aspect', action='store_true', help='不保持宽高比')

    # 批量处理选项
    parser.add_argument('--output-dir', help='输出目录(批量模式)')
    parser.add_argument('--recursive', '-r', action='store_true', help='递归处理子目录')

    args = parser.parse_args()

    # 参数验证
    if args.quality < 1 or args.quality > 100:
        print("错误: 质量必须在 1-100 之间")
        sys.exit(1)

    if os.path.isdir(args.input):
        process_directory(
            args.input,
            output_dir=args.output_dir or args.output,
            target_size_kb=args.target_size,
            quality=args.quality,
            max_dimension=args.max_dimension,
            scale_factor=args.scale,
            recursive=args.recursive,
            preserve_aspect=not args.no_preserve_aspect
        )
    else:
        process_single(
            args.input,
            output_file=args.output,
            target_size_kb=args.target_size,
            quality=args.quality,
            max_dimension=args.max_dimension,
            scale_factor=args.scale,
            preserve_aspect=not args.no_preserve_aspect
        )


if __name__ == '__main__':
    main()
SKILL.md:Skill描述文档完善
作用:描述Skill的基本信息,如:名称、描述、用法等
是否必须:必须
在本地jpg-resizer文件夹下,新建SKILL.md文件:
---
name: jpg-resizer
description: |
  JPG图片大小调整工具,支持压缩减少体积或放大增加体积到用户指定的目标大小范围。
  This skill should be used when users want to: resize JPG images to a specific file size range,
  compress images to reduce file size, enlarge images to increase file size,
  batch process images to uniform file sizes, or adjust image dimensions while maintaining quality.
  触发场景包括:调整图片大小、压缩图片、放大图片、指定目标文件大小等。
---

# JPG Image Resizer

JPG图片大小调整工具,支持压缩或放大到用户指定的目标尺寸范围。

## 核心功能

1. **目标大小模式** - 用户指定KB值,自动调整质量和/或尺寸达到目标
2. **压缩模式** - 减少图片体积,可通过降低质量或尺寸实现
3. **放大模式** - 增加图片体积,通过放大尺寸实现
4. **尺寸控制** - 支持最大边限制或缩放倍数控制

## 使用方式
### 单文件处理
bash
resize_jpg.py <input_file> [output_file] [options]

...后续省略,大家感兴趣的可参考Skillhub上源码...
其他文件
除了scripts文件夹、Skill.md文件,还有些可能有assets文件夹,用来存储示例等。总之Skill目录结构并非是固定的,只要能给模型描述好这个技能怎么使用即可。
2.3 Skill上线使用
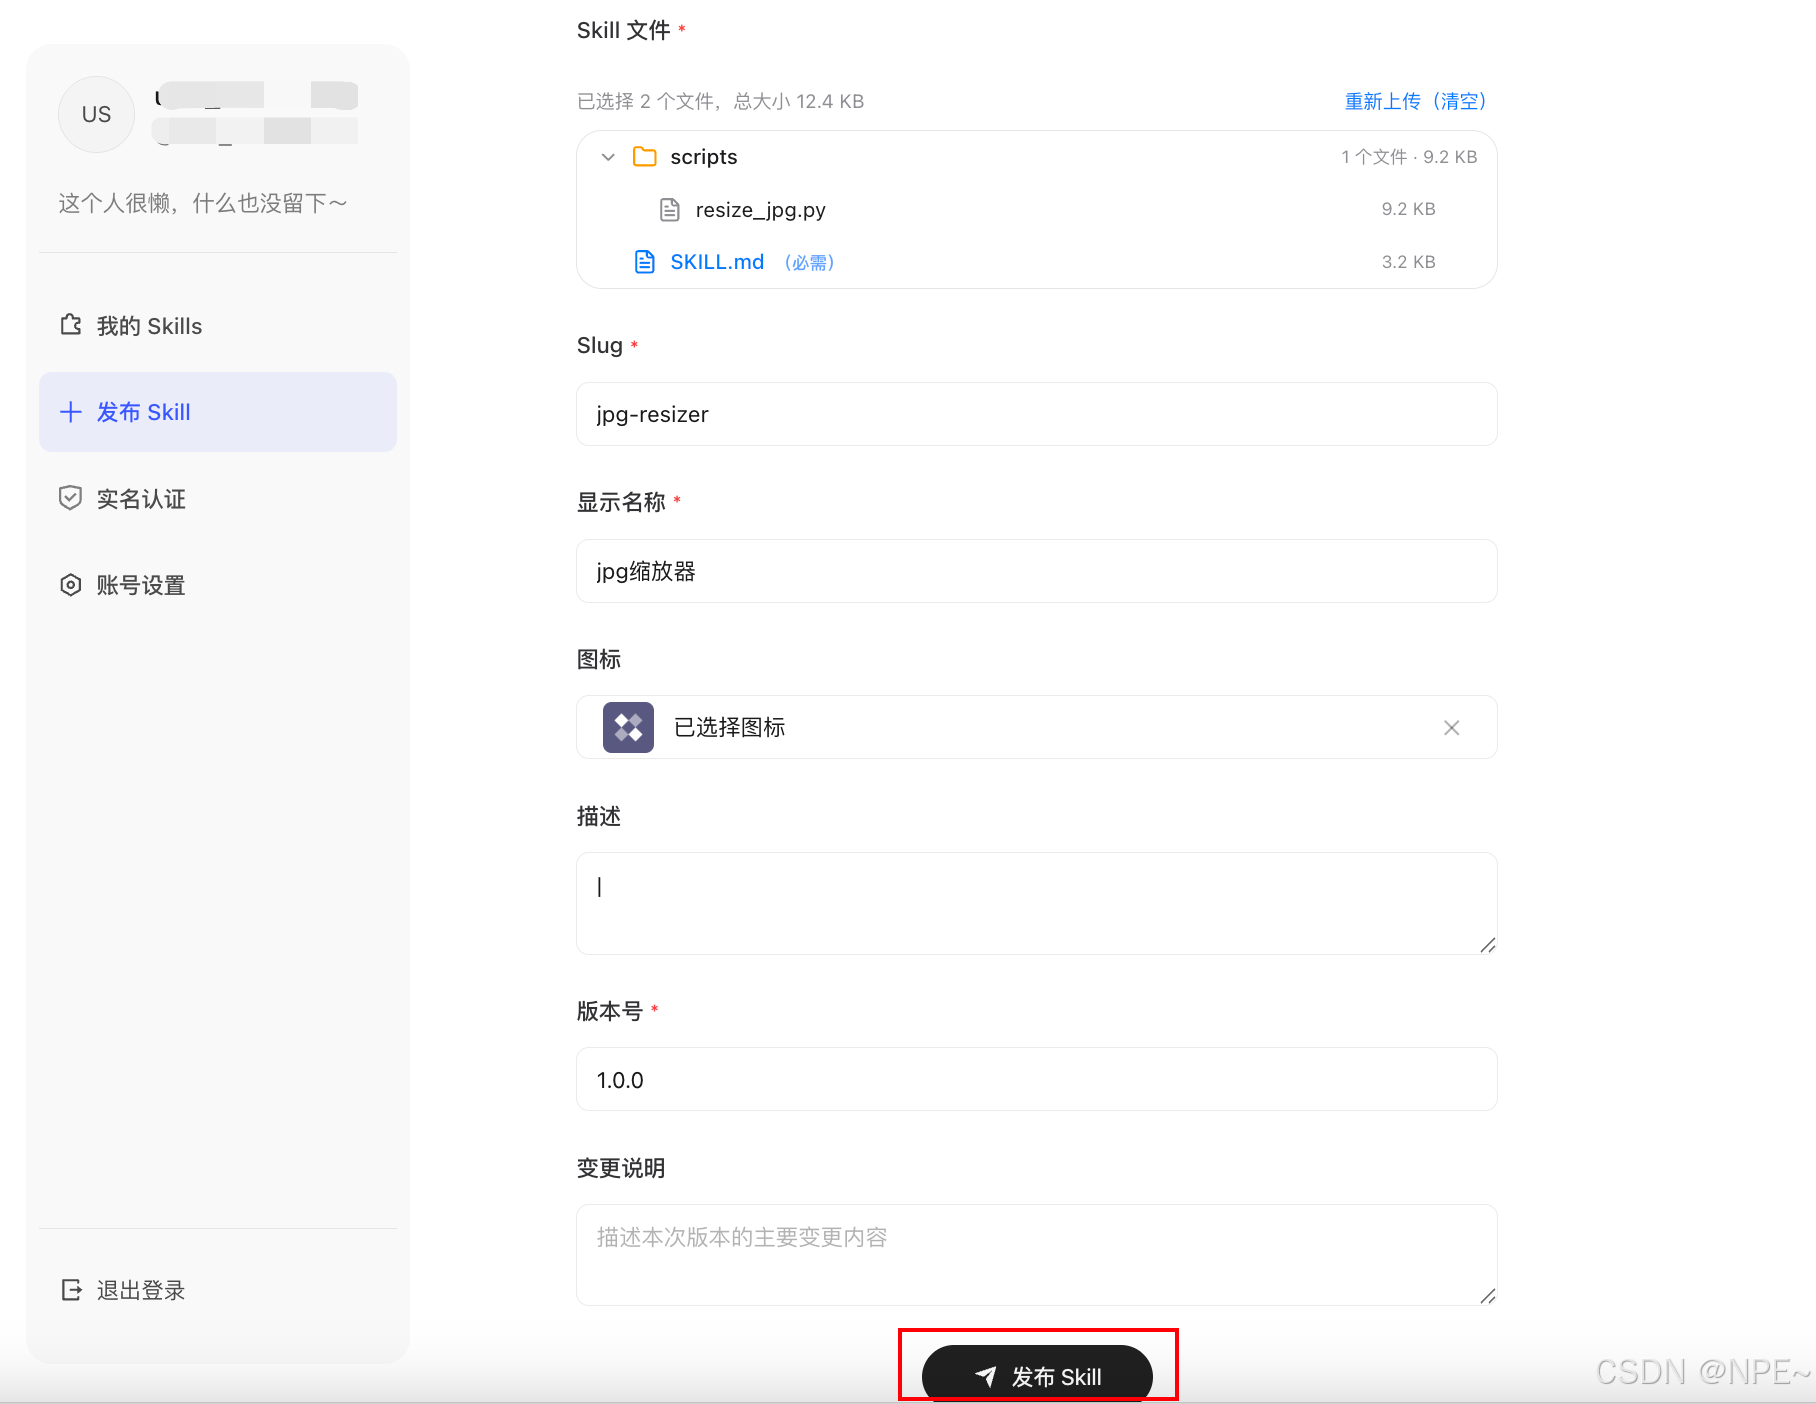
最终我们在本地开发好的Skill如下图所示:
- 将开发好的Skill上传到hub(如果没注册的需要注册,然后完成实名认证即可)
SkillHub官方网址:https://skillhub.cn/dashboard
- 点击发布Skill,将本地jpg-resizer文件夹拖动到该位置,并按照要求填写其他字段。最后点击发布即可
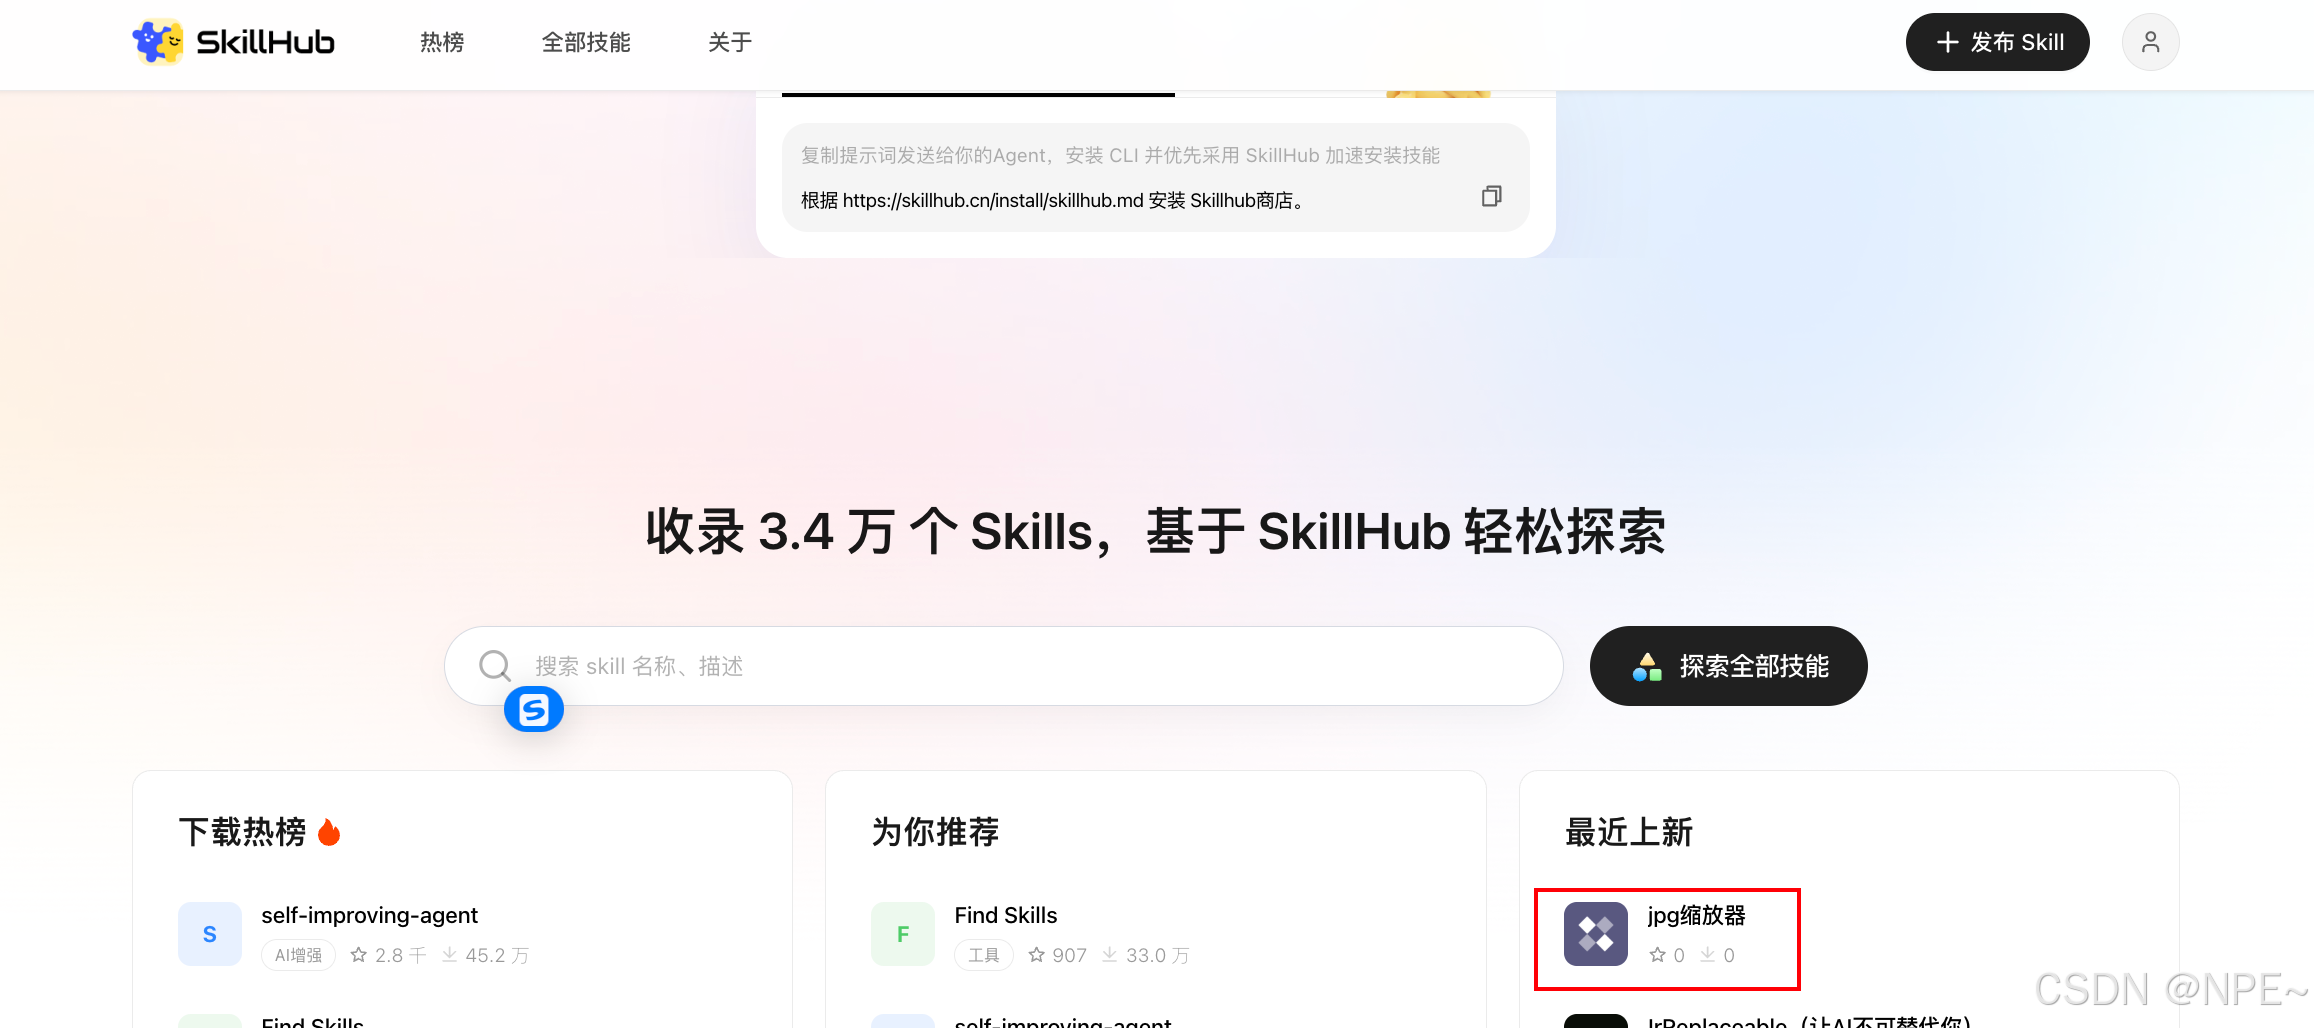
- 等待审核完成后,就可以在SkillHub官方平台搜到自己的skill了
- 接下来就可以直接在CodeBuddy技能模块搜索安装
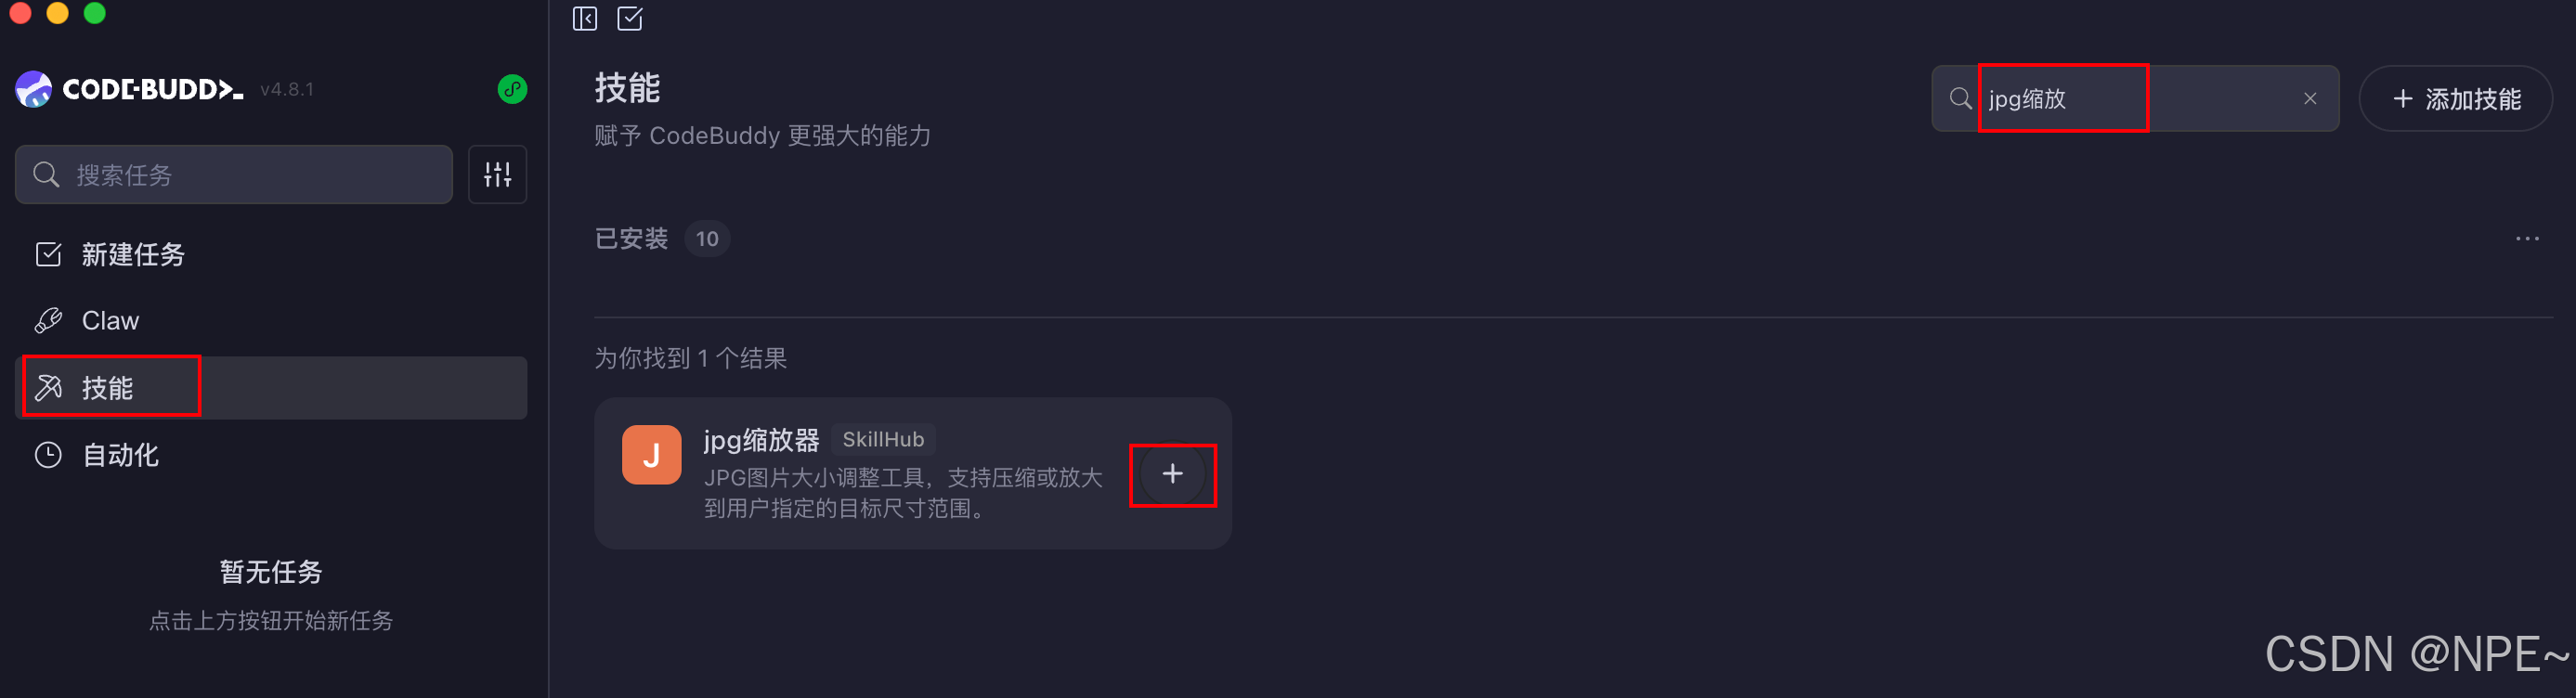
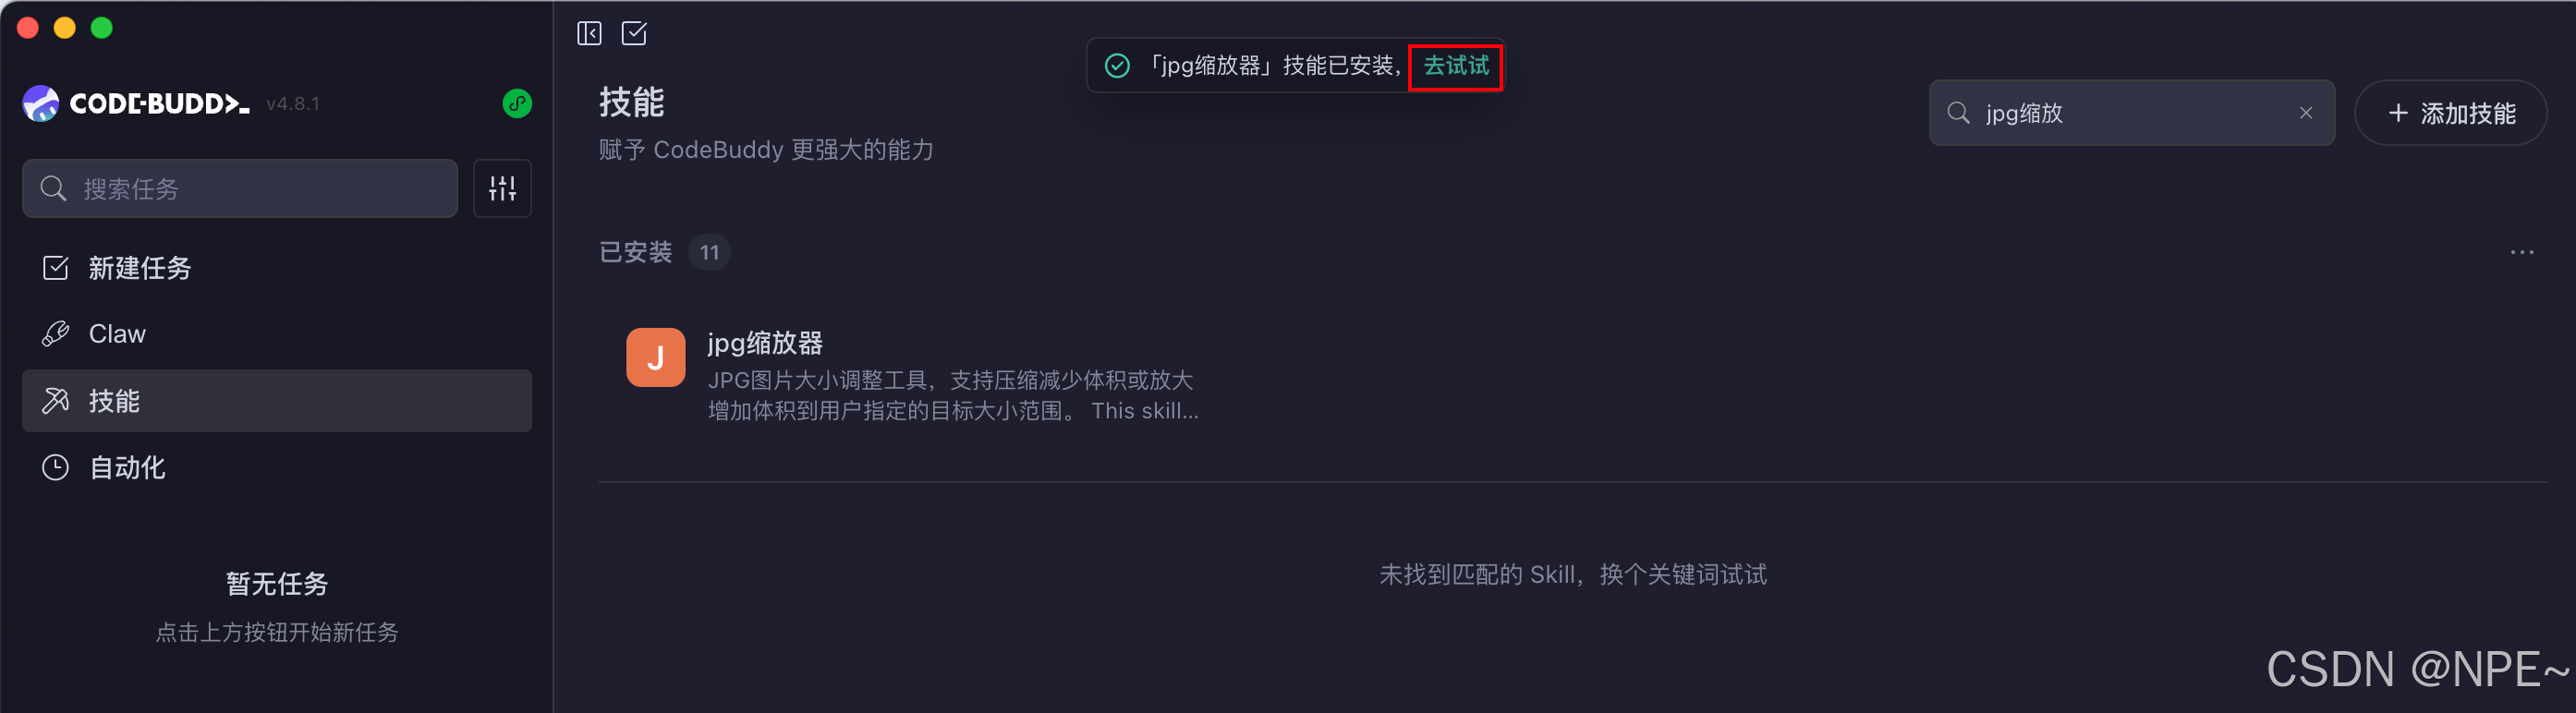
- 安装完成之后,我们可以来简单使用一下
- 我们本地找个jpg文件,让AI帮我们压缩或者增加体积

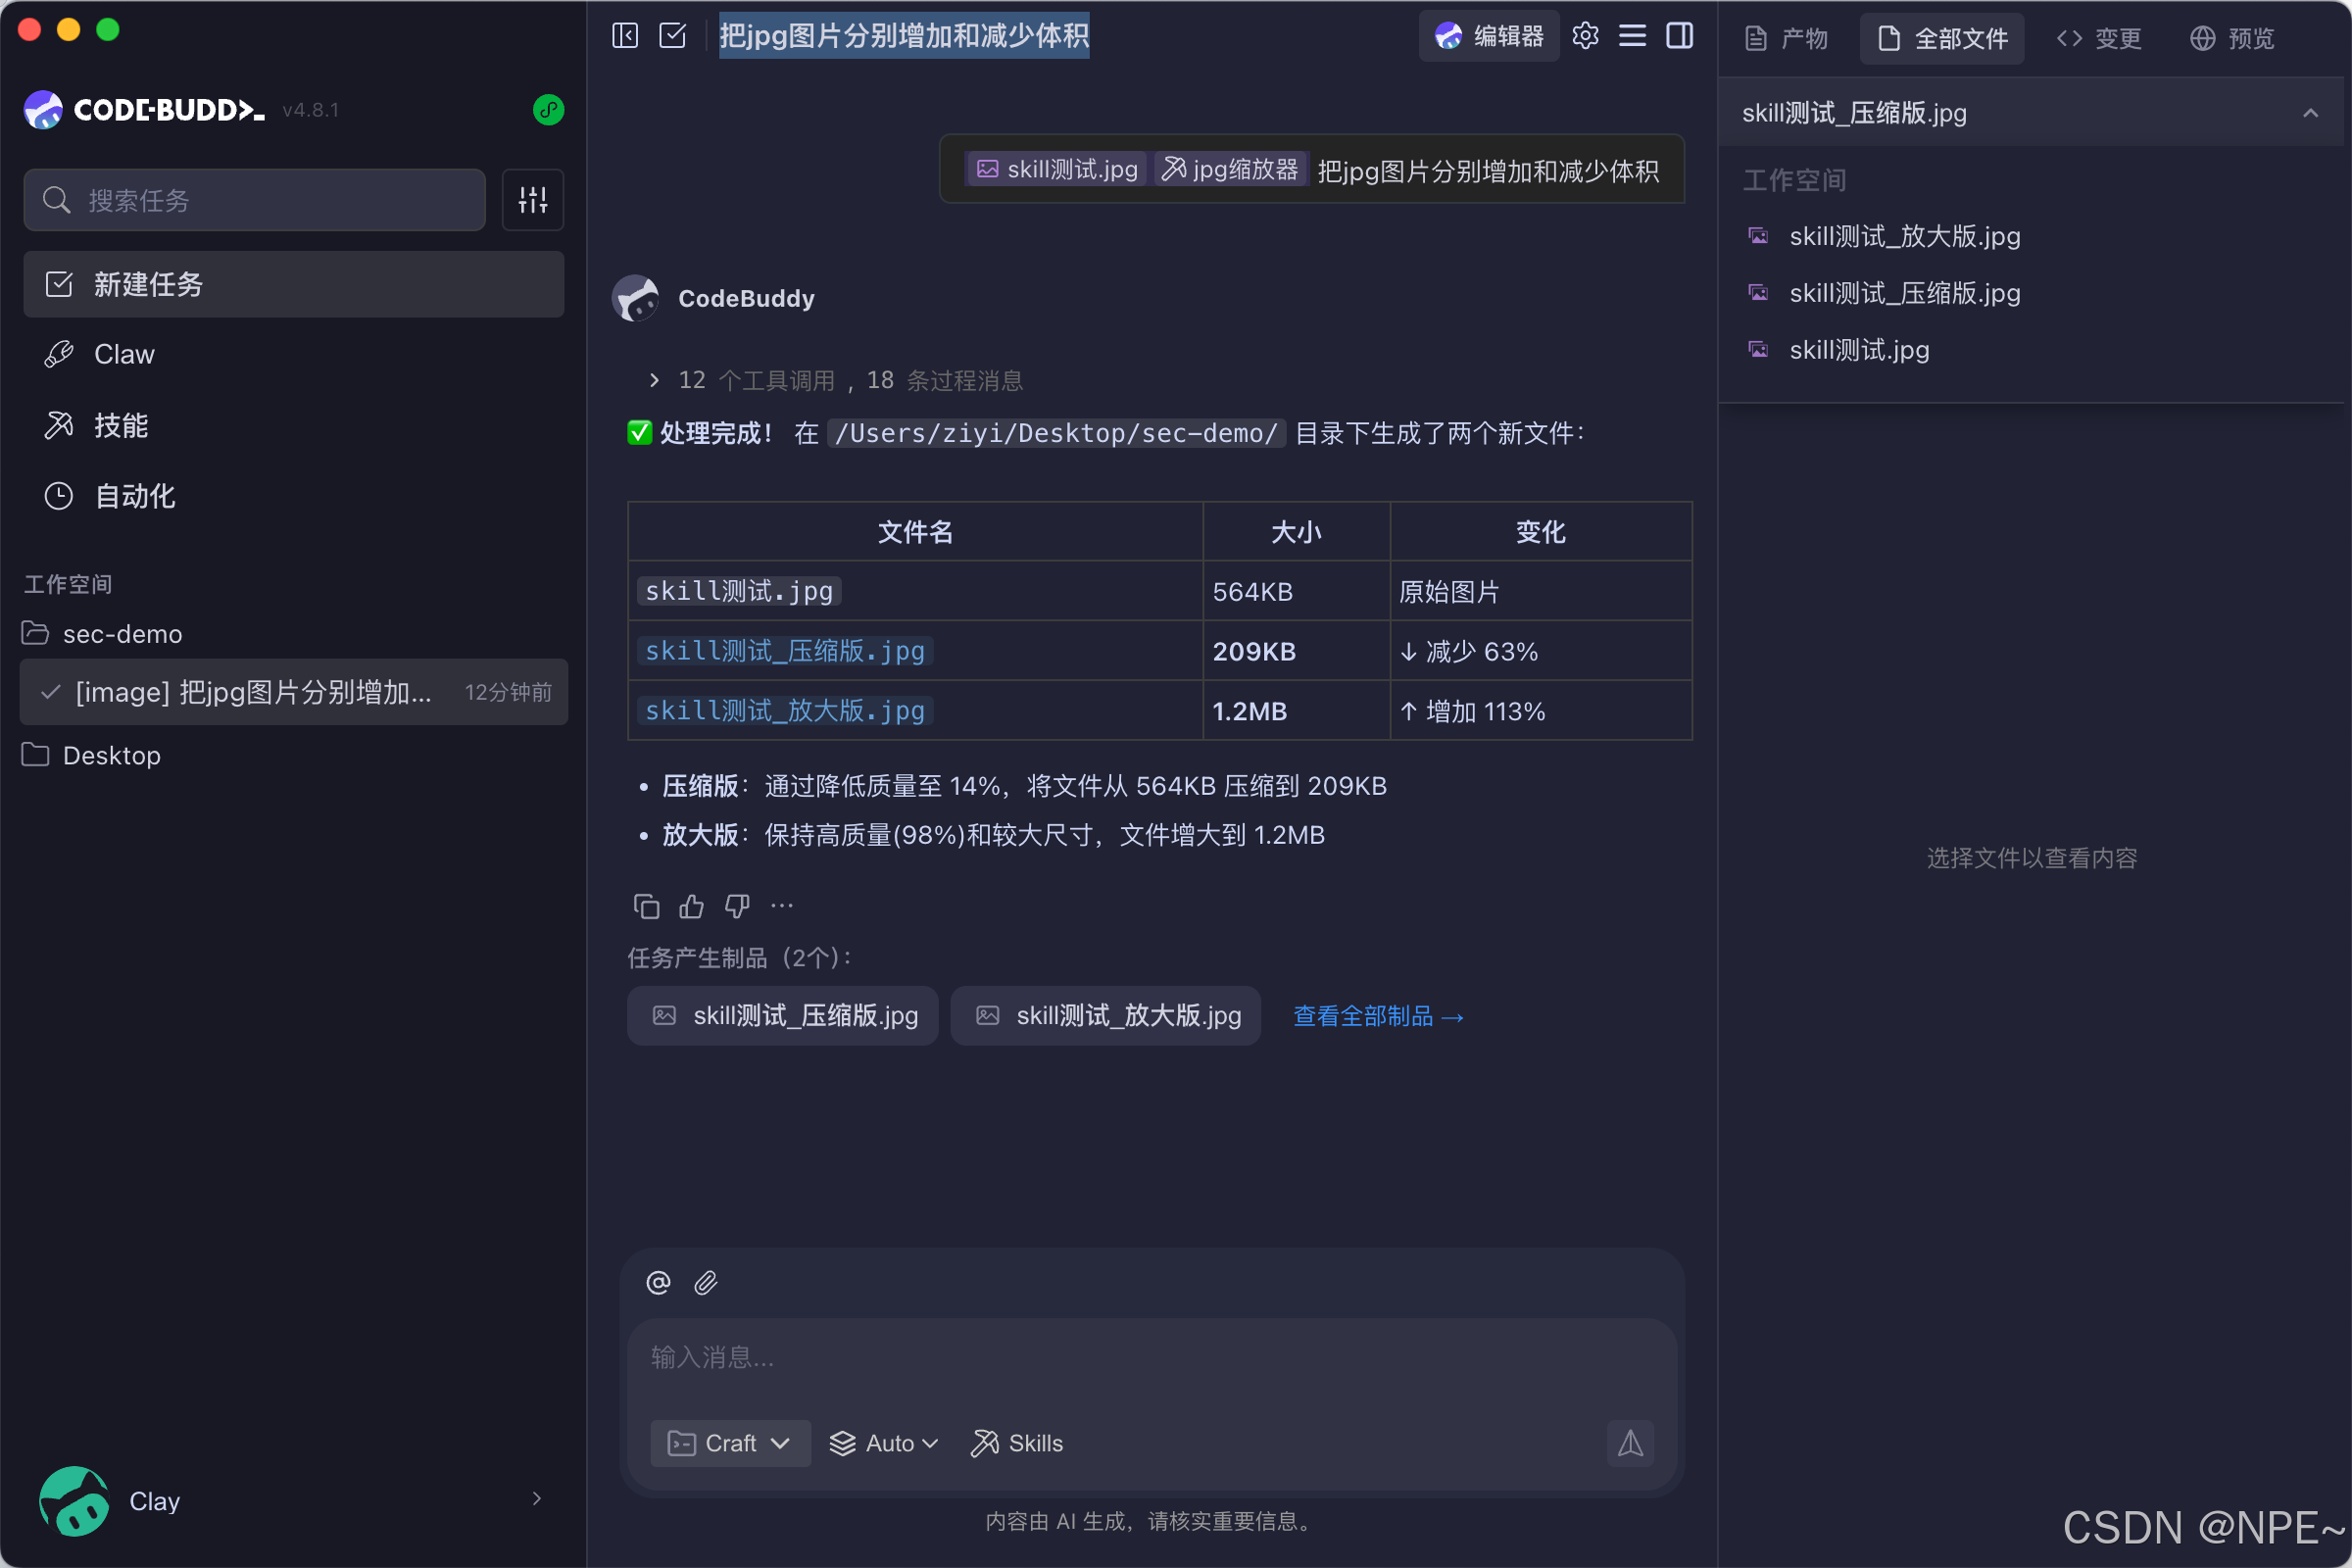
- 执行效果:

PS:当然除了上传到Skill hub市场安装,如果只是个人使用的话,完全可以本地安装(导入我们开发的Skill文件夹即可)

小龙虾开发者社区是 CSDN 旗下专注 OpenClaw 生态的官方阵地,聚焦技能开发、插件实践与部署教程,为开发者提供可直接落地的方案、工具与交流平台,助力高效构建与落地 AI 应用
更多推荐

 6
6 0
0- 0


 已为社区贡献1条内容

所有评论(0)