
本地部署OpenClaw安装配置使用
后面详细了解了下,这个功能其实就是一个npm包,不用买单独的云服务器。作为程序员,可以用的服务器可是有一堆,或者自己开个虚拟机在上面安装就行了。官网地址: https://github.com/openclaw/openclaw1.安装npm(第一种安装方式)首先你得安装22.0以上版本的npm,此版本的npm不支持在类似centos7的低版本系统中运行。例如,以下我是在centos8系统安装的。
本地部署方式
后面详细了解了下,这个功能其实就是一个npm包,不用买单独的云服务器。作为程序员,可以用的服务器可是有一堆,或者自己开个虚拟机在上面安装就行了。
官网地址: https://github.com/openclaw/openclaw
1.安装npm(第一种安装方式)
首先你得安装22.0以上版本的npm,此版本的npm不支持在类似centos7的低版本系统中运行。
例如,以下我是在centos8系统安装的。
# centos8、ubuntu22等系统用高版本的
# centos8、ubuntu22等系统用高版本的
wget https://nodejs.org/dist/v24.13.0/node-v24.13.0-linux-x64.tar.xz
# 解压缩
tar -xf node-v24.13.0-linux-x64.tar.xz
# 把这个解压缩的文件放到用户目录/usr/local
mv node-v24.13.0-linux-x64 /usr/local/node
# 配置软连接方便进行全局调用
sudo ln -s /usr/local/node/bin/node /usr/bin/node
sudo ln -s /usr/local/node/bin/npm /usr/bin/npm
2.安装openclaw
# 执行安装
npm install -g openclaw@latest
# 配置软连接
sudo ln -s /usr/local/node/bin/openclaw /usr/bin/openclaw
# 查看是否安装成功
openclaw --help
出现以下类似界面说明安装成功
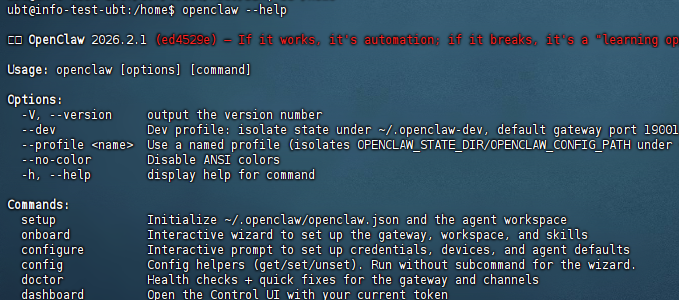
我竟然安装失败了。可能因为网络原因吧。
2.使用脚本安装(第2种安装方式)
curl -fsSL https://openclaw.ai/install.sh | bash
这种安装方式还是有可能失败,解决方案如下:
###这样会输出安装的所有日志,方便查看到底哪里报错
curl -fsSL --proto '=https' --tlsv1.2 https://openclaw.ai/install.sh \
  | CLAWDBOT_NPM_LOGLEVEL=verbose bash -s -- --verbose


###可以将报错信息丢给大模型去分析

常见原因:Git Key 问题(高频)
典型特征:
日志中出现:

git@github.com
Permission denied (publickey)
npm ERR! code 128
根本原因:
npm 表面失败,但根因在 git clone 私有仓库
Git SSH Key 没配置 / 配错了
四、解决步骤
1. 检查 SSH Key 配置
# 查看现有 SSH Key
ls -la ~/.ssh

# 测试 GitHub 连接
ssh -T git@github.com

2. 生成或配置 SSH Key
如果没有 SSH Key:

# 生成新的 SSH Key
ssh-keygen -t ed25519 -C "your_email@example.com"

# 将公钥添加到 GitHub
cat ~/.ssh/id_ed25519.pub


3. 将公钥添加到 GitHub
复制公钥内容
登录 GitHub → Settings → SSH and GPG keys → New SSH key
粘贴公钥并保存


五、其他常见问题
1. 网络问题
# 配置 npm 镜像(如果在中国大陆)
npm config set registry https://registry.npmmirror.com

2. Node 版本不兼容
# 检查 Node 版本
node -v

# 推荐使用 nvm 管理 Node 版本
nvm install 24
nvm use 24
出现下面安装

3.运行指引并安装守护进程
(1)手动配置
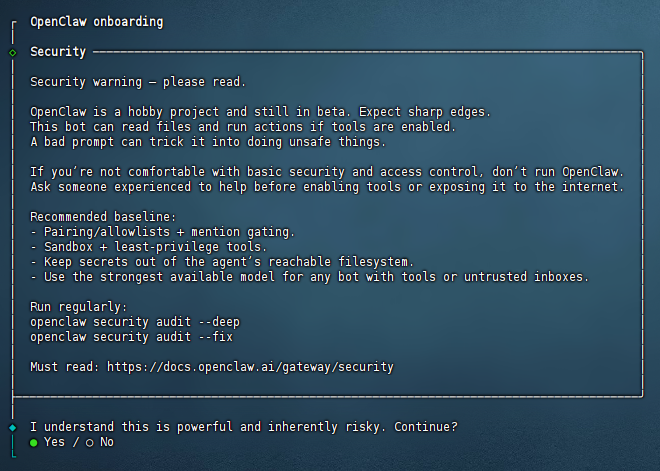
OpenClaw与常见的应用模板不同,官方提供了若干需用户自行手动配置的步骤,在首次登入服务器后,输入并回车运行如下命令开始配置:
openclaw onboard --install-daemon运行上面的命令后,出现同意免责声明,将会出现一个问题:是否知晓风险,选择Yes就行。
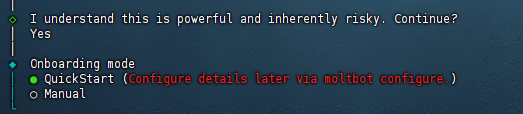
(2)配置模式选择:快速入门
接下来需要选择Onboarding的模式。
第一个是快速启动,后续通过 openclaw configure 配置信息。
第二个是先手动配置。
我们选择QuickStart。
(3)模型配置
然后它会让你配置AI大模型。

你有什么就选什么吧,网上说智谱的GLM4.7比较好用,但是这个太火爆了,买不到。我自己目前用的是阿里的Qwen。【这不不想配置,可以直接跳过】
(4)选择频道
配置好模型后,会让你选择聊天频道。
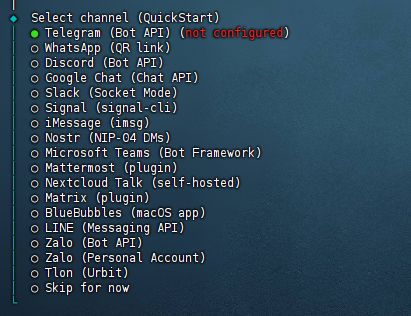
这些全是海外的,我们用不了。
选择最后一个,直接跳过。
(5)配置Skills
然后会问你要不要配置技能。选YES

依赖Homebrew也选Yes装上。
然后会让你选择用什么管理器安装。
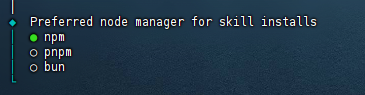
一般用npm,前面也安装过了。
再然后,会给你一堆Skills:
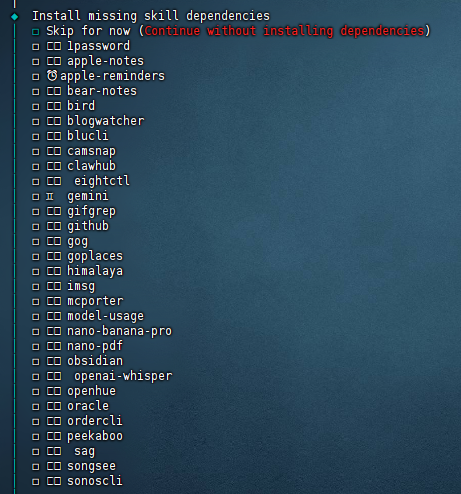
直接跳过吧,后续跟它对话也能装。
(6)配置Hooks
继续下一步,会问你要不要配置hooks。

可以理解为三个插件:
boot-md:启动时自动加载一段markdown文本当默认引导内容。常用于把你的规则、偏好、项目背景在每次启动时塞进去。
command-logger:把你在Clawdbot里执行过的命令和关键操作记一份日志,方便排查问题和复盘。如果你比较在意隐私或不想留痕,就别开它。
session-memory:保存会话相关的状态或记忆,让它下次能延续上下文,体验会更连贯。
建议都开,都非常实用。
(7)选择交互方式
它问你想要用什么方式孵化你的机器人?
命令行方式(推荐)
web界面方式
稍后选择
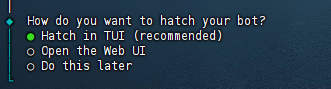
肯定有图形化界面最好了!这个新手选web界面方式吧。除非你是老手,只想用命令行界面方式交互。
4.配置web界面
这时候如果是用ubuntu系统安装的,不一定能打开网页界面。它只能本地http://127.0.0.1:18789进行访问,所以现在我们改下
(1)配置远程访问
首先防火墙放行端口
# 放行TCP端口
sudo ufw allow 18789/tcp
# 查看规则
sudo ufw status numbered
然后修改~/.openclaw/openclaw.json配置文件
vi openclaw.json
把bind的配置改为lan
  "gateway": {
    "mode": "local",
    "auth": {
      "mode": "token",
      "token": "***********"
    },
    "port": 18789,
    "bind": "loopback",  // 改为lan
    "tailscale": {
      "mode": "off",
      "resetOnExit": false
    }
  },
保存退出后重启应用
openclaw gateway restart现在就能在浏览器通过http://你的IP:18789进行访问了。
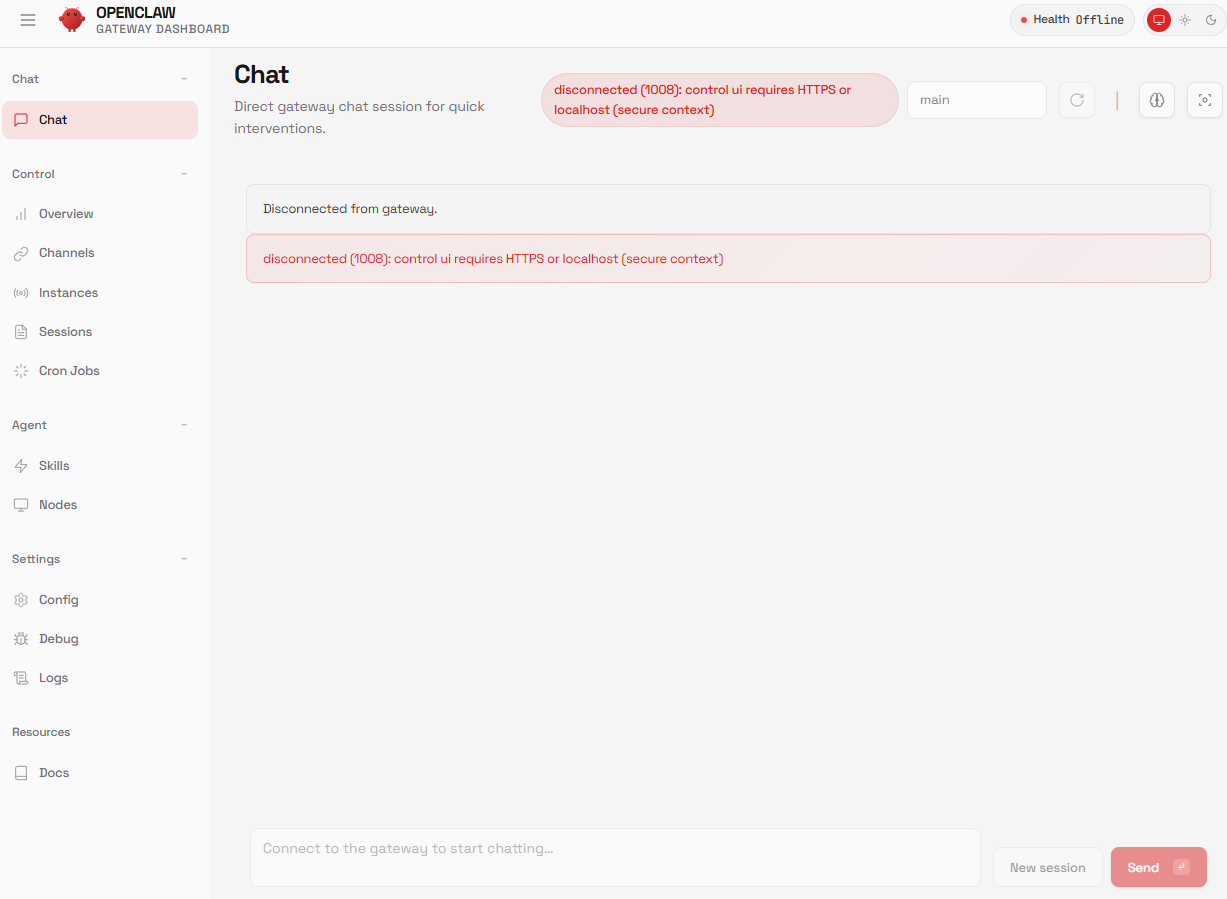
(2)解决报错
这里发现报错了,openclaw提示 disconnected (1008): control ui requires HTTPS or localhost (secure context)所以什么都操作不了。
继续编辑配置,修改~/.openclaw/openclaw.json配置文件
 "gateway": {
    "port": 18789,
    "mode": "local",
    "bind": "lan",
    // 加入下面这行配置
    "controlUi": {
      "allowInsecureAuth": true
    },
    "auth": {
      "mode": "token",
      "token": "*************************************"
    },
    "tailscale": {
      "mode": "off",
      "resetOnExit": false
    },
    "http": {
      "endpoints": {
        "responses": {
          "enabled": true
        }
      }
    }
  }
然后重启应用
openclaw gateway restart
现在就不报错,能正常访问了。
(3)修改模型选择
如果要修改模型选择,需要在配置文件进行修改。【使用云平台模型】
openclaw config set 'models.providers.mass' --json '{
  "baseUrl": "https://api.modelarts-maas.com/openai/v1",
  "apiKey": "api值",
  "api": "openai-completions",
  "models": [
    { "id": "DeepSeek-V3", "name": "DeepSeek-V3" },
    { "id": "deepseek-r1-250528", "name": "deepseek-r1-250528" }
  ]
}'

设置 models.mode 为 merge

openclaw config set models.mode merge
设置默认模型(以deepseek-chat为例)

openclaw models set mass/DeepSeek-V3

openclaw gateway restart
{
"agents": {
"defaults": {
"model": { "primary": "bailian/qwen3-max-2026-01-23" },
"models": {
"bailian/qwen3-max-2026-01-23": { "alias": "通义千问 Max Thinking 版" }
}
}
},
"models": {
"mode": "merge",
"providers": {
"bailian": {
"baseUrl": "https://dashscope.aliyuncs.com/compatible-mode/v1",
"apiKey": "${DASHSCOPE_API_KEY}",
"api": "openai-completions",
"models": [
{
"id": "qwen3-max-2026-01-23",
"name": "通义千问 Max Thinking 版",
"reasoning": false,
"input": ["text"],
"cost": { "input": 0.0025, "output": 0.01, "cacheRead": 0, "cacheWrite": 0 },
"contextWindow": 262144,
"maxTokens": 65536
}
]
}
}
}
}第二种:使用本地ollama平台
"my-ollama": {
"baseUrl": "http://127.0.0.1:11434/v1",
"apiKey": "ollama",
"api": "openai-completions",
"models": [
{
"id": "qwen3:32b",
"name": "Local Qwen3 32B",
"reasoning": false,
"input": ["text"],
"contextWindow": 32000,
"maxTokens": 4096,
"cost": {"input": 0, "output": 0, "cacheRead": 0, "cacheWrite": 0}
}
]
}
3.使用
openclaw dashboard --no-open ###查看token

浏览器里访问上面截图中带token的那个URL就可以了
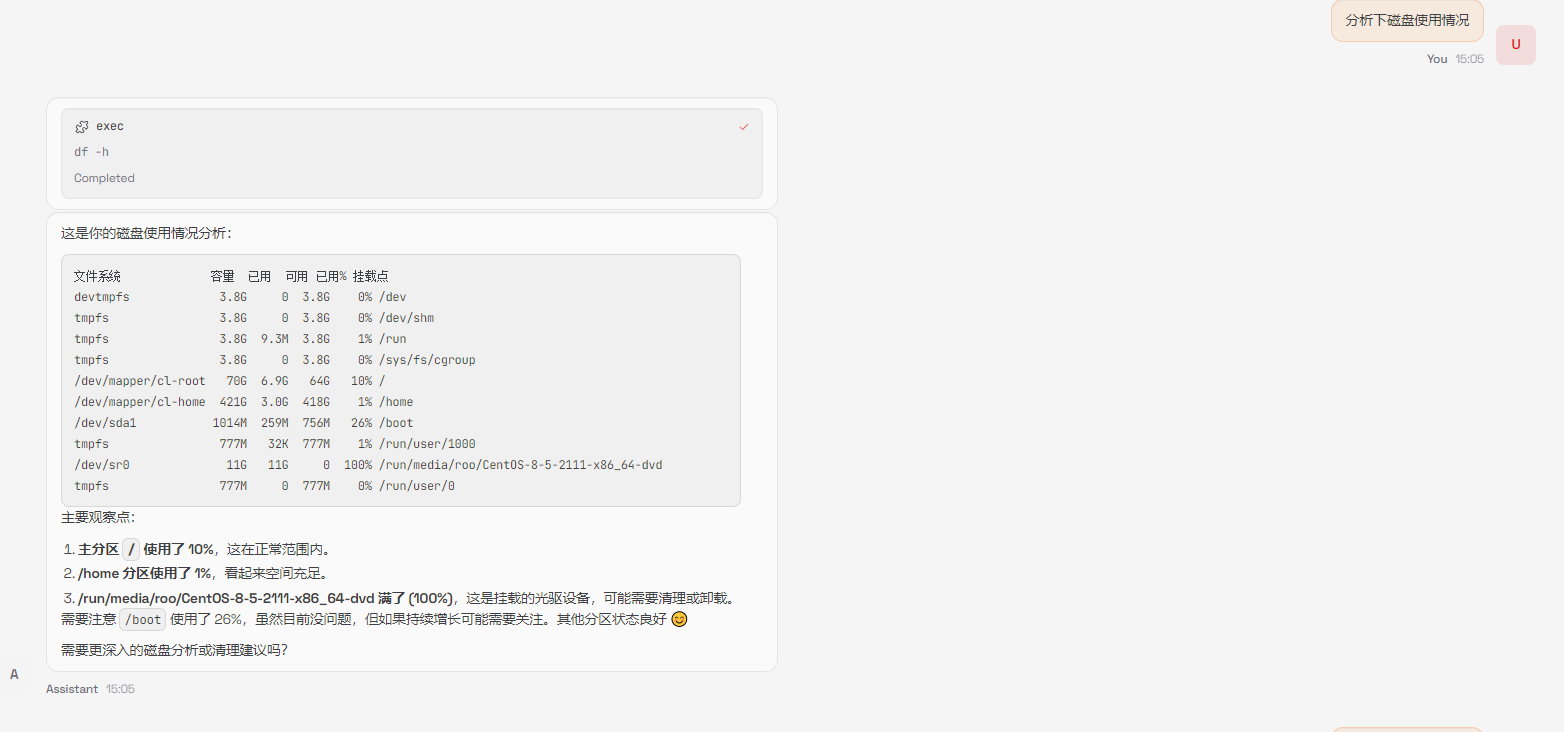
再来看看如何用Openclaw来远程登录Linux机器,并执行任务。
首先,你要让Openclaw生成密钥对,并将公钥给到我们
我要远程登录一台Linux机器,我要使用SSH密钥验证的方式,
请生成一对密钥对,并提供给我公钥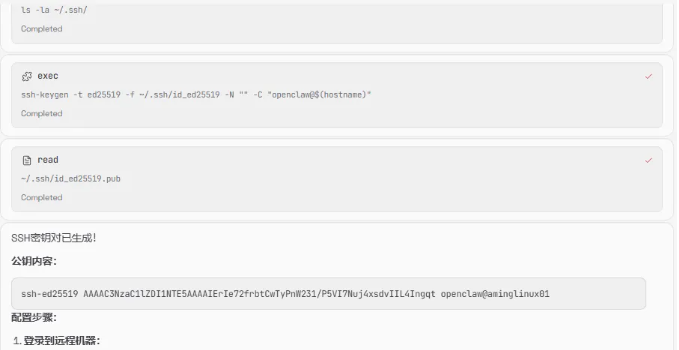
它不仅提供了公钥内容,还告诉我们如何配置,我把公钥放到了目标服务器上后,然后告诉它可以登录服务器了
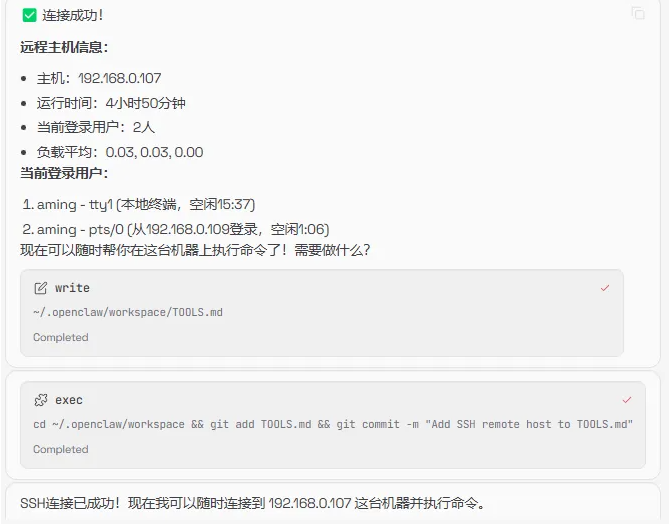
然后我再次发出需求
########配置文件模板
{
  // Workspace 配置
  agents: {
    defaults: {
      workspace: "~/.openclaw/workspace",
      repoRoot: "~/.openclaw/workspace",
      skipBootstrap: false,
      model: {
        primary: "provider/claude-sonnet-4",
        fallbacks: ["provider/claude-haiku-4"],
      },
      imageModel: "provider/claude-sonnet-4",
      timeoutSeconds: 600,
      compaction: {
        reserveTokensFloor: 20000,
        memoryFlush: {
          enabled: true,
          softThresholdTokens: 4000,
        },
      },
      heartbeat: {
        every: "30m",
        target: "last",
        activeHours: {
          start: "08:00",
          end: "23:00",
        },
      },
      blockStreamingDefault: "on",
      blockStreamingBreak: "text_end",
      blockStreamingChunk: {
        minChars: 200,
        maxChars: 1500,
      },
    },
  },

  // Gateway 配置
  gateway: {
    port: 18789,
    bind: "loopback",
    auth: {
      mode: "token",
      token: "your-secret-token",
    },
    reload: {
      mode: "hybrid",
    },
  },

  // 日志配置
  logging: {
    level: "info",
    consoleStyle: "pretty",
    redactSensitive: "tools",
  },

  // 渠道配置
  channels: {
    discord: {
      token: "your-discord-bot-token",
      allowFrom: ["server:your-server-id"],
      ackReaction: "👀",
      dm: {
        enabled: true,
        policy: "pairing",
      },
      historyLimit: 20,
      textChunkLimit: 2000,
    },
    telegram: {
      botToken: "your-telegram-bot-token",
      allowFrom: ["your-user-id"],
      dm: {
        enabled: true,
        policy: "pairing",
      },
      historyLimit: 50,
      replyToMode: "first",
      linkPreview: true,
      streamMode: "partial",
    },
  },

  // 向量检索配置
  memorySearch: {
    enabled: true,
    provider: "openai",
    remote: {
      baseUrl: "https://api.siliconflow.cn/v1",
      apiKey: "your-siliconflow-api-key",
    },
    model: "BAAI/bge-m3",
  },

  // 工具配置
  tools: {
    exec: {
      enabled: true,
    },
    web: {
      search: {
        enabled: true,
      },
    },
    media: {
      image: {
        enabled: true,
      },
    },
  },

  // Cron 配置
  cron: {
    enabled: true,
    maxConcurrentRuns: 2,
  },
}
4.nginx反向代理
sudo apt install nginx
sudo vim /etc/nginx/nginx.conf
注释掉如下行
#include /etc/nginx/sites-enabled/*;

上传SSL证书至/etc/nginx/ssl/
cd /etc/nginx/conf.d/
sudo vim openclaw_nginx_reverse_proxy.conf

添加如下行
server {
     # 将原有 listen 80 修改为 listen 80 改为 listen 443 ssl
    listen 443 ssl;
    # 原有 server_name,可继续新增更多当前证书支持的域名
    server_name openclaw.openjarvis.net;

    # ======================= 证书配置开始 =======================
    # 指定证书文件(中间证书可以拼接至该pem文件中),请将 /etc/ssl/cert/ssl.pem 替换为您实际使用的证书文件的绝对路径
    ssl_certificate /etc/nginx/ssl/openclaw.openjarvis.net.pem;
    # 指定私钥文档,请将 /etc/ssl/cert/ssl.key 替换为您实际使用的私钥文件的绝对路径
    ssl_certificate_key /etc/nginx/ssl/openclaw.openjarvis.net.key;
    # 配置 SSL 会话缓存,提高性能
    ssl_session_cache shared:SSL:1m;
    # 设置 SSL 会话超时时间
    ssl_session_timeout 5m;
    # 自定义设置使用的TLS协议的类型以及加密套件(以下为配置示例,请您自行评估是否需要配置)
    ssl_ciphers ECDHE-RSA-AES128-GCM-SHA256:ECDHE:ECDH:AES:HIGH:!NULL:!aNULL:!MD5:!ADH:!RC4;
    # 指定允许的 TLS 协议版本,TLS协议版本越高,HTTPS通信的安全性越高,但是相较于低版本TLS协议,高版本TLS协议对浏览器的兼容性较差
    ssl_protocols TLSv1.2 TLSv1.3;
    # 优先使用服务端指定的加密套件
    ssl_prefer_server_ciphers on;
    # ======================= 证书配置结束 =======================

    # 其它配置

    location / {
        proxy_pass http://127.0.0.1:18789;

        # WebSocket升级头
        proxy_http_version 1.1;
        proxy_set_header Upgrade $http_upgrade;
        proxy_set_header Connection 'upgrade';

        # 客户端真实信息
        proxy_set_header Host $host;
        proxy_set_header X-Real-IP $remote_addr;
        proxy_set_header X-Forwarded-For $proxy_add_x_forwarded_for;
        proxy_set_header X-Forwarded-Proto $scheme;

        # 缓冲区设置
        proxy_buffering off;

        # 超时设置
        proxy_read_timeout 86400s;
        proxy_send_timeout 86400s;
        proxy_connect_timeout 30s;
    }
}
5.接入钉钉
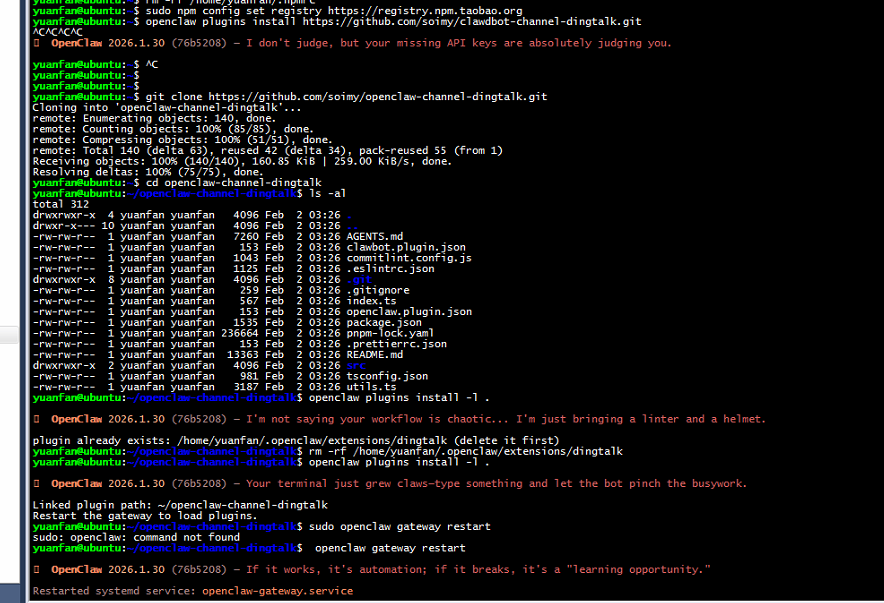
安装openclaw-channel-dingtalk插件
插件Github地址:https://github.com/soimy/openclaw-channel-dingtalk
git clone https://github.com/soimy/openclaw-channel-dingtalk.git
cd openclaw-channel-dingtalk
openclaw plugins install -l .
钉钉应用及机器人
-
创建钉钉应用
-
访问 钉钉开发者后台
-
创建企业内部应用
-
添加「机器人」能力
-
配置消息接收模式为 Stream 模式
-
发布应用
-
配置权限管理
在应用的权限管理页面,需要开启以下权限:
✅ Card.Instance.Write — 创建和投放卡片实例
✅ Card.Streaming.Write — 对卡片进行流式更新 步骤:
进入应用 → 权限管理 搜索「Card」相关权限 勾选上述两个权限 保存权限配置
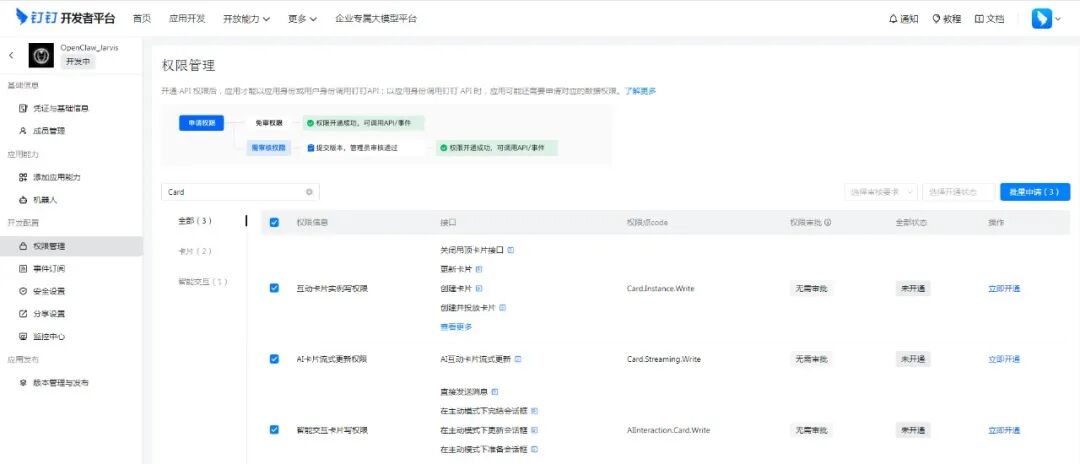
-
建立卡片模板 如需使用 AI 互动卡片功能,需要在钉钉卡片平台创建模板:
-
访问 钉钉卡片平台
-
进入「我的模板」
-
点击「创建模板」
-
卡片模板场景选择 「AI 卡片」
-
无需选择预设模板,直接点击保存
-
复制模板 ID(格式如:xxxxx-xxxxx-xxxxx.schema)
-
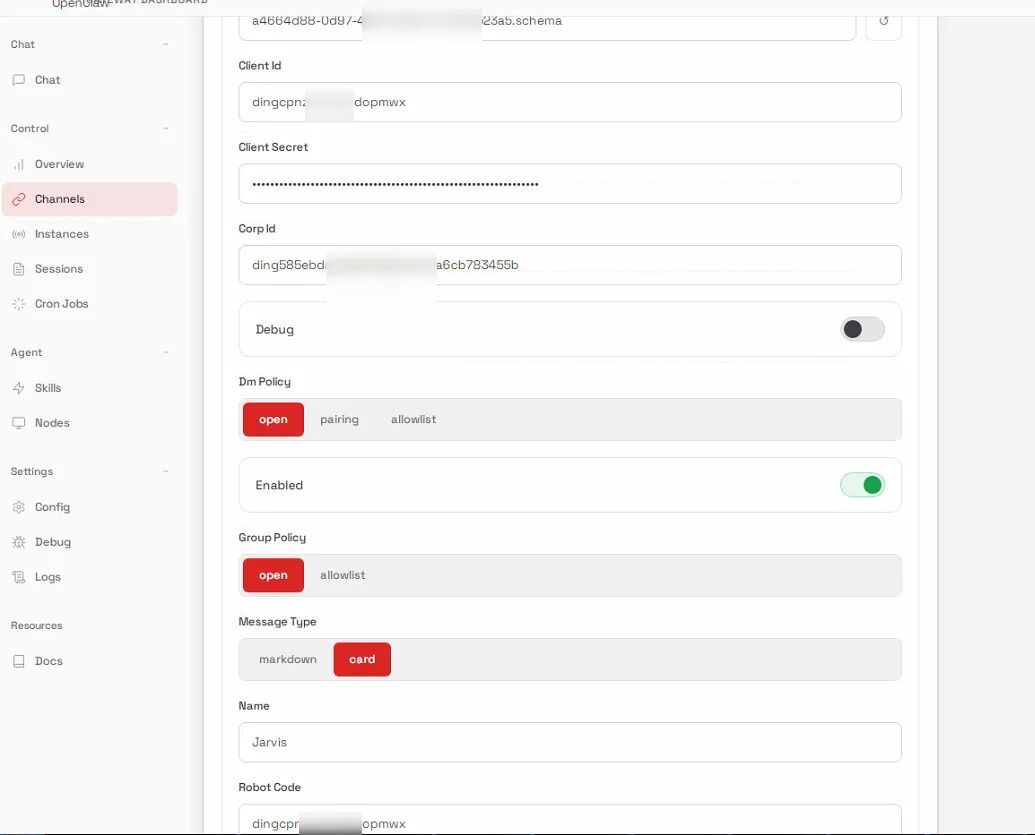
在OpenClaw控制台的Channel标签->Dingtalk配置面板-> Card Template Id填入
-
获取凭证 从开发者后台获取:
Client ID (AppKey)
Client Secret (AppSecret)
Robot Code (与 Client ID 相同)
Corp ID (企业 ID)
Agent ID (应用 ID)
9. 重启 Gatewa
openclaw gateway restart

10、与机器人进行对话进行验证
#####升级版本
最近把版本升级到最新的4.9后有些参数改变
openclaw update
"gateway": {
"port": 18789,
"mode": "local",
"bind": "lan",
"controlUi": {
"allowedOrigins": ["http://192.168.1.1:18789"],
"allowInsecureAuth": true,
"dangerouslyDisableDeviceAuth": true
},
#######连接微信插件
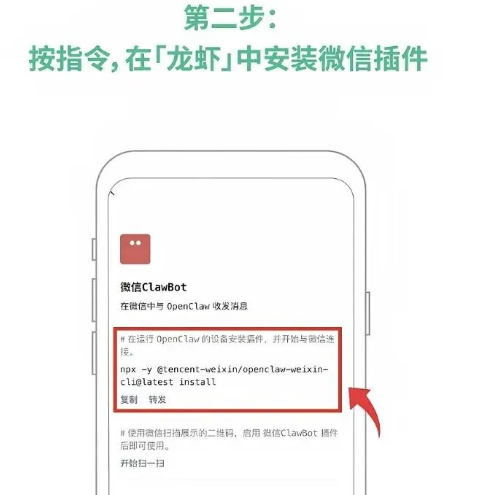
npx -y @tencent-weixin/openclaw-weixin-cli@latest install
[openclaw-weixin] 已找到本地安装的 openclaw
[openclaw-weixin] 检测到 OpenClaw 版本: 2026.4.9
[openclaw-weixin] 匹配 dist-tag: latest
[openclaw-weixin] 正在安装插件 @tencent-weixin/openclaw-weixin@latest...
[openclaw-weixin] 插件安装失败,请手动执行:
ClawHub /api/v1/packages/%40tencent-weixin%2Fopenclaw-weixin failed (429): Rate limit exceeded
openclaw plugins install "@tencent-weixin/openclaw-weixin@latest"
安装的时候会一直报429错误,需要先登录clawhub才行
npx clawhub login
Need to install the following packages:
clawhub@0.9.0
Ok to proceed? (y) y
Opening browser: https://clawhub.ai/cli/auth 根据连接登录clawhub才能安装,安装完成后根据二维码绑定就行了
Docker 部署汉化版 OpenClaw 程教程
使用 Docker Compose
version: '3.8'
services:
  openclaw:
    image: 1186258278/openclaw-zh:latest
    container_name: openclaw
    ports:
      - "18789:18789"
    volumes:
      - openclaw-data:/root/.openclaw
    restart: unless-stopped
    command: openclaw gateway run
    # 新增优化配置
    environment:
      - TZ=Asia/Shanghai  # 统一时区,避免日志时间错乱
      - NODE_ENV=production
    logging:  # 日志配置(限制日志大小,避免占满磁盘)
      driver: "json-file"
      options:
        max-size: "100m"  # 单个日志文件最大100M
        max-file: "3"     # 最多保留3个日志文件
    privileged: false     # 非特权模式(提升安全性)
    mem_limit: 1G         # 限制容器内存使用(避免占用过多资源)
volumes:
  openclaw-data:
    driver: local


 ###先执行初始化基础数据的命令
//1. 手动初始化
docker-compose run --rm openclaw openclaw setup
docker-compose run --rm openclaw openclaw config set gateway.mode local

//2. 配置绑定和认证
docker-compose run --rm openclaw openclaw config set gateway.bind lan
docker-compose run --rm openclaw openclaw config set gateway.auth.token YOUR_TOKEN

//3. 设置模型配置,newapiapp是自定义的供应商名称,配置相应的apikey、baseurl、默认Id,可以设置多个
docker-compose run --rm openclaw openclaw config set models.providers.newapiapp '{
  "api": "openai-completions",
  "apiKey": "sk-xxxx",
  "baseUrl": "https://api.openai.com/v1",
  "models": [
    {
      "id": "modelscope-k2.5",
      "name": "modelscope-k2.5"
    }
  ]
}'

//设置默认主模型,后面的对话就可以默认使用对应供应商的模型了
docker-compose run --rm openclaw openclaw config set agents.defaults.model.primary "newapiapp/modelscope-k2.5"

//4. 允许不完全访问,可以通过ip、域名反代等远程访问
docker-compose run --rm openclaw openclaw config set gateway.controlUi.allowInsecureAuth true

###配置初始化完成后,可以启动服务,执行如下命令
docker-compose up -d
使用 Docker Compose 部署
# 启动服务 docker-compose up -d
# 查看日志 docker-compose logs -f
# 停止服务 docker-compose down
# 重启服务 docker-compose restart
8.2 Nginx 反向代理 + HTTPS
📚 参考资源
官方文档:
•OpenClaw 汉化官网: https://openclaw.qingtong.cloud
•GitHub 仓库: https://github.com/1186258278/OpenClawChineseTranslation
•Docker Hub: https://hub.docker.com/r/1186258278/openclaw-zh
OpenClaw + K8s + Docker安装完整保姆级教程
环境要求
|
组件 |
版本要求 |
说明 |
|---|---|---|
|
操作系统 |
Ubuntu 22.04+ / Debian 12+ |
推荐 Ubuntu 22.04 LTS,内核 5.15+ |
|
Docker |
24.0+ |
需要 Docker Compose V2(docker compose 命令) |
|
Kubernetes |
1.28+ |
推荐 1.30,需要支持 PV 动态供给 |
|
Node.js |
24.x(容器内置) |
OpenClaw 镜像基于 node:24-bookworm,无需手动安装 |
|
GPU(可选) |
NVIDIA A100/A800/H100 |
仅 vLLM 推理服务需要,OpenClaw 网关本身不需要 GPU |
|
内存 |
4GB+(网关) / 64GB+(推理) |
网关内存需求低,推理节点建议 4 倍 GPU 显存 |
|
磁盘 |
20GB+(网关) / 500GB+ NVMe(推理) |
推理节点需要存储模型权重文件 |
|
网络 |
集群内网互通,Ingress Controller 已部署 |
推荐 NGINX Ingress Controller 或 Traefik |
二、详细步骤
2.1 准备工作
2.1.1 系统检查
# 检查系统版本
cat /etc/os-release

# 检查内核版本
uname -r

# 检查 Docker 版本(需要 24.0+)
docker --version
docker compose version

# 检查系统资源
free -h
df -h

# 如果部署 K8s 方案,检查集群状态
kubectl cluster-info
kubectl get nodes -o wide
预期输出:Docker 版本 24.0 以上,Docker Compose V2 正常输出版本号。K8s 集群所有节点 Ready 状态。
2.1.2 安装 Docker(如果还没装)
# Ubuntu/Debian 安装 Docker
curl -fsSL https://get.docker.com | bash -s docker

# 将当前用户加入 docker 组(避免每次 sudo)
sudo usermod -aG docker $USER
newgrp docker

# 验证安装
docker run hello-world
2.1.3 准备 OpenClaw 配置目录
# 创建配置目录
mkdir -p ~/.openclaw

# 创建工作空间目录
mkdir -p ~/openclaw-workspace
OpenClaw 的配置文件是 JSON5 格式,文件路径固定在 ~/.openclaw/openclaw.json。容器内部以 node 用户(uid 1000)运行,挂载目录时需要注意权限问题。
# 确保目录权限正确(容器内 node 用户 uid=1000)
sudo chown -R 1000:1000 ~/.openclaw
sudo chown -R 1000:1000 ~/openclaw-workspace
2.2 Docker Compose 部署(官方方案)
这是官方推荐的部署方式,适合开发测试和小规模生产环境。
2.2.1 使用官方安装脚本
OpenClaw 提供了 docker-setup.sh 一键安装脚本,流程是:拉取镜像 → 初始化配置(onboard)→ 启动服务。
# 拉取官方安装脚本并执行
curl -fsSL https://raw.githubusercontent.com/openclaw/openclaw/main/docker-setup.sh | bash
如果网络环境不方便直接执行远程脚本,也可以手动操作:
# 手动拉取镜像
docker pull ghcr.io/openclaw/openclaw:latest

# 初始化配置(交互式,会引导设置 Token 和基础配置)
docker run --rm -it \
  -v "$HOME/.openclaw:/home/node/.openclaw" \
  ghcr.io/openclaw/openclaw:latest \
  openclaw onboard
2.2.2 环境变量配置
docker-setup.sh 支持通过环境变量定制行为:
|
环境变量 |
默认值 |
说明 |
|---|---|---|
OPENCLAW_IMAGE |
ghcr.io/openclaw/openclaw:latest |
镜像地址,私有仓库可改这个 |
OPENCLAW_GATEWAY_BIND |
0.0.0.0:18789 |
网关监听地址和端口 |
OPENCLAW_HOME_VOLUME |
~/.openclaw |
配置文件挂载路径 |
OPENCLAW_SANDBOX |
0 |
设为 1 启用沙箱模式 |
# 自定义启动示例
export OPENCLAW_IMAGE="ghcr.io/openclaw/openclaw:latest"
export OPENCLAW_GATEWAY_BIND="0.0.0.0:18789"
export OPENCLAW_HOME_VOLUME="$HOME/.openclaw"
2.2.3 编写 Docker Compose 文件
生产环境建议用 docker-compose.yml 管理,比裸 docker run 更容易维护:
# docker-compose.yml
version:"3.8"

services:
openclaw-gateway:
    image:ghcr.io/openclaw/openclaw:latest
    container_name:openclaw-gateway
    restart:unless-stopped
    ports:
      -"18789:18789"
    volumes:
      -./config:/home/node/.openclaw
      -./workspace:/home/node/workspace
    environment:
      -NODE_ENV=production
    user:"1000:1000"
    healthcheck:
      test:["CMD","curl","-f","http://localhost:18789/healthz"]
      interval:30s
      timeout:10s
      retries:3
      start_period:15s
    deploy:
      resources:
        limits:
          memory:2G
          cpus:"2.0"
        reservations:
          memory:512M
          cpus:"0.5"
    logging:
      driver:json-file
      options:
        max-size:"50m"
        max-file:"5"
2.2.4 编写 OpenClaw 配置文件
在 ./config/ 目录下创建 openclaw.json(JSON5 格式,支持注释):
// ./config/openclaw.json
{
  // 网关配置
  gateway: {
    bind: "0.0.0.0:18789",
    auth: {
      // 生产环境必须改成随机生成的强 Token
      token: "oc-prod-a1b2c3d4e5f6g7h8i9j0k1l2m3n4o5p6"
    }
  },

  // 模型配置
  models: {
    // 默认模型(客户端不指定模型时使用)
    default: "vllm-local/Qwen3.5-35B",

    providers: {
      // 自托管 vLLM 推理服务
      "vllm-local": {
        baseUrl: "http://vllm-service:8000/v1",
        api: "openai-responses",
        models: [
          "Qwen/Qwen3.5-35B-A3B-FP8"
        ]
      }
    }
  }
}
注意:gateway.auth.token 这个值必须是强随机字符串,别用示例里的值。生成方法:
# 生成 32 字节随机 Token
openssl rand -hex 32
2.2.5 启动并验证
# 启动服务(后台运行)
docker compose up -d

# 查看日志,确认启动成功
docker compose logs -f openclaw-gateway

# 健康检查
curl -s http://localhost:18789/healthz
# 预期输出:{"status":"ok"}

# 就绪检查
curl -s http://localhost:18789/readyz
# 预期输出:{"status":"ready"}

# 带 Token 认证的请求测试
curl -s -H "Authorization: Bearer oc-prod-a1b2c3d4e5f6g7h8i9j0k1l2m3n4o5p6" \
  http://localhost:18789/v1/models
如果 /healthz 返回 {"status":"ok"} 就说明网关启动成功了。/readyz 还会检查后端模型连通性,如果 vLLM 还没部署,/readyz 可能返回 not ready,这是正常的。
2.3 Kubernetes 部署方案
官方没有提供 K8s 部署方案,以下配置是基于 Docker 方案转写的。核心思路:把 Docker 的 bind mount 换成 PVC,把环境变量和配置文件换成 ConfigMap/Secret,把容器换成 Deployment + Service。
2.3.1 创建 Namespace
kubectl create namespace openclaw
所有 OpenClaw 相关资源都放在 openclaw Namespace 下,方便管理和 RBAC 隔离。
2.3.2 ConfigMap:OpenClaw 配置文件
# openclaw-configmap.yaml
apiVersion:v1
kind:ConfigMap
metadata:
name:openclaw-config
namespace:openclaw
labels:
    app:openclaw
    component:gateway
data:
openclaw.json: |
    {
      // 网关配置
      "gateway": {
        "bind": "0.0.0.0:18789",
        "auth": {
          // Token 从 Secret 注入,这里用环境变量占位
          // 实际运行时由 entrypoint 脚本替换
          "token": "${OPENCLAW_AUTH_TOKEN}"
        }
      },
      "models": {
        "default": "vllm-local/Qwen3.5-35B",
        "providers": {
          "vllm-local": {
            "baseUrl": "http://vllm-service.openclaw.svc.cluster.local:8000/v1",
            "api": "openai-responses",
            "models": [
              "Qwen/Qwen3.5-35B-A3B-FP8"
            ]
          }
        }
      }
    }
模型服务地址使用 K8s 内部 DNS:vllm-service.openclaw.svc.cluster.local:8000,不需要走集群外部网络。
2.3.3 Secret:敏感信息
# 生成随机 Token
GATEWAY_TOKEN=$(openssl rand -hex 32)

# 创建 Secret
kubectl create secret generic openclaw-secrets \
  --namespace=openclaw \
  --from-literal=gateway-token="${GATEWAY_TOKEN}" \
  --from-literal=openai-api-key="sk-your-openai-key-if-needed"

# 验证 Secret 创建成功
kubectl get secret openclaw-secrets -n openclaw
也可以用 YAML 声明式创建(Token 需要 base64 编码):
# openclaw-secret.yaml
apiVersion:v1
kind:Secret
metadata:
name:openclaw-secrets
namespace:openclaw
labels:
    app:openclaw
type:Opaque
data:
# echo -n "your-token" | base64
gateway-token:"b2MtcHJvZC1hMWIyYzNkNGU1ZjZnN2g4aTlqMGsxbDJtM240bzVwNg=="
openai-api-key:""
2.3.4 PersistentVolumeClaim:持久化存储
# openclaw-pvc.yaml
apiVersion:v1
kind:PersistentVolumeClaim
metadata:
name:openclaw-data
namespace:openclaw
labels:
    app:openclaw
spec:
accessModes:
    -ReadWriteOnce
storageClassName:standard
resources:
    requests:
      storage:10Gi
---
apiVersion:v1
kind:PersistentVolumeClaim
metadata:
name:openclaw-workspace
namespace:openclaw
labels:
    app:openclaw
spec:
accessModes:
    -ReadWriteOnce
storageClassName:standard
resources:
    requests:
      storage:50Gi
storageClassName 根据集群实际情况调整。云厂商环境一般用 gp3(AWS)、pd-ssd(GCP)、managed-csi(Azure)。自建集群用 local-path 或 NFS。
如果 Gateway 需要多副本,accessModes 要改成 ReadWriteMany,存储后端也要支持(NFS、CephFS 等)。单副本用 ReadWriteOnce 就够了。
2.3.5 Deployment:OpenClaw Gateway
# openclaw-deployment.yaml
apiVersion:apps/v1
kind:Deployment
metadata:
name:openclaw-gateway
namespace:openclaw
labels:
    app:openclaw
    component:gateway
spec:
replicas:2
selector:
    matchLabels:
      app:openclaw
      component:gateway
strategy:
    type:RollingUpdate
    rollingUpdate:
      maxSurge:1
      maxUnavailable:0
template:
    metadata:
      labels:
        app:openclaw
        component:gateway
    spec:
      securityContext:
        runAsUser:1000
        runAsGroup:1000
        fsGroup:1000
      initContainers:
        # initContainer 用于将 ConfigMap 中的配置文件复制到可写目录
        # 并替换 Token 占位符
        -name:config-init
          image:ghcr.io/openclaw/openclaw:latest
          command:
            -/bin/sh
            --c
            -|
              cp /config-readonly/openclaw.json /home/node/.openclaw/openclaw.json
              sed -i "s|\${OPENCLAW_AUTH_TOKEN}|${GATEWAY_TOKEN}|g" /home/node/.openclaw/openclaw.json
          env:
            -name:GATEWAY_TOKEN
              valueFrom:
                secretKeyRef:
                  name:openclaw-secrets
                  key:gateway-token
          volumeMounts:
            -name:config-readonly
              mountPath:/config-readonly
            -name:openclaw-data
              mountPath:/home/node/.openclaw
      containers:
        -name:openclaw-gateway
          image:ghcr.io/openclaw/openclaw:latest
          ports:
            -name:http
              containerPort:18789
              protocol:TCP
          env:
            -name:NODE_ENV
              value:"production"
            -name:OPENCLAW_AUTH_TOKEN
              valueFrom:
                secretKeyRef:
                  name:openclaw-secrets
                  key:gateway-token
          volumeMounts:
            -name:openclaw-data
              mountPath:/home/node/.openclaw
            -name:openclaw-workspace
              mountPath:/home/node/workspace
          resources:
            requests:
              cpu:"500m"
              memory:"512Mi"
            limits:
              cpu:"2000m"
              memory:"2Gi"
          livenessProbe:
            httpGet:
              path:/healthz
              port:18789
            initialDelaySeconds:15
            periodSeconds:30
            timeoutSeconds:5
            failureThreshold:3
          readinessProbe:
            httpGet:
              path:/readyz
              port:18789
            initialDelaySeconds:10
            periodSeconds:10
            timeoutSeconds:5
            failureThreshold:3
          startupProbe:
            httpGet:
              path:/healthz
              port:18789
            initialDelaySeconds:5
            periodSeconds:5
            failureThreshold:12
      volumes:
        -name:config-readonly
          configMap:
            name:openclaw-config
        -name:openclaw-data
          persistentVolumeClaim:
            claimName:openclaw-data
        -name:openclaw-workspace
          persistentVolumeClaim:
            claimName:openclaw-workspace
      terminationGracePeriodSeconds:30
几个关键设计点:
-
initContainer 处理配置:ConfigMap 挂载的目录是只读的,但 OpenClaw 运行时需要读写
~/.openclaw目录。所以用 initContainer 把配置文件从 ConfigMap 复制到 PVC,同时替换 Token 占位符。 -
securityContext uid=1000:OpenClaw 镜像以
node用户运行(uid 1000),PVC 目录的 fsGroup 也设为 1000,避免权限问题。 -
三种探针都配了:startupProbe 给容器 60 秒启动时间(5s × 12次),livenessProbe 检测进程存活,readinessProbe 检测服务就绪。
-
RollingUpdate maxUnavailable=0:更新时先拉起新 Pod 再下旧 Pod,服务零中断。
2.3.6 Service
# openclaw-service.yaml
apiVersion:v1
kind:Service
metadata:
name:openclaw-gateway
namespace:openclaw
labels:
    app:openclaw
    component:gateway
spec:
type:ClusterIP
ports:
    -name:http
      port:18789
      targetPort:18789
      protocol:TCP
selector:
    app:openclaw
    component:gateway
---
# NodePort Service(可选,用于无 Ingress 环境直接访问)
apiVersion:v1
kind:Service
metadata:
name:openclaw-gateway-nodeport
namespace:openclaw
labels:
    app:openclaw
    component:gateway
spec:
type:NodePort
ports:
    -name:http
      port:18789
      targetPort:18789
      nodePort:31789
      protocol:TCP
selector:
    app:openclaw
    component:gateway
ClusterIP Service 供集群内部访问(Ingress 转发用),NodePort Service 供没有 Ingress 的环境直接通过 节点IP:31789 访问。生产环境推荐走 Ingress + ClusterIP,不暴露 NodePort。
2.3.7 Ingress:HTTPS 暴露
# openclaw-ingress.yaml
apiVersion:networking.k8s.io/v1
kind:Ingress
metadata:
name:openclaw-gateway
namespace:openclaw
labels:
    app:openclaw
annotations:
    nginx.ingress.kubernetes.io/proxy-read-timeout:"3600"
    nginx.ingress.kubernetes.io/proxy-send-timeout:"3600"
    # WebSocket 支持(OpenClaw 端口复用 HTTP + WS)
    nginx.ingress.kubernetes.io/proxy-http-version:"1.1"
    nginx.ingress.kubernetes.io/upstream-hash-by:"$remote_addr"
    # 请求体大小限制(Agent 对话上下文可能很长)
    nginx.ingress.kubernetes.io/proxy-body-size:"50m"
    # TLS 证书自动签发(需要 cert-manager)
    cert-manager.io/cluster-issuer:"letsencrypt-prod"
spec:
ingressClassName:nginx
tls:
    -hosts:
        -openclaw.example.com
      secretName:openclaw-tls
rules:
    -host:openclaw.example.com
      http:
        paths:
          -path:/
            pathType:Prefix
            backend:
              service:
                name:openclaw-gateway
                port:
                  number:18789
Ingress 的 proxy-read-timeout 设成 3600 秒,因为大模型推理响应时间可能很长(特别是长文本生成场景)。默认 60 秒超时在生产环境一定会出问题,这个坑踩过的人都知道。
WebSocket 的 proxy-http-version 必须设为 1.1,否则 WS 连接建不起来。
2.4 vLLM 推理服务部署
OpenClaw 网关本身不做推理,需要后端挂一个推理服务。这里用 vLLM 部署 Qwen/Qwen3.5-35B-A3B-FP8 模型。
2.4.1 vLLM Deployment
# vllm-deployment.yaml
apiVersion:apps/v1
kind:Deployment
metadata:
name:vllm-inference
namespace:openclaw
labels:
    app:openclaw
    component:vllm
spec:
replicas:1
selector:
    matchLabels:
      app:openclaw
      component:vllm
template:
    metadata:
      labels:
        app:openclaw
        component:vllm
    spec:
      containers:
        -name:vllm
          image:vllm/vllm-openai:latest
          command:
            -python3
            --m
            -vllm.entrypoints.openai.api_server
          args:
            -"--model"
            -"Qwen/Qwen3.5-35B-A3B-FP8"
            -"--host"
            -"0.0.0.0"
            -"--port"
            -"8000"
            -"--tensor-parallel-size"
            -"4"
            -"--max-model-len"
            -"32768"
            -"--gpu-memory-utilization"
            -"0.90"
            -"--block-size"
            -"16"
            -"--swap-space"
            -"8"
            -"--dtype"
            -"auto"
            -"--trust-remote-code"
          ports:
            -name:http
              containerPort:8000
              protocol:TCP
          env:
            -name:HUGGING_FACE_HUB_TOKEN
              valueFrom:
                secretKeyRef:
                  name:openclaw-secrets
                  key:openai-api-key
                  optional:true
            -name:VLLM_WORKER_MULTIPROC_METHOD
              value:"spawn"
          resources:
            requests:
              cpu:"8"
              memory:"64Gi"
              nvidia.com/gpu:"4"
            limits:
              cpu:"16"
              memory:"128Gi"
              nvidia.com/gpu:"4"
          volumeMounts:
            -name:model-cache
              mountPath:/root/.cache/huggingface
            -name:shm
              mountPath:/dev/shm
          livenessProbe:
            httpGet:
              path:/health
              port:8000
            initialDelaySeconds:120
            periodSeconds:30
            timeoutSeconds:10
            failureThreshold:5
          readinessProbe:
            httpGet:
              path:/health
              port:8000
            initialDelaySeconds:120
            periodSeconds:15
            timeoutSeconds:10
            failureThreshold:5
      volumes:
        -name:model-cache
          persistentVolumeClaim:
            claimName:vllm-model-cache
        -name:shm
          emptyDir:
            medium:Memory
            sizeLimit:16Gi
      tolerations:
        -key:nvidia.com/gpu
          operator:Exists
          effect:NoSchedule
      nodeSelector:
        gpu-type:a100
---
apiVersion:v1
kind:PersistentVolumeClaim
metadata:
name:vllm-model-cache
namespace:openclaw
spec:
accessModes:
    -ReadWriteOnce
storageClassName:standard
resources:
    requests:
      storage:200Gi
几个坑点说明:
-
/dev/shm必须挂载 emptyDir:vLLM 多进程通信依赖共享内存,Docker 默认的 64MB shm 远远不够。这里给了 16Gi,35B 模型 4 卡并行至少需要这个量级。 -
**
tensor-parallel-size=4**:Qwen3.5-35B-A3B-FP8 是 FP8 量化模型,4 张 A100 80GB 可以稳定加载。2 张卡勉强能跑但显存利用率太高,留不出 KV Cache 空间。 -
**
initialDelaySeconds=120**:大模型加载需要时间,35B 模型从磁盘加载到 GPU 至少要 90 秒,设短了 Pod 会被 K8s 反复杀掉重启。 -
**
gpu-memory-utilization=0.90**:给 KV Cache 留 10% 的显存余量。设成 0.95 虽然能多接几个并发,但在突发流量下容易 OOM。 -
nodeSelector:确保 Pod 调度到有 GPU 的节点,标签
gpu-type: a100需要提前给节点打好。
2.4.2 vLLM Service
# vllm-service.yaml
apiVersion:v1
kind:Service
metadata:
name:vllm-service
namespace:openclaw
labels:
    app:openclaw
    component:vllm
spec:
type:ClusterIP
ports:
    -name:http
      port:8000
      targetPort:8000
      protocol:TCP
selector:
    app:openclaw
    component:vllm
这个 Service 只在集群内部暴露,OpenClaw 网关通过 http://vllm-service.openclaw.svc.cluster.local:8000/v1 访问。不需要对外暴露推理服务端口,安全性更好。
2.5 OpenClaw 对接 vLLM
2.5.1 配置 models.providers
OpenClaw 的 openclaw.json 中 models.providers 部分配置 vLLM 作为推理后端:
{
  models: {
    default: "vllm-local/Qwen3.5-35B",
    providers: {
      "vllm-local": {
        // K8s 环境使用 Service DNS
        baseUrl: "http://vllm-service.openclaw.svc.cluster.local:8000/v1",
        // Docker 环境使用容器名或宿主机 IP
        // baseUrl: "http://host.docker.internal:8000/v1",
        api: "openai-responses",
        models: [
          "Qwen/Qwen3.5-35B-A3B-FP8"
        ]
      }
    }
  }
}
Provider 名称 vllm-local 可以自定义,客户端请求时通过 provider/model 格式指定模型,比如 vllm-local/Qwen3.5-35B。
如果有多个推理后端,可以配置多个 Provider:
{
  models: {
    default: "vllm-local/Qwen3.5-35B",
    providers: {
      "vllm-local": {
        baseUrl: "http://vllm-service.openclaw.svc.cluster.local:8000/v1",
        api: "openai-responses",
        models: ["Qwen/Qwen3.5-35B-A3B-FP8"]
      },
      "vllm-code": {
        baseUrl: "http://vllm-code-service.openclaw.svc.cluster.local:8000/v1",
        api: "openai-responses",
        models: ["Qwen/Qwen3-Coder-30B-A3B-FP8"]
      }
    }
  }
}
2.5.2 验证模型连通性
# K8s 环境:在集群内部验证
kubectl run -it --rm debug-curl \
  --namespace=openclaw \
  --image=curlimages/curl \
  --restart=Never \
  -- curl -s http://vllm-service:8000/v1/models

# 预期输出:
# {"data":[{"id":"Qwen/Qwen3.5-35B-A3B-FP8","object":"model",...}]}

# 验证 OpenClaw 网关到 vLLM 的端到端连通性
kubectl run -it --rm debug-curl \
  --namespace=openclaw \
  --image=curlimages/curl \
  --restart=Never \
  -- curl -s -H "Authorization: Bearer <your-gateway-token>" \
     http://openclaw-gateway:18789/v1/models
2.6 启动验证
2.6.1 K8s 部署一键执行
# 按顺序部署所有资源
kubectl apply -f openclaw-configmap.yaml
kubectl apply -f openclaw-secret.yaml
kubectl apply -f openclaw-pvc.yaml
kubectl apply -f vllm-deployment.yaml
kubectl apply -f vllm-service.yaml
kubectl apply -f openclaw-deployment.yaml
kubectl apply -f openclaw-service.yaml
kubectl apply -f openclaw-ingress.yaml

# 查看所有资源状态
kubectl get all -n openclaw

# 等待所有 Pod 就绪
kubectl wait --for=condition=ready pod \
  -l app=openclaw \
  -n openclaw \
  --timeout=300s
2.6.2 健康检查验证
# Docker 方案验证
curl -s http://localhost:18789/healthz | python3 -m json.tool
curl -s http://localhost:18789/readyz | python3 -m json.tool

# K8s 方案验证(通过 Ingress)
curl -s https://openclaw.example.com/healthz | python3 -m json.tool
curl -s https://openclaw.example.com/readyz | python3 -m json.tool

# K8s 方案验证(通过 NodePort)
curl -s http://<node-ip>:31789/healthz | python3 -m json.tool

# K8s 方案验证(通过 port-forward,调试用)
kubectl port-forward svc/openclaw-gateway 18789:18789 -n openclaw &
curl -s http://localhost:18789/healthz | python3 -m json.tool
2.6.3 端到端功能测试
# 发送一个完整的对话请求,验证网关→vLLM 链路
curl -s -X POST \
  -H "Authorization: Bearer <your-gateway-token>" \
  -H "Content-Type: application/json" \
  http://localhost:18789/v1/chat/completions \
  -d '{
    "model": "vllm-local/Qwen3.5-35B",
    "messages": [
      {"role": "system", "content": "You are a helpful assistant."},
      {"role": "user", "content": "Hello, what is Kubernetes?"}
    ],
    "max_tokens": 200,
    "temperature": 0.7
  }' | python3 -m json.tool
如果返回了正常的模型响应,说明整条链路跑通了:客户端 → OpenClaw Gateway(认证 + 路由)→ vLLM(推理)→ 返回结果。
三、示例代码和配置
3.1 完整 docker-compose.yml(含 vLLM)
Docker 方案的完整 Compose 文件,一个文件跑起整套服务:
# docker-compose.yml - OpenClaw + vLLM 完整部署
version:"3.8"

services:
# OpenClaw Gateway
openclaw-gateway:
    image:ghcr.io/openclaw/openclaw:latest
    container_name:openclaw-gateway
    restart:unless-stopped
    ports:
      -"18789:18789"
    volumes:
      -./config:/home/node/.openclaw
      -./workspace:/home/node/workspace
    environment:
      -NODE_ENV=production
    user:"1000:1000"
    depends_on:
      vllm:
        condition:service_healthy
    healthcheck:
      test:["CMD","curl","-f","http://localhost:18789/healthz"]
      interval:30s
      timeout:10s
      retries:3
      start_period:15s
    deploy:
      resources:
        limits:
          memory:2G
          cpus:"2.0"
        reservations:
          memory:512M
          cpus:"0.5"
    networks:
      -openclaw-net
    logging:
      driver:json-file
      options:
        max-size:"50m"
        max-file:"5"

# vLLM 推理服务
vllm:
    image:vllm/vllm-openai:latest
    container_name:vllm-inference
    restart:unless-stopped
    ports:
      -"8000:8000"
    command:
      -"--model"
      -"Qwen/Qwen3.5-35B-A3B-FP8"
      -"--host"
      -"0.0.0.0"
      -"--port"
      -"8000"
      -"--tensor-parallel-size"
      -"4"
      -"--max-model-len"
      -"32768"
      -"--gpu-memory-utilization"
      -"0.90"
      -"--block-size"
      -"16"
      -"--swap-space"
      -"8"
      -"--dtype"
      -"auto"
      -"--trust-remote-code"
    volumes:
      -model-cache:/root/.cache/huggingface
    environment:
      -HUGGING_FACE_HUB_TOKEN=${HF_TOKEN:-}
      -VLLM_WORKER_MULTIPROC_METHOD=spawn
    healthcheck:
      test:["CMD","curl","-f","http://localhost:8000/health"]
      interval:30s
      timeout:15s
      retries:10
      start_period:180s
    shm_size:"16gb"
    deploy:
      resources:
        reservations:
          devices:
            -driver:nvidia
              count:4
              capabilities:[gpu]
    networks:
      -openclaw-net

# OpenClaw CLI(管理工具,按需启动)
openclaw-cli:
    image:ghcr.io/openclaw/openclaw:latest
    container_name:openclaw-cli
    profiles:
      -tools
    volumes:
      -./config:/home/node/.openclaw
      -./workspace:/home/node/workspace
    user:"1000:1000"
    stdin_open:true
    tty:true
    networks:
      -openclaw-net

volumes:
model-cache:
    driver:local

networks:
openclaw-net:
    driver:bridge
使用方法:
# 启动网关 + 推理服务
docker compose up -d

# 查看所有服务状态
docker compose ps

# 按需启动 CLI 管理工具
docker compose --profile tools run --rm openclaw-cli openclaw --help

# 查看实时日志
docker compose logs -f

# 停止所有服务
docker compose down

# 停止并清理数据卷(谨慎操作)
docker compose down -v
3.2 完整 K8s YAML(All-in-One Manifest)
把所有 K8s 资源合并到一个文件,方便一键部署:
# openclaw-all-in-one.yaml
# 使用方法:kubectl apply -f openclaw-all-in-one.yaml

# --- Namespace ---
apiVersion:v1
kind:Namespace
metadata:
name:openclaw
labels:
    app:openclaw

---
# --- ConfigMap ---
apiVersion:v1
kind:ConfigMap
metadata:
name:openclaw-config
namespace:openclaw
data:
openclaw.json:|
    {
      "gateway": {
        "bind": "0.0.0.0:18789",
        "auth": {
          "token": "${OPENCLAW_AUTH_TOKEN}"
        }
      },
      "models": {
        "default": "vllm-local/Qwen3.5-35B",
        "providers": {
          "vllm-local": {
            "baseUrl": "http://vllm-service.openclaw.svc.cluster.local:8000/v1",
            "api": "openai-responses",
            "models": [
              "Qwen/Qwen3.5-35B-A3B-FP8"
            ]
          }
        }
      }
    }

---
# --- Secret(部署前先替换 Token) ---
apiVersion:v1
kind:Secret
metadata:
name:openclaw-secrets
namespace:openclaw
type:Opaque
stringData:
gateway-token:"REPLACE_WITH_RANDOM_TOKEN"

---
# --- PVC: Gateway 数据 ---
apiVersion:v1
kind:PersistentVolumeClaim
metadata:
name:openclaw-data
namespace:openclaw
spec:
accessModes:[ReadWriteOnce]
storageClassName:standard
resources:
    requests:
      storage:10Gi

---
# --- PVC: Gateway 工作空间 ---
apiVersion:v1
kind:PersistentVolumeClaim
metadata:
name:openclaw-workspace
namespace:openclaw
spec:
accessModes:[ReadWriteOnce]
storageClassName:standard
resources:
    requests:
      storage:50Gi

---
# --- PVC: vLLM 模型缓存 ---
apiVersion:v1
kind:PersistentVolumeClaim
metadata:
name:vllm-model-cache
namespace:openclaw
spec:
accessModes:[ReadWriteOnce]
storageClassName:standard
resources:
    requests:
      storage:200Gi

---
# --- Deployment: OpenClaw Gateway ---
apiVersion:apps/v1
kind:Deployment
metadata:
name:openclaw-gateway
namespace:openclaw
spec:
replicas:2
selector:
    matchLabels:
      app:openclaw
      component:gateway
strategy:
    type:RollingUpdate
    rollingUpdate:
      maxSurge:1
      maxUnavailable:0
template:
    metadata:
      labels:
        app:openclaw
        component:gateway
    spec:
      securityContext:
        runAsUser:1000
        runAsGroup:1000
        fsGroup:1000
      initContainers:
        -name:config-init
          image:ghcr.io/openclaw/openclaw:latest
          command:["/bin/sh","-c"]
          args:
            -|
              cp /config-readonly/openclaw.json /home/node/.openclaw/openclaw.json
              sed -i "s|\${OPENCLAW_AUTH_TOKEN}|${GATEWAY_TOKEN}|g" /home/node/.openclaw/openclaw.json
          env:
            -name:GATEWAY_TOKEN
              valueFrom:
                secretKeyRef:
                  name:openclaw-secrets
                  key:gateway-token
          volumeMounts:
            -name:config-readonly
              mountPath:/config-readonly
            -name:openclaw-data
              mountPath:/home/node/.openclaw
      containers:
        -name:gateway
          image:ghcr.io/openclaw/openclaw:latest
          ports:
            -containerPort:18789
          env:
            -name:NODE_ENV
              value:"production"
          resources:
            requests:
              cpu:"500m"
              memory:"512Mi"
            limits:
              cpu:"2000m"
              memory:"2Gi"
          livenessProbe:
            httpGet:
              path:/healthz
              port:18789
            initialDelaySeconds:15
            periodSeconds:30
          readinessProbe:
            httpGet:
              path:/readyz
              port:18789
            initialDelaySeconds:10
            periodSeconds:10
          startupProbe:
            httpGet:
              path:/healthz
              port:18789
            periodSeconds:5
            failureThreshold:12
          volumeMounts:
            -name:openclaw-data
              mountPath:/home/node/.openclaw
            -name:openclaw-workspace
              mountPath:/home/node/workspace
      volumes:
        -name:config-readonly
          configMap:
            name:openclaw-config
        -name:openclaw-data
          persistentVolumeClaim:
            claimName:openclaw-data
        -name:openclaw-workspace
          persistentVolumeClaim:
            claimName:openclaw-workspace
      terminationGracePeriodSeconds:30

---
# --- Deployment: vLLM ---
apiVersion:apps/v1
kind:Deployment
metadata:
name:vllm-inference
namespace:openclaw
spec:
replicas:1
selector:
    matchLabels:
      app:openclaw
      component:vllm
template:
    metadata:
      labels:
        app:openclaw
        component:vllm
    spec:
      containers:
        -name:vllm
          image:vllm/vllm-openai:latest
          command:["python3","-m","vllm.entrypoints.openai.api_server"]
          args:
            -"--model=Qwen/Qwen3.5-35B-A3B-FP8"
            -"--host=0.0.0.0"
            -"--port=8000"
            -"--tensor-parallel-size=4"
            -"--max-model-len=32768"
            -"--gpu-memory-utilization=0.90"
            -"--block-size=16"
            -"--swap-space=8"
            -"--dtype=auto"
            -"--trust-remote-code"
          ports:
            -containerPort:8000
          env:
            -name:VLLM_WORKER_MULTIPROC_METHOD
              value:"spawn"
          resources:
            requests:
              cpu:"8"
              memory:"64Gi"
              nvidia.com/gpu:"4"
            limits:
              cpu:"16"
              memory:"128Gi"
              nvidia.com/gpu:"4"
          volumeMounts:
            -name:model-cache
              mountPath:/root/.cache/huggingface
            -name:shm
              mountPath:/dev/shm
          livenessProbe:
            httpGet:
              path:/health
              port:8000
            initialDelaySeconds:120
            periodSeconds:30
          readinessProbe:
            httpGet:
              path:/health
              port:8000
            initialDelaySeconds:120
            periodSeconds:15
      volumes:
        -name:model-cache
          persistentVolumeClaim:
            claimName:vllm-model-cache
        -name:shm
          emptyDir:
            medium:Memory
            sizeLimit:16Gi
      tolerations:
        -key:nvidia.com/gpu
          operator:Exists
          effect:NoSchedule
      nodeSelector:
        gpu-type:a100

---
# --- Service: OpenClaw Gateway ---
apiVersion:v1
kind:Service
metadata:
name:openclaw-gateway
namespace:openclaw
spec:
type:ClusterIP
ports:
    -port:18789
      targetPort:18789
selector:
    app:openclaw
    component:gateway

---
# --- Service: vLLM ---
apiVersion:v1
kind:Service
metadata:
name:vllm-service
namespace:openclaw
spec:
type:ClusterIP
ports:
    -port:8000
      targetPort:8000
selector:
    app:openclaw
    component:vllm

---
# --- Ingress ---
apiVersion:networking.k8s.io/v1
kind:Ingress
metadata:
name:openclaw-gateway
namespace:openclaw
annotations:
    nginx.ingress.kubernetes.io/proxy-read-timeout:"3600"
    nginx.ingress.kubernetes.io/proxy-send-timeout:"3600"
    nginx.ingress.kubernetes.io/proxy-http-version:"1.1"
    nginx.ingress.kubernetes.io/proxy-body-size:"50m"
    cert-manager.io/cluster-issuer:"letsencrypt-prod"
spec:
ingressClassName:nginx
tls:
    -hosts:[openclaw.example.com]
      secretName:openclaw-tls
rules:
    -host:openclaw.example.com
      http:
        paths:
          -path:/
            pathType:Prefix
            backend:
              service:
                name:openclaw-gateway
                port:
                  number:18789
部署命令:
# 先替换 Token(手动或用 envsubst)
export GATEWAY_TOKEN=$(openssl rand -hex 32)
sed -i "s/REPLACE_WITH_RANDOM_TOKEN/${GATEWAY_TOKEN}/g" openclaw-all-in-one.yaml

# 一键部署
kubectl apply -f openclaw-all-in-one.yaml

# 查看部署状态
kubectl get all -n openclaw
3.3 openclaw.json 生产配置
完整的生产级配置文件,包含 vLLM Provider、Qwen3.5 模型和多 Provider 路由:
// ~/.openclaw/openclaw.json
// 生产环境配置 - 多 Provider 路由 + vLLM 推理后端
{
  gateway: {
    // 监听地址,容器环境用 0.0.0.0
    bind: "0.0.0.0:18789",

    auth: {
      // 每个接入方使用独立 Token
      // 通过 openclaw CLI 管理多 Token
      token: "oc-prod-<your-random-token-here>"
    },

    // 请求限流配置
    rateLimit: {
      // 每分钟最大请求数
      maxRequestsPerMinute: 600,
      // 单个 Token 每分钟最大请求数
      maxRequestsPerMinutePerToken: 60
    }
  },

  models: {
    // 默认模型(不指定模型时使用)
    default: "vllm-local/Qwen3.5-35B",

    providers: {
      // 主力推理后端:vLLM + Qwen3.5
      "vllm-local": {
        baseUrl: "http://vllm-service.openclaw.svc.cluster.local:8000/v1",
        api: "openai-responses",
        models: [
          "Qwen/Qwen3.5-35B-A3B-FP8"
        ]
      },

      // 代码生成专用后端(可选)
      "vllm-code": {
        baseUrl: "http://vllm-code.openclaw.svc.cluster.local:8000/v1",
        api: "openai-responses",
        models: [
          "Qwen/Qwen3-Coder-30B-A3B-FP8"
        ]
      },

      // 备用云端 Provider(可选,用于降级)
      "openai-cloud": {
        baseUrl: "https://api.openai.com/v1",
        api: "openai-responses",
        apiKey: "${OPENAI_API_KEY}",
        models: [
          "gpt-4o",
          "gpt-4o-mini"
        ]
      }
    }
  },

  // 日志配置
  logging: {
    level: "info",
    // 生产环境建议 JSON 格式,方便 ELK/Loki 采集
    format: "json"
  }
}
3.4 案例一:企业微信 / Telegram 多渠道接入
场景描述:公司同时使用企业微信(内部沟通)和 Telegram(海外团队),需要同一个 AI 助手在两个平台上提供服务。OpenClaw 作为网关统一接入,后端共用同一个 vLLM 推理实例。
架构图:
企业微信 Bot ──→ Webhook ──→ OpenClaw Gateway (:18789) ──→ vLLM (:8000)
Telegram Bot ──→ Webhook ──↗                                  ↓
                                                    Qwen3.5-35B-A3B-FP8
实现步骤:
-
在企业微信管理后台创建应用,获取
CorpID、AgentID、Secret -
在 Telegram 通过 @BotFather 创建 Bot,获取
BOT_TOKEN -
配置 OpenClaw 渠道接入
// openclaw.json - 多渠道配置
{
  gateway: {
    bind: "0.0.0.0:18789",
    auth: {
      token: "oc-prod-<your-token>"
    }
  },

  // 渠道配置
  channels: {
    // 企业微信接入
    "wechat-work": {
      type: "wechat-work",
      corpId: "ww1234567890abcdef",
      agentId: 1000002,
      secret: "${WECHAT_WORK_SECRET}",
      token: "${WECHAT_WORK_TOKEN}",
      encodingAesKey: "${WECHAT_WORK_AES_KEY}",
      // 消息回调地址:https://openclaw.example.com/webhook/wechat-work
      webhookPath: "/webhook/wechat-work"
    },

    // Telegram 接入
    "telegram": {
      type: "telegram",
      botToken: "${TELEGRAM_BOT_TOKEN}",
      // 消息回调地址:https://openclaw.example.com/webhook/telegram
      webhookPath: "/webhook/telegram"
    }
  },

  models: {
    default: "vllm-local/Qwen3.5-35B",
    providers: {
      "vllm-local": {
        baseUrl: "http://vllm-service.openclaw.svc.cluster.local:8000/v1",
        api: "openai-responses",
        models: ["Qwen/Qwen3.5-35B-A3B-FP8"]
      }
    }
  }
}
设置 Webhook 回调:
# Telegram:设置 Webhook URL
curl -s -X POST \
  "https://api.telegram.org/bot${TELEGRAM_BOT_TOKEN}/setWebhook" \
  -H "Content-Type: application/json" \
  -d '{"url": "https://openclaw.example.com/webhook/telegram"}'

# 企业微信:在管理后台「应用管理」→「接收消息」中配置
# URL: https://openclaw.example.com/webhook/wechat-work
# Token 和 EncodingAESKey 与 openclaw.json 中保持一致
验证:
# 验证 Telegram Webhook 状态
curl -s "https://api.telegram.org/bot${TELEGRAM_BOT_TOKEN}/getWebhookInfo" | python3 -m json.tool

# 在企业微信中给 Bot 发消息,观察 OpenClaw 日志
kubectl logs -f -l app=openclaw,component=gateway -n openclaw

# 在 Telegram 中给 Bot 发消息,观察响应
3.5 案例二:K8s 多租户隔离部署
场景描述:公司有三个部门(研发部、市场部、客服部),每个部门需要独立的 AI 助手,使用不同的模型和配置。要求部门之间网络隔离,互不影响。
隔离方案:Namespace 隔离 + NetworkPolicy 网络隔离 + RBAC 权限隔离 + 独立 vLLM 实例。
3.5.1 Namespace 规划
# 创建部门级 Namespace
kubectl create namespace openclaw-dev      # 研发部
kubectl create namespace openclaw-marketing # 市场部
kubectl create namespace openclaw-support   # 客服部

# 打标签用于 NetworkPolicy 选择
kubectl label namespace openclaw-dev department=dev
kubectl label namespace openclaw-marketing department=marketing
kubectl label namespace openclaw-support department=support
3.5.2 NetworkPolicy:部门间网络隔离
# networkpolicy-isolation.yaml
# 默认拒绝所有跨 Namespace 流量,只允许同 Namespace 内通信

# 研发部 NetworkPolicy
apiVersion:networking.k8s.io/v1
kind:NetworkPolicy
metadata:
name:deny-cross-namespace
namespace:openclaw-dev
spec:
podSelector:{}
policyTypes:
    -Ingress
    -Egress
ingress:
    # 允许同 Namespace 内 Pod 互访
    -from:
        -podSelector:{}
    # 允许 Ingress Controller 访问(必须,否则外部请求进不来)
    -from:
        -namespaceSelector:
            matchLabels:
              kubernetes.io/metadata.name:ingress-nginx
egress:
    # 允许同 Namespace 内 Pod 互访
    -to:
        -podSelector:{}
    # 允许 DNS 查询
    -to:
        -namespaceSelector:{}
          podSelector:
            matchLabels:
              k8s-app:kube-dns
      ports:
        -protocol:UDP
          port:53
        -protocol:TCP
          port:53
    # 允许访问外部网络(模型下载、API 调用)
    -to:
        -ipBlock:
            cidr:0.0.0.0/0
            except:
              -10.0.0.0/8
              -172.16.0.0/12
              -192.168.0.0/16
---
# 市场部和客服部使用相同模板,修改 namespace 即可
apiVersion:networking.k8s.io/v1
kind:NetworkPolicy
metadata:
name:deny-cross-namespace
namespace:openclaw-marketing
spec:
podSelector:{}
policyTypes:[Ingress,Egress]
ingress:
    -from:
        -podSelector:{}
    -from:
        -namespaceSelector:
            matchLabels:
              kubernetes.io/metadata.name:ingress-nginx
egress:
    -to:
        -podSelector:{}
    -to:
        -namespaceSelector:{}
          podSelector:
            matchLabels:
              k8s-app:kube-dns
      ports:
        -{protocol:UDP,port:53}
        -{protocol:TCP,port:53}
    -to:
        -ipBlock:
            cidr:0.0.0.0/0
            except:[10.0.0.0/8,172.16.0.0/12,192.168.0.0/16]
3.5.3 RBAC:部门管理员权限
# rbac-dev-admin.yaml
# 研发部管理员只能管理自己 Namespace 的资源
apiVersion:rbac.authorization.k8s.io/v1
kind:Role
metadata:
name:openclaw-admin
namespace:openclaw-dev
rules:
-apiGroups:["","apps","networking.k8s.io"]
    resources:["pods","services","deployments","configmaps","ingresses"]
    verbs:["get","list","watch","create","update","patch"]
-apiGroups:[""]
    resources:["pods/log"]
    verbs:["get","list"]
# 禁止删除操作和 Secret 访问
-apiGroups:[""]
    resources:["secrets"]
    verbs:["get","list"]
---
apiVersion:rbac.authorization.k8s.io/v1
kind:RoleBinding
metadata:
name:dev-admin-binding
namespace:openclaw-dev
subjects:
-kind:User
    name:dev-admin@company.com
    apiGroup:rbac.authorization.k8s.io
roleRef:
kind:Role
name:openclaw-admin
apiGroup:rbac.authorization.k8s.io
3.5.4 各部门独立部署
每个部门在自己的 Namespace 部署独立的 OpenClaw Gateway + vLLM 实例。以研发部为例:
# 部署研发部实例
# 1. 生成独立 Token
DEV_TOKEN=$(openssl rand -hex 32)

# 2. 创建 Secret
kubectl create secret generic openclaw-secrets \
  --namespace=openclaw-dev \
  --from-literal=gateway-token="${DEV_TOKEN}"

# 3. 部署(使用 all-in-one 模板,修改 namespace)
sed 's/namespace: openclaw/namespace: openclaw-dev/g' openclaw-all-in-one.yaml | \
  kubectl apply -f -

# 4. 验证
kubectl get all -n openclaw-dev
部门间完全隔离:不同 Token、不同网络策略、不同模型配置、不同资源配额。研发部的请求不会路由到市场部的 vLLM,市场部的 Pod 也无法访问研发部的服务。
3.5.5 ResourceQuota:资源配额限制
# resourcequota-dev.yaml
apiVersion:v1
kind:ResourceQuota
metadata:
name:openclaw-quota
namespace:openclaw-dev
spec:
hard:
    requests.cpu:"16"
    requests.memory:"128Gi"
    limits.cpu:"32"
    limits.memory:"256Gi"
    requests.nvidia.com/gpu:"4"
    persistentvolumeclaims:"5"
    pods:"10"
---
# 市场部配额(不需要 GPU,使用云端 API)
apiVersion:v1
kind:ResourceQuota
metadata:
name:openclaw-quota
namespace:openclaw-marketing
spec:
hard:
    requests.cpu:"4"
    requests.memory:"8Gi"
    limits.cpu:"8"
    limits.memory:"16Gi"
    requests.nvidia.com/gpu:"0"
    persistentvolumeclaims:"3"
    pods:"5"
市场部只部署 OpenClaw Gateway,模型对接云端 API(如 OpenAI),不需要 GPU 资源。研发部自带 vLLM + GPU,资源配额更高。这样既满足了不同部门的需求差异,又避免了资源争抢。
四、最佳实践和注意事项
4.1 最佳实践
4.1.1 性能优化
-
Gateway 并发调优:OpenClaw 基于 Node.js 单线程事件循环,默认并发能力取决于 libuv 线程池大小。生产环境建议设置
UV_THREADPOOL_SIZE=16,可将 I/O 密集型操作的并发提升 4 倍(默认值 4)。# Deployment 中添加环境变量 env: - name: UV_THREADPOOL_SIZE value: "16" - name: NODE_OPTIONS value: "--max-old-space-size=1536"max-old-space-size限制 V8 堆内存上限,设为容器 memory limit 的 75%。2Gi 内存限制对应 1536MB 堆上限,留出余量给 Node.js 的非堆内存(Buffer、Native 模块等)。 -
vLLM Continuous Batching 参数:vLLM 的 continuous batching 是吞吐量的关键。
max-num-seqs控制同时处理的最大序列数,默认 256。A100 80GB 4 卡跑 35B 模型,实测max-num-seqs=128是甜点值,QPS 稳定在 40-60。设太高会导致 KV Cache 不够分,反而降低吞吐。args: - "--max-num-seqs=128" - "--max-num-batched-tokens=32768" - "--enable-chunked-prefill"enable-chunked-prefill开启后,长 prompt 的 prefill 阶段会分块执行,不会阻塞其他请求的 decode 阶段。实测开启后 P99 延迟从 12s 降到 4s。 -
资源 limits 设置原则:CPU request 设为 limit 的 25-50%,给突发流量留余量。内存 request 和 limit 建议设成一样,避免 OOM Kill 后 Pod 被驱逐到其他节点引发雪崩。GPU 的 request 和 limit 必须相等(NVIDIA device plugin 的硬性要求)。
resources:
  requests:
    cpu: "500m"      # limit 的 25%
    memory: "2Gi"    # 和 limit 相同
  limits:
    cpu: "2000m"
    memory: "2Gi"
4.1.2 安全加固
-
Token 轮换机制:生产环境建议每 90 天轮换一次 Gateway Token。轮换流程:生成新 Token → 更新 Secret → 滚动重启 Gateway Pod → 通知接入方更新 Token。可以通过 CronJob 自动化:
# token-rotation-cronjob.yaml apiVersion:batch/v1 kind:CronJob metadata: name:token-rotation namespace:openclaw spec: schedule:"0 2 1 */3 *"# 每季度 1 号凌晨 2 点执行 jobTemplate: spec: template: spec: serviceAccountName:token-rotator containers: -name:rotate image:bitnami/kubectl:latest command:["/bin/sh","-c"] args: -| NEW_TOKEN=$(openssl rand -hex 32) kubectl create secret generic openclaw-secrets \ --namespace=openclaw \ --from-literal=gateway-token="${NEW_TOKEN}" \ --dry-run=client -o yaml | kubectl apply -f - kubectl rollout restart deployment/openclaw-gateway -n openclaw echo "Token rotated at $(date). New token prefix: ${NEW_TOKEN:0:8}..." restartPolicy:OnFailure -
NetworkPolicy 最小权限:Gateway Pod 只需要出站访问 vLLM Service(端口 8000)和 DNS。入站只允许 Ingress Controller。别偷懒开
allow-all,网络层隔离是多租户安全的基础。# networkpolicy-gateway.yaml apiVersion:networking.k8s.io/v1 kind:NetworkPolicy metadata: name:gateway-policy namespace:openclaw spec: podSelector: matchLabels: component:gateway policyTypes:[Ingress,Egress] ingress: -from: -namespaceSelector: matchLabels: kubernetes.io/metadata.name:ingress-nginx ports: -port:18789 egress: # 允许访问 vLLM Service -to: -podSelector: matchLabels: component:vllm ports: -port:8000 # 允许 DNS -to: -namespaceSelector:{} podSelector: matchLabels: k8s-app:kube-dns ports: -{protocol:UDP,port:53} -{protocol:TCP,port:53} -
RBAC 最小权限原则:运维人员使用 ClusterRole,开发人员只给 Namespace 级别 Role。Secret 的
get权限要谨慎分配,能用list就别给get(list只返回 Secret 名称,get会返回内容)。 -
TLS 全链路加密:Ingress 到 Gateway 走 HTTPS(cert-manager 自动签发),Gateway 到 vLLM 在集群内部走 HTTP(性能考虑)。如果安全要求极高,可以用 Service Mesh(Istio/Linkerd)实现集群内部 mTLS。
4.1.3 高可用配置
-
Gateway 多副本 + PDB:生产环境至少 2 个副本,配合 PodDisruptionBudget 保证滚动更新和节点维护时至少有 1 个 Pod 可用。
# pdb.yaml apiVersion:policy/v1 kind:PodDisruptionBudget metadata: name:openclaw-gateway-pdb namespace:openclaw spec: minAvailable:1 selector: matchLabels: app:openclaw component:gateway -
HPA 自动扩缩容:基于 CPU 使用率自动扩缩 Gateway 副本数。Gateway 是 I/O 密集型,CPU 通常不高,建议同时监控自定义指标(如请求队列长度)。
# hpa.yaml apiVersion:autoscaling/v2 kind:HorizontalPodAutoscaler metadata: name:openclaw-gateway-hpa namespace:openclaw spec: scaleTargetRef: apiVersion:apps/v1 kind:Deployment name:openclaw-gateway minReplicas:2 maxReplicas:8 metrics: -type:Resource resource: name:cpu target: type:Utilization averageUtilization:70 -type:Resource resource: name:memory target: type:Utilization averageUtilization:80 behavior: scaleUp: stabilizationWindowSeconds:60 policies: -type:Pods value:2 periodSeconds:60 scaleDown: stabilizationWindowSeconds:300 policies: -type:Pods value:1 periodSeconds:120scaleDown.stabilizationWindowSeconds=300很重要,防止流量波动导致频繁缩容。缩容太快会在下一波请求到来时来不及扩容,用户体验骤降。 -
vLLM 高可用:vLLM 本身是有状态服务(GPU 显存中有模型权重),不支持多副本负载均衡。高可用方案是部署 2 个独立的 vLLM 实例(不同 Deployment),在 OpenClaw 配置多 Provider,主 Provider 故障时手动切换到备用 Provider。未来可以用 OpenClaw 的 Provider 健康检查实现自动故障转移。
4.2 注意事项
4.2.1 配置注意事项
uid 1000 权限问题:这是新手踩得最多的坑。OpenClaw 容器以 node 用户(uid 1000)运行,如果宿主机目录的 owner 不是 1000,容器内写入会报 EACCES: permission denied。
# 修复权限(Docker 方案)
sudo chown -R 1000:1000 ./config ./workspace

# K8s 方案通过 fsGroup 自动处理
# spec.securityContext.fsGroup: 1000
bind 地址配置:容器内必须 bind 0.0.0.0,别写 127.0.0.1。写 127.0.0.1 只能容器内部访问,外部请求过来全是 connection refused。这个错误在日志里不会报错,排查起来很头疼。
配置热重载:OpenClaw 目前不支持配置文件热重载,修改 openclaw.json 后需要重启服务才能生效。K8s 环境下 kubectl rollout restart deployment/openclaw-gateway -n openclaw 就行,Docker 环境 docker compose restart openclaw-gateway。
4.2.2 常见错误
|
错误现象 |
原因分析 |
解决方案 |
|---|---|---|
EACCES: permission denied
启动失败 |
挂载目录 owner 不是 uid 1000 |
chown -R 1000:1000
挂载目录,或 K8s 设置 |
connect ECONNREFUSED 127.0.0.1:8000 |
Gateway 无法连接 vLLM |
检查 vLLM Service 是否 Ready,检查 |
/healthz
返回 200 但 |
Gateway 启动了但后端模型不可用 |
等待 vLLM Pod Ready,或检查 Provider 配置中的 |
401 Unauthorized |
请求 Token 和配置的 Token 不一致 |
检查 |
|
Pod 状态 |
容器反复崩溃重启 |
kubectl logs <pod-name> --previous
查看崩溃前日志 |
|
vLLM Pod |
GPU 显存或系统内存不足 |
降低 |
|
Ingress 返回 |
大模型推理超时 |
增加 |
|
vLLM 日志 |
KV Cache 不够分 |
降低 |
4.2.3 兼容性问题
-
Docker Compose V1 vs V2:OpenClaw 的 docker-compose.yml 使用了
deploy.resources.reservations.devices语法(GPU 声明),只有 Docker Compose V2 支持。V1 的docker-compose命令会报语法错误。用docker compose(没有横杠)确认是 V2。 -
K8s 版本兼容:Ingress API
networking.k8s.io/v1从 K8s 1.19 开始稳定,1.22 移除了extensions/v1beta1。如果集群版本低于 1.19,需要改用旧 API 版本。 -
NVIDIA Device Plugin:K8s 使用 GPU 需要安装 NVIDIA Device Plugin DaemonSet。没装的话 Pod 的
nvidia.com/gpu资源请求永远无法满足,Pod 会一直 Pending。# 检查 Device Plugin 是否安装 kubectl get ds -n kube-system | grep nvidia # 如果没有,安装 kubectl apply -f https://raw.githubusercontent.com/NVIDIA/k8s-device-plugin/v0.17.0/deployments/static/nvidia-device-plugin.yml -
Container Runtime:containerd 1.7+ 和 Docker 24+ 都支持 GPU 直通。CRI-O 需要额外配置 nvidia-container-runtime。
五、故障排查和监控
5.1 故障排查
5.1.1 日志查看
# K8s 环境:查看 Gateway 日志
kubectl logs -f -l app=openclaw,component=gateway -n openclaw

# K8s 环境:查看 vLLM 日志
kubectl logs -f -l app=openclaw,component=vllm -n openclaw

# K8s 环境:查看崩溃前的日志(Pod 重启后之前的日志会丢失)
kubectl logs <pod-name> -n openclaw --previous

# Docker 环境:查看实时日志
docker compose logs -f openclaw-gateway
docker compose logs -f vllm

# 容器内日志路径(如果需要进容器看)
# OpenClaw: /home/node/.openclaw/logs/
# vLLM: 标准输出(无文件日志,靠容器日志驱动收集)

# 过滤错误日志
kubectl logs -l component=gateway -n openclaw | grep -i "error\|fatal\|exception"
5.1.2 常见问题排查
问题一:Gateway Pod 状态 Pending,无法调度
# 诊断:查看 Pod 事件
kubectl describe pod -l component=gateway -n openclaw | tail -20

# 常见原因
# 1. PVC 无法绑定(storageClassName 不存在)
kubectl get pvc -n openclaw
kubectl get storageclass

# 2. 资源不足(CPU/内存不够)
kubectl describe nodes | grep -A 5 "Allocated resources"

# 3. nodeSelector 不匹配
kubectl get nodes --show-labels
解决方案:
-
PVC Pending → 检查 StorageClass 是否存在,是否有可用 PV。云环境检查 CSI Driver 是否正常
-
资源不足 → 降低 resource requests,或扩容节点
-
nodeSelector 不匹配 →
kubectl label node <node-name> gpu-type=a100
问题二:vLLM Pod OOMKilled
# 诊断:查看 Pod 终止原因
kubectl get pod -l component=vllm -n openclaw -o jsonpath='{.items[0].status.containerStatuses[0].lastState.terminated.reason}'

# 查看节点内存使用
kubectl top nodes

# 查看 Pod 内存使用趋势
kubectl top pod -l component=vllm -n openclaw
解决方案:
-
系统内存 OOM → 增加 Pod memory limit,确保节点物理内存充足(建议 4 倍 GPU 显存)
-
GPU 显存 OOM → 降低
gpu-memory-utilization到 0.85,减小max-model-len,或增加 tensor-parallel-size -
/dev/shm不足 → 确认 emptyDir 的sizeLimit足够大(建议 16Gi+)
问题三:Token 认证失败,返回 401
# 诊断:确认配置的 Token 值
kubectl get secret openclaw-secrets -n openclaw -o jsonpath='{.data.gateway-token}' | base64 -d

# 确认 ConfigMap 中的占位符已被替换
kubectl exec -it <gateway-pod> -n openclaw -- cat /home/node/.openclaw/openclaw.json | grep token

# 测试请求
curl -v -H "Authorization: Bearer <token>" http://localhost:18789/healthz
解决方案:
-
确认请求头格式:
Authorization: Bearer <token>,注意 Bearer 后面有空格 -
确认 initContainer 的 sed 替换逻辑正确执行了(查看 initContainer 日志)
-
如果 Secret 更新了但 Pod 没重启,Token 不会自动生效。执行
kubectl rollout restart deployment/openclaw-gateway -n openclaw
5.1.3 调试模式
# OpenClaw 开启 debug 日志
# 方法一:环境变量
kubectl set env deployment/openclaw-gateway -n openclaw DEBUG=openclaw:*

# 方法二:修改 ConfigMap 中的 logging.level
kubectl edit configmap openclaw-config -n openclaw
# 将 "level": "info" 改为 "level": "debug"
# 然后重启
kubectl rollout restart deployment/openclaw-gateway -n openclaw

# vLLM 开启详细日志
# 在 args 中添加 --log-level=debug
kubectl edit deployment/vllm-inference -n openclaw

# 进入容器交互式调试
kubectl exec -it <gateway-pod> -n openclaw -- /bin/bash
# 容器内检查网络连通性
curl -s http://vllm-service:8000/health
# 容器内查看进程状态
ps aux
# 容器内查看内存使用
node -e "console.log(process.memoryUsage())"
5.2 性能监控
5.2.1 关键指标监控
# Gateway 基础监控
# CPU 使用率
kubectl top pod -l component=gateway -n openclaw

# 内存使用
kubectl top pod -l component=gateway -n openclaw

# 网络连接数(进入容器内查看)
kubectl exec -it <gateway-pod> -n openclaw -- ss -s

# vLLM 推理性能指标(vLLM 内置 metrics 端点)
curl -s http://vllm-service:8000/metrics

# 关键 vLLM 指标
curl -s http://vllm-service:8000/metrics | grep -E "vllm:num_requests|vllm:gpu_cache|vllm:avg_generation"
5.2.2 监控指标说明
|
指标名称 |
正常范围 |
告警阈值 |
说明 |
|---|---|---|---|
|
Gateway CPU 使用率 |
10-40% |
>70% |
Node.js 单线程,持续高 CPU 说明事件循环阻塞 |
|
Gateway 内存使用 |
200-800MB |
>1.5GB |
接近 limit 时有 OOM 风险 |
|
Gateway 请求延迟 P95 |
100-500ms |
>2000ms |
不含模型推理时间,纯网关转发延迟 |
|
Gateway 活跃连接数 |
0-500 |
>1000 |
WebSocket 长连接场景下可能较高 |
|
vLLM GPU 利用率 |
60-90% |
>95% |
持续 95%+ 说明需要扩容 |
|
vLLM KV Cache 使用率 |
40-80% |
>90% |
超 90% 新请求会排队等待 |
|
vLLM 请求队列长度 |
0-20 |
>50 |
队列积压说明推理速度跟不上请求速度 |
|
vLLM 生成速率 |
30-50 tokens/s/req |
<10 tokens/s |
低于 10 说明 GPU 资源不足或 batch 配置有问题 |
5.2.3 Prometheus 监控告警配置
# prometheus-rules.yaml
apiVersion:monitoring.coreos.com/v1
kind:PrometheusRule
metadata:
name:openclaw-alerts
namespace:openclaw
labels:
    release:prometheus
spec:
groups:
    -name:openclaw-gateway
      rules:
        # Gateway Pod 挂了
        -alert:OpenClawGatewayDown
          expr:up{job="openclaw-gateway"}==0
          for:1m
          labels:
            severity:critical
          annotations:
            summary:"OpenClaw Gateway 实例不可用"
            description:"{{ $labels.pod }} 已停止响应超过 1 分钟"

        # Gateway 内存使用过高
        -alert:OpenClawGatewayHighMemory
          expr:|
            container_memory_working_set_bytes{namespace="openclaw", container="gateway"}
            / container_spec_memory_limit_bytes{namespace="openclaw", container="gateway"}
            > 0.85
          for:5m
          labels:
            severity:warning
          annotations:
            summary:"OpenClaw Gateway 内存使用超过 85%"
            description:"{{ $labels.pod }} 内存使用 {{ $value | humanizePercentage }}"

        # Gateway 重启次数过多
        -alert:OpenClawGatewayRestarts
          expr:|
            increase(kube_pod_container_status_restarts_total{
              namespace="openclaw", container="gateway"
            }[1h]) > 3
          labels:
            severity:warning
          annotations:
            summary:"OpenClaw Gateway 1 小时内重启超过 3 次"

    -name:openclaw-vllm
      rules:
        # vLLM GPU 显存使用过高
        -alert:VllmGpuMemoryHigh
          expr:|
            vllm:gpu_cache_usage_perc > 0.90
          for:10m
          labels:
            severity:warning
          annotations:
            summary:"vLLM GPU KV Cache 使用率超过 90%"
            description:"KV Cache 使用率 {{ $value | humanizePercentage }},新请求可能排队"

        # vLLM 请求队列积压
        -alert:VllmQueueBacklog
          expr:|
            vllm:num_requests_waiting > 50
          for:5m
          labels:
            severity:warning
          annotations:
            summary:"vLLM 请求队列积压超过 50"
            description:"等待处理的请求数: {{ $value }}"

        # vLLM 推理延迟过高
        -alert:VllmHighLatency
          expr:|
            histogram_quantile(0.95,
              rate(vllm:e2e_request_latency_seconds_bucket[5m])
            ) > 30
          for:5m
          labels:
            severity:warning
          annotations:
            summary:"vLLM P95 推理延迟超过 30 秒"
Prometheus ServiceMonitor 配置(需要 Prometheus Operator):
# servicemonitor.yaml
apiVersion:monitoring.coreos.com/v1
kind:ServiceMonitor
metadata:
name:vllm-metrics
namespace:openclaw
labels:
    release:prometheus
spec:
selector:
    matchLabels:
      component:vllm
endpoints:
    -port:http
      path:/metrics
      interval:15s
5.3 备份与恢复
5.3.1 备份策略
需要备份的数据:
-
openclaw.json配置文件(ConfigMap 已版本化,但建议额外备份) -
Gateway 工作空间数据(PVC)
-
K8s 资源定义(YAML 文件)
-
Secret(Token、API Key)
#!/bin/bash
# backup-openclaw.sh - OpenClaw 备份脚本
# 建议通过 CronJob 每天执行一次

BACKUP_DIR="/backup/openclaw/$(date +%Y%m%d)"
NAMESPACE="openclaw"

mkdir -p "${BACKUP_DIR}"

# 1. 备份 ConfigMap
kubectl get configmap openclaw-config -n ${NAMESPACE} -o yaml > "${BACKUP_DIR}/configmap.yaml"

# 2. 备份 Secret(加密存储)
kubectl get secret openclaw-secrets -n ${NAMESPACE} -o yaml > "${BACKUP_DIR}/secret.yaml.enc"
# 生产环境用 age/sops 加密
# sops --encrypt "${BACKUP_DIR}/secret.yaml" > "${BACKUP_DIR}/secret.yaml.enc"

# 3. 备份所有 K8s 资源定义
kubectl get all,configmap,secret,pvc,ingress,networkpolicy -n ${NAMESPACE} -o yaml > "${BACKUP_DIR}/all-resources.yaml"

# 4. 备份 PVC 数据(需要 Velero 或手动快照)
# 云环境使用 VolumeSnapshot
kubectl apply -f - <<EOF
apiVersion: snapshot.storage.k8s.io/v1
kind: VolumeSnapshot
metadata:
  name: openclaw-data-snapshot-$(date +%Y%m%d)
  namespace: ${NAMESPACE}
spec:
  volumeSnapshotClassName: csi-snapclass
source:
    persistentVolumeClaimName: openclaw-data
EOF

echo"Backup completed: ${BACKUP_DIR}"
# 清理 30 天前的备份
find /backup/openclaw -maxdepth 1 -mtime +30 -type d -exec rm -rf {} \;
5.3.2 恢复流程
# 1. 停止现有服务
kubectl scale deployment openclaw-gateway -n openclaw --replicas=0

# 2. 恢复配置
kubectl apply -f /backup/openclaw/20260313/configmap.yaml
kubectl apply -f /backup/openclaw/20260313/secret.yaml

# 3. 恢复 PVC 数据(从 VolumeSnapshot)
kubectl apply -f - <<EOF
apiVersion: v1
kind: PersistentVolumeClaim
metadata:
  name: openclaw-data
  namespace: openclaw
spec:
  accessModes: [ReadWriteOnce]
  storageClassName: standard
  resources:
    requests:
      storage: 10Gi
  dataSource:
    name: openclaw-data-snapshot-20260313
    kind: VolumeSnapshot
    apiGroup: snapshot.storage.k8s.io
EOF

# 4. 重新启动服务
kubectl scale deployment openclaw-gateway -n openclaw --replicas=2

# 5. 验证恢复结果
kubectl wait --for=condition=ready pod -l component=gateway -n openclaw --timeout=120s
curl -s http://localhost:18789/healthz
六、总结
6.1 技术要点回顾
-
Docker 方案快速启动:
docker-setup.sh一键部署,适合开发测试。docker-compose.yml管理服务依赖和健康检查,比裸docker run更可控。核心配置就一个openclaw.json(JSON5 格式),改完重启即可。 -
K8s 方案生产就绪:Deployment + Service + Ingress 三件套,配合 ConfigMap/Secret 管理配置和敏感信息。initContainer 解决 ConfigMap 只读问题,securityContext 解决 uid 1000 权限问题。三种探针(startup/liveness/readiness)保证服务可靠性。
-
vLLM 推理后端:tensor-parallel 多卡并行,
/dev/shm共享内存必须挂载,initialDelaySeconds要给够(120s+)。gpu-memory-utilization=0.90是安全值,别贪心设 0.95。 -
多租户隔离:Namespace + NetworkPolicy + RBAC + ResourceQuota 四层隔离。NetworkPolicy 默认拒绝跨 Namespace 流量,RBAC 限制管理权限,ResourceQuota 防止资源争抢。每个部门独立 Token,独立 vLLM 实例。
-
安全加固:Token 定期轮换(建议 90 天),NetworkPolicy 最小权限,TLS 全链路加密。Secret 的 RBAC 权限严格控制,别给
get权限只给list。 -
监控告警:Gateway 关注 CPU、内存、连接数;vLLM 关注 GPU Cache 使用率、请求队列长度、生成速率。Prometheus + ServiceMonitor 采集指标,PrometheusRule 配置告警。
6.2 进阶学习方向
-
Service Mesh 集成:用 Istio 或 Linkerd 实现集群内部 mTLS、流量镜像、金丝雀发布。OpenClaw Gateway 的多副本可以利用 Istio 的加权路由实现灰度更新,新版本先承接 10% 流量,验证稳定后逐步扩大。
-
实践建议:先在测试环境部署 Istio,给 openclaw namespace 打上
istio-injection=enabled标签,观察 sidecar 注入后的性能影响。
-
-
GitOps 持续交付:用 ArgoCD 或 Flux 管理 OpenClaw 的 K8s 资源定义,配置变更通过 Git PR 审批,自动同步到集群。ConfigMap 变更自动触发 Deployment 滚动更新,告别手动
kubectl apply。-
实践建议:把 openclaw-all-in-one.yaml 拆分成独立文件放进 Git 仓库,ArgoCD Application 指向仓库路径,开启自动同步。
-
-
多集群联邦部署:使用 KubeFed 或 Karmada 实现跨集群部署,不同区域的用户请求路由到就近的 OpenClaw 实例。GPU 资源池跨集群调度,提升利用率。
-
实践建议:先实现两个集群的同配置部署,DNS 层做地域路由(AWS Route53 Geolocation / Cloudflare Load Balancing),再考虑联邦管理。
-
6.3 参考资料
-
OpenClaw 官方文档 - 项目源码和官方 Docker 部署指南
-
vLLM 官方文档 - vLLM 部署配置和性能调优参考
-
Kubernetes 官方文档 - NetworkPolicy - 网络策略配置详解
-
NVIDIA GPU Operator - K8s GPU 资源管理和驱动自动化
-
Qwen3.5 模型卡 - 模型规格、硬件需求和推理配置
附录
A. 命令速查表
# ========== Docker 方案 ==========
docker compose up -d                                  # 启动所有服务
docker compose down                                   # 停止所有服务
docker compose logs -f openclaw-gateway               # 查看 Gateway 日志
docker compose restart openclaw-gateway               # 重启 Gateway
docker compose ps                                     # 查看服务状态
docker compose exec openclaw-gateway /bin/bash        # 进入 Gateway 容器
curl -s http://localhost:18789/healthz                 # 健康检查
curl -s http://localhost:18789/readyz                  # 就绪检查

# ========== K8s 方案 ==========
kubectl apply -f openclaw-all-in-one.yaml              # 一键部署
kubectl get all -n openclaw                            # 查看所有资源
kubectl logs -f -l component=gateway -n openclaw       # 查看 Gateway 日志
kubectl logs -f -l component=vllm -n openclaw          # 查看 vLLM 日志
kubectl rollout restart deploy/openclaw-gateway -n openclaw  # 重启 Gateway
kubectl rollout status deploy/openclaw-gateway -n openclaw   # 查看滚动更新状态
kubectl port-forward svc/openclaw-gateway 18789:18789 -n openclaw  # 端口转发
kubectl top pod -n openclaw                            # 查看资源使用
kubectl describe pod <pod-name> -n openclaw            # 查看 Pod 详情
kubectl exec -it <pod-name> -n openclaw -- /bin/bash   # 进入容器

# ========== 调试命令 ==========
kubectl run debug-curl --rm -it --image=curlimages/curl -n openclaw -- sh  # 启动调试 Pod
kubectl get events -n openclaw --sort-by='.lastTimestamp'                   # 查看事件(按时间排序)
kubectl get pvc -n openclaw                            # 查看存储卷状态
kubectl get networkpolicy -n openclaw                  # 查看网络策略

# ========== Token 管理 ==========
openssl rand -hex 32                                   # 生成随机 Token
kubectl get secret openclaw-secrets -n openclaw -o jsonpath='{.data.gateway-token}' | base64 -d  # 查看当前 Token
B. 配置参数详解
openclaw.json 核心参数
|
参数路径 |
类型 |
默认值 |
说明 |
|---|---|---|---|
gateway.bind |
string |
"0.0.0.0:18789" |
网关监听地址,格式 |
gateway.auth.token |
string |
- |
Gateway 认证 Token,必填 |
gateway.rateLimit.maxRequestsPerMinute |
number |
600 |
全局每分钟最大请求数 |
gateway.rateLimit.maxRequestsPerMinutePerToken |
number |
60 |
单 Token 每分钟最大请求数 |
models.default |
string |
- |
默认模型,格式 |
models.providers.<name>.baseUrl |
string |
- |
推理后端 API 地址 |
models.providers.<name>.api |
string |
"openai-responses" |
API 兼容模式 |
models.providers.<name>.apiKey |
string |
- |
后端 API Key(自托管可不填) |
models.providers.<name>.models |
array |
[] |
该 Provider 支持的模型列表 |
logging.level |
string |
"info" |
日志级别:debug/info/warn/error |
logging.format |
string |
"json" |
日志格式:json/text |
vLLM 关键启动参数
|
参数 |
默认值 |
推荐值 |
说明 |
|---|---|---|---|
--model |
- |
- |
模型名称或路径,必填 |
--tensor-parallel-size |
1 |
按 GPU 数量设置 |
张量并行度,等于使用的 GPU 数量 |
--max-model-len |
模型默认值 |
32768 |
最大序列长度,影响 KV Cache 大小 |
--gpu-memory-utilization |
0.90 |
0.85-0.90 |
GPU 显存利用率上限 |
--block-size |
16 |
16 |
KV Cache 块大小(tokens/block) |
--max-num-seqs |
256 |
64-128 |
同时处理的最大序列数 |
--max-num-batched-tokens |
32768 |
32768 |
单批次最大 token 数 |
--swap-space |
4 |
8 |
CPU swap 空间大小(GiB) |
--dtype |
auto |
auto |
计算精度,FP8 模型用 auto 即可 |
--enable-chunked-prefill |
false |
true |
分块预填充,降低长 prompt 延迟 |
--trust-remote-code |
false |
true |
允许执行模型仓库的自定义代码 |
C. 术语表
|
术语 |
英文 |
解释 |
|---|---|---|
|
AI Agent Gateway |
AI Agent Gateway |
AI 代理网关,负责多渠道消息接入、认证、模型路由和协议转换 |
|
Provider |
Provider |
模型提供方,在 OpenClaw 中指一个推理后端配置(包含 baseUrl 和模型列表) |
|
KV Cache |
Key-Value Cache |
大模型推理过程中缓存的注意力机制键值对,占用 GPU 显存 |
|
Tensor Parallel |
Tensor Parallelism |
张量并行,将模型参数切分到多张 GPU 上并行计算 |
|
PagedAttention |
Paged Attention |
vLLM 的核心技术,将 KV Cache 按页管理,提升显存利用率 |
|
Continuous Batching |
Continuous Batching |
连续批处理,动态将新请求加入正在处理的批次,提升吞吐量 |
|
PDB |
Pod Disruption Budget |
Pod 中断预算,限制同时不可用的 Pod 数量 |
|
HPA |
Horizontal Pod Autoscaler |
水平 Pod 自动扩缩容器 |
|
NetworkPolicy |
Network Policy |
K8s 网络策略,控制 Pod 间的网络流量 |
|
RBAC |
Role-Based Access Control |
基于角色的访问控制 |
|
ConfigMap |
ConfigMap |
K8s 配置映射,存储非敏感配置数据 |
|
Secret |
Secret |
K8s 密钥对象,存储敏感数据(Token、密码等) |
|
JSON5 |
JSON5 |
JSON 的超集,支持注释、尾逗号、单引号等语法 |
D. 端口清单
|
服务 |
端口 |
协议 |
用途 |
暴露方式 |
|---|---|---|---|---|
|
OpenClaw Gateway |
18789 |
HTTP + WebSocket |
API 网关入口(认证、路由、协议转换) |
Ingress / NodePort 31789 |
|
vLLM Inference |
8000 |
HTTP |
OpenAI 兼容 API(推理服务) |
ClusterIP(仅集群内部) |
|
vLLM Metrics |
8000 |
HTTP |
Prometheus 指标端点(/metrics) |
ClusterIP(Prometheus 抓取) |
|
Prometheus |
9090 |
HTTP |
监控数据查询 |
按需暴露 |
|
Grafana |
3000 |
HTTP |
监控面板 |
按需暴露 |

小龙虾开发者社区是 CSDN 旗下专注 OpenClaw 生态的官方阵地,聚焦技能开发、插件实践与部署教程,为开发者提供可直接落地的方案、工具与交流平台,助力高效构建与落地 AI 应用
更多推荐

 72
72 0
0- 0


 已为社区贡献1条内容

所有评论(0)