MCP深入
Python包、Sampling、FastAPI-MCP、MCP Connectors、百度地图MCP Server、Bing MCP
概述
在MCP、MCPHub、A2A、AG-UI概述介绍过MCP相关概念。MCP生态还在持续发展中,故有此文。
Python包
安装pip install mcp,可用于快速搭建MCP服务器:from mcp.server import FastMCP。
使用参考下面的代码。
Sampling
MCP Sampling是MCP中的一种机制,允许MCP服务器通过客户端向LLM请求生成内容(即采样或补全)。也就是说,让服务器能够主动向客户端发起请求,要求调用语言模型完成某项任务,而不是像传统流程那样总是由客户端单向发起请求。
传统AI系统大多采用客户端发请求、服务器返回结果的单向模式,存在以下痛点:
- 服务器无法主动调用AI能力:服务器只能被动响应,无法在业务逻辑需要时动态调用模型;
- 缺乏人机协作和审查机制:很多场景下,AI的输出需要人工审核、修正,但传统模式难以实现;
- 模型选择和权限管理不灵活:服务器直接调用模型时,难以统一控制模型选择、成本、权限等;
- 缺乏可追溯、可审计的结构化流程:传统Prompt工程往往自由格式,难以实现结构化、可复用、可审计的AI调用。
MCP Sampling通过以下方式解决这些问题:
- 服务器发起请求:服务器可在业务流程中任何需要的地方,主动发起对模型的调用请求;
- 客户端统一管理模型访问:由客户端统一控制模型的选择、权限、调用频率等,服务器无需直接暴露API Key等敏感信息;
- 支持人机协作:在模型请求发送前和返回后,都可以引入人工审核、编辑、拒绝等环节,实现人在环路(human-in-the-loop);
- 结构化、可审计:每个采样请求都遵循标准化的协议格式,便于追踪、审计和版本管理。
技术特点
- 多模态支持:文本、图像、音频等;
- 灵活的模型选择机制:服务器可以表达对模型性能、成本、速度的偏好,由客户端最终选择合适模型;
- 安全与隐私:服务器无需直接暴露模型API,所有调用由客户端统一控制;
- 标准化协议:请求和响应都遵循JSON-RPC格式,便于集成和扩展。
流程
- 服务器发起请求:当服务器需要AI辅助决策或生成内容时,向客户端发送sampling/createMessage请求;
- 客户端中介处理:客户端(如UI、自动调度系统、审核界面等)接收到请求,可选择先展示给人工审核,编辑后再发送给LLM,生成内容;
- 客户端审查生成结果:客户端可再次审核、编辑,再决定是否返回给服务器;
- 服务器继续后续逻辑:服务器收到审核后的结果,继续执行业务逻辑,如决策、存储、路由等。
核心是将模型的控制权保留在客户端(用户端),而不是由远程服务器直接调用模型。
应用场景
- 智能客服工单分类:服务器收到工单后,请求模型帮助判断分类,人工审核后再路由到对应团队。
- 数据提取与清洗:从非结构化文本中提取结构化数据,人工审核后入库。
- 决策支持:在业务流程中遇到模糊或复杂决策点时,服务器请求模型给出建议,人工确认后再继续。
- 表单自动补全:根据已有信息,调用模型生成表单缺失字段,人工审核后完成。
- 高精度内容生成:如医疗等高要求领域,内容必须经过人工审核。
示例
sampling_server.py如下:
from mcp.server import FastMCP
from mcp.types import SamplingMessage, TextContent

app = FastMCP('sampling-server')

@app.tool()
async def delete_file(file_path: str):
    """
    模拟删除文件,但需要用户确认
    """
    # 发起Sampling请求,等待用户确认
    result = await app.get_context().session.create_message(
        messages=[
            SamplingMessage(
                role='user',
                content=TextContent(
                    type='text',
                    text=f'是否要删除文件: {file_path} (Y/N)?'
                )
            )
        ],
        max_tokens=10
    )
    if result.content.text.strip().upper() == 'Y':
    	// TODO
        return f'文件 {file_path} 已被删除!'
    else:
        return f'取消删除文件 {file_path}。'

if __name__ == '__main__':
    app.run(transport='stdio')
解读:
- FastMCP:用于快速搭建MCP服务器;
@app.tool():定义工具,模拟删除文件;create_message:发起采样请求,参数包括消息列表和最大token数;- SamplingMessage:构造采样消息,包含角色和内容;
result.content[0].text:获取客户端回调返回的用户输入。
sampling_client.py如下:
import asyncio
from mcp.client.stdio import stdio_client
from mcp import ClientSession, StdioServerParameters
from mcp.shared.context import RequestContext
from mcp.types import (
    TextContent,
    CreateMessageRequestParams,
    CreateMessageResult,
)

server_params = StdioServerParameters(
    command='uv',
    args=['run', 'sampling_server.py'],
)

async def sampling_callback(
    context: RequestContext[ClientSession, None],
    params: CreateMessageRequestParams,
):
    """
    采样回调函数:显示服务器消息,获取用户输入,并返回给服务器。
    """
    # 显示服务器发来的消息
    user_input = input(params.messages[0].content.text + " ")
    # 返回用户输入
    return CreateMessageResult(
        role='user',
        content=TextContent(
            type='text',
            text=user_input.strip().upper() or 'N'
        ),
        model='user-input',
        stopReason='endTurn'
    )

async def main():
    async with stdio_client(server_params) as (stdio, write):
        async with ClientSession(
            stdio, write,
            sampling_callback=sampling_callback
        ) as session:
            await session.initialize()
            # 调用服务器delete_file工具
            res = await session.call_tool(
                'delete_file',
                {'file_path': 'C:\\DumpStack.log'}
            )
            print("最终结果:", res.content)

if __name__ == '__main__':
    asyncio.run(main())
解读:
stdio_client:通过标准输入输出与服务器通信;- ClientSession:建立会话,并注册
sampling_callback; sampling_callback:核心回调,接收服务器消息,获取用户输入,返回结果;- CreateMessageResult:构造返回结果,包含用户输入的内容。
终端执行pip install mcp,再执行python sampling_server.py。再打开一个终端,执行python sampling_client.py:
如果希望采样时调用LLM,只需修改客户端的sampling_callback:
import openai

async def sampling_callback(context, params):
    user_prompt = params.messages[0].content.text
    response = openai.chat.completions.create(
        model="gpt-4",
        messages=[{"role": "user", "content": user_prompt}],
        max_tokens=10
    )
    model_reply = response.choices[0].message.content
    return CreateMessageResult(
        role='assistant',
        content=TextContent(type='text', text=model_reply),
        model='gpt-4',
        stopReason='endTurn'
    )
最佳实践:
- 设置合理的令牌限制:通过
max_tokens参数控制生成长度,避免资源浪费或截断风险。
FastAPI-MCP
GitHub
可实现零配置自动将FastAPI端点作为MCP工具公开,极大简化API的接入和管理。
优势
- 零配置开箱即用:通过几行代码即可将现有FastAPI路由暴露为标准MCP工具,极大缩短开发周期;
- 灵活路由隔离:支持多组MCP工具挂载在不同路径,便于按业务线、角色或权限隔离管理,满足多样化需求;
- 自动化文档与Schema支持:结合Pydantic能力,可自动生成响应/入参描述,提升工具的可发现性和可维护性;
- 易于扩展与集成:适用于内部辅助、知识库问答、流程自动化等一系列智能应用场景,助力快速将传统后端服务能力赋能LLM智能生态;
- 高效协同:多人团队协作时,前端/智能体/业务方无需关心底层接口细节,无缝实现智能助手对后端服务的能力调用。
安装:pip install uvicorn fastapi-mcp
示例:
from fastapi import FastAPI
from fastapi_mcp import FastApiMCP
import uvicorn

app = FastAPI()
@app.get("/text", operation_id="text")
async def hello():
	return "Hello"

mcp = FastApiMCP(
    app, name="测试MCP",
    description="测试",
)
mcp.mount(mount_path='/test-mcp')
if __name__ == '__main__':
	uvicorn.run(app, host="0.0.0.0", port=8000)
通过路由区分多个MCP工具:FastAPI-MCP支持一个FastAPI应用公开多个MCP接口,每个接口根据不同业务场景和权限独立管理。
MCP Connectors
Anthropic推出MCP Connectors,使开发者可通过Messages API直接连接远程MCP服务器,而无需单独部署MCP客户端,极大简化MCP工具集成的流程,提升开发效率。
功能:
- API级集成:无需实现独立MCP客户端,通过Messages API即可连接远程MCP服务器;
- 工具调用支持:支持直接通过API调用MCP工具,扩展智能应用能力;
- OAuth鉴权:支持使用OAuth Bearer Token连接需要认证的服务器;
- 多服务器连接:通过在mcp_servers数组中配置多个对象,可在同一请求中连接多个MCP服务器。
限制:
- 仅支持Tool Calls,MCP规范中的其他功能暂未支持;
- 仅支持通过HTTP公网暴露的MCP服务器,不支持本地STDIO模式;
- 暂不支持Amazon Bedrock和Google Vertex平台。
百度地图MCP Server
Map Computing Platform Server,百度地图面向开发者推出的位置服务计算平台,目的是通过标准化接口和开放能力,将海量数据(如POI、路况、卫星影像)转化为可集成可定制的开发资源。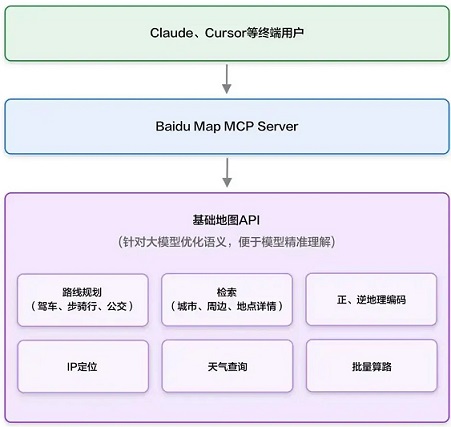
功能:
- 数据接入:支持uvx、pip等协议快速接入百度地图API;
- uvx:轻量化协议,降低设备端资源消耗,适用于IoT、车载终端等低功耗场景;
- pip:允许开发者通过流水线模式串联多个API,实现复杂业务逻辑的快速组装,如查询POI→计算路径→生成导航指令。
- 计算服务:提供路径规划、区域热力分析、地理围栏等算法能力;
- 可视化工具:集成地图渲染引擎,支持动态数据可视化展示。
| 服务 | 简介 | EP | 输入 | 输出 |
|---|---|---|---|---|
| 地理编码 | 将地址解析为对应的位置坐标 | geocoder_v2 | address | location |
| 逆地理编码 | 将坐标点转换为对应语义化地址 | reverse_geocoding_v3 | location | formatted_address,uid,addressComponent |
| 地点检索 | 多种场景的地点(POI)检索,包括城市检索、圆形区域检索 | place_v2_search | query:检索关键词 location:圆形检索的中心点 radius:圆形检索的半径 region:城市检索指定城市 |
POI列表,包含name,location,address等 |
| 地点详情检索 | 根据POI的uid,检索POI详情信息 | place_v2_detail | uid | POI详情,包含name,location,address,brand,price等 |
| 批量算路 | 根据起点和终点坐标,计算所有起终点组合间的路线距离和行驶时间 | routematrix_v2_driving | origins:起点经纬度列表 destinations:终点经纬度列表 mode:出行类型,可选取值包括driving、walking、riding、transit,默认使用driving |
每条路线的耗时和距离,包含distance,duration等 |
| 路线规划 | 根据起终点坐标规划出行路线和耗时,可指定驾车、步行、骑行、公交等出行方式 | directionlite_v1 | 同上 | 路线详情,包含steps,distance,duration等 |
| 天气查询 | 根据行政区划编码查询天气 | weather_v1 | district_id:行政区划编码 | 天气信息,包含temperature,weather,wind等 |
| IP定位 | 根据请求的IP获取当前请求的位置(定位到城市),如果使用的是IPv6需要申请高级权限 | location_ip | 无 | 当前所在城市和城市中点location |
实战
uv add "mcp[cli]"
# 验证mcp是否安装成功
uv run mcp
uv init baidu_map_mcp_server
uv run --with mcp[cli] mcp run baidu_map_mcp_server/map.py
添加MCP Server的JSON配置:
{
	"mcpServers": {
		"baidu-map": {
			"command": "uv",
			"args": [
				"run",
				"--with",
				"mcp[cli]",
				"mcp",
				"run",
				"baidu_map_mcp_server/map.py"
			],
			"env": {
			    "BAIDU_MAPS_API_KEY": "{AK}"
			}
		}
	}
}
或npx方式:
{
	"mcpServers": {
		"baidu-map": {
			"command": "npx",
			"args": [
				"-y",
				"@baidumap/mcp-server-baidu-map"
			],
			"env": {
				"BAIDU_MAP_API_KEY": "xxx"
			}
		}
	}
}
测试脚本:
import os
import asyncio
import appbuilder
from appbuilder.core.console.appbuilder_client.async_event_handler import AsyncAppBuilderEventHandler
from appbuilder.modelcontextprotocol.client import MCPClient

class MyEventHandler(AsyncAppBuilderEventHandler):
    def __init__(self, mcp_client):
        super().__init__()
        self.mcp_client = mcp_client
    def get_current_weather(self, location=None, unit="摄氏度"):
        return "{} 的温度是 {} {}".format(location, 20, unit)
    async def interrupt(self, run_context, run_response):
        thought = run_context.current_thought
        # 绿色打印
        print("\033[1;31m", "-> Agent 中间思考: ", thought, "\033[0m")
        tool_output = []
        for tool_call in run_context.current_tool_calls:
            tool_res = ""
            if tool_call.function.name == "get_current_weather":
                tool_res = self.get_current_weather(**tool_call.function.arguments)
            else:
                print(
                    "\033[1;32m",
                    "MCP工具名称: {}, MCP参数:{}\n".format(tool_call.function.name, tool_call.function.arguments),
                    "\033[0m",
                )
                mcp_server_result = await self.mcp_client.call_tool(
                    tool_call.function.name, tool_call.function.arguments
                )
                print("\033[1;33m", "MCP结果: {}\n\033[0m".format(mcp_server_result))
                for i, content in enumerate(mcp_server_result.content):
                    if content.type == "text":
                        tool_res += mcp_server_result.content[i].text
            tool_output.append(
                {
                    "tool_call_id": tool_call.id,
                    "output": tool_res,
                }
            )
        return tool_output
    async def success(self, run_context, run_response):
        print("\n\033[1;34m", "-> Agent 非流式回答: ", run_response.answer, "\033[0m")
async def agent_run(client, mcp_client, query):
    tools = mcp_client.tools
    conversation_id = await client.create_conversation()
    with await client.run_with_handler(
        conversation_id=conversation_id,
        query=query,
        tools=tools,
        event_handler=MyEventHandler(mcp_client),
    ) as run:
        await run.until_done()

os.environ["APPBUILDER_TOKEN"] = ("")
async def main():
    appbuilder.logger.setLoglevel("DEBUG")
    ### 发布的应用ID
    app_id = ""
    appbuilder_client = appbuilder.AsyncAppBuilderClient(app_id)
    mcp_client = MCPClient()
    ### 注意这里的路径为MCP Server文件在本地的相对路径
    await mcp_client.connect_to_server("./<YOUR_FILE_PATH>/map.py")
    print(mcp_client.tools)
    await agent_run(
        appbuilder_client,
        mcp_client,
        '开车导航从北京到上海',
    )
    await appbuilder_client.http_client.session.close()
if __name__ == "__main__":
    loop = asyncio.get_event_loop()
    loop.run_until_complete(main())
Bing MCP
非官方开源,无需API密钥,支持返回搜索结果列表,可获取特定网页内容。
安装:
- 全局安装:
npm install -g bing-cn-mcp - 通过npx安装:
npx bing-cn-mcp
启动:bing-cn-mcp或npx bing-cn-mcp
在支持MCP的环境(如Cursor、Claude)中,配置MCP服务器来使用:
{
  "mcpServers": {
    "bingcn": {
      "command": "npx",
      "args": [
        "bing-cn-mcp"
      ]
    }
  }
}
或
{
  "mcpServers": {
    "bingcnmcp": {
        "command": "cmd",
        "args": [
          "/c",
          "npx",
          "bing-cn-mcp"
      ]
    }
  }
}
提供工具:
bing_search:搜索必应并获取结果列表,参数:- query:搜索关键词
num_results:返回结果数量,默认5
fetch_webpage:根据搜索结果ID获取对应网页的内容,参数:result_id:bing_search返回的结果ID
参考

为武汉地区的开发者提供学习、交流和合作的平台。社区聚集了众多技术爱好者和专业人士,涵盖了多个领域,包括人工智能、大数据、云计算、区块链等。社区定期举办技术分享、培训和活动,为开发者提供更多的学习和交流机会。
更多推荐
 8
8 0
0- 0


 已为社区贡献4条内容

所有评论(0)