vue和java后端
There are so many ways we can build Vue apps and ship for production. One way is to build Vue with NodeJS or Java and another way is to build the Vue and serve that static content with the NGINX web server. With Java we have to deal with the server code as well, for example, you need to load the index.html page with java.
我们可以通过多种方式来构建Vue应用并交付生产。 一种方法是使用NodeJS或Java构建Vue,另一种方法是构建Vue并使用NGINX Web服务器提供该静态内容。 使用Java,我们还必须处理服务器代码,例如,您需要使用Java加载index.html页面。
In this post, we will see the details and implementation with Java. We will go through step by step with an example.
在本文中,我们将看到Java的详细信息和实现。 我们将逐步举例。
Introduction
介绍
Prerequisites
先决条件
Example Project
示例项目
How To Build and Develop The Project
如何构建和开发项目
How To Build For Production
如何进行生产
Summary
概要
Conclusion
结论
介绍(Introduction)
Vue.js is a javascript library for building web apps and it doesn’t load itself in the browser. We need some kind of mechanism that loads the index.html (single page) of Vue with all the dependencies(CSS and js files) in the browser. In this case, we are using java as the webserver which loads Vue assets and accepts any API calls from the Vue.js app.
Vue.js是一个用于构建Web应用程序JavaScript库,它不会在浏览器中加载自身。 我们需要某种机制来加载Vue的index.html(单页)以及浏览器中的所有依赖项(CSS和js文件)。 在这种情况下,我们使用Java作为网络服务器,该网络服务器加载Vue资产并接受来自Vue.js应用程序的所有API调用。
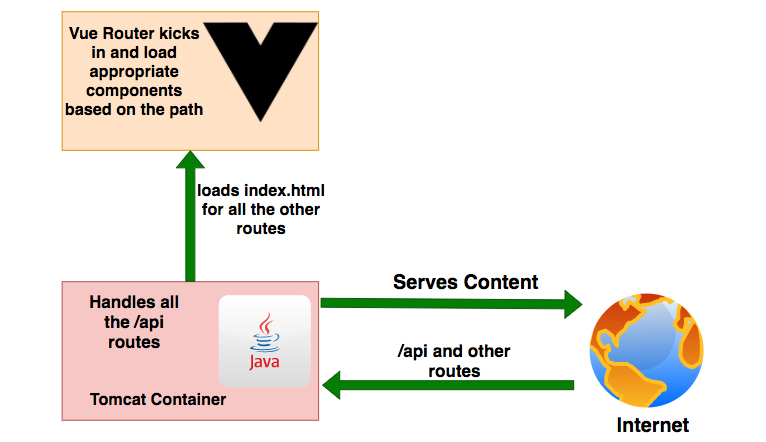
If you look at the above diagram all the web requests without the /api will go to the Vue router. All the paths that contain /api will be handled by the Apache Tomcat container.
如果您看上图,所有不带/ api的Web请求都将转到Vue路由器。 包含/ api的所有路径都将由Apache Tomcat容器处理。
先决条件 (Prerequisites)
There are some prerequisites for this article. You need to have Java installed on your laptop and know-how Http works. If you want to practice and run this on your laptop you need to have these on your machine.
本文有一些先决条件。 您需要在笔记本电脑上安装Java,并且知道Http的工作原理。 如果要在笔记本电脑上练习并运行此程序,则需要在计算机上安装它们。
示例项目(Example Project)
This is a simple project which demonstrates developing and running Vue application with Java. We have a simple app in which we can add users, count, and display them at the side, and retrieve them whenever you want.
这是一个简单的项目,演示了如何使用Java开发和运行Vue应用程序。 我们有一个简单的应用程序,可以在其中添加用户,计数并在侧面显示它们,并在需要时检索它们。
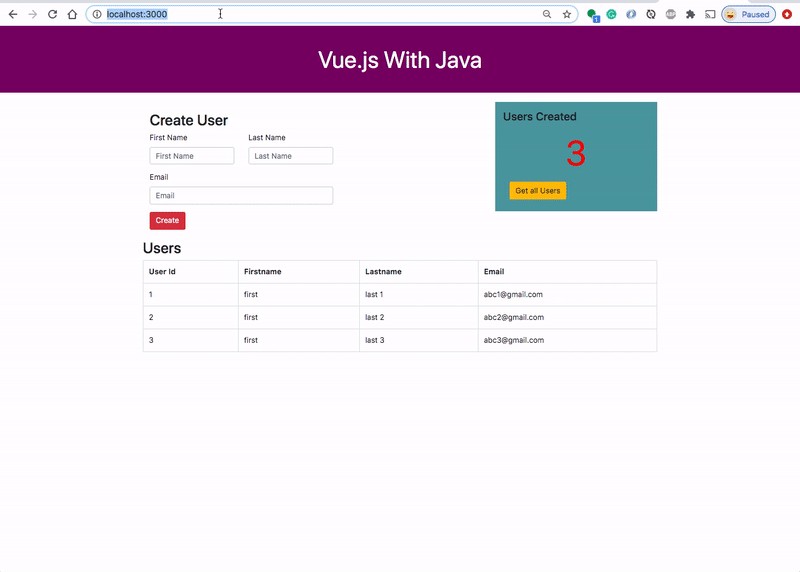
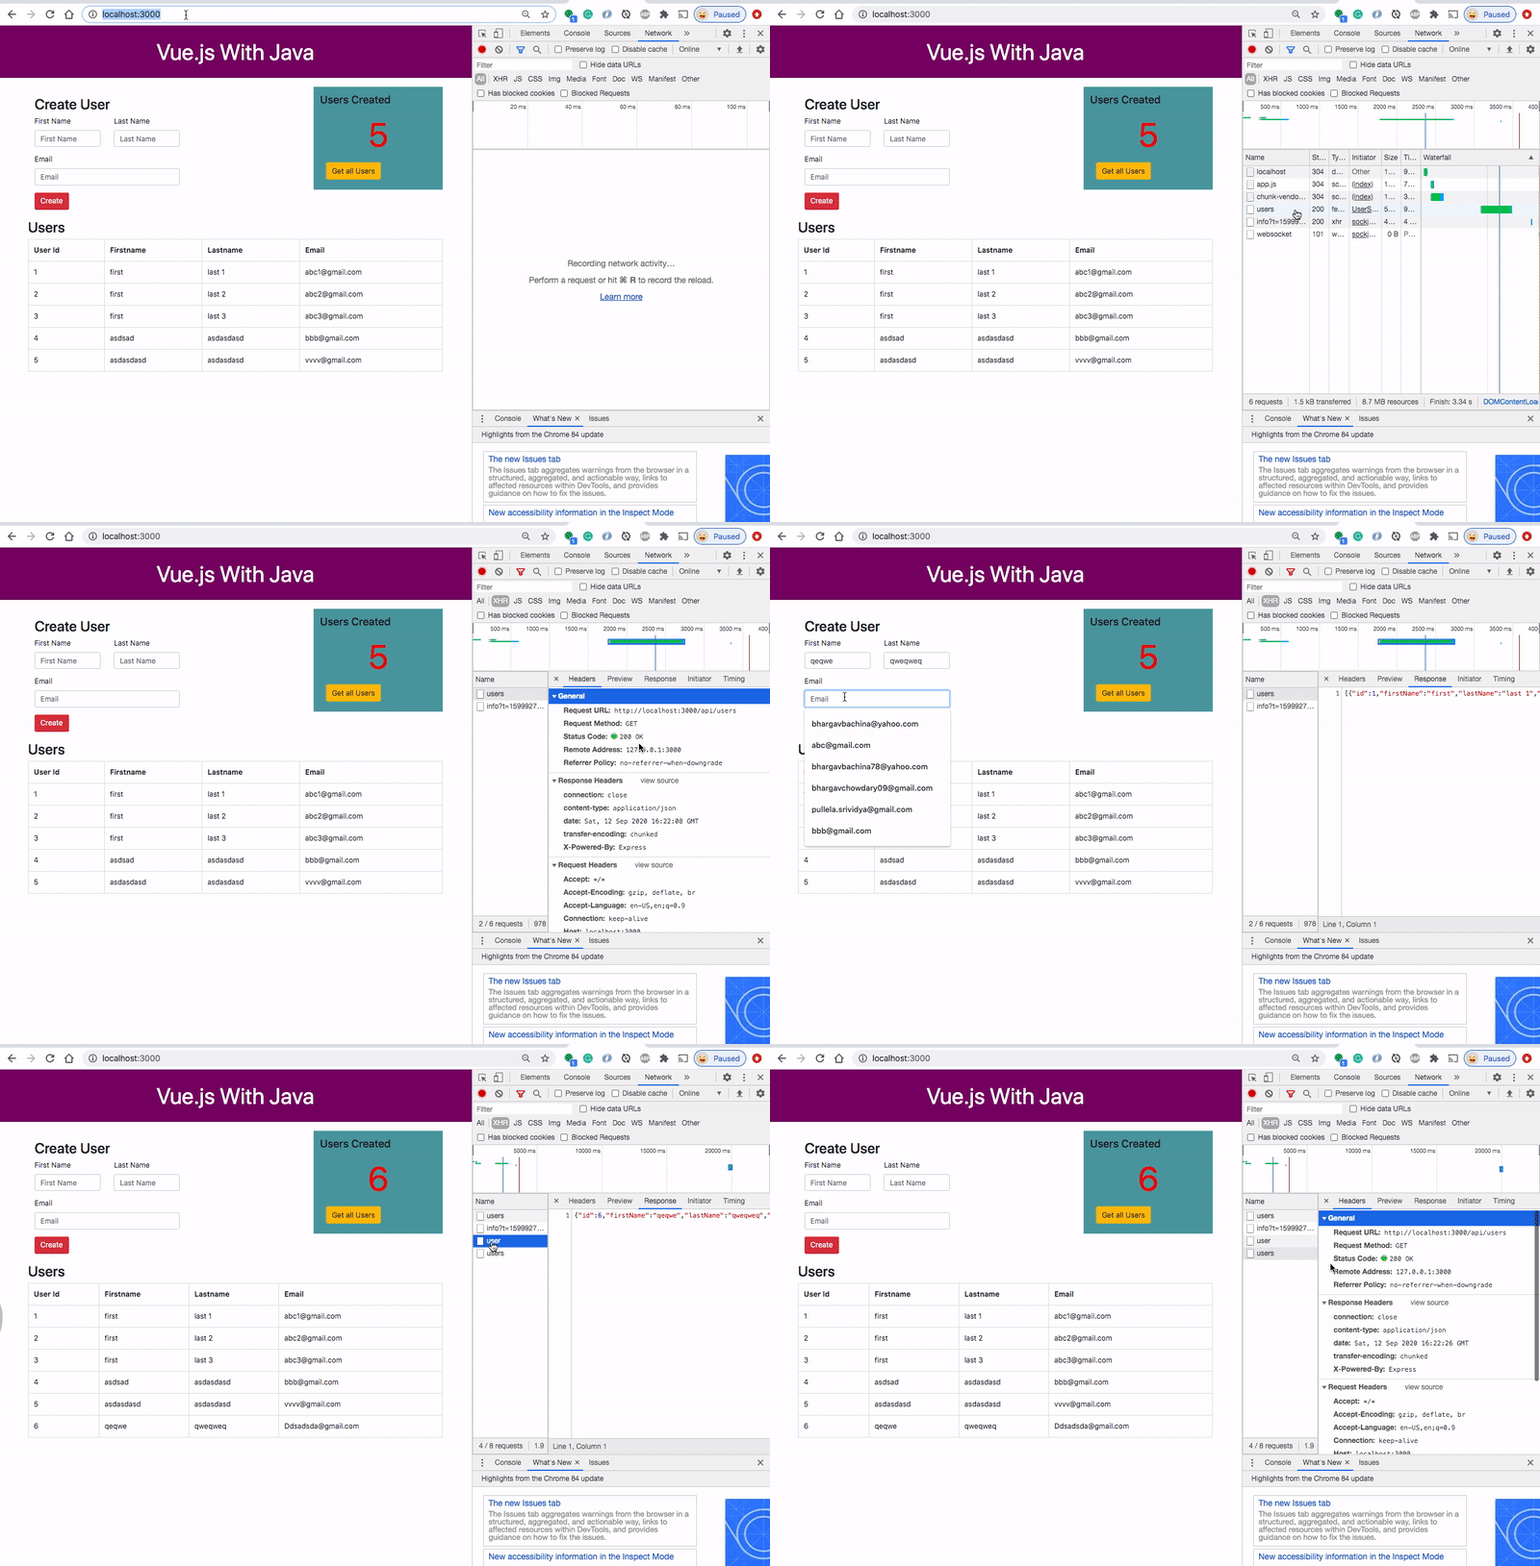
As you add users we are making an API call to the Java server to store them and get the same data from the server when we retrieve them. You can see network calls in the following video.
当您添加用户时,我们正在对Java服务器进行API调用以存储它们,并在我们检索用户时从服务器获取相同的数据。 您可以在以下视频中看到网络通话。
Here is a Github link to this project. You can clone it and run it on your machine.
这是该项目的Github链接。 您可以克隆它并在计算机上运行它。
// clone the project
git clone https://github.com/bbachi/vuejs-java-example.git// Run Vue on port 3000
cd /src/main/ui
npm install
npm run serve// Run Java Code on 8080
mvn clean install
java -jar target/users-0.0.1-SNAPSHOT.jar
如何构建和开发项目 (How To Build and Develop The Project)
Usually, the way you develop and the way you build and run in production are completely different. Thatswhy, I would like to define two phases: The development phase and the Production phase.
通常,您的开发方式以及在生产中构建和运行的方式是完全不同的。 因此,我想定义两个阶段:开发阶段和生产阶段。
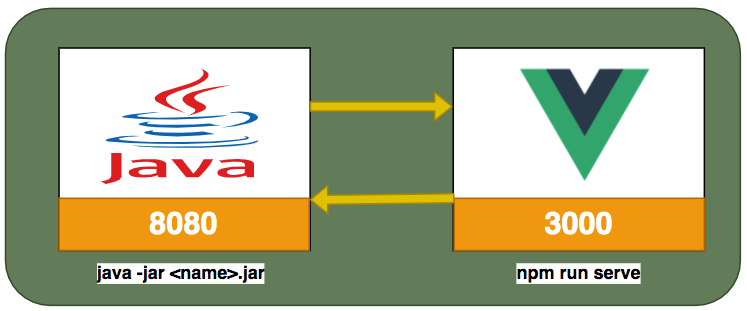
In the development phase, we run the java server and the Vue app on completely different ports. It’s easier and faster to develop that way. If you look at the following diagram the Vue app is running on port 3000 with the help of a Vue CLI Service and the java server is running on port 8080.
在开发阶段,我们在完全不同的端口上运行Java服务器和Vue应用程序。 这样开发起来更容易,更快捷。 如果您看下图,借助于Vue CLI服务,Vue应用程序在端口3 000上运行,而Java服务器在端口8080上运行。
项目结构(Project Structure)
Let’s understand the project structure for this project. We need to have two completely different folders for java and Vue. It’s always best practice to have completely different folders for each one. In this way, you will have a clean architecture or any other problems regarding merging any files.
让我们了解该项目的项目结构。 我们需要为Java和Vue创建两个完全不同的文件夹。 最好的做法是每个文件夹都有完全不同的文件夹。 这样,您将拥有干净的体系结构或有关合并任何文件的任何其他问题。
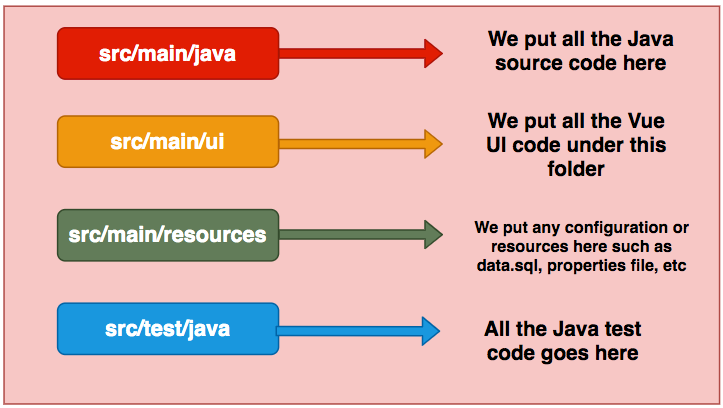
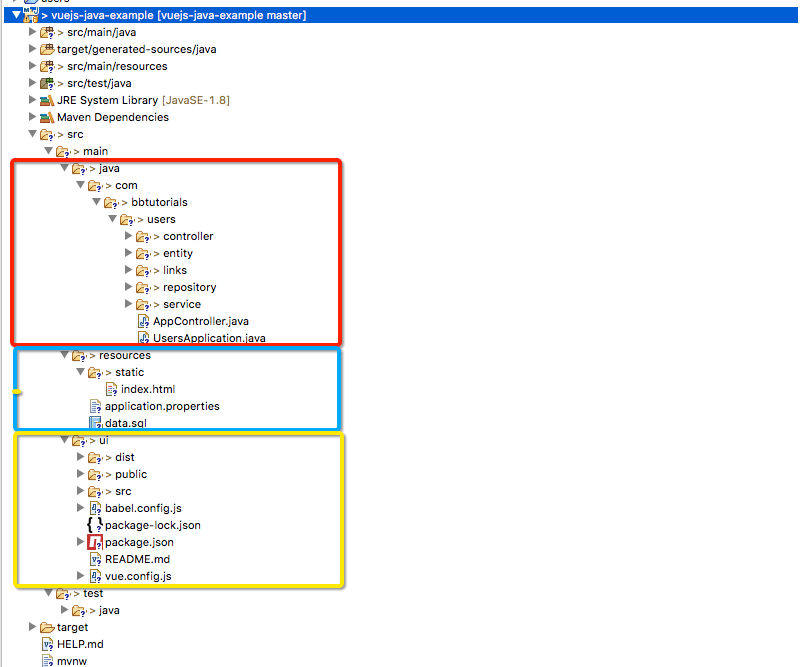
If you look at the above project structure, all the Vue app resides under the src/main/ui folder and Java code resides under the src/main/java folder. All the resources are under the folder /src/main/resources such as properties, static assets, etc
如果您查看上述项目结构,则所有Vue应用程序都位于src / main / ui文件夹下,而Java代码则位于src / main / java文件夹下。 所有资源都在文件夹/ src / main / resources下,例如属性,静态资产等。
Java API (Java API)
We use spring boot and a lot of other tools such as Spring Devtools, Spring Actuator, etc under the spring umbrella. Nowadays almost every application has spring boot and it is an open-source Java-based framework used to create a micro Service. It is developed by the Pivotal Team and is used to build stand-alone and production-ready spring applications.
我们在弹簧保护伞下使用弹簧靴和许多其他工具,例如Spring Devtools,Spring Actuator等。 如今,几乎每个应用程序都具有Spring启动功能,它是用于创建微服务的基于Java的开源框架。 它是由Pivotal团队开发的,用于构建独立的,可立即投入生产的弹簧应用程序。
We start with Spring's initializer and select all the dependencies and generate the zip file.
我们从Spring的初始化程序开始,选择所有依赖项并生成zip文件。
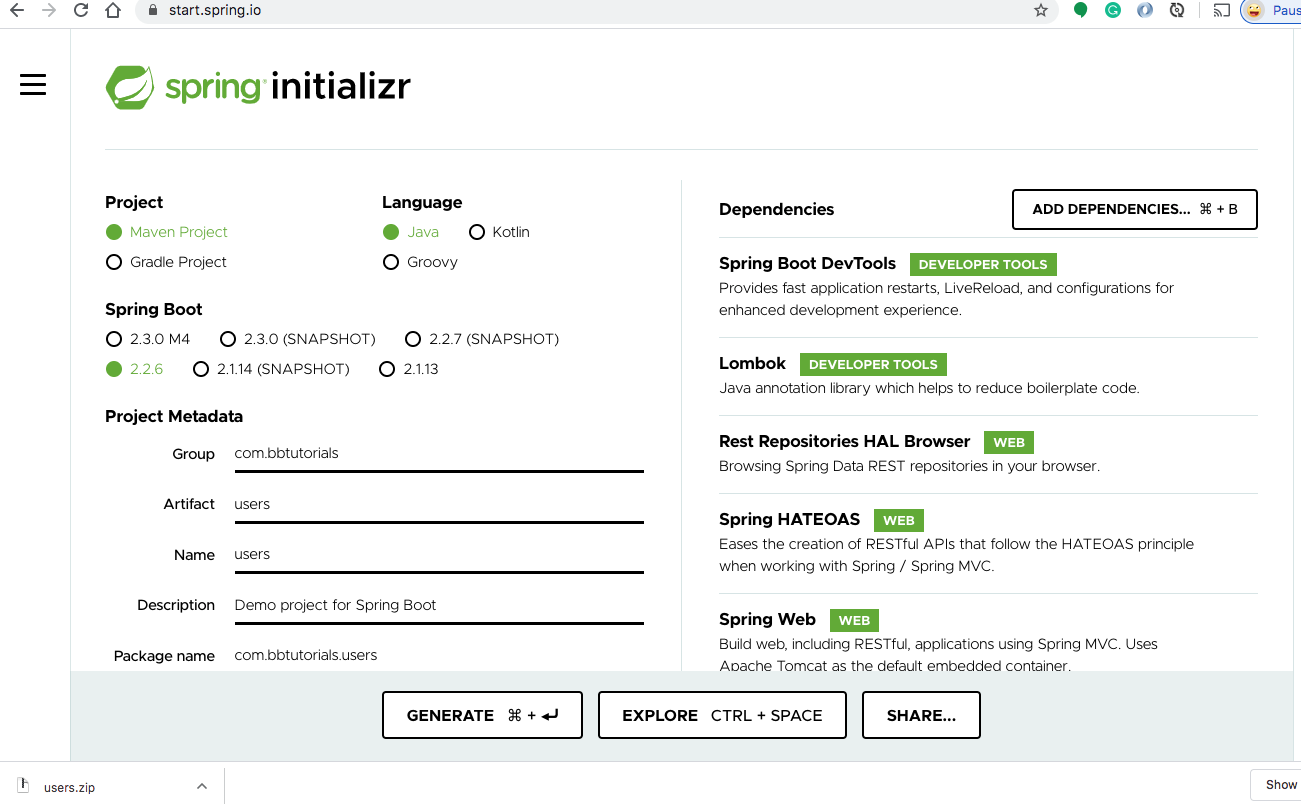
Once you import the zip file in the eclipse or any other IDE as a Maven project you can see all the dependencies in the pom.xml. Below is the dependencies section of pom.xml.
将zip文件作为Maven项目导入eclipse或其他任何IDE中后,您可以在pom.xml中看到所有依赖项。 以下是pom.xml的“依赖项”部分。
<?xml version="1.0" encoding="UTF-8"?>
<project xmlns="http://maven.apache.org/POM/4.0.0" xmlns:xsi="http://www.w3.org/2001/XMLSchema-instance"
	xsi:schemaLocation="http://maven.apache.org/POM/4.0.0 https://maven.apache.org/xsd/maven-4.0.0.xsd">
	<modelVersion>4.0.0</modelVersion>
	<parent>
		<groupId>org.springframework.boot</groupId>
		<artifactId>spring-boot-starter-parent</artifactId>
		<version>2.2.6.RELEASE</version>
		<relativePath/> <!-- lookup parent from repository -->
	</parent>
	<groupId>com.bbtutorials</groupId>
	<artifactId>users</artifactId>
	<version>0.0.1-SNAPSHOT</version>
	<name>users</name>
	<description>Demo project for Spring Boot</description>


	<properties>
		<java.version>1.8</java.version>
	</properties>


	<dependencies>
		<dependency>
			<groupId>org.springframework.boot</groupId>
			<artifactId>spring-boot-starter-actuator</artifactId>
		</dependency>
		<dependency>
			<groupId>org.springframework.boot</groupId>
			<artifactId>spring-boot-starter-data-jpa</artifactId>
		</dependency>
		<dependency>
			<groupId>com.h2database</groupId>
			<artifactId>h2</artifactId>
			<scope>runtime</scope>
			<version>1.4.199</version>
		</dependency>
		<dependency>
			<groupId>org.springframework.boot</groupId>
			<artifactId>spring-boot-starter-data-rest</artifactId>
		</dependency>
		<dependency>
			<groupId>org.springframework.boot</groupId>
			<artifactId>spring-boot-starter-hateoas</artifactId>
		</dependency>
		<dependency>
			<groupId>org.springframework.boot</groupId>
			<artifactId>spring-boot-starter-web</artifactId>
		</dependency>
		<dependency>
			<groupId>org.springframework.data</groupId>
			<artifactId>spring-data-rest-hal-browser</artifactId>
		</dependency>
		<!-- QueryDSL -->
		<dependency>
			<groupId>com.querydsl</groupId>
			<artifactId>querydsl-apt</artifactId>
		</dependency>
		<dependency>
			<groupId>com.querydsl</groupId>
			<artifactId>querydsl-jpa</artifactId>
		</dependency>


		<dependency>
			<groupId>com.h2database</groupId>
			<artifactId>h2</artifactId>
			<scope>runtime</scope>
		</dependency>


		<dependency>
			<groupId>org.springframework.boot</groupId>
			<artifactId>spring-boot-devtools</artifactId>
			<scope>runtime</scope>
			<optional>true</optional>
		</dependency>
		<dependency>
			<groupId>org.projectlombok</groupId>
			<artifactId>lombok</artifactId>
			<optional>true</optional>
		</dependency>
		<dependency>
			<groupId>org.springframework.boot</groupId>
			<artifactId>spring-boot-starter-test</artifactId>
			<scope>test</scope>
			<exclusions>
				<exclusion>
					<groupId>org.junit.vintage</groupId>
					<artifactId>junit-vintage-engine</artifactId>
				</exclusion>
			</exclusions>
		</dependency>
	</dependencies>


	<build>
		<plugins>
			<plugin>
				<groupId>org.springframework.boot</groupId>
				<artifactId>spring-boot-maven-plugin</artifactId>
			</plugin>
			<plugin>
				<groupId>com.mysema.maven</groupId>
				<artifactId>apt-maven-plugin</artifactId>
				<version>1.1.3</version>
				<executions>
					<execution>
						<goals>
							<goal>process</goal>
						</goals>
						<configuration>
							<outputDirectory>target/generated-sources/java</outputDirectory>
							<processor>com.querydsl.apt.jpa.JPAAnnotationProcessor</processor>
						</configuration>
					</execution>
				</executions>
			</plugin>
		</plugins>
	</build>


</project>
Here are the spring boot file and the controller with two routes one with a GET request and another is a POST request.
这是spring引导文件和具有两条路由的控制器,一条带有GET请求,另一条是POST请求。
package com.bbtutorials.users;


import org.springframework.boot.SpringApplication;
import org.springframework.boot.autoconfigure.SpringBootApplication;


@SpringBootApplication
public class UsersApplication {


	public static void main(String[] args) {
		SpringApplication.run(UsersApplication.class, args);
	}


}配置H2数据库(Configure H2 Database)
This H2 Database is for development only. When you build this project for production you can replace it with any database of your choice. You can run this database standalone without your application. We will see how we can configure with spring boot.
该H2数据库仅用于开发。 当您构建此项目进行生产时,可以将其替换为您选择的任何数据库。 您可以在没有应用程序的情况下独立运行此数据库。 我们将看到如何使用Spring Boot进行配置。
First, we need to add some properties to the application.properties file under /src/main/resources
首先,我们需要在/ src / main / resources下的application.properties文件中添加一些属性
spring.datasource.url=jdbc:h2:mem:testdb
spring.datasource.driverClassName=org.h2.Driver
spring.datasource.username=sa
spring.datasource.password=password
spring.jpa.database-platform=org.hibernate.dialect.H2Dialect
spring.h2.console.enabled=true
Second, add the below SQL file under the same location.
其次,将以下SQL文件添加到同一位置。
DROP TABLE IF EXISTS users;


CREATE TABLE users (
  id INT PRIMARY KEY,
  FIRST_NAME VARCHAR(250) NOT NULL,
  LAST_NAME VARCHAR(250) NOT NULL,
  EMAIL VARCHAR(250) NOT NULL
);


INSERT INTO users (ID, FIRST_NAME, LAST_NAME, EMAIL) VALUES
  (1, 'first', 'last 1', 'abc1@gmail.com'),
  (2, 'first', 'last 2', 'abc2@gmail.com'),
  (3, 'first', 'last 3', 'abc3@gmail.com');
Third, start the application, and spring boot creates this table on startup. Once the application is started you can go to this URL http://localhost:8080/h2-console and access the database on the web browser. Make sure you have the same JDBC URL, username, and password as in the properties file.
第三,启动应用程序,然后Spring Boot在启动时创建该表。 启动应用程序后,您可以转到此URL http:// localhost:8080 / h2-console并在Web浏览器上访问数据库。 确保您具有与属性文件中相同的JDBC URL,用户名和密码。
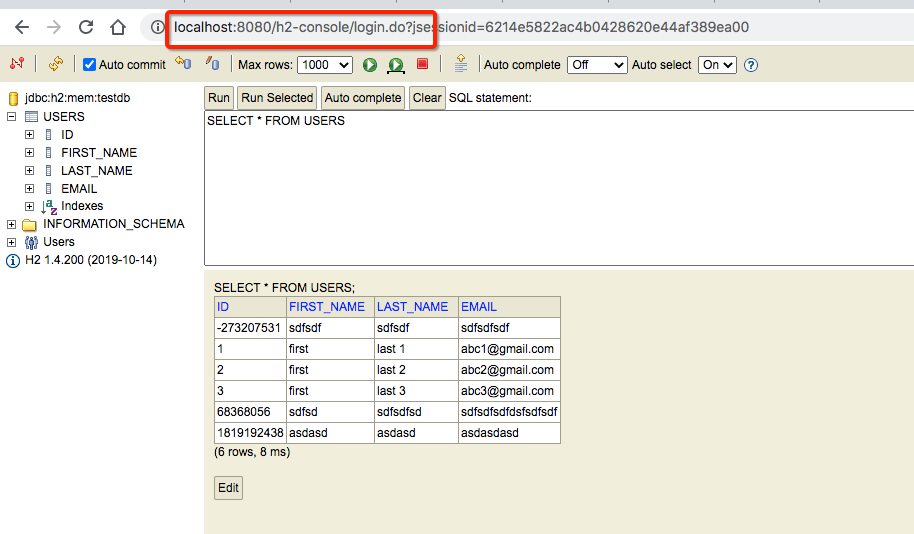
Let’s add the repository files, service files, and entity classes as below and start the spring boot app.
让我们如下添加存储库文件,服务文件和实体类,然后启动spring boot应用程序。
package com.bbtutorials.users.entity;


import javax.persistence.Column;
import javax.persistence.Entity;
import javax.persistence.Id;
import javax.validation.constraints.NotNull;


import lombok.Data;


@Entity
@Data
public class Users {

	@Id
	@Column
    private long id;


    @Column
    @NotNull(message="{NotNull.User.firstName}")
    private String firstName;

    @Column
    @NotNull(message="{NotNull.User.lastName}")
    private String lastName;

    @Column
    @NotNull(message="{NotNull.User.email}")
    private String email;


}
You can start the application in two ways: you can right-click on the UsersApplication and run it as a java application or do the following steps.
您可以通过两种方式启动该应用程序:可以右键单击UsersApplication并将其作为Java应用程序运行,或者执行以下步骤。
// mvn install
mvn clean install// run the app
java -jar target/<repo>.war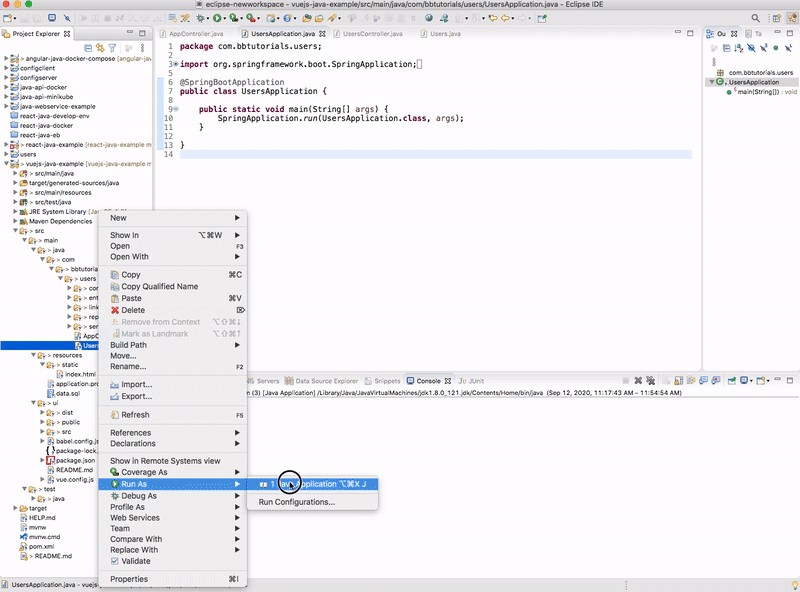
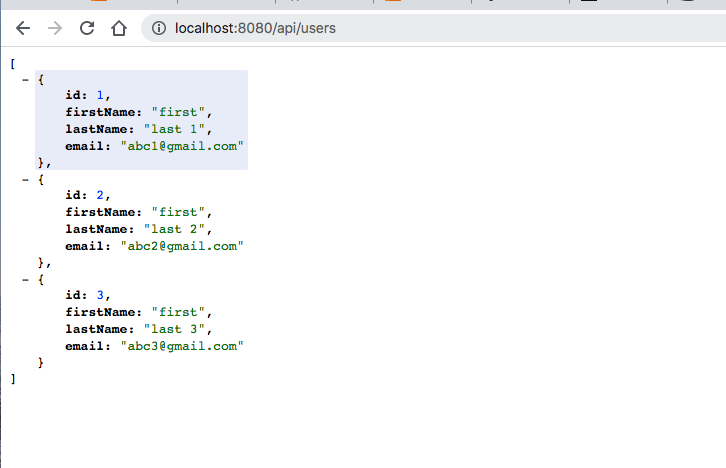
Finally, you can list all the users with this endpoint http://localhost:8080/api/users.
最后,您可以列出所有具有此端点的用户http:// localhost:8080 / api / users 。
Vue应用程式(Vue App)
Now the Java API is running on port 8080. Now it’s time to look at the Vue UI. The entire Vue app is under the folder /src/main/ui. You can create with this command vue create src/main/uiI am not going to put all the files here you can look at the entire files in the above Github link or here.
现在,Java API在端口8080上运行。现在是时候查看Vue UI了。 整个Vue应用程序位于/ src / main / ui文件夹下。 您可以使用此命令vue create src/main/ui我不会将所有文件放在此处,您可以在上面的Github链接或此处查看整个文件。
Let’s see some important files here. Here is the service file which calls java API. This is a service file with two async functions that use fetch API to make the API calls.
让我们在这里看到一些重要的文件。 这是调用Java API的服务文件。 这是一个具有两个异步函数的服务文件,这些函数使用访存API进行API调用。
export async function getAllUsers() {


    const response = await fetch('/api/users');
    return await response.json();
}


export async function createUser(data) {
    const response = await fetch(`/api/user`, {
        method: 'POST',
        headers: {'Content-Type': 'application/json'},
        body: JSON.stringify({user: data})
      })
    return await response.json();
}
Here is the Dashboard component that calls this service and gets the data from the API. Once we get the data from the API we set the state accordingly and renders the appropriate components again to pass the data down the component tree. You can find other components here.
这是调用此服务并从API获取数据的仪表板组件。 从API获取数据后,我们将相应地设置状态,并再次渲染适当的组件以将数据传递到组件树。 您可以在此处找到其他组件。
<template>
  <div class="hello">
    <Header />
    <div class="container mrgnbtm">
          <div class="row">
            <div class="col-md-8">
                <CreateUser @createUser="userCreate($event)" />
            </div>
            <div class="col-md-4">
                <DisplayBoard :numberOfUsers="numberOfUsers" @getAllUsers="getAllUsers()" />
            </div>
          </div>
    </div>
    <div class="row mrgnbtm">
        <Users v-if="users.length > 0" :users="users" />
    </div>
  </div>
</template>


<script>
import Header from './Header.vue'
import CreateUser from './CreateUser.vue'
import DisplayBoard from './DisplayBoard.vue'
import Users from './Users.vue'
import { getAllUsers, createUser } from '../services/UserService'

export default {
  name: 'Dashboard',
  components: {
    Header,
    CreateUser,
    DisplayBoard,
    Users
  },
  data() {
      return {
          users: [],
          numberOfUsers: 0
      }
  },
  methods: {
    getAllUsers() {
      getAllUsers().then(response => {
        console.log(response)
        this.users = response
        this.numberOfUsers = this.users.length
      })
    },
    userCreate(data) {
      console.log('data:::', data)
      data.id = this.numberOfUsers + 1
      createUser(data).then(response => {
        console.log(response);
        this.getAllUsers();
      });
    }
  },
  mounted () {
    this.getAllUsers();
  }
}
</script>
Vue UI和Node API之间的交互(Interaction between Vue UI and Node API)
In the development phase, the Vue app is running on port 3000 with the help of a Vue CLI and java API running on port 8080.
在开发阶段,借助于在端口8080上运行的Vue CLI和Java API,Vue应用程序将在端口3000上运行。
There should be some interaction between these two. We can proxy all the API calls to java API. Vue CLI provides some inbuilt functionality and to tell the development server to proxy any unknown requests to your API server in development, we just need to add this file at the root where package.json resides and configures the appropriate API paths.
两者之间应该有一些互动。 我们可以将所有API调用代理到Java API。 Vue CLI提供了一些内置功能,并告诉开发服务器将任何未知请求代理到开发中的API服务器,我们只需要将此文件添加到package.json所在的根目录并配置适当的API路径即可。
module.exports = {
  devServer: {
    proxy: {
      '^/api': {
        target: 'http://localhost:8080',
        changeOrigin: true
      },
    }
  }
}
With this in place, all the calls start with /api will be redirected to http://localhost:8080 where the java API running.
有了这个,所有以/ api开头的调用将被重定向到http:// localhost:8080 运行Java API的位置。
Once this is configured, you can run the Vue app on port 3000 and java API on 8080 still make them work together.
配置完成后,您可以在端口3000上运行Vue应用程序,而8080上的Java API仍然可以使它们一起工作。
// java API (Terminal 1)
mvn clean install
java -jar target/<war file name>// Vue app (Terminal 2)
cd src/main/ui (change it to app directory)
npm run serve
如何进行生产 (How To Build For Production)
As you have seen above, we run the Vue and Java server on different ports in the development phase. But, when you build the app for production you need to pack your Vue code with Java and run it on one port. We can use the maven plugin and gulp to package the application for production.
如上所示,在开发阶段,我们在不同的端口上运行Vue和Java服务器。 但是,在构建用于生产的应用程序时,您需要将Vue代码与Java打包在一起并在一个端口上运行。 我们可以使用maven插件和gulp打包应用程序以进行生产。
概要 (Summary)
- There are so many ways we can build Vue apps and ship for production.我们可以通过多种方式来构建Vue应用并交付生产。
- One way is to build Vue with Java. 一种方法是使用Java构建Vue。
- In the development phase, we can run Vue and Java on separate ports. 在开发阶段,我们可以在单独的端口上运行Vue和Java。
- The interaction between these two happens with proxying all the calls to API. 这两者之间的交互是通过代理所有对API的调用而发生的。
- In the production phase, you can build the Vue app and put all the assets in the build folder and load it with the java code. 在生产阶段,您可以构建Vue应用并将所有资产放置在build文件夹中,并使用Java代码加载它。
- We can package the application for production with maven plugin and gulp. 我们可以使用maven插件和gulp打包应用程序以进行生产。
结论 (Conclusion)
This is one way of building and shipping Vue apps. This is really useful when you want to do server-side rendering or you need to do some processing. In future posts, I will discuss more on building for production and deploying strategies.
这是构建和交付Vue应用程序的一种方法。 当您要进行服务器端渲染或需要进行一些处理时,这确实很有用。 在以后的文章中,我将讨论有关构建生产和部署策略的更多信息。
vue和java后端


 已为社区贡献1条内容

所有评论(0)