vue:如何设计网页的微信扫码登录功能
上一篇文章讲到了如何根据不同的需求展示不同的弹框组件,这篇文章主要讲解如何设计网页的微信登录扫码功能。那么就开始吧!本篇文章主要讲解了如何设计网页的微信登录扫码功能。httpshttpshttps。......
文章目录
一、前言
上一篇文章讲到了如何根据不同的需求展示不同的弹框组件,这篇文章主要讲解如何设计网页的微信登录扫码功能。那么就开始吧!
二、微信官方文档调用微信二维码
微信官网文档网址:https://developers.weixin.qq.com/doc/
具体说明在“开放平台-移动应用-微信登录功能”。

2.1、获取微信二维码
在 public/index.html 的head标签中引入:
<script src="https://res.wx.qq.com/connect/zh_CN/htmledition/js/wxLogin.js"></script>
把Login.vue文件中展示二维码图片的盒子上添加 id=“weixin” ,将来获取的微信二维码会以iframe的方式嵌入到这个盒子中:
<div id="weixin" class="qrcode" v-show="!isShowForm">
     二维码
</div>
在点击切换到微信登录的函数中添加如下代码:
	weixinClick(){// 点击切换微信扫码登录这一项,并向微信扫码登录
            this.isShowForm=false;

            // 微信登录第一步:申请微信登录二维码
            let _this = this;
            new WxLogin({
                id: "weixin",
                appid: "wx67cfaf9e3ad31a0d",  // 这个appid要填死
                scope: "snsapi_login",
                // 扫码成功后重定向的接口
                redirect_uri: "https://sc.wolfcode.cn/cms/wechatUsers/shop/PC",
                // state填写编码后的url
                state: encodeURIComponent(window.btoa("http://127.0.0.1:8080" + _this.$route.path)),
                // 调用样式文件
                href: "",
            });

        },
2.2、微信二维码样式调整
把今天其他文件夹中的wxLoginStyle文件夹放到utils文件夹中,然后在这个wxLoginStyle目录下用node执行js文件(这个文件我没有放出来,需要的话可以找我要):
node data-url.js
得到:
data:text/css;base64,Lyogd3hsb2dpbi5jc3MgKi8NCi5pbXBvd2VyQm94IC50aXRsZSwgLmltcG93ZXJCb3ggLmluZm97DQogIGRpc3BsYXk6IG5vbmU7DQp9DQoNCi5pbXBvd2VyQm94IC5xcmNvZGV7DQogIG1hcmdpbi10b3A6IDIwcHg7DQp9
把它填到上面的href属性,隐藏头部尾部。
最后调整页面iframe外层盒子的样式,使二维码居中。
#weixin{
    /* background-color: #fcf; */
    display: flex;
    justify-content: center;
    margin-top: -20px;
}
完成至此已经可以进行扫码登录了。
如果扫码跳转的时候被谷歌浏览器被拦截,需要修改谷歌浏览器设置。
打开谷歌浏览器设置,搜索 “弹出式窗口和重定向”,选择“可以发现”。
三、发起微信扫码登录请求
3.1、请求写在哪里
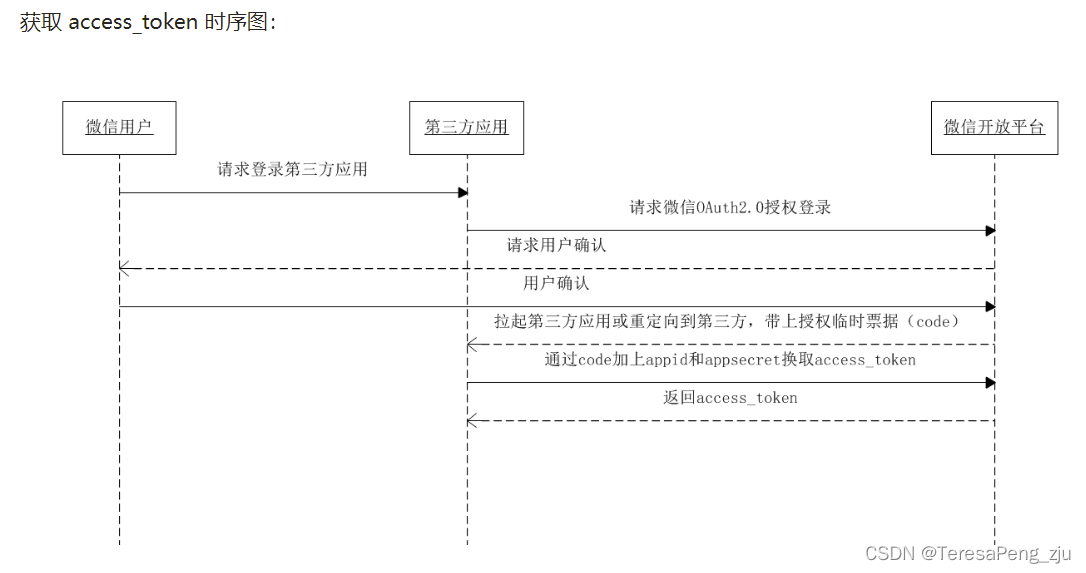
接口文档中表示,微信扫码得到的code。我希望在拿到code时就发起请求,也就是说刷新页面时就发起请求。因此,我们可以将created()写在TopBar.vue中(topbar刷新页面就会执行),且只有code存在时才需要发起扫码登陆请求。同时,发起请求要使用async、await。

扫码后,想要获取地址栏中的code,用route.query.code获取即可。
async created(){
    // console.log(this.$route.query.code);
      let mycode = this.$route.query.code;
          if(mycode){
            //手机扫码登录
            let res = await weixinLoginAPI({
            code:mycode
          });
          console.log(res);
          }
},
3.2、处理400和407的特殊情况
说明文档中提到:
 因此,要在响应拦截器request文件夹下的
request.js中处理400和407的特殊情况,加上两个&&条件(响应拦截器具体如何书写见之前的文章)。
...
if (res_data.code != 0 && res_data.code != 400 && res_data.code != 407) {
    store.dispatch("ToastStatus/asyncChanIsshowToast", {
      msg: res_data.message,
      type: "danger"
    })

    return false
  }
  ...
3.3、解决code拿到但不发起请求的问题
有时由于性能问题,会出现code拿到但是不发起请求的问题。对于这种情况,可以为请求函数书写定时器,时间设置为100~200ms即可,同时,async的位置要调整:
created(){
    // console.log(this.$route.query.code);
      setInterval(async ()=>{
      let mycode = this.$route.query.code;
          if(mycode){
            //手机扫码登录
            let res = await weixinLoginAPI({
            code:mycode
          });
          console.log(res);
          }
        },100)
},
四、处理后端设定的不同情况
说明文档中对400及407的解释:

4.1、400错误
当code返回400时,需执行以下逻辑:
1.提示用户进行重新扫码登陆
2.弹出登录框(打开登陆的模态窗口)
4.2、407错误
当code返回407时,代表手机号没有绑定,会返回一个uuid。只有积分商城中存储该手机号时,业务才会成功。因此,出现407错误后,我们应该引导用户去绑定手机号。故需要执行以下逻辑:
1.弹出提示框,提示用户手机号需绑定微信号
2.弹出登录框
3.保存uuid(绑定后用户输入手机号点击登录按钮时,发送登录请求时需携带uuid给后端)
4.清除浏览器url中的code
topbar.vue中的具体代码如下:
 created(){
    // console.log(this.$route.query.code);
      setInterval(async ()=>{
      let mycode = this.$route.query.code;
          if(mycode){
            let res = await weixinLoginAPI({
            code:mycode
          });
          console.log(res);
          if(res.code==0){
            //1. 弹出提示框
            //微信扫码登陆
            this.asyncChanIsshowToast({
            msg:"登陆成功",
            type:"success"
          })
          //2.保存token到localStorage
          localStorage.setItem('x-auth-token',res['x-auth-token'])
          //3.登陆状态的切换
          this.chanIsLogined(true);
          //4. 清除浏览器code
          this.$router.push(this.$route.path);

          }else if(res.code==400){
            //1.弹出提示框
            this.asyncChanIsshowToast({
            msg:"请重新扫码",
            type:"warning"
      });
            //2.弹出登录框
            this.chanIsshowLoginModal(true);
          }else if(res.code==407){
            //1.弹出提示框
            this.asyncChanIsshowToast({
            msg:"请用手机号登录绑定微信",
            type:"danger"
      });
            //2.弹出登录框
            this.chanIsshowLoginModal(true);
            //3.储存uuid
            localStorage.setItem("uuid",res.uuid)
            //4.清除浏览器url中的code
              this.$router.push(this.$route.path);
          }
          }
        },100)
},
五、手机绑定微信
通过“手机绑定微信”接口,按“登录”按钮时,逻辑上会发生两件事:发起登录请求和绑定微信,依据是保存在localstorage中的uuid。
5.1、在api.js中书写接口请求
export const PhoneBindingAPI = (params) => instance.post("/wechatUsers/binding", qs.stringify(params))
5.2、在login.vue中引入
import {sendSMSAPI,PhoneReginAPI,PhoneBindingAPI} from '@/request/api.js'
5.3、在login.vue中书写逻辑代码
记得检查某些函数是否在该页面引入,譬如这里就要注意引入chanIsLogined:
...mapMutations({
      chanIsshowLoginModal:"showLoginModal/chanIsshowLoginModal",
      chanIsLogined:"LoginStatus/chanIsLogined"
    })
其他新增代码如下:
let uuid = localStorage.getItem("uuid");
let res =null;
if(uuid){
  //1 手机绑定微信的请求
  //手机号登陆
  res = await PhoneBindingAPI({
    phone:this.userPhone.trim(),
    verifyCode:this.userSMSCode.trim(),
    uuid
    //ES6的简写写法
  })
}else{
  //发起登录请求
    let res = await PhoneReginAPI({
        verifyCode:this.userSMSCode.trim(),
        phone:this.userPhone.trim()
      })
      // console.log(res)
}
      //防止业务为0不成功
      if(!res)return;
        this.asyncChanIsshowToast({
        msg:"登陆成功",
        type:"success"
      })
      //1.关闭登录窗口
      this.close();
      //2.保存token到localStorage
      localStorage.setItem('x-auth-token',res['x-auth-token'])
      //3.登陆状态的切换(影响到头像、昵称、购物车按钮等)
      this.chanIsLogined(true);
      //4. 清除url中的code
      if(uuid){
              this.$router.push(this.$route.path);
              localStorage.removeItem("uuid")
            }
    },
注:this.$route.path可获取当前路由地址。
六、总结
本篇文章主要讲解了如何设计网页的微信登录扫码功能。本期复盘到此结束,感谢大家的阅读!
更多推荐
 已为社区贡献3条内容


所有评论(0)