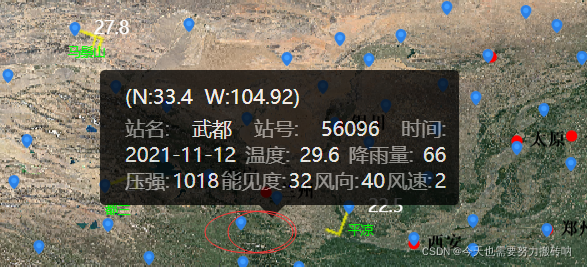
vue+openlayers 实现hover效果弹框 或者 点击事件弹框
vue+openlayers 实现hover(pointermove )效果弹框 或者 点击(click)事件弹框、首先先写个盒子<div id="featureTiPing" v-drag></div>布局样式/* 新弹框*/#featureTiPing {position: absolute;top: 10px;left: 50px;width: 287px;backg
·
vue+openlayers 实现hover(pointermove )效果弹框 或者 点击(click)事件弹框、

首先先写个盒子
<div id="featureTiPing" v-drag></div>
布局样式
/* 新弹框*/
#featureTiPing {
  position: absolute;
  top: 10px;
  left: 50px;
  width: 287px;
  background-color: #000000;
  border-radius: 6px;
  opacity: 0.76;
  z-index: 999999;
  display: none;
  border-radius: 4px;
  color: #000;
  padding: 10px 10px 10px 20px;
}
#featureTiPing .d4 {
  margin: 0 auto;
  width: 0;
  height: 0;
  border-width: 20px;
  border-style: solid;
  z-index: 9999;
  border-color: transparent #000 transparent transparent;
  transform: rotate(-90deg);
  position: absolute;
  left: 41%;
}
首先我们先去实现点在地图上的效果
mapListdataS****代表后端传来的接口内容
groundgreendot(mapListdataS) {
      // console.log(mapListdataS)
      this.removeLayerByName("地面显示点");
      //创建画板
      if (mapListdataS && mapListdataS[0]) {
        let sourceArr = new SourceVec({});
      const [x1, y1, x2, y2] = map.getView().calculateExtent();
      var index1111 = 0;

        for (var i = 0; i <= mapListdataS.length - 1; i++) {
          //点的坐标信息
            var b = false;


        if (
          mapListdataS[i].lon <= x2 &&
          mapListdataS[i].lon >= x1 &&
          mapListdataS[i].lat <= y2 &&
          mapListdataS[i].lat >= y1
        ){
          index1111++;
          // let coordinates = [120.0 + Math.random(), 30.0 + Math.random()];
          let coordinates = [mapListdataS[i].lon, mapListdataS[i].lat];
          //console.log(mapListdataS[i],"iiiii")
          //将点的信息存入self中***
          let feature = new Feature({
            geometry: new Point(coordinates),
            self: mapListdataS[i],
          });
          let markerStyle = new Style({
            //设置icon大小
            image: new Icon({
              scale: 0.4, //大小
              src: this.imgUrl, //图片
              color: "#409EFF", //颜色
            }),
          });
          //设置样式
          feature.setStyle(markerStyle);
          //添加
          sourceArr.addFeature(feature);
        }
        }
        //LayerVec /VectorLayer  这两种都可以
        var layer = new VectorLayer({
          source: sourceArr,
          visible: this.dmlayerShowFlag, //先测试下,这样就行了,设置true或者false=
          name: "地面显示点", //设置图层名称,根据名称查找图层
        });

        //地图添加画板
        this.map.addLayer(layer);
      }
    },
最后我们开始点击事件 或者hover事件
  saybulletframe(evt, evtFeature){
       //获取元素
      const _this = this;
      //  // 弹出框
      let containers = document.getElementById("popuper");
      // // 弹框内容
      let content = document.getElementById("popup-contents");
      // 关闭
      let closer = document.getElementById("popup-closers");

      let overlay = new Overlay({
        element: containers,
        autoPan: true,
        positioning: "bottom-center",
        autoPanAnimation: {
          duration: 250, //当Popup超出地图边界时,为了Popup全部可见,地图移动的速度.
        },
      });

      //获取点的函数
         this.groundgreendot(this.gkData)

      // 获取hover框元素
      let featurepsDom = document.getElementById("seyHoverbox");
      // pointermove 这个是hover效果
      this.map.on("click", async (evt) => {
        //判断鼠标是否悬停在要素上
        let pixel = this.map.getEventPixel(evt.originalEvent);
        // let feature = this.map.forEachFeatureAtPixel(pixel, (feature) => { return feature;}, {hitTolerance:10});
        var hit = map.hasFeatureAtPixel(pixel);
        //将hover内容获取到
        let feature = evtFeature
          ? evtFeature
          : this.map.forEachFeatureAtPixel(
              evt.pixel,
              function (feature, layer) {
                return feature;
              }
            );
        //判断feature是否为undefined
        if (feature != undefined) {
          //点击事件获取到的 feature,红点点的 名字为 fBreakPoint
          // console.log(feature, "fBreakPoint");
          featurepsDom.innerHTML = `
            xxxxx内容***********

      <div class="d4"></div>
              `;
          featurepsDom.style.display = "block";

          //减去弹框的宽度一半
          featurepsDom.style.left = evt.pixel[0] - 160 + "px";
          //减去弹框的高度的一半左右
          featurepsDom.style.top = evt.pixel[1] - 160 + "px";
        } else {
          //鼠标没有悬停在要素上
          featurepsDom.style.display = "none";
        }
      });
    },
更多推荐
 已为社区贡献5条内容


所有评论(0)