electron自动更新
vue+electron 实现自动更新
·
1.主进程background.js引入autoUpdater
let {autoUpdater} = require('electron-updater')2.主进程写入更新代码
if (!process.env.WEBPACK_DEV_SERVER_URL) {
  autoUpdater.autoDownload = false

  autoUpdater.signals.updateDownloaded(() => {})
  autoUpdater.on('error', (error) => {
    log.warn('检查更新失败: ' + error == null ? 'unknown' : (error.stack || error).toString())
    // dialog.showErrorBox('Error: ', error == null ? 'unknown' : (error.stack || error).toString())
  })

  autoUpdater.on('update-available', (info) => {
    // var appInfo = {
    //   info: info.version,
    //   files: info.files,
    //   path: info.path,
    //   sha512: info.sha512,
    //   releaseDate: info.releaseDate
    // }
    dialog.showMessageBox({
      type: 'info',
      title: '更新提示',
      message: '软件需要更新,您是否立即更新?',
      buttons: ['推迟', '立即更新']
    }).then((res) => {
      log.warn('index:' + res.response)
      if (res.response === 1) {
        log.warn('选择升级')
        autoUpdater.downloadUpdate()
      } else {
        log.warn('选择不升级:')
      }
    })
  })

  // 检查更新时触发
  autoUpdater.on('update-available', (res) => {
    log.warn('检查更新时触发')
    // log.warn(res)
    // dialog.showMessageBox({
    //   title: '检查更新',
    //   message: '正在检查更新'
    // })
  })

  // 没有可用更新
  autoUpdater.on('update-not-available', () => {
    log.warn('没有可用更新')
    // dialog.showMessageBox({
    //   title: '已是最新版',
    //   message: '当前版本是最新版本。'
    // })
  })

  // 安装更新
  autoUpdater.on('update-downloaded', (res) => {
    // log.warn(res)
    log.warn('下载完毕!提示安装更新')
    dialog.showMessageBox({
      title: '升级提示!',
      message: '已自动升级为最新版,请等待程序安装完成并重启应用!'
    }, () => {
      log.warn('确认安装')
      setImmediate(() => autoUpdater.quitAndInstall(true, true))
    })
  })
3.启动应用调用检测更新函数
 if (process.env.WEBPACK_DEV_SERVER_URL) {
    // Load the url of the dev server if in development mode
    win.loadURL(process.env.WEBPACK_DEV_SERVER_URL)
    if (!process.env.IS_TEST) win.webContents.openDevTools()
  } else {
    createProtocol('app')
    // Load the index.html when not in development
    win.loadURL('app://./index.html')
    autoUpdater.checkForUpdates() //检测有无新版本
  }
4.在vue.config中配置更新地址
module.exports = {

  pluginOptions: {
    electronBuilder: {

      builderOptions: {
        productName: "打包后的exe名称",
        appId: "xxx",
        //注意, 只有在配置了publish路径时, build之后才会生成latest.yml文件
        publish: [
          {
            "provider": "generic",
            "url": "你的文件服务器地址"
          }
        ]
      }
    }
.......
  },
5.在package.json中配置第一个版本号
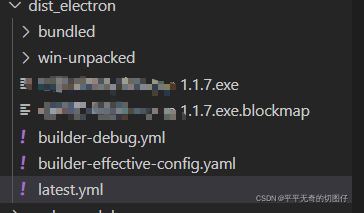
"version": "0.0.1" //package.json 这是你的版本号6.打包你的项目生成dist_electron文件

7.安装exe到你的电脑,这是初始版本。
8.重新写了业务代码后,更改package.json中的版本号为高版本,例如0.1.2,并重新打包生成dist_electron文件,将文件中的新版本exe和lates.yml放入你的文件服务器中。
9.启动你刚开始安装的exe,此时应用会自动检测有无新版本,没有无提示,有则提示是否更新。
更多推荐
 已为社区贡献1条内容


所有评论(0)