vue中实现图片上传
前言:之前感觉上传图片很难,每次写都感觉特别麻烦,但思路清楚之后就感觉还行,没有想像中那个复杂,接触vue之后感觉很多地方相对于之前而言更加方便,用多个组件,相同的可以进行组件复用,减少代码的重复,下面就说一下近期食谱管理项目实战中的上传图片功能吧!1、预览图2、大致思路页面布局:设置两个均为100px的盒子,左侧是预览图(浏览上传的图片),右侧是操作图(input框占满盒子并隐藏起来,可以通过o
·
前言:之前感觉上传图片很难,每次写都感觉特别麻烦,但思路清楚之后就感觉还行,没有想像中那个复杂,接触vue之后感觉很多地方相对于之前而言更加方便,用多个组件,相同的可以进行组件复用,减少代码的重复,下面就说一下近期食谱管理项目实战中的上传图片功能吧!
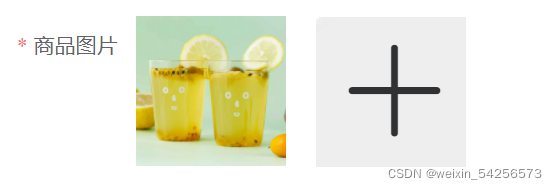
1、预览图

2、大致思路
页面布局:设置两个均为100px的盒子,左侧是预览图(浏览上传的图片),右侧是操作图(input框占满盒子并隐藏起来,可以通过 opacity: 0来实现,给input绑定@change=‘showImg’事件,如果改变了就相当于input框的value值改变了,对应预览的图片 也应跟着改变,与此同时还可以给input框加一个ref属性 对右侧的加号图标绑定事件 )
功能:右侧点击加号图标,左边可以预览图片,右侧点加号还可以继续修改
上传图片需要使用input框,可以利用type=‘file’这一属性打开电脑系统文件夹进行挑选图片,具体实现代码如下
vue组件中:
框架:
 <el-form-item label="图片"  prop="goodsSurfaceimg">
     <el-image
      style="width: 100px; height: 100px"
      :src="onegoodsForm.goodsSurfaceimg"
        ></el-image>
        <div class="uppicture">
          <img  alt="" class="dispalyimg" ><input type="file"  class="upinput"  ref="file" @change="showimg"><i class="el-icon-plus" id="changes" @click="changeimg"></i></div>
</el-form-item>
绑定事件:
 // 预览图片
    showimg () {
      const that = this
      console.log(that.$refs.file.files[0])
      var fr = new FileReader()
      fr.readAsDataURL(that.$refs.file.files[0])
      fr.onload = function () {
        that.onegoodsForm.goodsSurfaceimg = fr.result
      }
    },
    // 更换图片
    changeimg () {
      this.$refs.file.dispatchEvent(new MouseEvent('click'))
    },
样式:
.goods-img{
            position:relative;
            width:100px;
            height:100px;
            background:url("https://i1.douguo.com//upload/banner/1543312604.jpg");
            margin-top: -115px;
            margin-left: 120px;
            input{
                width: 100%;
                height: 100%;
                opacity: 0;
            }
            img{
                position: absolute;
                width: 100%;
                height: 100%;
                top: 0;left: 0;
            }
        }
交互的时候接口需要获取到上传的图片,可以借助formData来实现该功能,
具体代码如下
// 添加商品
addgoods () {
const file = this.$refs.img.files[0]
console.log(file)
const param = new FormData()
param.append('multipartFile', file)
param.append('goodsName', this.AddGoodsForm.goodsname)
param.append('goodsPrice', this.AddGoodsForm.goodsprice)
param.append('goodsDecription', this.AddGoodsForm.goodsintro)
param.append('goodsLimit', this.AddGoodsForm.goodslimit)
param.append('goodsStore', this.AddGoodsForm.goodsstore)
param.append('goodsClassify', this.goodssort)
const config = {
headers: {
'Content-Type': 'multipart/form-data',
token: 'eyJ0eXAiOiJKV1QiLCJhbGciOiJIUzI1NiJ9.eyJyb2xlIjoiMSIsImV4cCI6MTY0NjQ2MjA3NSwiaWF0IjoxNjQ1ODU3Mjc1LCJ1c2VySWQiOiIxIn0.CYQFivU7lcs2aoH-T7QtNvVWbJO8qvM2IqeOX7wPWok'
}
}
this.$axios.post('Menu/Admin/addGoods', param, config)
.then(res => {
console.log(res)
if (res.data.code === 200) {
this.$message.success(res.data.object)
this.AddGoodsForm = {}
}
})
.catch(err => {
console.log(err)
})
更多推荐
 已为社区贡献1条内容


所有评论(0)