VueJS (2.x) - 组件测试助手 - 第一部分
软件测试可以定义为检查正在构建的应用程序是否符合预期要求并且没有缺陷的方法。
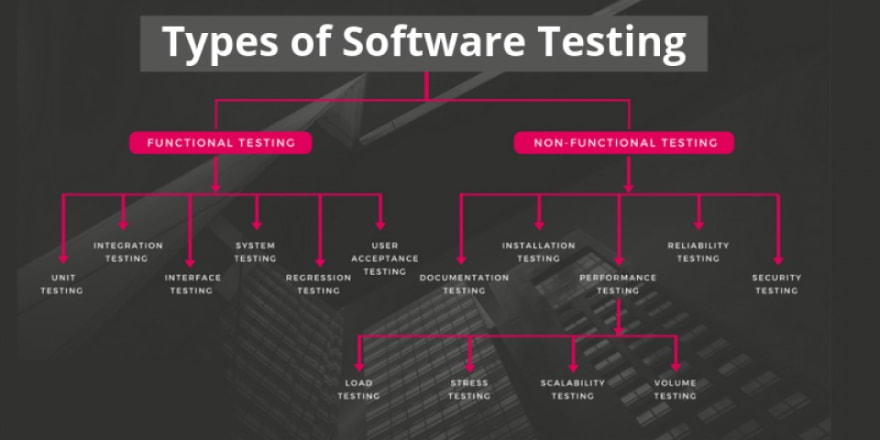
有几种类型的软件测试,如下图所示:
[ ](https://res.cloudinary.com/practicaldev/image/fetch/s--tb-iHjGN--/c_limit%2Cf_auto%2Cfl_progressive%2Cq_auto%2Cw_880/https://dev -to-uploads.s3.amazonaws.com/uploads/articles/x9g0hwkfc2pxd1xw7c6c.png)
来源:https://hackr.io/blog/types-of-software-testing
在现实世界中,很难在一个项目中实现所有这些,主要是因为严格的期限和缺乏合格的人来完成这项工作。但是,至少有两种类型的测试可以由开发人员自己在 VueJS 项目中轻松实现,而无需付出太多努力。
-
单元测试
-
组件测试
单元测试
单元测试允许您单独测试各个代码单元。它使开发团队有信心在不影响应用程序稳定性的情况下实现新功能和重构遗留代码。
元件测试
组件测试允许您检查组件是否完全正常工作并正确显示其状态。为此,必须将组件安装到 DOM(虚拟或真实)。
在本文中,我将展示如何构建一个有用且可扩展的帮助器,它可以帮助您非常轻松地为您的 VueJS 组件实现测试。
创建一个新的VueJS项目
使用Vue CLI创建一个新的 VueJS 项目,选择Manually select features选项并选择以下选项:
-
通天塔
-
Linter / Formatter
-
单元测试
[ ](https://res.cloudinary.com/practicaldev/image/fetch/s--5w3TtMu5--/c_limit%2Cf_auto%2Cfl_progressive%2Cq_auto%2Cw_880/https:// dev-to-uploads.s3.amazonaws.com/uploads/articles/slb09pmtsxi825cbq3uu.png)
分别在Vue Version和Pick unit test solution步中选择2.x和Jest。
创建项目后,在项目中安装以下开发依赖项:
- Vue 测试库
yarn add -D @testing-library/vue
进入全屏模式 退出全屏模式
构建组件测试助手
现在,让我们在/src/utils文件夹中创建一个名为test.js的新文件,并导入有助于我们实例化 Vue 类和渲染组件的函数:
import { createLocalVue } from '@vue/test-utils'
import { render } from '@testing-library/vue'

const localVue = createLocalVue()
进入全屏模式 退出全屏模式
然后,创建并导出一个customRender函数,该函数调用 Vue 测试库render函数并将localVue以及每个测试所需的自定义选项传递给它(我们将在本文的第二部分探讨一些自定义选项的示例;):
export const customRender = (component, options = {}) =>
  render(
    component,
      {
        localVue,
        ...options
      }
   )
进入全屏模式 退出全屏模式
最后一步是从@testing-library/vue导出所有内容。这并不是必须的,但它可以帮助您在测试文件中只保留一行import,如果您将来需要,它可能会在您需要时帮助您也可以轻松更改您的测试框架/库。
export * from '@testing-library/vue'
进入全屏模式 退出全屏模式
这足以让您对组件进行简单的测试。
创建一个简单的组件
让我们看一下这个简单的组件,它负责根据给定的状态显示彩色标签:
<template>
  <span data-testid="status-label" :class="label.color">
    {{ label.text }}
  </span>
</template>
进入全屏模式 退出全屏模式
import { STATUS } from "@/constants";

export default {
  name: "Status",
  props: ["status"],
  computed: {
    label() {
      const color = `Status__${this.status}`;

      if (this.status === STATUS.ERROR) {
        return {
          text: "Finished with errors",
          color,
        };
      } else if (this.status === STATUS.WARNING) {
        return {
          text: "Finished with warnings",
          color,
        };
      } else if (this.status === STATUS.SUCCESS) {
        return {
          text: "Finished",
          color,
        };
      }

      return {
        text: "Invalid Status",
        color: null,
      };
    },
  },
};
进入全屏模式 退出全屏模式
<style lang="css" scoped>
.Status__error {
  color: red;
}
.Status__warning {
  color: orange;
}
.Status__success {
  color: green;
}
</style>
进入全屏模式 退出全屏模式
_注意模板中的data-testid属性。在组件范围内确定每个元素的唯一data-testids以识别其元素并使其更易于测试是一种很好的做法。
实施测试
现在,使用我们的测试助手和Jest,让我们创建一个简单的测试套件,以确保组件根据status属性值显示正确的文本和颜色。
import "@testing-library/jest-dom/extend-expect";
import { customRender } from "@/utils/test";
import Status from "@/components/Status";

describe("Status", () => {
  it('should display a red label "Finished with errors" if status is equal to "error"', () => {
    const { getByTestId } = customRender(Status, {
      props: { status: "error" },
    });

    const statusLabel = getByTestId("status-label");
    expect(statusLabel).toHaveClass("Status__error");
    expect(statusLabel).toHaveTextContent("Finished with errors");
  });

  it('should display an orange label "Finished with warnings" if status is equal to "warning"', () => {
    const { getByTestId } = customRender(Status, {
      props: { status: "warning" },
    });

    const statusLabel = getByTestId("status-label");

    expect(statusLabel).toHaveClass("Status__warning");
    expect(statusLabel).toHaveTextContent("Finished with warnings");
  });

  it('should display a green label "Finished" if status is equal to "success"', () => {
    const { getByTestId } = customRender(Status, {
      props: { status: "success" },
    });

    const statusLabel = getByTestId("status-label");

    expect(statusLabel).toHaveClass("Status__success");
    expect(statusLabel).toHaveTextContent("Finished");
  });
});
进入全屏模式 退出全屏模式
那很容易吧?!
您可以在此链接中找到实现此帮助程序的工作项目的完整源代码。
很快,我将发布本文的第二部分,我们将改进这个帮助程序并使其可定制,它允许您测试具有外部依赖项的组件,例如Vuex或Vue I18n。
我希望你喜欢它!
请分享和评论...
封面图片来自Matthew Waring

Vue社区为您提供最前沿的新闻资讯和知识内容
更多推荐
 0
0 0
0- 0


 已为社区贡献21229条内容

所有评论(0)