使用实体组件系统(ECS)开发”吃方块”游戏实例分析
最近翻译了一篇有关实体组件系统架构的介绍文章,今天来简单讲解一下如何利用这个架构来完成一个小的JavaScript游戏。如果对ECS模式还不是很了解的话那么可以先看看我前面翻译的这篇文章。1.游戏制作背景我们希望开发一款非常简易的吃方块的游戏。那么这个游戏主要是希望能够实现玩家控制的方块可以随着鼠标的移动来吃掉比自己弱小的方块而不可触碰比自己强大的方块。非常简单的一个需求,当然我们也可以把这个小
最近翻译了一篇有关实体组件系统架构的介绍文章,今天来简单讲解一下如何利用这个架构来完成一个小的JavaScript游戏。如果对ECS模式还不是很了解的话那么可以先看看我前面翻译的这篇文章。
1.游戏制作背景
我们希望开发一款非常简易的吃方块的游戏。那么这个游戏主要是希望能够实现玩家控制的方块可以随着鼠标的移动来吃掉比自己弱小的方块而不可触碰比自己强大的方块。非常简单的一个需求,当然我们也可以把这个小游戏做得非常复杂并且有趣,但是主要是为了讲解如何使用ECS来开发这样一个小型的游戏系统,在了解好我们所需要的需求后。我们需要分析一下这个简单需求需要我们如何架构我们的系统。
首先,需要了解一下我们的开发环境以及所需要具备的基础知识。那么既然使用js来开发,所以基础的h5知识,css和js的基本知识我们还是需要具备的,所以相关这一部分内容我就不再写出来了。如果希望手机上也可以很好地操作这样一个游戏,那么hammer.js类库我们也可以引用进来。
接下来,对于整个系统来说我们要确定什么物体在这个游戏系统中担任Entity的职责,什么物体担任Component职责,以及需要建立多少个System来驱动整个系统。毋庸置疑,这个游戏中的实体就是我们游戏名字中的方块,每一个方块都是一个实体,通过方块与方块之间的交互,整个游戏才算实现基本的功能。那么组件呢,了解一般游戏开发基础内容的童鞋都应该知道需要哪些基本的组件是做游戏必备的内容。物体的外观组件、玩家控制器组件、碰撞组件、方块坐标组件和方块生命值组件。而对于驱动整个游戏的系统来说,系统创建本质是要和组件挂钩,通过系统我们可以将每个实体调用他们相对应所包含的组件来实现整个游戏逻辑。因此主要说来方块的外观样式和显示坐标组件本质说来就是需要我们对图像进行一次渲染的操作,而渲染这个操作便可以让我们抽象称为一个渲染系统。方块不能够一直存在于场景,我们需要不断让老的方块消失,让新的方块出现,那么对于方块的生命值来说我们需要一个生命值的衰减系统。玩家要来操作,那么我们需要获取玩家的输入所以需要一个用户输入的系统。最后,玩家控制的方块要与其它方块进行交互,也就是通过碰撞组件来实现的功能,我们需要一个碰撞系统。基本来说,我们就需要以上这几个系统,当然随着功能的不断复杂,所需要的系统也会越来越多,当然这也就是ECS模式一个不是非常好的地方,对于过于复杂的项目或者系统,我们需要过多的系统来对每个物体的组件进行调用组合,那么会使得这种组合无穷无尽,甚至我们可能不知道我们需要如何构建一个合适的系统来调用适合的组件最终完成一项功能。最后一点,不可忽视的是系统的加载顺序,其实这里我们系统加载顺序是写死的,但是真正的开发之中我们应该利用合理的方式来调度各个系统加载,将所有的系统都同时加载进入游戏是否真的合适也需要考虑。
2.游戏实例讲解
首先,我们先从构建基础ECS架构的核心思想开始。
Entity 实体,在实体系统之中,ID至关重要,甚至我们可以将实体称之为ID,但一定要是唯一标识,最好的方案是使用GUID,但是通过JS,我们还是先简单模拟一下好了。实体必须具备的功能是每一个实体都应该可以组合各种各样的组件,只要他的属性是组件,那么就应该可以在某一个实体上执行动态地添加或者移除操作。也因此,实体需要一个组件列表来记录当前这个ID的实体拥有多少个组件以及他们具体是哪些组件,具备添加和移除的方法也是为了实体可以具有实时更新自身状态的能力。实体部分的实现代码如下:
/* =========================================================================
 *
 *  Entity.js
 *  定义实体. 一个实体就是一个ID
 *  将实体作为一个数据容器
 *
 * ========================================================================= */
ECS.Entity = function Entity(){
    // 创建随机ID
    this.id = (+new Date()).toString(16) +
        (Math.random() * 100000000 | 0).toString(16) +
        ECS.Entity.prototype._count;

    // 实体数量
    ECS.Entity.prototype._count++;

    // 组件列表
    this.components = {};

    return this;
};
// 实体数量初始化
ECS.Entity.prototype._count = 0;

ECS.Entity.prototype.addComponent = function addComponent ( component ){
    // 添加组件到实体之中
    this.components[component.name] = component;
    return this;
};
ECS.Entity.prototype.removeComponent = function removeComponent ( componentName ){
    // 通过引用移除组件
    // 允许组件名称为一个方法或是字符串

    var name = componentName;

    if(typeof componentName === 'function'){
        // 获取组件方法中组件的名称
        name = componentName.prototype.name;
    }

    delete this.components[name];
    return this;
};

ECS.Entity.prototype.print = function print () {
    // 调试实体信息
    console.log(JSON.stringify(this, null, 4));
    return this;
};
第二步,组件概念的实现
组件本质上就是来存储数据,通过ECS模式的术语定义,我们了解到组件不应该具有任何的实际功能和逻辑。因此,组件非常重要的是区分组件的名称以及每个组件需要实现功能需要记录的数据信息。
/* =========================================================================
 *
 *  Components.js
 *  组件定义,组件由数据组成
 *
 * ========================================================================= */

// 外观组件
// --------------------------------------
ECS.Components.Appearance = function ComponentAppearance ( params ){
    // 外观组件主要包含颜色和大小的数据信息
    params = params || {};

    this.colors = params.colors;
    if(!this.colors){
        this.colors = {
            r: 0,
            g: 100,
            b: 150
        };
    }

    this.size = params.size || (1 + (Math.random() * 30 | 0));

    return this;
};
ECS.Components.Appearance.prototype.name = 'appearance';

// 生命值组件
// --------------------------------------
ECS.Components.Health = function ComponentHealth ( value ){
    value = value || 20;
    this.value = value;

    return this;
};
ECS.Components.Health.prototype.name = 'health';

// 坐标组件
// --------------------------------------
ECS.Components.Position = function ComponentPosition ( params ){
    params = params || {};

    // 随机生成坐标数值,由于生成的点一定要在Canvas之内,所以这里才引入canvas的信息,但本质上不应该引入

    this.x = params.x || 20 + (Math.random() * (ECS.$canvas.width - 20) | 0);
    this.y = params.y || 20 + (Math.random() * (ECS.$canvas.height - 20) | 0);

    return this;
};
ECS.Components.Position.prototype.name = 'position';

// 用户控制组件
// --------------------------------------
ECS.Components.PlayerControlled = function ComponentPlayerControlled ( params ){
    this.pc = true;
    return this;
};
ECS.Components.PlayerControlled.prototype.name = 'playerControlled';

// 碰撞器组件
// --------------------------------------
ECS.Components.Collision = function ComponentCollision ( params ){
    this.collides = true;
    return this;
};
ECS.Components.Collision.prototype.name = 'collision';
第三步,装配器引入
生成一个实体我们可以借用工厂模式的思想,通过工厂来创造实体,当然这并不是我们非常核心内容,所以这一部分非常简单,只是帮助我们一个实体附加一些必备的组件而已。更为详细和完善的设计还需要我们自己根据需求去实现来提升我们系统性能。
/* =========================================================================
 *
 *  Assemblages.js
 *  装配器
 *
 * ========================================================================= */

ECS.Assemblages = {
    // 每个装配器都应该生成一个实体并将其返回.
    //实体可以进行组件的添加或者是移除的操作
    // 类似于工厂模式

    CollisionRect: function CollisionRect(){

        var entity = new ECS.Entity();
        entity.addComponent( new ECS.Components.Appearance());
        entity.addComponent( new ECS.Components.Position());
        entity.addComponent( new ECS.Components.Collision());
        return entity;
    }

};
第四步 衰减系统
衰减系统是我们制作的第一个系统,也是在游戏运行的时候最先需要初始化的系统。原因很简单,我们要在渲染物体之前告诉整个游戏系统这个物体到底有多少生命值,他的生命值是以什么样的情况在运转的。当然由于这是第一个我们写的系统,所以有些内容要稍微提一下。本质来说,每个系统都是在每一帧不断运转的,他们运转的同时也是在不断检测这个游戏系统之中存在所有实体是否符合调用当前这个系统的需求,其实更直白来说就是是否含有这个系统需要执行逻辑用到的组件的数据。那么对于衰减系统来说需要区分玩家方块和其它可以被吃掉的方块的生命衰减,以及不同衰减会出现什么样的特殊效果都可以在这里定义。因为代码都有非常详细的注释那么我就不多解释具体的逻辑了。
/* =========================================================================
 *
 *  decay.js
 *  衰减系统主要控制生命值组件.
 *  每一帧都会逐渐减少生命值和方块大小
 *
 *
 * ========================================================================= */
// 启动系统
// --------------------------------------
ECS.systems.decay = function systemDecay ( entities ) {


    var curEntity;

    // 处理所有实体
    for( var entityId in entities ){
        curEntity = entities[entityId];

        //检测实体是否已经死亡
        if(curEntity.components.playerControlled){
            if(curEntity.components.health.value < 0){
                // 死亡,结束游戏
                ECS.game.endGame();
                return false;
            }
        }

        // 如果实体包含组件
        if( curEntity.components.health ){

            // 生命值递减计算方式
            if(curEntity.components.health.value < 0.7){
                curEntity.components.health.value -= 0.01;

            } else if(curEntity.components.health.value < 2){
                curEntity.components.health.value -= 0.03;

            } else if(curEntity.components.health.value < 10){
                curEntity.components.health.value -= 0.07;

            } else if(curEntity.components.health.value < 20){
                curEntity.components.health.value -= 0.15;
            } else {
                //如果生成方块过大,快速衰退
                curEntity.components.health.value -= 1;
            }

            // 检测方块生命
            // --------------------------
            if(curEntity.components.health.value >= 0){

                //不同生命值显示不同的颜色
                if(curEntity.components.playerControlled){
                    if(curEntity.components.health.value > 10){
                        curEntity.components.appearance.colors.r = 50;
                        curEntity.components.appearance.colors.g = 255;
                        curEntity.components.appearance.colors.b = 50;
                    } else {
                        curEntity.components.appearance.colors.r = 255;
                        curEntity.components.appearance.colors.g = 50;
                        curEntity.components.appearance.colors.b = 50;
                    }
                }

                // 如果实体中的方块大小存在,那么让其大小等同于生命值
                if(curEntity.components.appearance.size){
                    curEntity.components.appearance.size = curEntity.components.health.value;
                }

            } else {

                //实体已经死亡

                //实体是玩家控制的
                if(curEntity.components.playerControlled){

                    // 死亡,结束游戏
                    ECS.game.endGame();
                } else {
                    //实体不是玩家控制
                    // 移除实体
                    delete entities[entityId];
                }
            }
        }
    }
};
第五步,完成用户输入、碰撞和渲染系统
剩余的这三个系统核心设计思想是与衰减系统相似,所以我就不多赘述,下面会简单介绍一下。
用户输入系统:主要为了获取用户鼠标的坐标位置,还需要将用户鼠标的坐标位置转化到canvas的位置之上,因此需要进行一定的对应计算。同时,结合hammer.js我们完成移动端的移动检测。
/* =========================================================================
 *
 * userInput.js
 * 用户输入
 *
 * ========================================================================= */
function hasTouchEnabled() { return 'ontouchstart' in window || 'onmsgesturechange' in window; }


var userInputPosition = {
    x: -100,
    y: -100,
    deltaX: false,
    deltaY: false
};

// 初始化
if(hasTouchEnabled){
    userInputPosition = {
        x: ECS.$canvas.width / 2,
        y: ECS.$canvas.height / 2,
        lastX: ECS.$canvas.width / 2,
        lastY: ECS.$canvas.height / 2
    };
}

// 更新用户鼠标坐标
// --------------------------------------
function updateMousePosition(evt) {
    var rect = ECS.$canvas.getBoundingClientRect();
    userInputPosition.x = evt.clientX - rect.left;
    userInputPosition.y = evt.clientY - rect.top;
    userInputPosition.touch = false;
}

ECS.$canvas.addEventListener('mousemove', function mouseMove (evt) {
     当鼠标移动时进行更新
    updateMousePosition(evt);
}, false);

// 通过 hammer.js插件进行触屏检测
// --------------------------------------
var mc = new Hammer.Manager(ECS.$canvas);
if(hasTouchEnabled()){
    mc.add(new Hammer.Pan({ threshold: 0, pointers: 0 }));
    mc.on("panstart", function onPanStart(ev){
        var rect = ECS.$canvas.getBoundingClientRect();

        userInputPosition.lastX = userInputPosition.x;
        userInputPosition.lastY = userInputPosition.y;

        userInputPosition.x = ev.center.x - rect.left - 10;
        userInputPosition.y = ev.center.y - rect.top - 10;
    });

    mc.on("panmove", function onPanMove(ev) {
        userInputPosition.x = userInputPosition.lastX + ev.deltaX;
        userInputPosition.y = userInputPosition.lastY + ev.deltaY;
    });

    mc.on("panend", function onPanEnd(ev){
        //userInputPosition.lastX = userInputPosition.x;
        //userInputPosition.lastY = userInputPosition.y;
    });
}

// 启动用户输入系统
// --------------------------------------
ECS.systems.userInput = function systemUserInput ( entities ) {

    var curEntity;

    for( var entityId in entities ){
        curEntity = entities[entityId];
        //当前实体为玩家控制
        if( curEntity.components.playerControlled ){
            // 玩家控制的实体位置跟随用户输入位置进行移动
            curEntity.components.position.x = userInputPosition.x;
            curEntity.components.position.y = userInputPosition.y;
        }
    }
};
碰撞器系统:这个系统非常重要,他需要处理方块与方块碰撞之后触发的效果,因此一些关于这个游戏非常核心的算法也会写在这个碰撞器里面。不过这样也有不好之处,因为碰撞系统一般来说其实也就是在做碰撞检测,那么最好设计成当有两物体进行碰撞之后将这两个物体碰撞的事件传递给更上层的系统,只有当更上层的系统希望获取到碰撞检测时,再告知是什么物体发生了碰撞,那么更上层系统可以通过拿到这些物体再进行一些核心算法计算并做出响应的反映可能会更好。
/* =========================================================================
 *
 * collision.js
 * 碰撞系统
 *
 * ========================================================================= */


function doesIntersect(obj1, obj2) {
    //检测obj1和obj2是否进行触碰
    //  obj1: 玩家控制的方块
    //  obj2: 需要检测碰撞的方块
    //
    var rect1 = {
        x: obj1.position.x - obj1.size,
        y: obj1.position.y - obj1.size,
        height: obj1.size * 2,
        width: obj1.size * 2
    };
    var rect2 = {
        x: obj2.position.x - obj2.size,
        y: obj2.position.y - obj2.size,
        height: obj2.size * 2,
        width: obj2.size * 2
    };

    return (rect1.x < rect2.x + rect2.width &&
        rect1.x + rect1.width > rect2.x &&
        rect1.y < rect2.y + rect2.height &&
        rect1.height + rect1.y > rect2.y);
}

// 碰撞系统
// --------------------------------------
ECS.systems.collision = function systemCollision ( entities ) {


    var curEntity;
    var entityIdsCollidedWith = [];

    for( var entityId in entities ){
        curEntity = entities[entityId];

        // 设置颜色,但并不进行渲染
        curEntity.components.appearance.colors.r = 0;

        // 含有必备的组件且当前为玩家控制
        if( curEntity.components.appearance &&
            curEntity.components.playerControlled &&
            curEntity.components.position ){

            curEntity.components.appearance.colors.r = 0;

            for( var entityId2 in entities){
                // 对实体集合当中所有包含必备组件且除了玩家控制的实体进行判别
                if( !entities[entityId2].components.playerControlled &&
                    entities[entityId2].components.position &&
                    entities[entityId2].components.collision &&
                    entities[entityId2].components.appearance ){

                    if( doesIntersect(
                        {
                            position: curEntity.components.position,
                            size: curEntity.components.appearance.size
                        },
                        {
                            position: entities[entityId2].components.position,
                            size: entities[entityId2].components.appearance.size
                        }
                    )){
                        //发生与玩家控制方块碰撞
                        curEntity.components.appearance.colors.r = 255;
                        entities[entityId2].components.appearance.colors.r = 150;

                        // 记录碰撞到的方块ID
                        entityIdsCollidedWith.push(entityId);
                        var negativeDamageCutoff = 12;

                        if(curEntity.components.health){
                            // 提升玩家生命值,并将吃掉其它方块
                            curEntity.components.health.value += Math.max(
                                -2,
                                negativeDamageCutoff - entities[entityId2].components.appearance.size
                            );

                            // 触碰小方块的额外奖励
                            if(entities[entityId2].components.appearance.size < 1.3){
                                if(curEntity.components.health.value < 30){
                                    curEntity.components.health.value += 9;
                                }
                            }
                            if ( entities[entityId2].components.appearance.size > negativeDamageCutoff ){

                                ECS.$canvas.className='badHit';
                                setTimeout(function(){
                                    ECS.$canvas.className='';
                                }, 100);

                                // 触碰黑色方块对玩家生命值进行减少
                                curEntity.components.health.value -= Math.min(
                                    5,
                                    entities[entityId2].components.appearance.size - negativeDamageCutoff
                                );


                            } else {
                                ECS.$canvas.className='goodHit';
                                setTimeout(function(){
                                    ECS.$canvas.className='';
                                }, 100);
                            }
                        }

                        // 更新分数
                        ECS.score++;
                        ECS.$score.innerHTML = ECS.score;

                        delete ECS.entities[entityId2];

                        break;
                    }
                }
            }
        }
    }

    // Add new entities if the player collided with any entities
    // ----------------------------------
    var chanceDecay = 0.8;
    var numNewEntities = 3;

    if(ECS.score > 100){
        chanceDecay = 0.6;
        numNewEntities = 4;
    }

    if(entityIdsCollidedWith.length > 0){
        for(i=0; i<entityIdsCollidedWith.length; i++){
            var newEntity;

            // Don't add more entities if there are already too many
            if(Object.keys(ECS.entities).length < 30){

                for(var k=0; k < numNewEntities; k++){
                    // Add some new collision rects randomly
                    if(Math.random() < 0.8){
                        newEntity = new ECS.Assemblages.CollisionRect();
                        ECS.entities[newEntity.id] = newEntity;

                        // add a % chance that they'll decay
                        if(Math.random() < chanceDecay){
                            newEntity.addComponent( new ECS.Components.Health() );
                        }
                    }
                }

            }
        }
    }
};
渲染系统:一般来说渲染系统不会这么简单啦,但是首先是2D游戏而且需求效果也没有那么强,所以这里实现的方式也就比较一般,主要是获取组件的rgba数值并做一些效果的调整。
/* =========================================================================
 *
 * render.js
 * 渲染系统
 *
 * ========================================================================= */
function clearCanvas () {
    // 清空Canvas
    ECS.context.save();

    ECS.context.setTransform(1, 0, 0, 1, 0, 0);
    ECS.context.clearRect(0, 0, ECS.$canvas.width, ECS.$canvas.height);

    ECS.context.restore();
}


// 渲染系统
// --------------------------------------
ECS.systems.render = function systemRender ( entities ) {
    // 刷新画布
    clearCanvas();

    var curEntity, fillStyle;

    for( var entityId in entities ){
        curEntity = entities[entityId];

        if( curEntity.components.appearance && curEntity.components.position ){

            // 基于实体的颜色数据渲染样式
            fillStyle = 'rgba(' + [
                curEntity.components.appearance.colors.r,
                curEntity.components.appearance.colors.g,
                curEntity.components.appearance.colors.b
            ];

            if(!curEntity.components.collision){
                // 不存在碰撞组件,透明
                fillStyle += ',0.1)';
            } else {
                // 存在碰撞组件
                fillStyle += ',1)';
            }

            ECS.context.fillStyle = fillStyle;

            // 不是玩家控制且非常巨大,设置为黑色方块,玩家不可触碰。重新定义新的样式
            if(!curEntity.components.playerControlled &&
            curEntity.components.appearance.size > 12){
                ECS.context.fillStyle = 'rgba(0,0,0,0.8)';
            }

            //边线样式
            ECS.context.strokeStyle = 'rgba(0,0,0,1)';

            // 绘制方块
            ECS.context.fillRect(
                curEntity.components.position.x - curEntity.components.appearance.size,
                curEntity.components.position.y - curEntity.components.appearance.size,
                curEntity.components.appearance.size * 2,
                curEntity.components.appearance.size * 2
            );
            // 绘制边线
            ECS.context.strokeRect(
                curEntity.components.position.x - curEntity.components.appearance.size,
                curEntity.components.position.y - curEntity.components.appearance.size,
                curEntity.components.appearance.size * 2,
                curEntity.components.appearance.size * 2
            );
        }
    }
};
第六步:组合系统,完成游戏
下面我们来组合我们所有的系统进入游戏的主线程逻辑。主要流程就是
创建并初始化所有游戏实体方块->为不同情况实体赋予不同的组件->按顺序开启并调用所有独立系统->逐帧调用所有系统对所有实体进行检测并刷新canvas。这样看来整个游戏主线逻辑非常清晰,因为各个系统只要认认真真地处理自己系统该处理的问题就完全不需要在主进程中做任何处理。
/* =========================================================================
 *
 * game.js
 * 组件系统。控制游戏逻辑
 *
 * ========================================================================= */
ECS.Game = function Game (){

    var self = this;

    // 创建实体
    // ----------------------------------
    var entities = {}; //实体JSON结构 { id: entity  }
    var entity;

    //创建随机个实体
    for(var i=0; i < 20; i++){
        entity = new ECS.Entity();
        entity.addComponent( new ECS.Components.Appearance());
        entity.addComponent( new ECS.Components.Position());

        // % 随机生成衰减方块,只有衰减方块才具备生命值
        if(Math.random() < 0.8){
            entity.addComponent( new ECS.Components.Health() );
        }

        entity.addComponent( new ECS.Components.Collision());

        entities[entity.id] = entity;
    }

    // 玩家实体
    // ----------------------------------
    entity = new ECS.Entity();
    entity.addComponent( new ECS.Components.Appearance());
    entity.addComponent( new ECS.Components.Position());
    entity.addComponent( new ECS.Components.PlayerControlled() );
    entity.addComponent( new ECS.Components.Health() );
    entity.addComponent( new ECS.Components.Collision() );


    entity.components.appearance.colors.g = 255;
    entities[entity.id] = entity;


    // 存储所有生成实体
    ECS.entities = entities;

    // 启动系统
    // ----------------------------------
    var systems = [
        ECS.systems.userInput,
        ECS.systems.collision,
        ECS.systems.decay,
        ECS.systems.render
    ];

    // 游戏主进程
    // ----------------------------------
    function gameLoop (){

        for(var i=0,len=systems.length; i < len; i++){
            // 启动所有系统
            systems[i](ECS.entities);
        }

        // 如果当前未处于运行状态,则重新激活主进程
        if(self._running !== false){
            requestAnimationFrame(gameLoop);
        }
    }
    // 启动游戏主进程
    requestAnimationFrame(gameLoop);

    // 失败情况
    // ----------------------------------
    this._running = true; // 设置游戏正在运行
    this.endGame = function endGame(){
        self._running = false;
        document.getElementById('final-score').innerHTML = ECS.score;
        document.getElementById('game-over').className = '';

        setTimeout(function(){
            document.getElementById('game-canvas').className = 'game-over';
        }, 100);
    };


    return this;
};

// 启动游戏
ECS.game = new ECS.Game();
结语
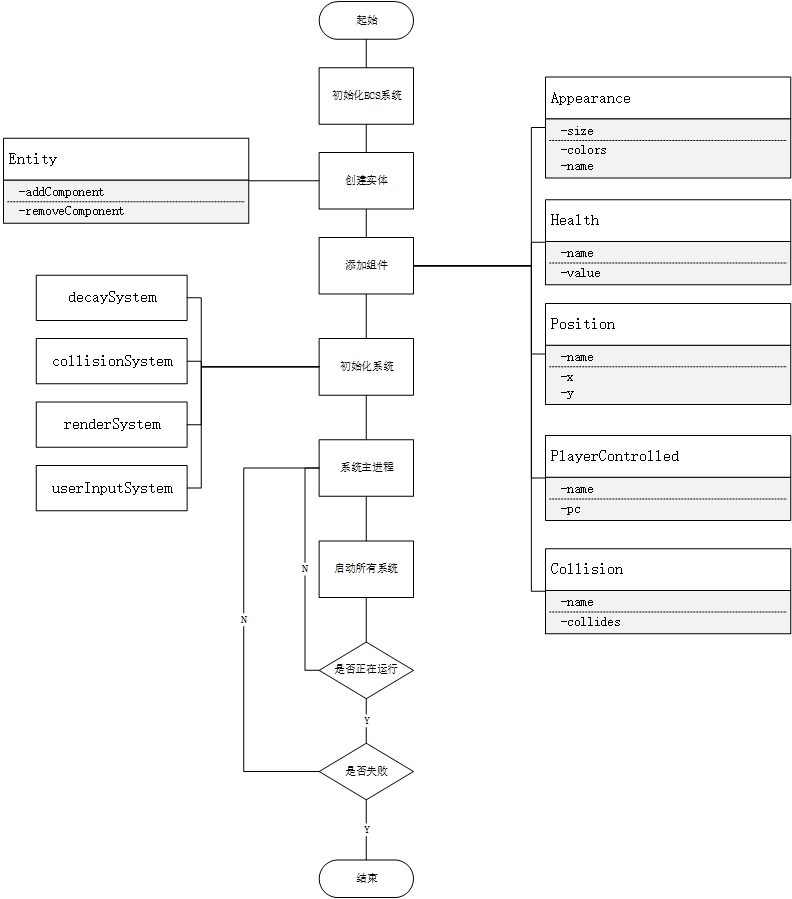
对于ECS基础系统的学习基本上就结束了,下面附带一张整个系统的架构图。要想深入了解ECS系统还是需要不断深入地思考并改善这个系统,因为现在貌似对这样一个系统并没有那么多的资料可供我们参考,逐步构建并完善我们自己的系统才是最重要的。最后,学习到这篇译文的内容确实对我学习ECS系统帮助良多,附上Demo的git地址,大家可以自己下载去看哦。
2017.6.19 更新
很久不更新博客了,上面的链接地址失效,下面附上新的链接地址,是我以前自己写的,应该有注释。

开源、云原生的融合云平台
更多推荐
 2
2 0
0- 0


 已为社区贡献1条内容

所有评论(0)