【Cocos2dx】新建场景、场景的切换、设置启动场景与菜单的新建
这是Cocos2dx最简单的部分。主要是体现对场景的操作,其实这东西就是Flash的舞台,安卓的Activity,WIN32窗体程序的Framework窗体,网页的body,反正就是对那个容纳各种东西的大容器进行操作,爱怎么叫就怎么叫。用一个例子说明这个问题,将会做出如下的效果,在官方提供的Helloworld加一个场景Scene1,Scene1里面就摆一个可以切回Helloworld的按钮,
这是Cocos2dx最简单的部分。主要是体现对场景的操作,其实这东西就是Flash的舞台,安卓的Activity,WIN32窗体程序的Framework窗体,网页的body,反正就是对那个容纳各种东西的大容器进行操作,爱怎么叫就怎么叫。
用一个例子说明这个问题,将会做出如下的效果,在官方提供的Helloworld加一个场景Scene1,Scene1里面就摆一个可以切回Helloworld的按钮,同时设置这个Scene1为启动程序(游戏)的初始场景。同时对原本Helloworld场景的关闭按钮进行改造,原本关闭程序调整为切换到Scene1。两个场景切换有动画效果,当然这是Cocos2dx本来就自带的。
1、首先,与《【Cocos2dx】Windows平台下Cocos2dx 2.x的下载、安装、配置,打造自己的Helloworld》(点击打开链接)中一样,利用(cocos2d-x-2.2.6安装目录).\tools\project-creator下的create_project.py,输入:
create_project.py -project Scene -package test.scene -language cpp 在(cocos2d-x-2.2.6安装目录).\project下得到一个Scene文件夹,打开其中的proj.win32中的HelloCpp.sln利用vs2010进行编辑。
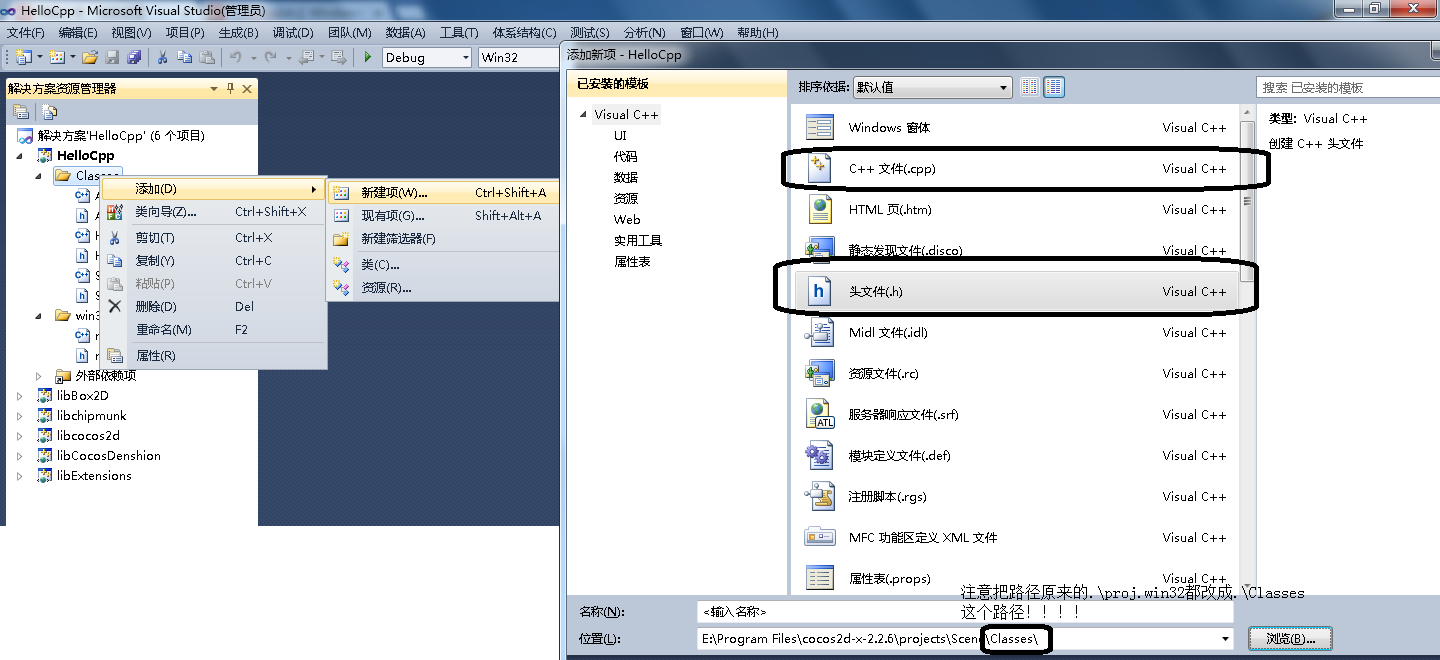
2、上来直接新建场景Scene1,如下图,对HelloCpp下的Classes文件夹中,新建两个项一个Scene1.h,另一个为Scene1.cpp。
这里千万要注意的时,记得把这个文件创建在(工程目录).\Classes文件中,默认是坑爹的proj.win32,如果不创建在.\Classes文件夹中,你创建的文件夹,无法与原来就存在的文件使用include命令相互交互……
3、对Scene1.h编写如下的代码,技巧是模仿原来就存在的HelloWorldScene.h声明一个场景
#ifndef __SCENE1_H__
#define __SCENE1_H__

#include "cocos2d.h"

class Scene1:public cocos2d::CCLayer
{
public:
    // Here's a difference. Method 'init' in cocos2d-x returns bool, instead of returning 'id' in cocos2d-iphone
    virtual bool init();

    // there's no 'id' in cpp, so we recommend returning the class instance pointer
    static cocos2d::CCScene* scene();

	void menuGoToHelloworld(CCObject* pSender);//声明场景切换的按钮的回调(执行)函数

    //原本为HelloWorld这里改成Scene1
    CREATE_FUNC(Scene1);
};

#endif

//这里仿造HelloWorldScene.h这个文件进行修改,把原本为HelloWorld都改成Scene1,此文件主要是场景的声明、按钮函数的声明
4、之后,对Scene1.cpp编写如下的代码,同样是模仿原来就存在的HelloWorldScene.cpp的关闭按钮,及其回调函数,也就是执行函数。
#include "HelloWorldScene.h"//由于要切换回Helloworld这个场景,因此要声明这个函数
#include "Scene1.h"

USING_NS_CC;
//声明部分,依旧仿造HelloWorldScene.h进行修改
CCScene* Scene1::scene()
{
	// 'scene' is an autorelease object
	CCScene *scene = CCScene::create();

	// 'layer' is an autorelease object
	Scene1 *layer = Scene1::create();

	// add layer as a child to scene
	scene->addChild(layer);

	// return the scene
	return scene;
}

//精华部分,场景组件的放置
bool Scene1::init()
{
	//声明位置组件,主要是为了下方确定位置的setPosition函数中ccp,origin等可以跨平台确定函数的组件可用
	CCSize visibleSize = CCDirector::sharedDirector()->getVisibleSize();
	CCPoint origin = CCDirector::sharedDirector()->getVisibleOrigin();

	//声明一个按钮
	CCMenuItemImage *pCloseItem = CCMenuItemImage::create(
		"CloseNormal.png",//正常状态的图片,系统自带的
		"CloseSelected.png",//被点击的图片
		this,
		menu_selector(Scene1::menuGoToHelloworld));//声明按钮的回调(执行)函数,头文件已经声明过这个函数

	//按钮的位置
	pCloseItem->setPosition(ccp(origin.x + visibleSize.width/2,origin.y + visibleSize.height/2));

	//摆放按钮的固有实现部分,HelloWorldScene.cpp复制过来的,什么意思不用管
	// create menu, it's an autorelease object
	CCMenu* pMenu = CCMenu::create(pCloseItem, NULL);
	pMenu->setPosition(CCPointZero);
	this->addChild(pMenu);


	return true;
}

//按钮的回调(执行)函数的实现
void Scene1::menuGoToHelloworld(CCObject* pSender)
{
#if (CC_TARGET_PLATFORM == CC_PLATFORM_WINRT) || (CC_TARGET_PLATFORM == CC_PLATFORM_WP8)
	CCMessageBox("You pressed the close button. Windows Store Apps do not implement a close button.","Alert");
#else
	//核心在这句话,其余都是HelloWorldScene.cpp复制过来的,什么意思不用管,把原本的end()方法,改成切换场景replaceScene()方法。
	//CCTransitionMoveInL为左进入特效,0.4f为耗时,越少越快,可以为3.0f等,HelloWorld::scene()就是要切换到的场景
	CCDirector::sharedDirector()->replaceScene(CCTransitionMoveInL::create(0.4f,HelloWorld::scene()));
#if (CC_TARGET_PLATFORM == CC_PLATFORM_IOS)
	exit(0);
#endif
#endif
}#include "HelloWorldScene.h"
#include "Scene1.h"//引入要切换的场景
USING_NS_CC;
CCScene* HelloWorld::scene()
{
// 'scene' is an autorelease object
CCScene *scene = CCScene::create();
// 'layer' is an autorelease object
HelloWorld *layer = HelloWorld::create();
// add layer as a child to scene
scene->addChild(layer);
// return the scene
return scene;
}
// on "init" you need to initialize your instance
bool HelloWorld::init()
{
//////////////////////////////
// 1. super init first
if ( !CCLayer::init() )
{
return false;
}
CCSize visibleSize = CCDirector::sharedDirector()->getVisibleSize();
CCPoint origin = CCDirector::sharedDirector()->getVisibleOrigin();
/////////////////////////////
// 2. add a menu item with "X" image, which is clicked to quit the program
// you may modify it.
// add a "close" icon to exit the progress. it's an autorelease object
CCMenuItemImage *pCloseItem = CCMenuItemImage::create(
"CloseNormal.png",
"CloseSelected.png",
this,
menu_selector(HelloWorld::menuCloseCallback));
pCloseItem->setPosition(ccp(origin.x + visibleSize.width - pCloseItem->getContentSize().width/2 ,
origin.y + pCloseItem->getContentSize().height/2));
// create menu, it's an autorelease object
CCMenu* pMenu = CCMenu::create(pCloseItem, NULL);
pMenu->setPosition(CCPointZero);
this->addChild(pMenu, 1);
/////////////////////////////
// 3. add your codes below...
// add a label shows "Hello World"
// create and initialize a label
CCLabelTTF* pLabel = CCLabelTTF::create("Hello World", "Arial", 24);
// position the label on the center of the screen
pLabel->setPosition(ccp(origin.x + visibleSize.width/2,
origin.y + visibleSize.height - pLabel->getContentSize().height));
// add the label as a child to this layer
this->addChild(pLabel, 1);
// add "HelloWorld" splash screen"
CCSprite* pSprite = CCSprite::create("HelloWorld.png");
// position the sprite on the center of the screen
pSprite->setPosition(ccp(visibleSize.width/2 + origin.x, visibleSize.height/2 + origin.y));
// add the sprite as a child to this layer
this->addChild(pSprite, 0);
return true;
}
void HelloWorld::menuCloseCallback(CCObject* pSender)
{
#if (CC_TARGET_PLATFORM == CC_PLATFORM_WINRT) || (CC_TARGET_PLATFORM == CC_PLATFORM_WP8)
CCMessageBox("You pressed the close button. Windows Store Apps do not implement a close button.","Alert");
#else
CCDirector::sharedDirector()->replaceScene(CCTransitionFade::create(0.4f,Scene1::scene()));//核心的修改
#if (CC_TARGET_PLATFORM == CC_PLATFORM_IOS)
exit(0);
#endif
#endif
}
这里,切换场景的特效,可以通过查询cocos2dx的API进行了解,常用的特效如下所示:
//慢慢淡化到另一场景
TransitionCrossFade::create(时间,目标场景);
//本场景变暗消失后另一场景慢慢出现
TransitionFade::create(时间,目标场景);
//本场景右上角到左下角方块消失到另一场景
TransitionFadeBL::create(时间,目标场景);
//本场景从上到下横条消失到另一场景
TransitionFadeDown::create(时间,目标场景);
//本场景左下角到右上角方块消失到另一场景
TransitionFadeTR::create(时间,目标场景);
//本场景从下到上横条消失到另一场景
TransitionFadeUp::create(时间,目标场景);
//本场景翻转消失到另一场景(斜上方)
TransitionFlipAngular::create(时间,目标场景,样式 );
//本场景翻转消失到另一场景(X轴)
TransitionFlipX::create(时间,目标场景,样式);
//本场景翻转消失到另一场景(Y轴)
TransitionFlipY::create(时间,目标场景);
//本场景跳动消失后另一场景跳动出现
TransitionJumpZoom::create(时间,目标场景);
//另一场景由整体从下面出现
TransitionMoveInB::create(时间,目标场景);
//另一场景由整体从左面出现
TransitionMoveInL::create(时间,目标场景);
//另一场景由整体从上面出现
TransitionMoveInT::create(时间,目标场景);
//另一场景由整体从右面出现
TransitionMoveInR::create(时间,目标场景);
//翻页切换,bool为true是向前翻。
TransitionPageTurn::create(时间,目标场景,bool);
//本场景从左到右消失同时另一场景出现
TransitionProgressHorizontal::create(时间,目标场景);
//本场景从中间到四周消失同时另一场景出现
TransitionProgressInOut::create(时间,目标场景);
//本场景从四周到中间消失同时另一场景出现
TransitionProgressOutIn::create(时间,目标场景);
//本场景逆时针消失到另一场景
TransitionProgressRadialCCW::create(时间,目标场景);
//本场景顺时针消失到另一场景
TransitionProgressRadialCW::create(时间,目标场景);
//本场景从上到下消失同时另一场景出现
TransitionProgressVertical::create(时间,目标场景);
//本场景旋转消失后另一场景旋转出现
TransitionRotoZoom::create(时间,目标场景);
//本场景缩小切换到另一场景放大
TransitionShrinkGrow::create(时间,目标场景);
//本场景向上滑动到另一场景
TransitionSlideInB::create(时间,目标场景);
//本场景向右滑动到另一场景
TransitionSlideInL::create(时间,目标场景);
//本场景向左滑动到另一场景
TransitionSlideInR::create(时间,目标场景);
//本场景向下滑动到另一场景
TransitionSlideInT::create(时间,目标场景);
//本场景三矩形上下消失后另一场景三矩形上下出现
TransitionSplitCols::create(时间,目标场景);
//本场景三矩形左右消失后另一场景三矩形左右出现
TransitionSplitRows::create(时间,目标场景);
//本场景小方块消失到另一场景
TransitionTurnOffTiles::create(时间,目标场景);
//本场景翻转消失到另一场景(斜上方)
TransitionZoomFlipAngular::create(时间,目标场景,样式);
//本场景翻转消失到另一场景(X轴)
TransitionZoomFlipX::create(时间,目标场景,样式);
//本场景翻转消失到另一场景(Y轴)
TransitionZoomFlipY::create(时间,目标场景,样式);
6、最后,修改程序开场所展示的场景就完事了,具体是在AppDelegate.cpp中,先引入我们创建的Scene1.h,同时将第29行的Helloworld改为Scene1,同时关闭第23行难看的提示信息。具体修改如下:
#include "AppDelegate.h"
#include "HelloWorldScene.h"
#include "Scene1.h"

USING_NS_CC;

AppDelegate::AppDelegate() {

}

AppDelegate::~AppDelegate()
{
}

bool AppDelegate::applicationDidFinishLaunching() {
    // initialize director
    CCDirector* pDirector = CCDirector::sharedDirector();
    CCEGLView* pEGLView = CCEGLView::sharedOpenGLView();

    pDirector->setOpenGLView(pEGLView);

    // turn on display FPS
    pDirector->setDisplayStats(false);

    // set FPS. the default value is 1.0/60 if you don't call this
    pDirector->setAnimationInterval(1.0 / 60);

    // create a scene. it's an autorelease object
    CCScene *pScene = Scene1::scene();//修改启动的场景为Scene1

    // run
    pDirector->runWithScene(pScene);

    return true;
}

// This function will be called when the app is inactive. When comes a phone call,it's be invoked too
void AppDelegate::applicationDidEnterBackground() {
    CCDirector::sharedDirector()->stopAnimation();

    // if you use SimpleAudioEngine, it must be pause
    // SimpleAudioEngine::sharedEngine()->pauseBackgroundMusic();
}

// this function will be called when the app is active again
void AppDelegate::applicationWillEnterForeground() {
    CCDirector::sharedDirector()->startAnimation();

    // if you use SimpleAudioEngine, it must resume here
    // SimpleAudioEngine::sharedEngine()->resumeBackgroundMusic();
}

云原生社区为您提供最前沿的新闻资讯和知识内容
更多推荐


 5
5 0
0- 0


 已为社区贡献10条内容

所有评论(0)