Ubuntu Server 16.04 安装+安全Web服务器(linux+apache+mysql+php)搭建流程(更新至Ubuntu Server 16.04 LTS + PHP7)
之前整过CentOS,整了Ubuntu才发现,Ubuntu简单多了~~不知道性能相比又如何。以Ubtuntu 14.04为例,记录一下搭建流程。一、安装注意点1. IP地址安装时先不要插网线,不然会DHCP,后续配置起来也麻烦2. 硬盘分区自动分区貌似有:/、swap、efiswap、/boot(200MB)实际两个区就足够了:swap为内存的1~2倍大小,剩余皆为/二、IP配置装完后一般远程连
之前整过CentOS,整了Ubuntu才发现,Ubuntu简单多了~~不知道性能相比又如何。
以Ubtuntu 14.04为例,记录一下搭建流程。
安装注意点
1. IP地址
安装时先不要插网线,不然会DHCP,后续配置起来也麻烦
2. 硬盘分区
自动分区貌似有:/、swap、efiswap、/boot(200MB)
实际两个区就足够了:swap为内存的1~2倍大小,剩余皆为/
IP配置
装完后一般远程连接,需要配置ip地址,以下是多ip配置。(安装时会以向导形式配好一个IP,修改时只要复制粘贴就可以)
vi /etc/network/interfaces配置信息:
 # The primary network interface
 auto em0
 iface em0 inet static
         address 192.168.1.1
         netmask 255.255.252.0
         network 192.168.1.0
         broadcast 192.168.1.255
         gateway 192.168.8.254
         # dns-* options are implemented by the resolvconf package, if installed
         dns-nameservers 8.8.8.8 8.8.8.9
         # dns-search 163.com

 # The second network interface
 auto em1
 iface em1 inet static
         address 192.168.1.2
         netmask 255.255.252.0
         network 192.168.1.0
重启网卡(貌似不一定生效,reboot肯定可以)
/etc/init.d/networking restartSSH服务器
apt-get install ssh默认安装后vi /etc/ssh/sshd_config,修改配置文件。
安全起见,可以建立允许列表:
1. 修改/etc/hosts.allow:
sshd: 192.168.1. , 192.168.0. : allow2. 修改/etc/hosts.deny:
sshd : ALL系统更新
先更新源,用以Trusty Tahr (14.04)为例,其他版本看配置生成器
deb http://mirrors.ustc.edu.cn/ubuntu/ trusty main restricted universe multiverse
deb http://mirrors.ustc.edu.cn/ubuntu/ trusty-security main restricted universe multiverse
deb http://mirrors.ustc.edu.cn/ubuntu/ trusty-updates main restricted universe multiverse
deb http://mirrors.ustc.edu.cn/ubuntu/ trusty-proposed main restricted universe multiverse
deb http://mirrors.ustc.edu.cn/ubuntu/ trusty-backports main restricted universe multiverse
deb-src http://mirrors.ustc.edu.cn/ubuntu/ trusty main restricted universe multiverse
deb-src http://mirrors.ustc.edu.cn/ubuntu/ trusty-security main restricted universe multiverse
deb-src http://mirrors.ustc.edu.cn/ubuntu/ trusty-updates main restricted universe multiverse
deb-src http://mirrors.ustc.edu.cn/ubuntu/ trusty-proposed main restricted universe multiverse
deb-src http://mirrors.ustc.edu.cn/ubuntu/ trusty-backports main restricted universe multiverse
再更新apt-get
apt-get update
sudo apt-get upgrade
然后更新系统并重启
sudo apt-get install update补充:ssh终端乱码问题
ubuntu默认是中文编码,然后又没法正常中文,因此putty连接时会乱码,只要设定即可 /etc/default/locale:
LANG=”zh_CN.UTF-8″
LANGUAGE=”zh_CN:zh:en_US:en”
如果不行:
1. 查看 /var/lib/locales/supported.d/local 中设定的字符集:
en_US.UTF-8 UTF-8
zh_CN.UTF-8 UTF-8
zh_CN.GBK GBK
zh_CN GB2312保存后,执行命令:sudo locale-gen
- 打开
/etc/environment,添加:
LANG=”zh_CN.UTF-8″
LANGUAGE=”zh_CN:zh:en_US:en”
reboot 即可
Samba安装网上邻居
- 默认安装 apt-get install samba
- 为samba创建ubuntu系统已经存在的用户somebody:
smbpasswd -a somebody然后会提示你输入密码,这是访问网上邻居文件夹的密码。
3. 修改配置文件:
cp /etc/samba/smb.conf /etc/samba/smb.conf.bak
vi /etc/samba/smb.conf
在其后增加共享目录:
[share]
    path = /home/somebody/samba_share
      available = yes
      browseable = yes
      public = no
      writable = yes
[home]
   comment = Users' Home
   path = /home
   admin users = somebody
   writable = yes
   hosts deny = ALL
   hosts allow = 192.168.1.7
[www]
   path = /var/www
   admin users = somebody
   writable = yes
   hosts deny = ALL
   hosts allow = 192.168.1.7
[logs]
   path = /var/log
   read only = yes
- 重启samba就可以像windows一样访问
/etc/init.d/samba restart 安装apache2
apt-get install apache2 装好后访问http://localhost就可以看到“It Works!”
apache2配置文件在/etc/apache2/apache2.conf,web目录在/var/www/html
默认用户是www-data,定义在./envvars文件中
其他配置文件在:./sites-enabled/*.conf
启用rewrite
sudo a2enmod rewrite并修改AllowOverride None 为AllowOverride All
安装mysql
apt-get install mysql-server mysql-client安装过程需要设置root的密码。Ubuntu下,MySQL的配置信息在/etc/mysql目录
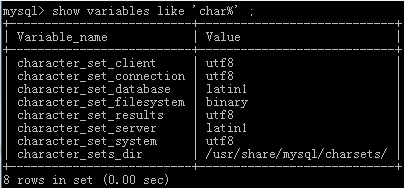
MySQL默认的字符集是latin1: 
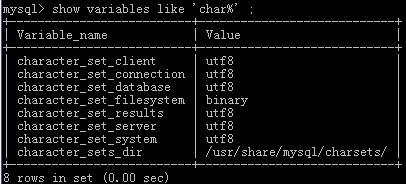
为了避免中文可能带来的乱码问题,将默认字符集改成utf-8,具体可以参考这篇文章,修改 /etc/mysql/my.cnf 文件,在相应位置添加:
[client]
default-character-set=utf8

[mysql]
default-character-set=utf8

[mysqld]
collation-server = utf8_unicode_ci
init-connect='SET NAMES utf8'
character-set-server = utf8
修改后是这样的:
安装php5及Apache的php5模块
apt-get install php5 libapache2-mod-php5 php5-mysql php5-curl php5-gd php5-intl php-pear php5-imagick php5-imap php5-mcrypt php5-memcache php5-ming php5-ps php5-pspell php5-recode php5-snmp php5-sqlite php5-tidy php5-xmlrpc php5-xsl安装php7
apt-get install php libapache2-mod-php php7.0-mysqlOK! It Works!
安装常用模块(gd mysql-dev mbstring)
apt install libmysqlclient-dev libmysql++-dev php7.0-mysql php7.0-gd fp-compiler php7.0-mbstringApache配置
<VirtualHost ip or *:80>
    # The ServerName directive sets the request scheme, hostname and port that
    # the server uses to identify itself. This is used when creating
    # redirection URLs. In the context of virtual hosts, the ServerName
    # specifies what hostname must appear in the request's Host: header to
    # match this virtual host. For the default virtual host (this file) this
    # value is not decisive as it is used as a last resort host regardless.
    # However, you must set it for any further virtual host explicitly.
    #ServerName www.example.com

    ServerAdmin webmaster1@localhost
    DocumentRoot /var/www/html
    ServerName ip or domain

    # Available loglevels: trace8, ..., trace1, debug, info, notice, warn,
    # error, crit, alert, emerg.
    # It is also possible to configure the loglevel for particular
    # modules, e.g.
    #LogLevel info ssl:warn

    ErrorLog ${APACHE_LOG_DIR}/error.log
    CustomLog ${APACHE_LOG_DIR}/access.log combined

    # For most configuration files from conf-available/, which are
    # enabled or disabled at a global level, it is possible to
    # include a line for only one particular virtual host. For example the
    # following line enables the CGI configuration for this host only
    # after it has been globally disabled with "a2disconf".
    #Include conf-available/serve-cgi-bin.conif
    <Directory "/var/www/html">
            Options FollowSymLinks
            AllowOverride All
            Order allow,deny
            Allow from all
    </Directory>

    Alias /something "/var/www/html/public"
    <Directory "/var/www/yzoi/public">
            Options FollowSymLinks
            AllowOverride All
            Order allow,deny
            Allow from all
    </Directory>
</VirtualHost>
FTP Server
vsftpd安装与配置,戳这里
可能会出现的问题:
ServerName问题
apr_sockaddr_info_get() failed for localhost
....
ServerName error明明在apache2.conf里设置了ServerName,apache2还是报错?那么就是系统host名的关系,在/etc/hosts中:
127.0.0.1       localhost
user-ip-address    domain.com   hostname

# The following lines are desirable for IPv6 capable hosts
::1     localhost ip6-localhost ip6-loopback
ff02::1 ip6-allnodes
ff02::2 ip6-allrouters
domain.com是你设定的域名,hostname是你主机名,最好和/etc/hostname主机名一致
更多推荐
 已为社区贡献2条内容


所有评论(0)