
Zeroclaw 配置本地 LM Studio 模型实战
本文详细介绍了如何在Windows环境下部署ZeroClaw本地AI助手,结合LMStudio实现完全离线的AI服务。主要内容包括:1)环境准备(Rust工具链、Git、Python);2)源码构建与LMStudio配置;3)ZeroClaw初始化与交互式配置;4)Gateway设置与固定Token配置;5)Web界面搭建方案;6)常见问题排查。该方案具有启动快(<10ms)、内存占用小(&
Zeroclaw 配置本地 LM Studio 模型实战
🦀 ZeroClaw 完全部署指南:打造你的本地 AI 助手
Zero overhead. Zero compromise. 100% Rust. 100% Agnostic.
GitHub - zeroclaw-labs/zeroclaw:快速、小巧且完全自主的AI助手基础设施——可部署到任何地方,随时交换 🦀
【OpenClaw 本地实战 Ep.1】抛弃 Ollama?转向 LM Studio!Windows 下用 NVIDIA 显卡搭建 OpenClaw 本地极速推理服务
【OpenClaw 本地实战 Ep.2】零代码对接:使用交互式向导快速连接本地 LM Studio 用 CUDA GPU 推理
作者: AITechLab
日期: 2026-02-16
环境: Windows 11 + Python 3.11 + LM Studio 0.4.3
阅读时间: 15 分钟
限制: 本文仅进行本地模型和 web 界面的相关测试,未集成聊天软件进行测试。
📋 目录
🎯 项目概述
什么是 ZeroClaw?
ZeroClaw 是一个用 Rust 编写的轻量级 AI 助手基础设施,核心特点:
| 特性 | 参数 | 对比 OpenClaw |
|---|---|---|
| 内存占用 | < 5MB | 99% 更小 |
| 启动速度 | < 10ms | 400 倍更快 |
| 二进制大小 | ~3.4MB | 无需 Node.js |
| 硬件成本 | $10 设备可运行 | 无需 Mac Mini |

架构对比
┌─────────────────────────────────────────┐
│           传统方案 (OpenClaw)            │
│  Node.js + TypeScript + 依赖包 (>500MB)  │
│         启动时间 > 3 秒                 │
└─────────────────────────────────────────┘

┌─────────────────────────────────────────┐
│           ZeroClaw (本文方案)            │
│     Rust 单二进制文件 (~3.4MB)           │
│        启动时间 < 10ms                  │
│    + LM Studio 本地模型 (完全离线)        │
└─────────────────────────────────────────┘
适用场景
-
✅ 隐私敏感:数据不出本地
-
✅ 离线环境:无网络依赖
-
✅ 低资源设备:树莓派、旧电脑
-
✅ API 成本控制:零调用费用
🔧 环境准备
系统要求
| 组件 | 最低要求 | 推荐配置 |
|---|---|---|
| 操作系统 | Windows 10/11 | Windows 11 23H2 |
| 内存 | 4GB | 8GB+ |
| 磁盘 | 1GB 可用空间 | SSD 10GB+ |
| 网络 | 仅构建时需要 | 稳定连接 |
安装依赖
1. Rust 工具链
# 方法 1: 官方安装器
# 访问 https://rustup.rs/ 下载 rustup-init.exe

# 方法 2: Winget (推荐)
winget install Rustlang.Rustup

# 方法 3: MSYS2 MINGW64 (本机示例)
pacman -Syu
pacman -S mingw-w64-x86_64-rust

# 方法 4: WSL-Linux (可选)
curl --proto '=https' --tlsv1.2 -sSf https://sh.rustup.rs | sh
source ~/.bashrc # 更新环境变量

# 验证安装
rustc --version
cargo --versionMSYS2+Rust+Poetry安装tokenizers失败的排查与解决LINK : fatal error LNK1181: cannot open file “python3.lib“
预期输出:
rustc 1.84.0 (9fc6b4312 2025-01-07)
cargo 1.84.0 (66221abde 2025-01-07)
2. Git
winget install Git.Git

# 验证
git --version
3. Python (用于 Web 界面或二次开发)
# 创建 Python.3.11 虚拟环境
# 使用--copies参数避免符号链接(推荐用于可能移动的项目)
python -m venv --copies .venv
.venv\Scripts\activate
4. LM Studio
下载地址: https://lmstudio.ai/
详细设置教程请参考
【OpenClaw 本地实战 Ep.1】抛弃 Ollama?转向 LM Studio!Windows 下用 NVIDIA 显卡搭建 OpenClaw 本地极速推理服务
安装后确认:
-
[ ] 加载模型 (如
openai/gpt-oss-20b) -
[ ] 启动 Local Server (端口 1234)
-
[ ] 关闭 Require Authentication (开发环境)
-
[ ] 关闭 Require Authentication (开发环境)
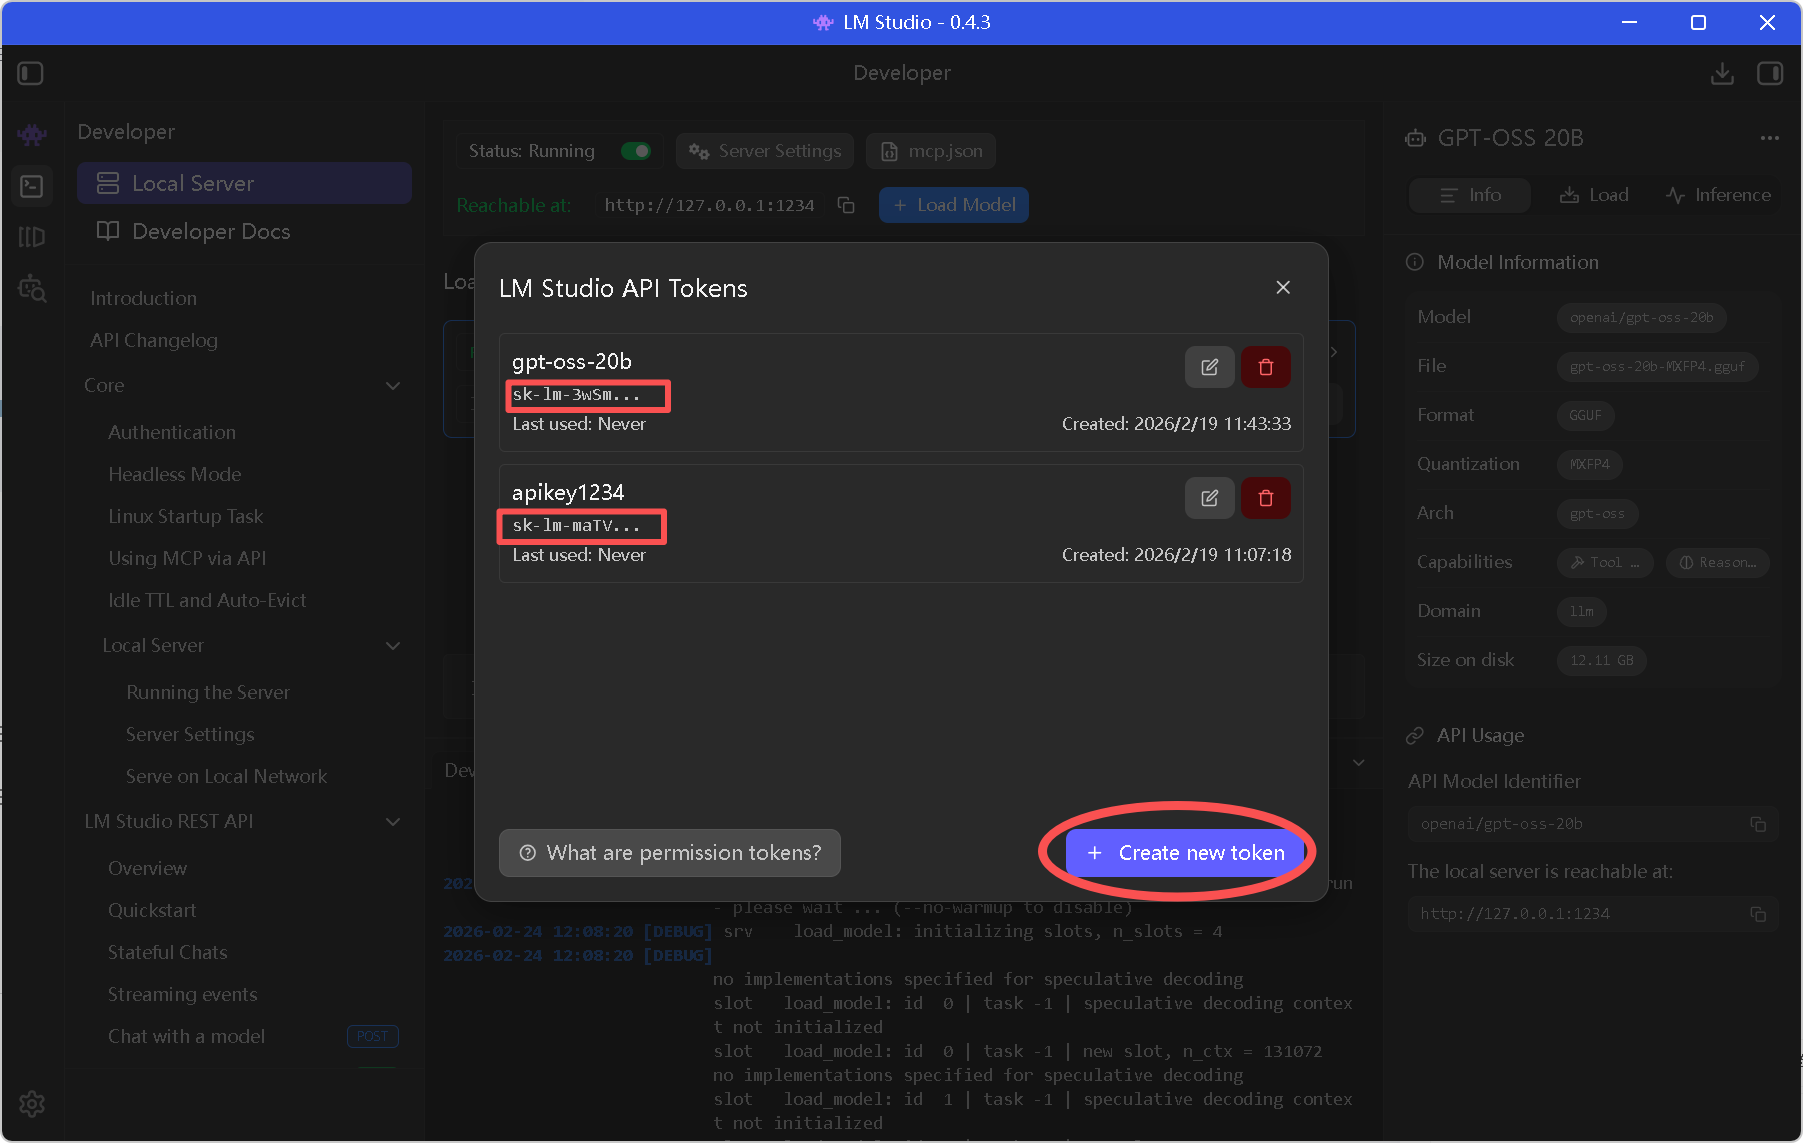
-
[ ] 创建本地模型的 API Key:格式如 sk-xxxxxxxxxxxx

🏗️ 源码构建
步骤 1: 克隆仓库
# 选择工作目录
cd J:\PythonProjects4

# 克隆源码
git clone https://github.com/zeroclaw-labs/zeroclaw.git
cd zeroclaw
步骤 2: 构建发布版本
# 开发构建 (调试使用)
cargo build

# 发布构建 (推荐, 优化体积和性能)
cargo build --release构建时间: 首次约 5-10 分钟 (取决于网络和设备)
步骤 3: 安装到系统路径
# 全局安装
cargo install --path . --force

# 验证安装
zeroclaw --version预期输出:
zeroclaw 0.1.0
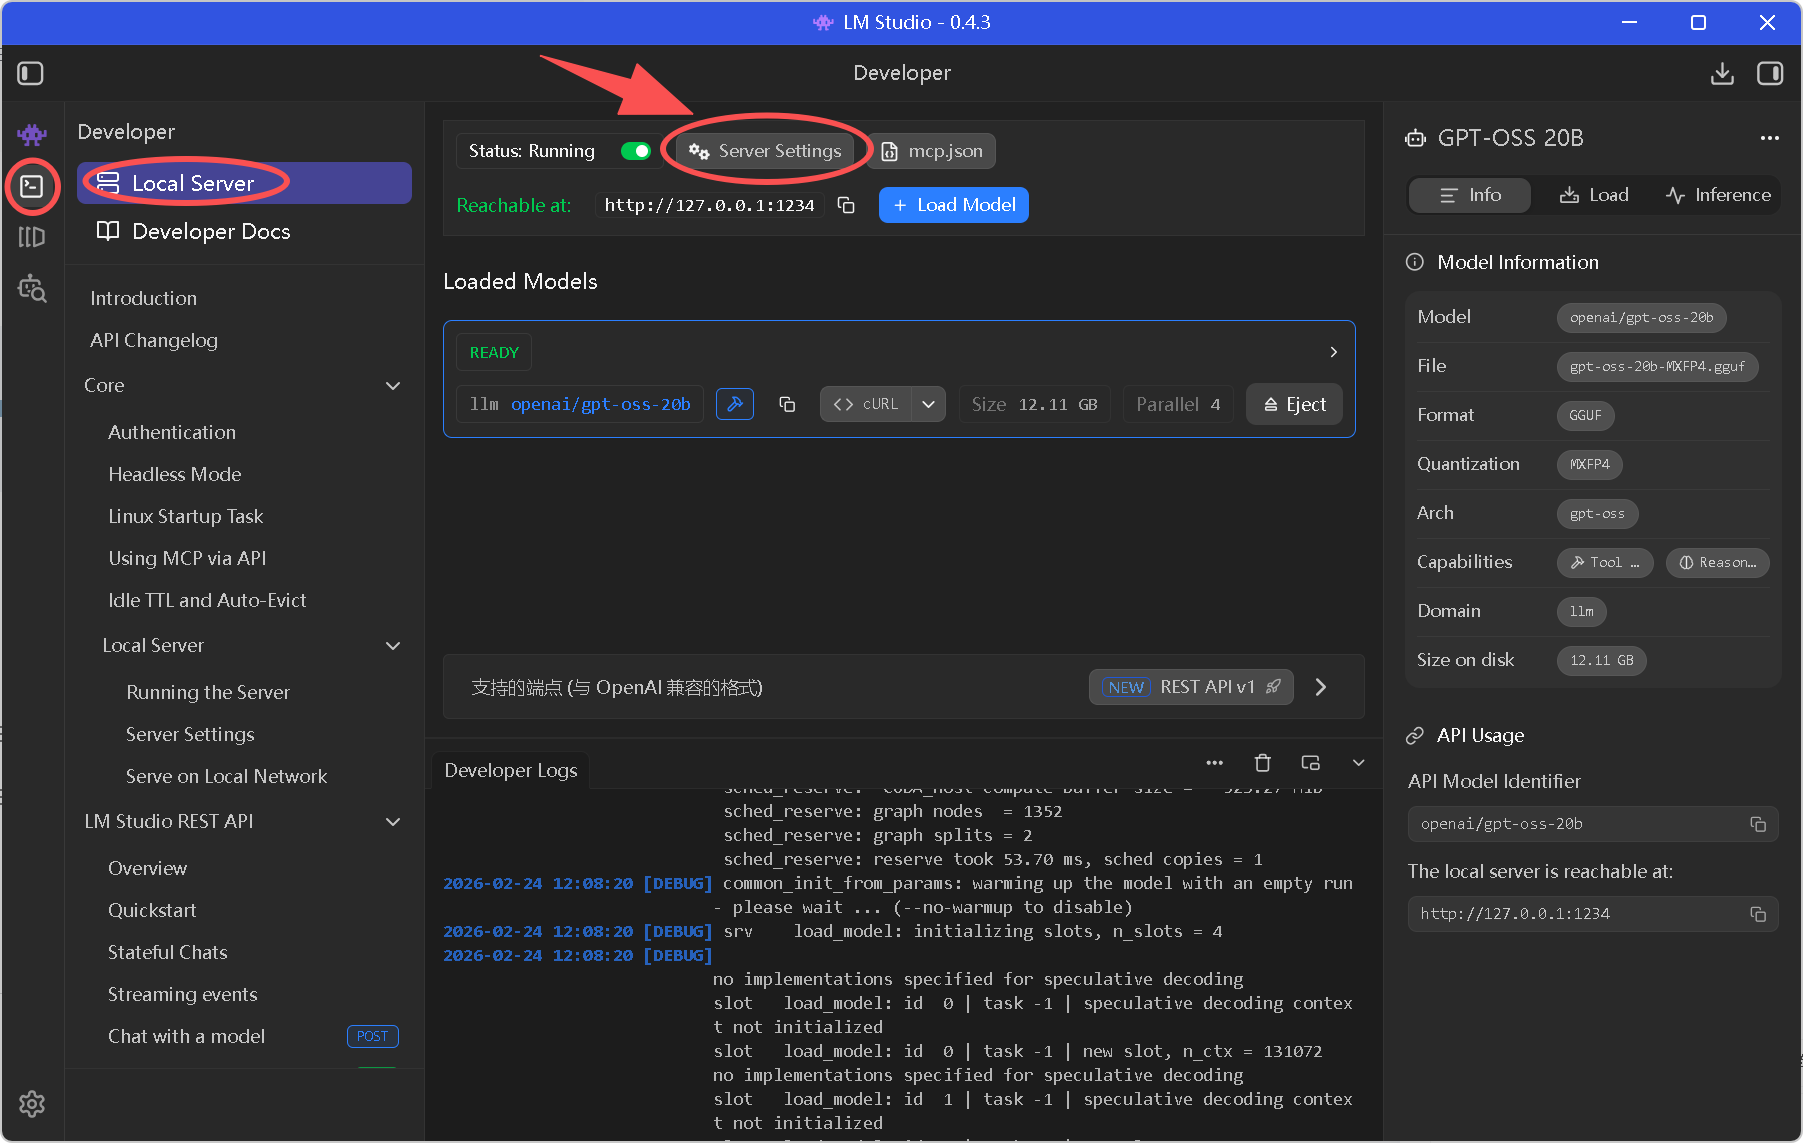
🤖 LM Studio 配置
界面操作步骤
1. 打开 LM Studio
   │
   ├── 2. 下载/加载模型
   │      └── 推荐: openai/gpt-oss-20b (中文友好)
   │
   ├── 3. 点击右下角 [→] 加载模型
   │
   └── 4. 点击左侧 [Developer] 标签
          │
          ├── 5. 点击 [Start Server]
          │      └── 确认端口: 1234
          │
          └── 6. 关闭 [Require Authentication]
                 (开发环境简化配置)
验证 LM Studio 运行
# 测试 API 可访问性
curl http://localhost:1234/v1/models预期输出:
{
  "data": [
    {
      "id": "openai/gpt-oss-20b",
      "object": "model",
      "owned_by": "organization_owner"
    }
  ]
}
⚙️ ZeroClaw 初始化
启动交互式配置向导
zeroclaw onboard --interactive配置流程详解
[1/8] Workspace Setup
› Default location: C:\Users\love\.zeroclaw
Use default workspace location? no
Enter workspace path: J:\PythonProjects4\zeroclaw\.zeroclaw
✓ Workspace: J:\PythonProjects4\zeroclaw\.zeroclaw\workspace建议: 使用默认路径,避免权限问题
[2/8] AI Provider & API Key
Select provider category: 🔧 Custom — bring your own OpenAI-compatible API

API base URL: http://localhost:1234/v1
API key: sk- xxxxxxxxxxxxx
Model name: openai/gpt-oss-20b

✓ Provider: custom:http://localhost:1234/v1 | Model: openai/gpt-oss-20b关键参数:
base_url: 必须包含/v1后缀
api_key: LM Studio 不验证,可填任意值或者 “lm studio” 或者前边获取到的 API Key
model: 须与 LM Studio 加载的模型 ID 一致
[3/8] Channels
Connect a channel (or Done to continue): Done — finish setup
✓ Channels: CLI后续可添加: Tele****, Dis****, Slack, Webhook 等
[4/8] Tunnel
Select tunnel provider: Skip — local only (default)
✓ Tunnel: none (local only)
[5/8] Tool Mode & Security
Select tool mode: Sovereign (local only) — you manage API keys, full privacy (default)
Enable encrypted secret storage? yes
✓ Secrets: encrypted
[6/8] Memory Configuration
Select memory backend: SQLite with Vector Search (recommended)
Auto-save conversations to memory? yes
✓ Memory: sqlite (auto-save: on)功能: 自动保存对话历史,支持语义搜索
[7/8] Project Context
Your name: love
Your timezone: Other (type manually)
Enter timezone: Asia/Shanghai
Agent name: lily
Communication style: Friendly & casual — warm, human, and helpful
[8/8] Workspace Files
✓ Created 8 files, skipped 0 existing | 5 subdirectories

Workspace layout:
  C:\Users\love\.zeroclaw\workspace/
  ├── sessions/
  ├── memory/
  ├── state/
  ├── skills/
  ├── IDENTITY.md
  ├── AGENTS.md
  ├── HEARTBEAT.md
  ├── SOUL.md
  ├── USER.md
  └── ...
验证配置
# 查看配置摘要
zeroclaw status预期输出:
🤖 Provider:      custom:http://localhost:1234/v1
🧠 Model:         openai/gpt-oss-20b
🛡️  Autonomy:      Supervised
🧠 Memory:        sqlite (auto-save: on)
📡 Channels:      CLI
🔑 API Key:       configured
🔒 Secrets:       encrypted
测试对话
# 单次消息
zeroclaw agent -m "你好,lily!"

# 交互模式
zeroclaw agent预期输出:
你好!👋 有什么我可以帮你的吗?
🌐 Gateway 配置与固定 Token
问题背景
默认情况下,ZeroClaw Gateway 每次启动都需要配对码,不适合浏览器访问。
修改配置
编辑全局配置文件:
notepad C:\Users\love\.zeroclaw\config.toml关键修改项
[gateway]
port = 8080
host = "127.0.0.1"
require_pairing = false          # ← 关闭配对要求
allow_public_bind = false
paired_tokens = ["abc1234"]      # ← 设置固定 Token
pair_rate_limit_per_minute = 10
webhook_rate_limit_per_minute = 60
idempotency_ttl_secs = 300
完整网关配置参考
# C:\Users\love\.zeroclaw\config.toml (关键部分)
api_key = "lm-studio"
default_provider = "custom:http://localhost:1234/v1"
default_model = "openai/gpt-oss-20b"
default_temperature = 0.7
[gateway]
port = 8080
host = "127.0.0.1"
require_pairing = false
allow_public_bind = false
paired_tokens = ["abc1234"]
pair_rate_limit_per_minute = 10
webhook_rate_limit_per_minute = 60
idempotency_ttl_secs = 300
[reliability]
provider_retries = 2
provider_backoff_ms = 500
fallback_providers = [] # ← 禁用回退,强制使用本地模型
[memory]
backend = "sqlite"
auto_save = true
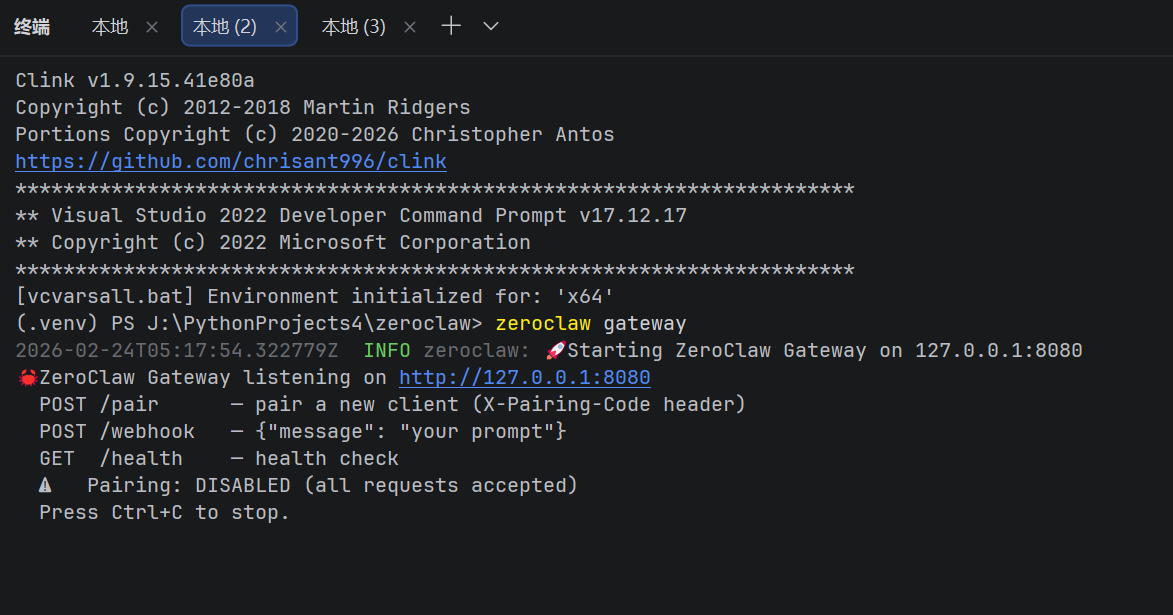
embedding_provider = "none" # ← 本地运行,禁用嵌入模型启动 Gateway
# 终端 1: 启动 Gateway
zeroclaw gateway预期输出:
🚀 Starting ZeroClaw Gateway on 127.0.0.1:8080
⚠️  Pairing: DISABLED (all requests accepted)
API 测试
# 健康检查
curl http://127.0.0.1:8080/health

# 发送消息
curl -X POST http://127.0.0.1:8080/webhook `
  -H "Authorization: Bearer abc1234" `
  -H "Content-Type: application/json" `
  -d '{"message": "你好"}'
🖥️ Web 界面搭建测试
方案一:Reflex 管理面板
ZeroClaw Reflex UI完整搭建流程——ZeroClaw Gateway + LM Studio + Reflex 本地 AI 管理面板
方案二: Python Flask 简单聊天界面
由于浏览器安全策略(CORS),直接访问 Gateway 会失败,需要搭建代 li。
创建 proxy.py:
"""
ZeroClaw Web UI Proxy
解决 CORS 问题,提供浏览器访问界面
"""

from flask import Flask, request, jsonify
from flask_cors import CORS
import requests

app = Flask(__name__)
CORS(app)

# 配置
TOKEN = "abc1234"
ZEROCLAW_URL = "http://127.0.0.1:8080/webhook"

HTML_TEMPLATE = """
<!DOCTYPE html>
<html lang="zh-CN">
<head>
    <meta charset="UTF-8">
    <meta name="viewport" content="width=device-width, initial-scale=1.0">
    <title>ZeroClaw Chat - 本地 AI 助手</title>
    <style>
        * {
            margin: 0;
            padding: 0;
            box-sizing: border-box;
        }

        body {
            font-family: -apple-system, BlinkMacSystemFont, 'Segoe UI', Roboto, sans-serif;
            background: linear-gradient(135deg, #667eea 0%, #764ba2 100%);
            min-height: 100vh;
            padding: 20px;
        }

        .container {
            max-width: 900px;
            margin: 0 auto;
            background: rgba(255, 255, 255, 0.95);
            border-radius: 20px;
            box-shadow: 0 20px 60px rgba(0,0,0,0.3);
            overflow: hidden;
        }

        .header {
            background: linear-gradient(90deg, #667eea 0%, #764ba2 100%);
            color: white;
            padding: 30px;
            text-align: center;
        }

        .header h1 {
            font-size: 2.5em;
            margin-bottom: 10px;
        }

        .header p {
            opacity: 0.9;
            font-size: 1.1em;
        }

        .status-bar {
            display: flex;
            justify-content: center;
            gap: 20px;
            padding: 15px;
            background: #f8f9fa;
            border-bottom: 1px solid #e9ecef;
            font-size: 0.9em;
            color: #666;
        }

        .status-item {
            display: flex;
            align-items: center;
            gap: 5px;
        }

        .status-dot {
            width: 8px;
            height: 8px;
            border-radius: 50%;
            background: #28a745;
            animation: pulse 2s infinite;
        }

        @keyframes pulse {
            0%, 100% { opacity: 1; }
            50% { opacity: 0.5; }
        }

        #chat {
            height: 500px;
            overflow-y: auto;
            padding: 30px;
            background: #fafafa;
        }

        .message {
            margin-bottom: 20px;
            animation: fadeIn 0.3s ease;
        }

        @keyframes fadeIn {
            from { opacity: 0; transform: translateY(10px); }
            to { opacity: 1; transform: translateY(0); }
        }

        .message-user {
            text-align: right;
        }

        .message-bubble {
            display: inline-block;
            max-width: 70%;
            padding: 15px 20px;
            border-radius: 20px;
            line-height: 1.6;
            word-wrap: break-word;
        }

        .message-user .message-bubble {
            background: linear-gradient(90deg, #667eea 0%, #764ba2 100%);
            color: white;
            border-bottom-right-radius: 5px;
        }

        .message-bot .message-bubble {
            background: white;
            color: #333;
            border: 1px solid #e9ecef;
            border-bottom-left-radius: 5px;
            box-shadow: 0 2px 5px rgba(0,0,0,0.05);
        }

        .message-meta {
            font-size: 0.75em;
            color: #999;
            margin-top: 5px;
        }

        .input-area {
            display: flex;
            gap: 15px;
            padding: 30px;
            background: white;
            border-top: 1px solid #e9ecef;
        }

        #message-input {
            flex: 1;
            padding: 15px 20px;
            border: 2px solid #e9ecef;
            border-radius: 30px;
            font-size: 1em;
            outline: none;
            transition: border-color 0.3s;
        }

        #message-input:focus {
            border-color: #667eea;
        }

        #send-btn {
            padding: 15px 30px;
            background: linear-gradient(90deg, #667eea 0%, #764ba2 100%);
            color: white;
            border: none;
            border-radius: 30px;
            font-size: 1em;
            cursor: pointer;
            transition: transform 0.2s, box-shadow 0.2s;
        }

        #send-btn:hover {
            transform: translateY(-2px);
            box-shadow: 0 5px 20px rgba(102, 126, 234, 0.4);
        }

        #send-btn:disabled {
            opacity: 0.6;
            cursor: not-allowed;
            transform: none;
        }

        .loading {
            display: inline-flex;
            align-items: center;
            gap: 8px;
            color: #666;
        }

        .loading-dots {
            display: flex;
            gap: 4px;
        }

        .loading-dots span {
            width: 8px;
            height: 8px;
            background: #667eea;
            border-radius: 50%;
            animation: bounce 1.4s infinite ease-in-out both;
        }

        .loading-dots span:nth-child(1) { animation-delay: -0.32s; }
        .loading-dots span:nth-child(2) { animation-delay: -0.16s; }

        @keyframes bounce {
            0%, 80%, 100% { transform: scale(0); }
            40% { transform: scale(1); }
        }

        .error-message {
            background: #f8d7da;
            color: #721c24;
            padding: 15px;
            border-radius: 10px;
            margin-bottom: 15px;
        }
    </style>
</head>
<body>
    <div class="container">
        <div class="header">
            <h1>🦀 ZeroClaw</h1>
            <p>本地 AI 助手 · 完全离线 · 隐私安全</p>
        </div>

        <div class="status-bar">
            <div class="status-item">
                <span class="status-dot"></span>
                <span>Gateway: 127.0.0.1:8080</span>
            </div>
            <div class="status-item">
                <span>Model: openai/gpt-oss-20b</span>
            </div>
            <div class="status-item">
                <span>Memory: SQLite</span>
            </div>
        </div>

        <div id="chat">
            <div class="message message-bot">
                <div class="message-bubble">
                    你好!我是 ZeroClaw,你的本地 AI 助手。有什么可以帮你的吗?🦀
                </div>
                <div class="message-meta">刚刚</div>
            </div>
        </div>

        <div class="input-area">
            <input
                type="text"
                id="message-input"
                placeholder="输入消息..."
                autocomplete="off"
            >
            <button id="send-btn" onclick="sendMessage()">发送</button>
        </div>
    </div>

    <script>
        const chat = document.getElementById('chat');
        const input = document.getElementById('message-input');
        const sendBtn = document.getElementById('send-btn');

        // 回车发送
        input.addEventListener('keypress', (e) => {
            if (e.key === 'Enter') sendMessage();
        });

        function addMessage(text, isUser = false) {
            const time = new Date().toLocaleTimeString('zh-CN', {
                hour: '2-digit',
                minute: '2-digit'
            });

            const div = document.createElement('div');
            div.className = `message ${isUser ? 'message-user' : 'message-bot'}`;
            div.innerHTML = `
                <div class="message-bubble">${escapeHtml(text)}</div>
                <div class="message-meta">${time}</div>
            `;
            chat.appendChild(div);
            chat.scrollTop = chat.scrollHeight;
        }

        function showLoading() {
            const id = 'loading-' + Date.now();
            const div = document.createElement('div');
            div.className = 'message message-bot';
            div.id = id;
            div.innerHTML = `
                <div class="message-bubble">
                    <span class="loading">
                        思考中
                        <span class="loading-dots">
                            <span></span><span></span><span></span>
                        </span>
                    </span>
                </div>
            `;
            chat.appendChild(div);
            chat.scrollTop = chat.scrollHeight;
            return id;
        }

        function removeLoading(id) {
            const el = document.getElementById(id);
            if (el) el.remove();
        }

        function showError(msg) {
            const div = document.createElement('div');
            div.className = 'message';
            div.innerHTML = `<div class="error-message">${escapeHtml(msg)}</div>`;
            chat.appendChild(div);
            chat.scrollTop = chat.scrollHeight;
        }

        function escapeHtml(text) {
            const div = document.createElement('div');
            div.textContent = text;
            return div.innerHTML;
        }

        async function sendMessage() {
            const text = input.value.trim();
            if (!text) return;

            // 禁用输入
            input.value = '';
            input.disabled = true;
            sendBtn.disabled = true;

            // 显示用户消息
            addMessage(text, true);

            // 显示加载
            const loadingId = showLoading();

            try {
                const response = await fetch('/chat', {
                    method: 'POST',
                    headers: {
                        'Content-Type': 'application/json'
                    },
                    body: JSON.stringify({ message: text })
                });

                if (!response.ok) {
                    throw new Error(`HTTP ${response.status}`);
                }

                const data = await response.json();
                removeLoading(loadingId);

                // 显示回复
                const reply = data.response || data.message || JSON.stringify(data);
                addMessage(reply);

            } catch (err) {
                removeLoading(loadingId);
                showError('发送失败: ' + err.message);
            } finally {
                input.disabled = false;
                sendBtn.disabled = false;
                input.focus();
            }
        }

        // 自动聚焦
        input.focus();
    </script>
</body>
</html>
"""

@app.route('/')
def index():
    """返回 Web 界面"""
    return HTML_TEMPLATE

@app.route('/chat', methods=['POST'])
def chat():
    """代理到 ZeroClaw Gateway"""
    try:
        message = request.json.get('message', '')

        resp = requests.post(
            ZEROCLAW_URL,
            headers={
                'Authorization': f'Bearer {TOKEN}',
                'Content-Type': 'application/json'
            },
            json={'message': message},
            timeout=60
        )

        return jsonify({'response': resp.text})

    except requests.exceptions.ConnectionError:
        return jsonify({'response': '错误: 无法连接到 ZeroClaw Gateway,请确认已运行 `zeroclaw gateway`'}), 503

    except Exception as e:
        return jsonify({'response': f'错误: {str(e)}'}), 500

if __name__ == '__main__':
    print("🦀 ZeroClaw Web UI")
    print("访问地址: http://127.0.0.1:5000")
    print("请确保 Gateway 已启动: zeroclaw gateway")
    app.run(host='127.0.0.1', port=5000, debug=False)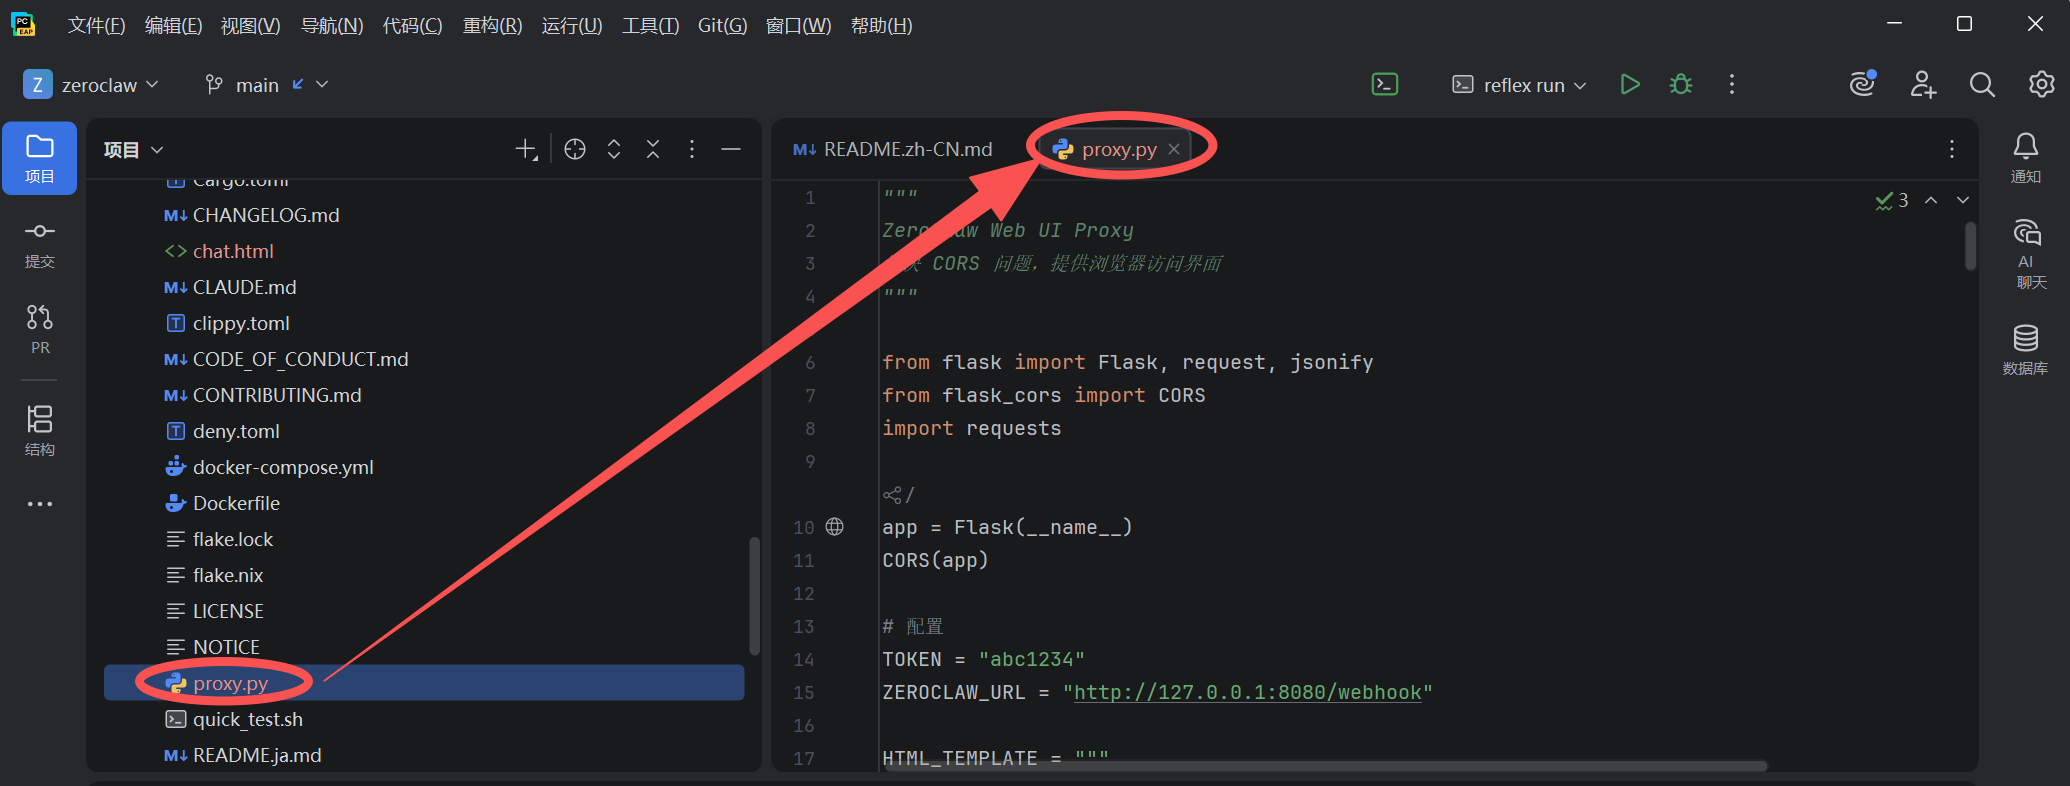
安装依赖并运行
# 安装依赖
pip install flask flask-cors requests

# 启动网关
zeroclaw gateway
启动网关后不要关闭网关终端
重新打开另一个终端然后运行
# 运行(启动web界面)
python proxy.py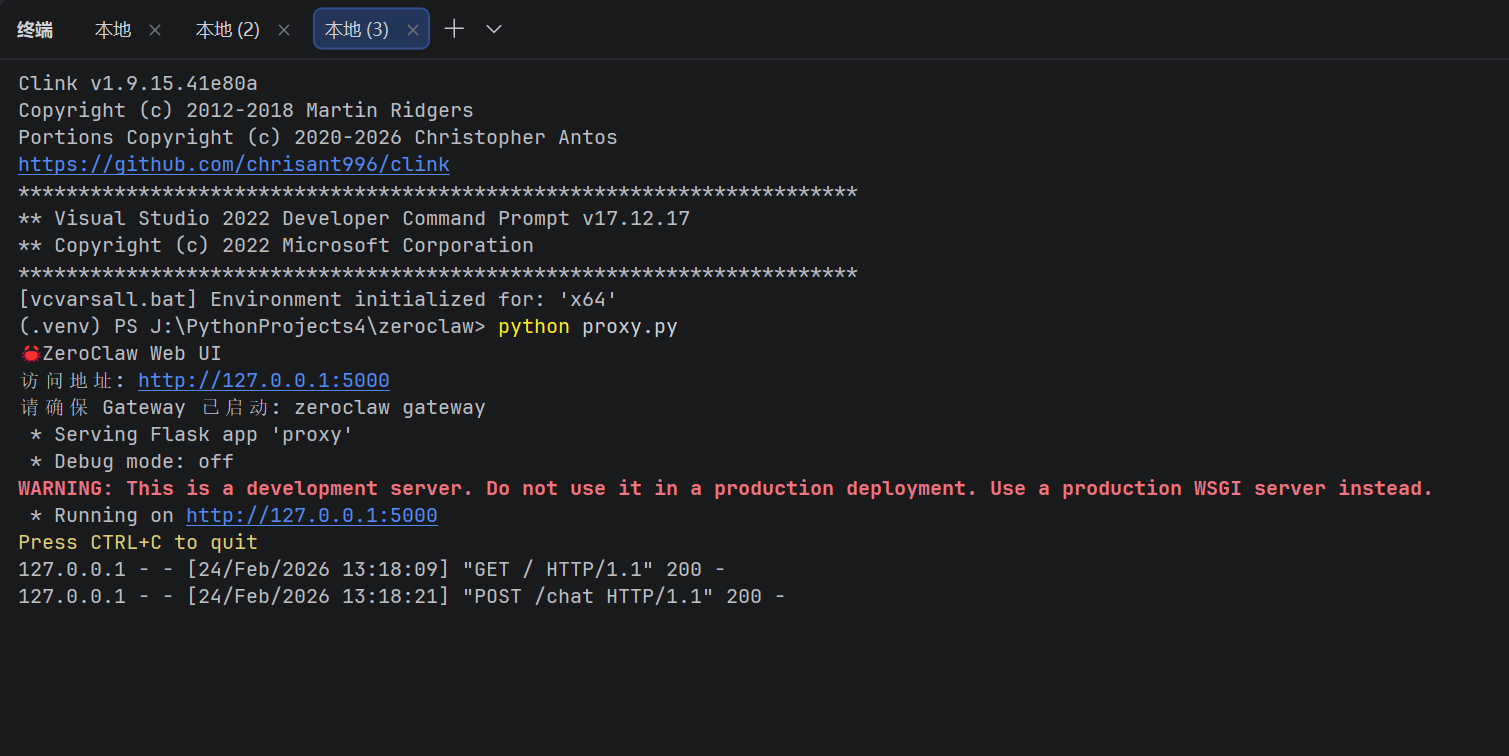
访问 Web 界面
浏览器打开:
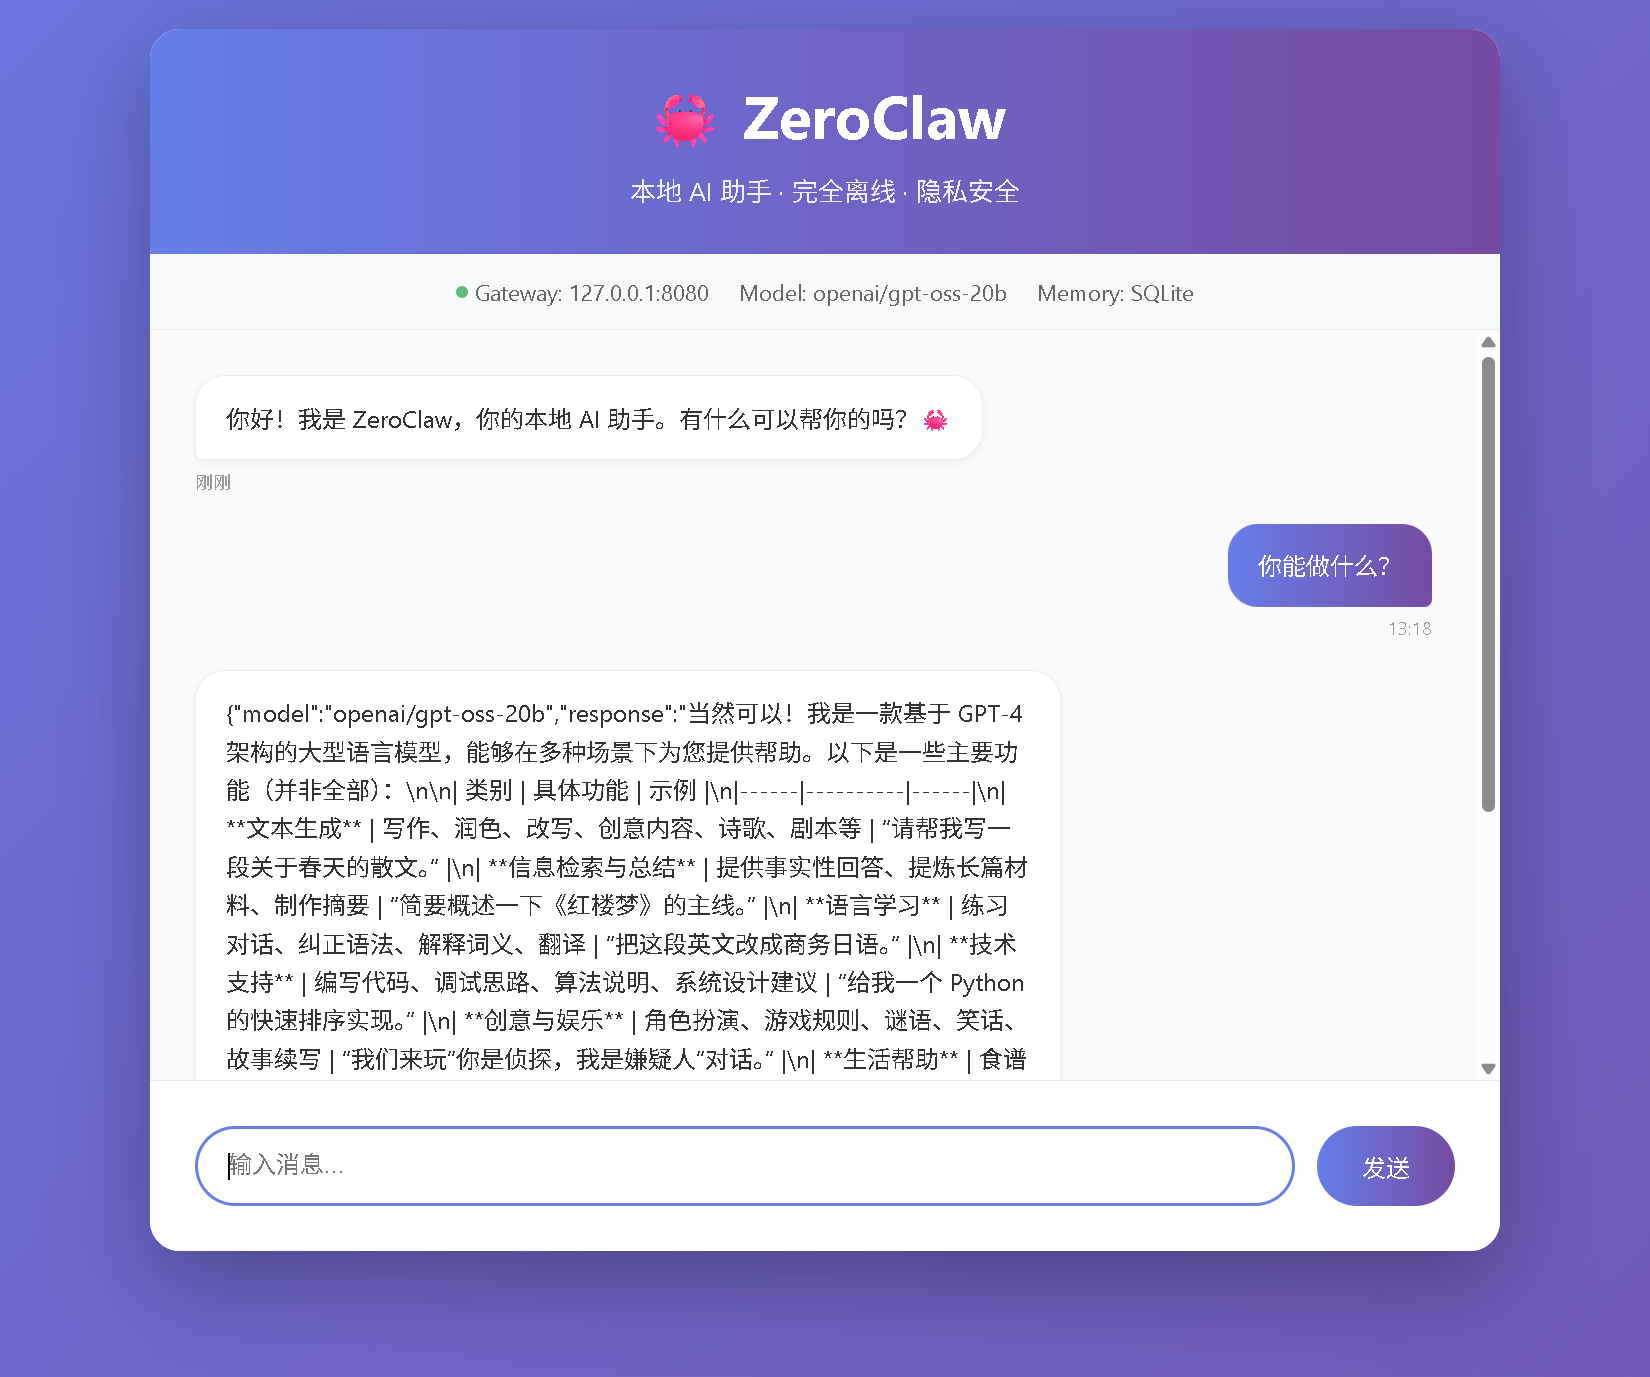
http://127.0.0.1:5000界面预览
┌─────────────────────────────────────────┐
│  🦀 ZeroClaw                            │
│  本地 AI 助手 · 完全离线 · 隐私安全       │
├─────────────────────────────────────────┤
│  🟢 Gateway: 127.0.0.1:8080             │
│  Model: openai/gpt-oss-20b              │
│  Memory: SQLite                         │
├─────────────────────────────────────────┤
│                                         │
│  🤖 你好!有什么可以帮你的吗?            │
│                                         │
│  👤 你能做什么?                         │
│                                         │
│  🤖 我可以帮你完成很多任务...            │
│                                         │
├─────────────────────────────────────────┤
│  [输入消息...                 ] [发送]  │
└─────────────────────────────────────────┘
🐛 常见问题排查
问题 1: 连接 OpenRouter 而不是本地模型
现象:
Provider call failed, retrying provider="openrouter"原因: 配置读取了全局配置而非项目配置
解决:
# 确认使用全局配置
zeroclaw status

# 修改 C:\Users\love\.zeroclaw\config.toml
default_provider = "custom:http://localhost:1234/v1"
fallback_providers = []
问题 2: LM Studio 认证失败
现象:
An LM Studio API token is required解决:
LM Studio → Developer → Server Settings →
取消勾选 [Require Authentication]
问题 3: Git 克隆失败
现象:
fatal: remote helper 'https' aborted session解决:
# 方案 1: 使用 SSH
git config --global url."git@github.com:".insteadOf "https://github.com/"

# 方案 2: 直接下载 ZIP
Invoke-WebRequest "https://github.com/.../archive/main.zip" -OutFile "temp.zip"
问题 4: CORS 跨域错误
现象:
TypeError: Failed to fetch解决: 使用 Python 代理方案(见 Web 界面章节)
📚 配置参考
完整配置文件
路径: C:\Users\love\.zeroclaw\config.toml
# ============================================
# ZeroClaw 配置文件
# 位置: C:\Users\love\.zeroclaw\config.toml
# ============================================

# --------------------------------------------
# 核心配置
# --------------------------------------------
api_key = "lm-studio"
default_provider = "custom:http://localhost:1234/v1"
default_model = "openai/gpt-oss-20b"
default_temperature = 0.7
model_routes = []

# --------------------------------------------
# 可观测性
# --------------------------------------------
[observability]
backend = "none"

# --------------------------------------------
# 自主级别与安全
# --------------------------------------------
[autonomy]
level = "supervised"              # readonly | supervised | full
workspace_only = true
allowed_commands = [
    "git", "npm", "cargo", "ls", "cat", "grep",
    "find", "echo", "pwd", "wc", "head", "tail"
]
forbidden_paths = [
    "/etc", "/root", "/home", "/usr", "/bin",
    "/sbin", "/lib", "/opt", "/boot", "/dev",
    "/proc", "/sys", "/var", "/tmp",
    "~/.ssh", "~/.gnupg", "~/.aws", "~/.config"
]
max_actions_per_hour = 20
max_cost_per_day_cents = 500
require_approval_for_medium_risk = true
block_high_risk_commands = true

# --------------------------------------------
# 运行时
# --------------------------------------------
[runtime]
kind = "native"                   # native | docker

[runtime.docker]
image = "alpine:3.20"
network = "none"
memory_limit_mb = 512
cpu_limit = 1.0
read_only_rootfs = true
mount_workspace = true

# --------------------------------------------
# 可靠性
# --------------------------------------------
[reliability]
provider_retries = 2
provider_backoff_ms = 500
fallback_providers = []           # 禁用回退,强制本地
channel_initial_backoff_secs = 2
channel_max_backoff_secs = 60

# --------------------------------------------
# 心跳
# --------------------------------------------
[heartbeat]
enabled = false
interval_minutes = 30

# --------------------------------------------
# 渠道配置
# --------------------------------------------
[channels_config]
cli = true

# --------------------------------------------
# 记忆系统
# --------------------------------------------
[memory]
backend = "sqlite"
auto_save = true
hygiene_enabled = true
archive_after_days = 7
purge_after_days = 30
conversation_retention_days = 30
embedding_provider = "none"       # 本地运行,禁用嵌入
vector_weight = 0.7
keyword_weight = 0.3

# --------------------------------------------
# 网关
# --------------------------------------------
[gateway]
port = 8080
host = "127.0.0.1"
require_pairing = false           # 固定 Token 模式
paired_tokens = ["abc1234"]
allow_public_bind = false
pair_rate_limit_per_minute = 10
webhook_rate_limit_per_minute = 60

# --------------------------------------------
# 隧道
# --------------------------------------------
[tunnel]
provider = "none"

# --------------------------------------------
# 安全
# --------------------------------------------
[secrets]
encrypt = true

# --------------------------------------------
# 浏览器工具
# --------------------------------------------
[browser]
enabled = false

# --------------------------------------------
# 身份配置
# --------------------------------------------
[identity]
format = "openclaw"

# --------------------------------------------
# 代理配置(可选)
# --------------------------------------------
[agents]
🎯 快速启动命令
# 终端 1: 启动 LM Studio Server
# (在 LM Studio 界面中点击 Start Server)

# 终端 2: 启动 ZeroClaw Gateway
zeroclaw gateway

# 终端 3: 启动 Web 界面
python proxy.py

# 终端 4: 命令行交互(可选)
zeroclaw agent
📊 性能对比
| 指标 | ZeroClaw + LM Studio | OpenClaw + OpenAI |
|---|---|---|
| 首次启动 | < 10ms | ~3 秒 |
| 内存占用 | < 5MB | > 1GB |
| 网络依赖 | 无(完全离线) | 必需 |
| API 成本 | 0 | 按 token 计费 |
| 隐私性 | 100% 本地 | 数据上传云端 |
| 模型选择 | 受限于本地硬件 | 200+ 模型 |
🔗 相关链接
-
-
LM Studio: https://lmstudio.ai/
-
-
本教程源码: 见博客附件
💡 进阶建议
-
模型优化: 尝试更小的模型(如 7B)提升速度
-
多模型路由: 配置不同任务使用不同模型
-
Tele**** 或其他 聊天软件 集成: 添加
channels_config.telegram实现远程访问 -
定时任务: 启用
heartbeat实现定时提醒
Happy Hacking! 🦀
本文由 AITechLab 撰写,基于 ZeroClaw 源代码 和 LM Studio 0.4.3 实测。

小龙虾开发者社区是 CSDN 旗下专注 OpenClaw 生态的官方阵地,聚焦技能开发、插件实践与部署教程,为开发者提供可直接落地的方案、工具与交流平台,助力高效构建与落地 AI 应用
更多推荐
 28
28 0
0- 0


 已为社区贡献16条内容

所有评论(0)