
关于chatglm3 function calling的理解
ChatGLM3-6B开源了工具调用,好奇他是怎么实现的,所以写了这个文章记录。
ChatGLM3-6B开源了工具调用,好奇他是怎么实现的,所以写了这个文章记录。
一、测试官方的示例
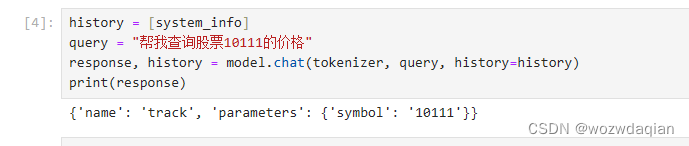
官方给的示例很简单,只不过给的两个函数 track 和 text-to-speech 没有具体的实现,模型的输出也只是给出了需要调用的函数名和参数。剩下的需要自己去实现..
我更换了tools中的函数:
tools = [
    {
        "name": "go_ahead",
        "description": "小车前进",
        "parameters": {
            "type": "object",
            "properties": {
                "distance": {
                    "description": "前进的距离,单位为米"
                }
            },
            "required": ['distance']
        }
    },
    {
        "name": "back",
        "description": "小车后退",
        "parameters": {
            "type": "object",
            "properties": {
                "distance": {
                    "description": "后退的距离,单位为米"
                }
            },
            "required": ['distance']
        }
    },
    {
        "name": "turn_left",
        "description": "小车左转",
        "parameters": {
            "type": "object",
            "properties": {
                "angle": {
                    "description": "左转角度,单位为°"
                }
            },
            "required": ['angle']
        }
    },
    {
        "name": "turn_right",
        "description": "小车右转",
        "parameters": {
            "type": "object",
            "properties": {
                "angle": {
                    "description": "右转角度,单位为°"
                }
            },
            "required": ['angle']
        }
    }
]
测试下来出现以下问题:
1. 输入多个操作只能执行一个操作

2. 会出现输出不存在的函数的情况
3. 当已有的函数不能实现用户的操作时,会调用已有函数强行输出

二、代码解析
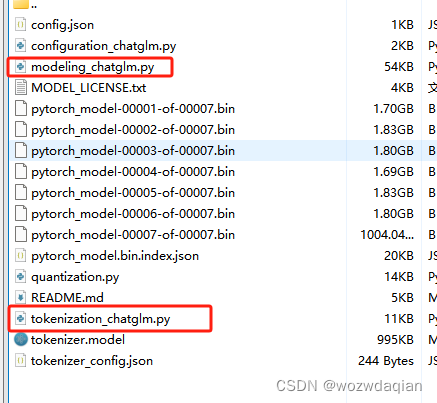
现在让我们来看看具体实现的代码。下载chatglm3-6b权重的时候也会下载modeling_chatglm.py和tokenization_chatglm.py这两个python文件,chatglm3实现function calling也是在这里面实现的。
1. 输入的处理
首先工具调用跟一般的对话的输入差在有一个 system_info ,他是作为history输入到model.chat函数中的。
system_info = {"role": "system", "content": "Answer the following questions as best as you can. You have access to the following tools:", "tools": tools}我们可以在modeling_chatglm.py文件中找到chat的实现
@torch.inference_mode()
def chat(self, tokenizer, query: str, history: List[Tuple[str, str]] = None, role: str = "user",
            max_length: int = 8192, num_beams=1, do_sample=True, top_p=0.8, temperature=0.8, logits_processor=None,
            **kwargs):
    if history is None:
        history = []
    if logits_processor is None:
        logits_processor = LogitsProcessorList()
    logits_processor.append(InvalidScoreLogitsProcessor())
    gen_kwargs = {"max_length": max_length, "num_beams": num_beams, "do_sample": do_sample, "top_p": top_p,
                    "temperature": temperature, "logits_processor": logits_processor, **kwargs}


    inputs = tokenizer.build_chat_input(query, history=history, role=role)


    inputs = inputs.to(self.device)
    eos_token_id = [tokenizer.eos_token_id, tokenizer.get_command("<|user|>"),
                    tokenizer.get_command("<|observation|>")]
    outputs = self.generate(**inputs, **gen_kwargs, eos_token_id=eos_token_id)
    outputs = outputs.tolist()[0][len(inputs["input_ids"][0]):-1]
    response = tokenizer.decode(outputs)
    history.append({"role": role, "content": query})
    response, history = self.process_response(response, history)
    return response, history
在chat函数中,history又被作为参数送到tokenizer.build_chat_input中,然后得到input。
那很明显需要查看tokenizer.build_chat_input的实现,tokenizer.build_chat_input函数在tokenization_chatglm中:
def build_chat_input(self, query, history=None, role="user"):
    if history is None:
        history = []
    input_ids = []
    for item in history:
        content = item["content"]
        if item["role"] == "system" and "tools" in item:


            content = content + "\n" + json.dumps(item["tools"], indent=4, ensure_ascii=False)


        input_ids.extend(self.build_single_message(item["role"], item.get("metadata", ""), content))
    input_ids.extend(self.build_single_message(role, "", query))
    input_ids.extend([self.get_command("<|assistant|>")])
return self.batch_encode_plus([input_ids], return_tensors="pt", is_split_into_words=True)根据上面的代码看得出来,他是直接用json.dumps把tools拼接到content中,然后塞给大模型的。
2. 输出的处理
输出的处理在chat函数中的process_response函数
def process_response(self, output, history):
    content = ""
    history = deepcopy(history)
    for response in output.split("<|assistant|>"):
        metadata, content = response.split("\n", maxsplit=1)
        if not metadata.strip():
            content = content.strip()
            history.append({"role": "assistant", "metadata": metadata, "content": content})
            content = content.replace("[[训练时间]]", "2023年")
        else:
            history.append({"role": "assistant", "metadata": metadata, "content": content})
            if history[0]["role"] == "system" and "tools" in history[0]:
                content = "\n".join(content.split("\n")[1:-1])
                def tool_call(**kwargs):
                    return kwargs
                parameters = eval(content)
                content = {"name": metadata.strip(), "parameters": parameters}
            else:
                content = {"name": metadata.strip(), "content": content}
    return content, history
这里需要注意一点,chatglm3-6b应该是有针对工具调用进行训练,输出的结果很稳定,基本上都是下面的结构:
'turn_right\n```python\ntool_call(angle=30)\n```'第一行是调用的函数名,然后下面是执行函数的代码(代码中函数名统一为tool_call)。再通过split('\n')得到代码,eval执行tool_call函数得到函数的变量字典,然后返回字典如下:
{'name': 'turn_right', 'parameters': {'angle': 30}}3. openai_api_demo.py
官方还给出了openai_api_demo.py这个文件,他实现了完整的 输入自然语言->得到函数和函数参数->执行函数 这一套流程。虽然不知道为什么没有在readme中写出来
openai_api_demo.py主要依靠tool_register.py下的get_tools和dispatch_tool
1. register_tool用于注册函数,它接受一个可调用对象 func 作为参数。该函数将 func 注册为一个工具,并返回 func 本身。

2. dispatch_tool用于执行函数,它接受一个函数名和函数参数,返回函数的返回。
三、尝试在百川上实现
我是在baichaun-13B上进行测试的,相对于chatglm3-6b每次稳定的输出,baichaun-13B的输出就不是那么好了。所以我们需要设计一个prompt如下:
prompt = '''
输出必须是带有markdown格式的python代码:
```python
工具的name(parameters)
```
例如:
```python
back(distance=10)
```'''
那么输入到百川模型的messages如下:
system_info = {"role": "system", "content": "尽可能回答以下问题。您可以使用以下工具:\n tools:" + json.dumps(tools, indent=4, ensure_ascii=False) + prompt}

query = "23加69等于多少"

messages = [
    system_info,
    {"role": "user", "content": query}
]
没有意外的话模型会生成一个被```python```包裹的代码,使用eval()执行代码就可以了


旨在为数千万中国开发者提供一个无缝且高效的云端环境,以支持学习、使用和贡献开源项目。
更多推荐


 25
25 0
0- 0


 已为社区贡献2条内容

所有评论(0)