WebRPC开发基础流程
每个 `MediaDevicesInfo` 都包含一个名为 `kind` 的属性,其值为 `audioinput`、`audiooutput` 或 `videoinput`,指示它是哪种类型的媒体设备。此时,我们会将从 `getUserMedia()` 收到的数据流连接到 `RTCPeerConnection`。`RTCPeerConnection` 上的事件 `icegatheringstate
一、WebRTC 使用入门
WebRTC(全称 Web Real-Time Communication),即网页即时通信。 是一个支持网页浏览器进行实时语音对话或视频对话的技术方案。从前端技术开发的视角来看,是一组可调用的API标准。
WebRTC API
WebRTC 标准概括介绍了两种不同的技术:媒体捕获设备和点对点连接。
媒体捕获设备包括摄像机和麦克风,还包括屏幕捕获设备。对于摄像头和麦克风,我们使用 `navigator.mediaDevices.getUserMedia()` 来捕获 `MediaStreams`。对于屏幕录制,我们改为使用 `navigator.mediaDevices.getDisplayMedia()`。
点对点连接由 `RTCPeerConnection` 接口处理。这是在 WebRTC 中两个对等方之间建立和控制连接的中心点。
WebRPC 需要做以下的几件事:
- - 获取音频,视频或者其他数据
- - 获取网络信息比如IP地址,端口,并与其他的WebRTC客户端进行交换,穿过NAT合防火墙进行连接.
- - 处理信号以便发起请求报告错误或者关闭会话
- - 交换客户端支持的媒体信息,比如分辨率,解码器
- - 传输音频视频流或者数据
webrtc工作流程
媒体设备使用入门
针对 Web 开发时,WebRTC 标准提供了用于访问连接到计算机或智能手机的相机和麦克风的 API。这些设备通常称为媒体设备,可以通过实现 `MediaDevices` 接口的 `navigator.mediaDevices` 对象使用 JavaScript 进行访问。通过此对象,我们可以枚举所有已连接的设备,监听设备的变化(设备连接或断开连接时)以及打开设备以检索媒体流(见下文)。
其最常见的方式是通过 `getUserMedia()` 函数,该函数会返回一个解析为匹配媒体设备的 `MediaStream` 的 promise。此函数采用单个 `MediaStreamConstraints` 对象,用于指定我们的要求。例如,要简单地打开默认麦克风和摄像头,请执行以下操作。
// 使用promise
const constraints = {
    'video': true,
    'audio': true
}
navigator.mediaDevices.getUserMedia(constraints)
    .then(stream => {
        console.log('Got MediaStream:', stream);
    })
    .catch(error => {
        console.error('Error accessing media devices.', error);
    });

// 使用await/async
const openMediaDevices = async (constraints) => {
    return await navigator.mediaDevices.getUserMedia(constraints);
}

try {
    const stream = openMediaDevices({'video':true,'audio':true});
    console.log('Got MediaStream:', stream);
} catch(error) {
    console.error('Error accessing media devices.', error);
}
调用 `getUserMedia()` 将触发权限请求。如果用户接受该权限,系统会使用包含一个视频和一个音轨的 `MediaStream` 解析该 promise。如果权限遭拒,系统会抛出 `PermissionDeniedError`。如果没有连接任何匹配的设备,则会抛出 `NotFoundError`。
查询媒体设备
在更复杂的应用中,我们很可能需要检查所有连接的摄像头和麦克风,并向用户提供相应的反馈。这可以通过调用 `enumerateDevices()` 函数来实现。这将返回一个 promise,它可以解析为描述每个已知媒体设备的 `MediaDevicesInfo` 数组。我们可以用它来呈现界面,让用户选择他们喜欢的那个。每个 `MediaDevicesInfo` 都包含一个名为 `kind` 的属性,其值为 `audioinput`、`audiooutput` 或 `videoinput`,指示它是哪种类型的媒体设备。
// promise
function getConnectedDevices(type, callback) {
    navigator.mediaDevices.enumerateDevices()
        .then(devices => {
            const filtered = devices.filter(device => device.kind === type);
            callback(filtered);
        });
}

getConnectedDevices('videoinput', cameras => console.log('Cameras found', cameras));

// async await
async function getConnectedDevices(type) {
    const devices = await navigator.mediaDevices.enumerateDevices();
    return devices.filter(device => device.kind === type)
}

const videoCameras = getConnectedDevices('videoinput');
console.log('Cameras found:', videoCameras);
监听设备更改
大多数计算机都支持在运行时插入各种设备。它可能是通过 USB 连接的摄像头、蓝牙耳机或一组外部扬声器。为了正确支持这一点,Web 应用应监听媒体设备的变化。这可以通过为 `devicechange` 事件的 `navigator.mediaDevices` 添加监听器来实现。
// Updates the select element with the provided set of cameras
function updateCameraList(cameras) {
    const listElement = document.querySelector('select#availableCameras');
    listElement.innerHTML = '';
    cameras.map(camera => {
        const cameraOption = document.createElement('option');
        cameraOption.label = camera.label;
        cameraOption.value = camera.deviceId;
    }).forEach(cameraOption => listElement.add(cameraOption));
}

// Fetch an array of devices of a certain type
async function getConnectedDevices(type) {
    const devices = await navigator.mediaDevices.enumerateDevices();
    return devices.filter(device => device.kind === type)
}

// Get the initial set of cameras connected
const videoCameras = getConnectedDevices('videoinput');
updateCameraList(videoCameras);

// Listen for changes to media devices and update the list accordingly
navigator.mediaDevices.addEventListener('devicechange', event => {
    const newCameraList = getConnectedDevices('video');
    updateCameraList(newCameraList);
});
媒体限制
如果约束对象必须实现 `MediaStreamConstraints` 接口并将其作为参数传递给 `getUserMedia()`,我们就可以打开符合特定要求的媒体设备。此要求可以非常宽泛(音频和/或视频),也可以非常具体(最低相机分辨率或确切设备 ID)。建议使用 `getUserMedia()` API 的应用先检查现有设备,然后使用 `deviceId` 限制条件指定与设备完全匹配的限制条件。如果可能,设备还会根据限制条件进行配置。我们可以对麦克风启用回声消除功能,也可以从摄像头设置视频的特定或最小宽度和高度。
async function getConnectedDevices(type) {
    const devices = await navigator.mediaDevices.enumerateDevices();
    return devices.filter(device => device.kind === type)
}

// Open camera with at least minWidth and minHeight capabilities
async function openCamera(cameraId, minWidth, minHeight) {
    const constraints = {
        'audio': {'echoCancellation': true},
        'video': {
            'deviceId': cameraId,
            'width': {'min': minWidth},
            'height': {'min': minHeight}
            }
        }

    return await navigator.mediaDevices.getUserMedia(constraints);
}

const cameras = getConnectedDevices('videoinput');
if (cameras && cameras.length > 0) {
    // Open first available video camera with a resolution of 1280x720 pixels
    const stream = openCamera(cameras[0].deviceId, 1280, 720);
}
本地播放(拉流)
媒体设备打开后,如果有 MediaStream,我们可以将其分配给视频或音频元素,以在本地播放流。
async function playVideoFromCamera() {
    try {
        const constraints = {'video': true, 'audio': true};
        const stream = await navigator.mediaDevices.getUserMedia(constraints);
        const videoElement = document.querySelector('video#localVideo');
        videoElement.srcObject = stream;
    } catch(error) {
        console.error('Error opening video camera.', error);
    }
}
与 `getUserMedia()` 一起使用的典型视频元素所需的 HTML 通常具有 `autoplay` 和 `playsinline` 属性。`autoplay` 属性将使分配给元素的新数据流自动播放。`playsinline` 属性允许视频在特定移动浏览器中内嵌播放,而不仅仅是全屏播放。此外,我们还建议对直播使用 `controls="false"`,除非用户应能够暂停这些直播。
<html>
<head><title>Local video playback</video></head>
<body>
    <video id="localVideo" autoplay playsinline controls="false"/>
</body>
</html>
二、媒体捕获和约束
WebRTC 的媒体部分介绍了如何使用能够捕捉视频和音频的硬件(例如相机和麦克风),以及媒体流的工作原理。此外,还介绍了显示媒体,这是应用可执行屏幕捕获的方式。
媒体设备
您可以通过 `navigator.mediaDevices` 对象访问和管理浏览器支持的所有摄像头和麦克风。应用可以检索已连接设备的最新列表并监听变化,因为许多相机和微型麦克风可通过 USB 连接,并且可以在应用生命周期内连接和断开连接。由于媒体设备的状态可能会随时发生变化,因此建议应用注册设备更改,以便正确处理更改。
采集音视频
访问媒体设备时,建议您提供尽可能详细的限制条件。虽然可以通过简单的约束条件打开默认摄像头和麦克风,但其提供的媒体流可能明显优于应用的最佳流。
具体的约束条件在 `MediaTrackConstraint` 对象中定义,一个针对音频,另一个针对视频。此对象中的特性类型为 `ConstraintLong`、`ConstraintBoolean`、`ConstraintDouble` 或 `ConstraintDOMString`。这些对象可以是特定值(例如数字、布尔值或字符串)、范围(具有最小值和最大值的 `LongRange` 或 `DoubleRange`)或具有 `ideal` 或 `exact` 定义的对象。对于特定值,浏览器将尝试选择尽可能接近的值。对于某个范围,将使用该范围内的最佳值。指定 `exact` 后,系统将仅返回与约束条件完全匹配的媒体流。
// Camera with a resolution as close to 640x480 as possible
{
    "video": {
        "width": 640,
        "height": 480
    }
}
// Camera with a resolution in the range 640x480 to 1024x768
{
"video": {
"width": {
"min": 640,
"max": 1024
},
"height": {
"min": 480,
"max": 768
}
}
}// Camera with the exact resolution of 1024x768
{
"video": {
"width": {
"exact": 1024
},
"height": {
"exact": 768
}
}
}为了确定某个媒体流的特定轨道的实际配置,我们可以调用 `MediaStreamTrack.getSettings()`,它会返回当前应用的 `MediaTrackSettings`。
此外,也可以通过对媒体轨道上调用 `applyConstraints()` 来更新已打开的媒体设备上的轨道约束条件。这样,应用无需重新关闭现有音频流,即可重新配置媒体设备。
显示媒体
想要能够截取和录制屏幕的应用必须使用 Display Media API。函数 `getDisplayMedia()`(属于 `navigator.mediaDevices` 的一部分)与 `getUserMedia()` 类似,用于打开显示内容(或部分内容,如窗口)。返回的 `MediaStream` 与使用 `getUserMedia()` 时相同。
`getDisplayMedia()` 的约束条件与常规视频或音频输入资源的限制不同。
{
    video: {
        cursor: 'always' | 'motion' | 'never',
        displaySurface: 'application' | 'browser' | 'monitor' | 'window'
    }
}
上述代码片段展示了屏幕录制的特殊限制的工作原理。请注意,并非所有支持显示媒体支持的浏览器都支持这些属性。
帧率降噪功能配置
-
frameRate:可以配置视频帧率
-
width:设置视频宽度,ideal代表理想宽度
-
height:设置视频高度,ideal代表理想高度
-
aspectRatio:代表宽高比
-
对于音频则是开启回音消除、降噪、自动增益等操作
const mediaStreamContrains = {
 video: {
 		frameRate: {min: 20},
 		width: {min: 640, ideal: 1280},
 		height: {min: 360, ideal: 720},
		aspectRatio: 16/9
 },
 audio: {
 		echoCancellation: true, // 开启回音消除
 		noiseSuppression: true, // 降噪
 		autoGainControl: true // 自动增益
 }
};

var promise = navigator.mediaDevices.getUserMedia(mediaStreamContrains);
采集视频数据
-
采集摄像头的内容并在浏览器上播放
-
需要注意的是,一定要在https协议或者本地localhost域名下才可以调用
-
我们通过调用
getUserMedia方法,将视频数据加载到video标签中进行播放 -
如果video标签想要播放流媒体数据,需要将数据挂在到
srcObject属性上,该属性和普通的src属性互斥 -
如果是第一次请求 Camera,浏览器会向用户弹出提示窗口,让用户决定是否可以访问摄像头
-
如果用户允许访问,且设备可用,则调用
gotLocalMediaStream方法
获取浏览器设备信息
-
以手机为例,它一般会包括前置摄像头和后置摄像头麦克风、相机、耳机等。我们可以根据自己的需要,选择打开不同的设备
-
WebRTC 是否提供了的
enumerateDevices接口,可以查询自己机子上都有哪些音视频设备 -
deviceInfo中有三个比较重要的属性
-
deviceID:设备的唯一标识
-
label:设备名称,用户已被授予访问媒体设备的权限(要想授予权限需要使用 HTTPS 请求),否则 label 字段始终为空。
-
kind:设备种类,可用于识别出是音频设备还是视频设备,是输入设备还是输出设备
// 判断浏览器是否支持这些 API
if (!navigator.mediaDevices || !navigator.mediaDevices.enumerateDevices) {
    console.log("enumerateDevices() not supported.");
    return;
}

// 枚举 cameras and microphones.
navigator.mediaDevices.enumerateDevices()
    .then(function (deviceInfos) {
        // 打印出每一个设备的信息
        deviceInfos.forEach(function (deviceInfo) {
            console.log(deviceInfo.kind + ": " + deviceInfo.label +
                " id = " + deviceInfo.deviceId);
        });
    })
    .catch(function (err) {
        console.log(err.name + ": " + err.message);
    });
方法 `getUserMedia` 的配置参数
- facingMode: ‘user’ , ‘environment’ 代表前后置。
- sampleRate:指定采样率。
- sampleSize:每个采样点大小的位数
- volume:从0(静音)到1(最大)取值
- echoCancellation:是否使用回声消除来尝试去除通过麦克风回传到扬声器的音频
- autoGainControl:是否要修改麦克风的输入音量
- noiseSuppression:是否尝试去除音频信号中的背景噪声
- latency:以秒为单位,控制开始处理声音和下一步可以使用数据之间的时间,不是很确定为什么要设更高的延迟,但是音频编解码器的延时确实有所不同。
- channelCount:规定了单声道的时候为1,立体声的时候为2。
数据流和轨道
`MediaStream` 表示媒体内容流,由音频和视频轨道 (`MediaStreamTrack`) 组成。您可以通过调用 `MediaStream.getTracks()` 从 `MediaStream` 检索所有轨道,该方法会返回一组 `MediaStreamTrack` 对象。
媒体流跟踪
`MediaStreamTrack` 具有的 `kind` 属性为 `audio` 或 `video`,用于表示其表示的媒体类型。您可以通过切换其 `enabled` 属性将各个轨道静音。轨道具有布尔属性 `remote`,它会指示它来自 `RTCPeerConnection` 而来自远程对等设备。
对等连接
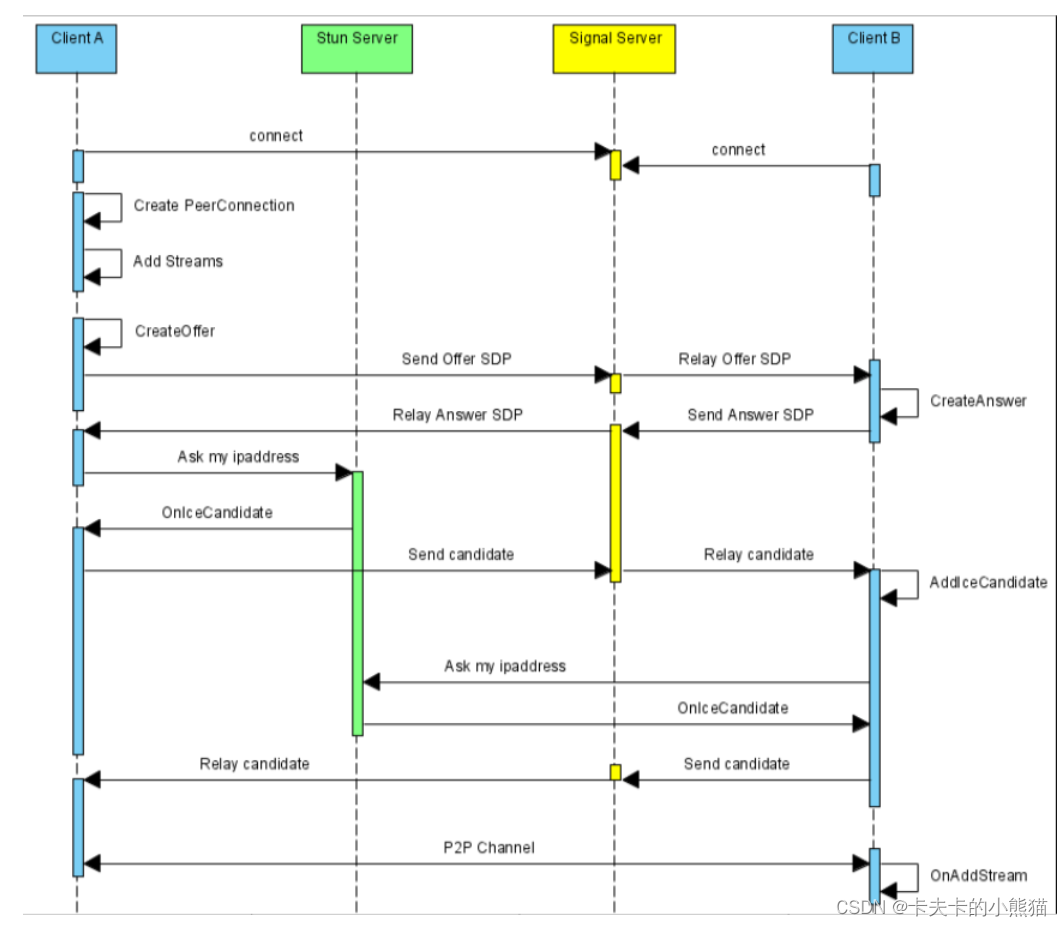
点对点连接是 WebRTC 规范的一部分,该规范旨在对点一台计算机上的两台应用进行连接,以使用点对点协议进行通信。对等设备之间的通信可以是视频、音频或任意二进制数据(适用于支持 `RTCDataChannel` API 的客户端)。为了发现两个对等端如何连接,两个客户端都需要提供 ICE Server 配置。这是 STUN 或 TURN 服务器,其作用是向每个客户端提供 ICE 候选对象,然后这些客户端将被传输到远程对等方。这种转移 ICE 候选对象的方式通常称为信号。
信令
WebRTC 规范包含用于与 ICE(互联网连接建立)服务器通信的 API,但**信令组件**并不属于该组件。需要发出信号才能让两个对等网络共享它们之间的连接方式。这通常可以通过基于 HTTP 的常规 Web API(即 REST 服务或其他 RPC 机制)解决,在此过程中,网络应用可在发起对等连接之前中继必要的信息。
// Set up an asynchronous communication channel that will be
// used during the peer connection setup
const signalingChannel = new SignalingChannel(remoteClientId);
signalingChannel.addEventListener('message', message => {
    // New message from remote client received
});

// Send an asynchronous message to the remote client
signalingChannel.send('Hello!');
信令可以通过许多不同的方式实现,WebRTC 规范不偏好任何特定的解决方案。(前端程序员,可以使用nodejs,websocket技术实现)
启动对等连接
每个对等连接都由一个 `RTCPeerConnection` 对象处理。此类的构造函数接受单个 `RTCConfiguration` 对象作为其参数。此对象定义对等连接的设置方式,**应包含关于要使用的 ICE 服务器的信息**。
每个对等连接都由一个RTCPeerconnection对象处理。此类的构造函数将单个RTCConfiguration对象作为其参数。此对象定义了对等连接的设置方式,并应包含有关要使用的ICE服务器的信息。
一旦创建了RTCPeerConnection连接,我们需要创建**SDP提供**或**应答**,这取决于我们是主叫对等体还是接收对等体。一旦创建了SDP提供或应答,就必须通过不同的信道将其发送到远程对等端。将SDP对象传递给远程对等方称为**信令**,不在Web RTC规范的范围内。
为了从调用端启动对等连接设置,我们创建了一个RTCPeerconnection对象,然后调用createOffer()来创建一个RTCSessionDescription对象。使用setLocalDescription()将此会话描述设置为本地描述,然后通过我们的信令信道发送到接收方。我们还为我们的信号通道设置了一个监听器,以便在从接收端接收到对我们提供的会话描述的回答时使用。
async function makeCall() {
    const configuration = {'iceServers': [{'urls': 'stun:stun.l.google.com:19302'}]}
    const peerConnection = new RTCPeerConnection(configuration);
    signalingChannel.addEventListener('message', async message => {
        if (message.answer) {
            const remoteDesc = new RTCSessionDescription(message.answer);
            await peerConnection.setRemoteDescription(remoteDesc);
        }
    });
    const offer = await peerConnection.createOffer();
    await peerConnection.setLocalDescription(offer);
    signalingChannel.send({'offer': offer});
}
RTCPeerConnection.createOffer():RTCPeerConnection接口的 createOffer() 方法启动创建一个[SDP](https://developer.mozilla.org/zh-CN/docs/Glossary/SDP) offer,目的是启动一个新的 WebRTC 去连接远程端点。SDP offer 包含有关已附加到 WebRTC 会话,浏览器支持的编解码器和选项的所有[`MediaStreamTrack`](https://developer.mozilla.org/zh-CN/docs/Web/API/MediaStreamTrack)s 信息,以及[ICE](https://developer.mozilla.org/zh-CN/docs/Glossary/ICE) 代理,目的是通过信令信道发送给潜在远程端点,以请求连接或更新现有连接的配置。返回值是一个[`Promise` (en-US)](https://developer.mozilla.org/en-US/docs/Web/JavaScript/Reference/Global_Objects/Promise),创建 offer 后,将使用包含新创建的要约的[`RTCSessionDescription`](https://developer.mozilla.org/zh-CN/docs/Web/API/RTCSessionDescription)对象来解析该返回值。
在接收端,我们会等待传入的回应,然后再创建 `RTCPeerConnection` 实例。完成后,我们使用 `setRemoteDescription()` 设置收到的回应。接下来,我们调用 `createAnswer()` 为收到的优惠创建答案。系统会使用 `setLocalDescription()` 将此答案设置为本地说明,然后通过我们的信令服务器将其发送至发起调用的一方。
const peerConnection = new RTCPeerConnection(configuration);
signalingChannel.addEventListener('message', async message => {
    if (message.offer) {
        peerConnection.setRemoteDescription(new RTCSessionDescription(message.offer));
        const answer = await peerConnection.createAnswer();
        await peerConnection.setLocalDescription(answer);
        signalingChannel.send({'answer': answer});
    }
});
两个对等方同时设置了本地和远程会话说明之后,他们就会了解远程对等方的功能。这并不意味着对等设备之间的连接已准备就绪。为此,我们需要在每个对等端收集 ICE 候选项,并通过信令通道传输给另一个对等方。
ICE
创建 `RTCPeerConnection` 对象后,底层框架会使用提供的 ICE 服务器收集连接建立的候选对象(ICE 候选对象)。`RTCPeerConnection` 上的事件 `icegatheringstatechange` 会指示 ICE 收集的状态为(`new`、`gathering` 或 `complete`)。
虽然对等设备可以等待 ICE 收集完成,但通常要高效地使用“滚动冰”技术,并在发现每个 ICE 候选设备后将其传输到远程对等设备。这将大大缩短对等连接的设置时间,并允许视频通话以更低的延迟开始。
要收集 ICE 候选对象,只需为 `icecandidate` 事件添加监听器即可。针对该监听器发出的 `RTCPeerConnectionIceEvent` 将包含 `candidate` 属性,该属性表示应发送到远程对等端的新候选音频(请参阅信号)。
// Listen for local ICE candidates on the local RTCPeerConnection
peerConnection.addEventListener('icecandidate', event => {
    if (event.candidate) {
        signalingChannel.send({'new-ice-candidate': event.candidate});
    }
});

// Listen for remote ICE candidates and add them to the local RTCPeerConnection
signalingChannel.addEventListener('message', async message => {
    if (message.iceCandidate) {
        try {
            await peerConnection.addIceCandidate(message.iceCandidate);
        } catch (e) {
            console.error('Error adding received ice candidate', e);
        }
    }
});
已建立连接
收到 ICE 候选对象后,我们的对等连接状态最终会变为已连接状态。为了检测这一点,我们在 `RTCPeerConnection` 中添加一个监听器,用于监听 `connectionstatechange` 事件。
// Listen for connectionstatechange on the local RTCPeerConnection
peerConnection.addEventListener('connectionstatechange', event => {
    if (peerConnection.connectionState === 'connected') {
        // Peers connected!
    }
});
远程数据流使用入门
`RTCPeerConnection` 连接到远程对等设备后,就可以在它们之间流式传输音频和视频。此时,我们会将从 `getUserMedia()` 收到的数据流连接到 `RTCPeerConnection`。媒体流包含至少一个媒体轨道,当我们想将媒体传输到远程对等设备时,它们会分别添加到 `RTCPeerConnection` 中。
const localStream = await getUserMedia({vide: true, audio: true});
const peerConnection = new RTCPeerConnection(iceConfig);
localStream.getTracks().forEach(track => {
    peerConnection.addTrack(track, localStream);
});
轨道可以在连接到远程对等方之前添加到 `RTCPeerConnection`,因此最好尽早执行此设置,而不是等待连接完成。
添加远程轨道
为了接收由另一个对等方添加的远程轨道,我们会在本地 `RTCPeerConnection` 上注册一个监听器,用于监听 `track` 事件。`RTCTrackEvent` 包含一个 `MediaStream` 对象数组,这些对象与对等项的相应本地数据流具有相同的 `MediaStream.id` 值。在我们的示例中,每个轨道仅与单个数据流相关联。
const remoteVideo = document.querySelector('#remoteVideo');

peerConnection.addEventListener('track', async (event) => {
    const [remoteStream] = event.streams;
    remoteVideo.srcObject = remoteStream;
});
数据通道
WebRTC 标准还涵盖用于通过 `RTCPeerConnection` 发送任意数据的 API。可通过对 `RTCPeerConnection` 对象调用 `createDataChannel()` 来完成此操作,该方法会返回 `RTCDataChannel` 对象。
const peerConnection = new RTCPeerConnection(configuration);
const dataChannel = peerConnection.createDataChannel();
远程对等端可以通过监听 `RTCPeerConnection` 对象的 `datachannel` 事件来接收数据通道。收到的事件是 `RTCDataChannelEvent` 类型,包含一个 `channel` 属性,该属性表示在对等方之间连接的 `RTCDataChannel`。
const peerConnection = new RTCPeerConnection(configuration);
peerConnection.addEventListener('datachannel', event => {
    const dataChannel = event.channel;
});
打开和关闭事件
在使用数据通道发送数据之前,客户端需要等到数据通道打开后才能使用它。具体方法是监听 `open` 事件。同样,当任意一侧关闭频道时,也会发生 `close` 事件。
const messageBox = document.querySelector('#messageBox');
const sendButton = document.querySelector('#sendButton');
const peerConnection = new RTCPeerConnection(configuration);
const dataChannel = peerConnection.createDataChannel();

// Enable textarea and button when opened
dataChannel.addEventListener('open', event => {
    messageBox.disabled = false;
    messageBox.focus();
    sendButton.disabled = false;
});

// Disable input when closed
dataChannel.addEventListener('close', event => {
    messageBox.disabled = false;
    sendButton.disabled = false;
});
信息
如需在 `RTCDataChannel` 上发送消息,请使用要发送的数据调用 `send()` 函数。此函数的 `data` 参数可以是字符串、`Blob`、`ArrayBuffer` 或 `ArrayBufferView`。
const messageBox = document.querySelector('#messageBox');
const sendButton = document.querySelector('#sendButton');

// Send a simple text message when we click the button
sendButton.addEventListener('click', event => {
    const message = messageBox.textContent;
    dataChannel.send(message);
})
远程对等端将通过监听 `message` 事件来接收 `RTCDataChannel` 上发送的消息。
const incomingMessages = document.querySelector('#incomingMessages');

const peerConnection = new RTCPeerConnection(configuration);
const dataChannel = peerConnection.createDataChannel();

// Append new messages to the box of incoming messages
dataChannel.addEventListener('message', event => {
    const message = event.data;
    incomingMessages.textContent += message + '\n';
});
代码流程实例
webrtc.js
export default {
  data() {
    return {
      stream: null,
    }
  },
  methods: {
    // 推流
    async pullPlayer() {
      try {
        // 1.获取本地音视频流
        // 调用 getUserMedia API 获取音视频流
        this.stream = await navigator.mediaDevices.getUserMedia({
          audio: true,
          video: true,
        })
        // 拉流
        this.localVideo = document.getElementById('localVideo')
        console.log('Received local stream', this.stream, this.localVideo.srcObject)
        // this.desc = '11111'
        this.localVideo.srcObject = this.stream
        this.localStream = this.stream
      } catch (e) {
        console.log(`getUserMedia() error: ${e}`)
      }
    },
    // 创建RTCPeerConnection连接:发送方
    createRTCPeer() {
      this.configuration = {
        iceServers: [
          {
            urls: 'stun:stun.l.google.com:19302',
          },
        ],
      }
      // 源连接
      this.pc1 = new RTCPeerConnection(this.configuration)

      // 监听返回的 Candidate
      // 当ice准备好后,加到目标源中
      this.pc1.addEventListener('icecandidate', e => this.onIceCandidate(this.pc1, e))
      this.pc1.addEventListener('iceconnectionstatechange', e => this.onIceStateChange(this.pc1, e))
      //把localStream的音视频,放到源中
      this.getTracksStreams()
    },
    accceptRTCPeer() {
      //目标
      this.pc2 = new RTCPeerConnection(this.configuration)
      // 当ice准备好后,加到目标源中
      this.pc2.addEventListener('icecandidate', e => this.onIceCandidate(this.pc2, e))
      this.pc2.addEventListener('iceconnectionstatechange', e => this.onIceStateChange(this.pc2, e))
      //等待源发来的流
      this.pc2.addEventListener('track', this.gotRemoteStream)
    },

    //把localStream的音视频,放到源中
    getTracksStreams() {
      // 遍历本地流的所有轨道
      this.localStream.getTracks().forEach(track => this.pc1.addTrack(track, this.localStream))
    },
    // 添加 iceCandidate 时调用的方法
    async onIceCandidate(pc, event) {
      try {
        // 源发来的ice,加入到目标中
        await this.getOtherPc(pc).addIceCandidate(event.candidate)
        // 添加成功
        this.onAddIceCandidateSuccess(pc)
      } catch (e) {
        // 添加失败
        this.onAddIceCandidateError(pc, e)
      }
      console.log(
        `${this.getName(pc)} ICE candidate:\n${event.candidate ? event.candidate.candidate : '(null)'}`,
      )
    },
    // 拉流:将发送来的轨道数据赋值
    gotRemoteStream(e) {
      if (this.remoteVideo.srcObject !== e.streams[0]) {
        // getUserMedia 获得流后,将音视频流展示并保存到 localStream
        this.remoteVideo.srcObject = e.streams[0]
        console.log('pc2 received remote stream', e.streams[0])
      }
    },
    // 判断是发送方还是接收方
    getOtherPc(pc) {
      return pc === this.pc1 ? this.pc2 : this.pc1
    },
    getName(pc) {
      return pc === this.pc1 ? 'pc1' : 'pc2'
    },
    onIceStateChange(pc, event) {
      if (pc) {
        console.log(`${this.getName(pc)} ICE state: ${pc.iceConnectionState}`)
        console.log('ICE state change event: ', event)
      }
    },

    // 创建和设置连接描述
    async createOffers() {
      try {
        console.log('pc1 createOffer start')
        this.offerOptions = {
          offerToReceiveAudio: 1,
          offerToReceiveVideo: 1,
        }
        // 交换媒体描述信息
        const offer = await this.pc1.createOffer(this.offerOptions)
        await this.onCreateOfferSuccess(offer)
      } catch (e) {
        this.onCreateSessionDescriptionError(e)
      }
    },
    async onCreateOfferSuccess(desc) {
      // 发送端创建连接描述
      try {
        // 本地设置描述并将它发送给远端
        // 将 offer 保存到本地
        await this.pc1.setLocalDescription(desc)
        this.onSetLocalSuccess(this.pc1)
      } catch (e) {
        this.onSetSessionDescriptionError()
      }
      // 接收端创建连接描述
      try {
        // 远端将本地给它的描述设置为远端描述
        // 远端将 offer 保存
        await this.pc2.setRemoteDescription(desc)
        this.onSetRemoteSuccess(this.pc2)
      } catch (e) {
        this.onSetSessionDescriptionError()
      }
      // 目标 拿到源的连接描述后,给自己,并生成自己的连接描述
      try {
        // 远端创建应答 answer
        const answer = await this.pc2.createAnswer()
        await this.onCreateAnswerSuccess(answer)
      } catch (e) {
        this.onCreateSessionDescriptionError(e)
      }
    },
    // 本地描述创建成功
    onSetLocalSuccess(pc) {
      console.log(`${this.getName(pc)} setLocalDescription complete`)
    },
    // 本地描述创建失败
    onSetSessionDescriptionError(error) {
      console.log(`Failed to set session description: ${error.toString()}`)
    },
    // 接收描述创建成功
    onSetRemoteSuccess(pc) {
      console.log(`${this.getName(pc)} setRemoteDescription complete`)
    },
    // 接收描述创建失败
    onCreateSessionDescriptionError(error) {
      console.log(`Failed to create session description: ${error.toString()}`)
    },
    // 接收端:生成自己的连接描述
    async onCreateAnswerSuccess(desc) {
      try {
        // 远端设置本地描述并将它发给本地
        // 远端保存 answer
        await this.pc2.setLocalDescription(desc)
        this.onSetLocalSuccess(this.pc2)
      } catch (e) {
        this.onSetSessionDescriptionError(e)
      }
      console.log('pc1 setRemoteDescription start')
      try {
        // 本地将远端的应答描述设置为远端描述
        // 本地保存 answer
        await this.pc1.setRemoteDescription(desc)
        this.onSetRemoteSuccess(this.pc1)
      } catch (e) {
        this.onSetSessionDescriptionError(e)
      }
    },
    // 接收端创建本地描述成功
    onSetLocalSuccess(pc) {
      console.log(`${this.getName(pc)} setLocalDescription complete`)
    },
    // 3.端与端建立连接
    handleConnection(event) {
      // 获取到触发 icecandidate 事件的 RTCPeerConnection 对象
      // 获取到具体的Candidate
      const peerConnection = event.target
      const iceCandidate = event.candidate

      if (iceCandidate) {
        // 创建 RTCIceCandidate 对象
        const newIceCandidate = new RTCIceCandidate(iceCandidate)
        // 得到对端的 RTCPeerConnection
        const otherPeer = getOtherPeer(peerConnection)

        // 将本地获得的 Candidate 添加到远端的 RTCPeerConnection 对象中
        // 为了简单,这里并没有通过信令服务器来发送 Candidate,直接通过 addIceCandidate 来达到互换 Candidate 信息的目的
        otherPeer
          .addIceCandidate(newIceCandidate)
          .then(() => {
            handleConnectionSuccess(peerConnection)
          })
          .catch(error => {
            handleConnectionFailure(peerConnection, error)
          })
      }
    }, // 4.显示远端媒体流
    gotRemoteMediaStream(event) {
      if (remoteVideo.srcObject !== event.streams[0]) {
        remoteVideo.srcObject = event.streams[0]
        remoteStream = event.streams[0]
        console.log('remote 开始接受远端流')
      }
    },
  },
}
player.vue
<template>
  <div class="video-window">
    <video id="localVideo" playsinline autoplay muted></video>
    <video id="remoteVideo" playsinline autoplay></video>

    <div class="box">
      <button id="startButton" @click="start">Start</button>
      <button id="callButton" @click="call">Call</button>
      <button id="hangupButton" @click="hangup">Hang Up</button>
    </div>
    <div>{{ desc }}</div>
    <button class="btn" @click="ToIndex1">001</button>
  </div>
</template>
<script>
import wx from 'weixin-js-sdk'
import webrtc from '../mixins/webrtc'
export default {
  data() {
    return {
      startButton: null,
      callButton: null,
      hangupButton: null,
      localVideo: null,
      remoteVideo: null,
      startTime: null,

      pc1: null,
      pc2: null,
      desc: '',
    }
  },
  mixins: [webrtc],
  created() {
    this.roomId = this.$route.query.roomId ? this.$route.query.roomId : '001'
  },
  mounted() {
    this.startButton = document.getElementById('startButton')
    this.callButton = document.getElementById('callButton')
    this.hangupButton = document.getElementById('hangupButton')
    this.callButton.disabled = true
    this.hangupButton.disabled = true

    this.remoteVideo = document.getElementById('remoteVideo')
  },
  methods: {
    async start() {
      try {
        await this.pullPlayer()
        this.startButton.disabled = true
        this.callButton.disabled = false
      } catch (error) {
        this.desc = e
        this.startButton.disabled = false
      }
    },
    // 拉流
    async call() {
      this.callButton.disabled = true
      this.hangupButton.disabled = false
      console.log('Starting call')
      this.startTime = window.performance.now()
      // 视频轨道
      const videoTracks = this.localStream.getVideoTracks()
      // 音频轨道
      const audioTracks = this.localStream.getAudioTracks()

      // 判断视频轨道是否有值
      if (videoTracks.length > 0) {
        console.log(`Using video device: ${videoTracks[0].label}`)
      }
      // 判断音频轨道是否有值
      if (audioTracks.length > 0) {
        console.log(`Using audio device: ${audioTracks[0].label}`)
      }

      await this.createRTCPeer()
      await this.accceptRTCPeer()
      await this.createOffers()
    },

    // 断链
    hangup() {
      console.log('Ending call')
      this.pc1.close()
      this.pc2.close()
      this.pc1 = null
      this.pc2 = null
      this.hangupButton.disabled = true
      this.callButton.disabled = false
    },

    ToIndex() {
      wx.miniProgram.navigateTo({
        url: '/pages/index/index', //小程序地址
      })
    },

    ToIndex1() {
      this.$router.push({
        path: 'index',
      })
    },
  },
}
</script>
<style scoped>
.video-window {
  width: 100%;
  height: 100%;
}
/* .video-window video {
  width: 100%;
  height: 100%;
  margin: 12px 12px 0;
} */
video {
  width: calc(100% - 48px);
  height: 200px;
  background: #000;
  margin: 24px 24px 0;
}
.btn {
  padding: 12px;
  position: absolute;
  top: 12px;
  right: 12px;
}
.box {
  width: 100%;
  height: 42px;
  text-align: center;
}
.box button {
  padding: 8px 12px;
  margin: 12px 4px;
}
</style>
WEBRTC能力测试
页面准备
视频播放的媒介是 H5 提供的 Video(音视频)和 Audio(纯音频)。
<body >
<!-- 音视频 -->
<!--
本地视频流
muted:
本地视频流的video必须置为静音(muted),否则会出现啸叫/回声等问题
Mac / iPhone / iPad 需要用js设置muted属性
autoplay:必须为激活状态
playsinline:保证在ios safari中不全屏播放
-->
<video id="localVideo" muted autoplay playsinline></video>
<!-- 远端视频流 -->
<video id="remoteVideo" autoplay playsinline></video>
<!-- 纯音频 -->
<!-- 本地音频流 / 这种场景下,localaudio 其实没有播放的必要了,可以用来调试 -->
<!-- <audio id="localAudioMedia" muted autoplay></audio> -->
<!-- 远端音频流 -->
<!-- <audio id="remoteAudioMedia" autoplay ></audio> -->
<script src="https://sqimg.qq.com/expert_qq/webrtc/3.0/WebRTCAPI.min.js"></script>
</body>
H5 支持的平台
| 操作系统平台 | 浏览器/webview | 版本要求 | 备注 |
|---|---|---|---|
| iOS | Safari ( 只支持Safari ) | 11.1.2 | 由于苹果 Safari 仍有偶现的 bug,产品化方案建议先规避,待苹果解决后再使用对于iOS可以考虑使用我们的小程序解决方案 |
| Android | TBS (微信和手机QQ的默认Webview) | 43600 | 微信和手机QQ默认内置的浏览器内核为TBS。TBS 介绍 |
| Android | Chrome | 60+ | 需要支持 H264 |
| Mac | Chrome | 47+ | |
| Mac | Safari | 11+ | |
| Windows(PC) | Chrome | 52+ | |
| Windows(PC) | QQ浏览器 | 10.2 |
function checkTBSVersion(ua) {
//ua = "Mozilla/5.0 (Linux; Android 7.1.1; vivo X9 Build/NMF26F; wv)
//AppleWebKit/537.36 (KHTML, like Gecko) Version/4.0 Chrome/53.0.2785.49
//Mobile MQQBrowser/6.2 TBS/043501 Safari/537.36
//MicroMessenger/6.5.13.1100 NetType/WIFI Language/zh_CN";
    var list = ua.split(" ");
    for (var i = 0; i < list.length; i++) {
        var item = list[i];
        if (item.indexOf("TBS") !== -1 || item.indexOf("tbs") !== -1) {
            var versionStr = item.split("/")[1];
            var version = parseInt(versionStr) || 0;
            if (version <= 43600) {
                alert("您的TBS版本号(" + versionStr + ")过低,不支持WebRTC,请升级!");
            }
        }
    }
}
欢迎加入西安开发者社区!我们致力于为西安地区的开发者提供学习、合作和成长的机会。参与我们的活动,与专家分享最新技术趋势,解决挑战,探索创新。加入我们,共同打造技术社区!
更多推荐
 16
16 0
0- 0


 已为社区贡献1条内容

所有评论(0)