
Vue3 + Vite 打包优化及配置
本文如果有错误和不足之处,欢迎大家在评论区指出,多多提出您宝贵的意见!github地址。
前面简单讲了一下脚手架各个目录的作用以及实现方法,最近刚好项目上线闲下来了,就打算补充一下脚手架的相关配置,自己留作记录也给大家提供点参考。
Vue3 + Vite 搭建企业级开发脚手架【目录篇】
Vue3 Element-Plus Json配置一站式生成动态表单
CSS 工程化配置
我们刚接触前端时候,提到前端样式,首先会想到的就是原生CSS;随着技术的迭代更新,原生CSS不可避免的暴露了许多问题,具体有哪些问题呢?
- 开发体验差。比如不能样式嵌套、不能使用变量…。
解决方案:CSS预处理器,常用的css预处理有Sass/Scss、Less和Stylus
// 样式只能一层层平铺,不能像预处理器一样嵌套
.header {}
.header .menu {}
.header .menu .box {}
-
浏览器兼容性问题。在处理浏览器兼容性问题时,针对有些属性(如
transform)我们会加上不同的浏览器前缀-webkit-、-moz-、-ms-、-o-,如果手动一个个去加,这显然会极大影响开发效率。
解决方案:PostCSS,用来解析CSS,自动添加浏览器前缀 -
全局样式的污染。 当使用相同类名时,就可能会造成样式的覆盖和污染。
解决方案:CSS Modules,将css类名处理成哈希值,这样就不存在覆盖和污染的可能;在Vue中scoped也能一定程度上解决这个问题。
// a.css
.test {}

// b.css
// 会覆盖a.css中test,造成显示问题
.test {}
CSS 预处理
在这里我们以Less为例,在Vite中我们只需要安装Less,就能直接使用
pnpm i less less-loader -D
常规使用:
// index.vue
<template>
    <p class="header">This is Header</p>
</template>
<style scoped lang="less">
//@import '../index.less';
.header {
    width:200px
}
</style>
变量的使用:
// variable.less
@primary-color: #005eff; // 全局主色

// index.vue
<template>
    <p class="header">This is Header</p>
</template>
<style scoped lang="less">
@import './variable.less';
.header{
    background-color: @primary-color;
}
</style>
看到这里你会发现,每次使用@primary-color时都需要@import './variable.less';,那有没有办法可以自动导入呢,这个还真有,让我们改造一下vite.config.js
// vite.config.js

import { defineConfig, normalizePath } from 'vite';

const variablePath = normalizePath(path.resolve('./src/variable.less'));
export default defineConfig({
    ...
    css: {
        preprocessorOptions: {
            less: {
                additionalData: `@import "${variablePath}";`
            }
        }
    }
})
这样你就可以直接使用@primary-color,不需要@import './variable.less';
更多的使用方法,查看 Less 官网。
兼容性处理 PostCSS
首先安装依赖
pnpm i autoprefixer -D
在vite.config.js同级目录下新增postcss.config.js
// postcss.config.js
import autoprefixer from "autoprefixer";

export default {
    plugins: [
        autoprefixer({
            // 指定目标浏览器
            overrideBrowserslist: [
                "Android 4.1",
                "iOS 7.1",
                "Chrome > 31",
                "ff > 31",
                "ie >= 8",
            ],
            grid: true,
        }),
    ],
}
在vite.config.js中使用
// vite.config.js
import { defineConfig } from 'vite';
import postcssConfig from './postcss.config';

export default defineConfig({
    ...
    css: {
        postcss: postcssConfig
    }
})
添加一个测试样式
.header {
    display: flex;
    flex-flow: row nowrap;
}
当你执行pnpm run build进行打包,你就会发现产物中已自动加上了前缀:
.header {
    display: -webkit-box;
    display: -webkit-flex;
    display: -ms-flexbox;
    display: flex;
    -webkit-box-orient: horizontal;
    -webkit-box-direction: normal;
    -webkit-flex-flow: row nowrap;
    -ms-flex-flow: row nowrap;
    flex-flow: row nowrap
}
CSS Modules
<template>
    <p :class="style.header">This is Header</p>
</template>

<script setup lang="ts">
import { useCssModule } from 'vue';

const style = useCssModule();
</script>

<style module lang="less">
.header {
	text-decoration: dashed;
	display: flex;
	flex-flow: row nowrap;
	justify-content: center;
}
</style>
除上面的方法,当然你也可以将样式写在index.module.less中,如:
// index.module.less
.header {
    text-decoration: dashed;
    display: flex;
    flex-flow: row nowrap;
    justify-content: center;
}
<template>
    <p :class="style.header">This is Header</p>
</template>

<script setup lang="ts">
import { useCssModule } from 'vue';

const style = useCssModule();
</script>

<style module lang="less">
@import './index.module.less';
</style>
打开浏览器,你会发现.header类名已经被处理成了哈希值
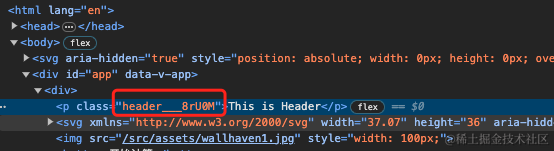
说明已经生效了
别名的配置
// vite.config.js
import { defineConfig } from 'vite';

export default defineConfig({
    ...
    resolve: {
        // 别名配置
        alias: {
                '@': path.join(__dirname, 'src'),
                '@assets': path.join(__dirname, 'src/assets')
        }
    },
})
图片压缩
pnpm i vite-plugin-imagemin -D
// vite.config.js
import { defineConfig } from 'vite';
import viteImagemin from 'vite-plugin-imagemin';

export default defineConfig({
    plugins: [
        viteImagemin({
            // 无损压缩配置,无损压缩下图片质量不会变差
            optipng: {
                    optimizationLevel: 7
            },
            // 有损压缩配置,有损压缩下图片质量可能会变差
            pngquant: {
                    quality: [0.8, 0.9]
            },
            // svg 优化
            svgo: {
                plugins: [
                    {
                        name: 'removeViewBox'
                    },
                    {
                        name: 'removeEmptyAttrs',
                        active: false
                    }
                ]
            }
        })
    ]
})
代码规范
在多人协同开发项目,常常会遇到不同的人写代码的风格不一样,一个系统多种代码风格,这显然是不利于后期维护和阅读甚至还会影响代码质量,这时代码规范就显得尤为必要;但是仅仅只靠个人的自觉性还是做不到完全的统一,所以我们需要依靠工具,下面我们就介绍一下
ESLint、Prettier、Commitlint工具的使用,并配合husky、lint-staged、VSCode 插件搭建完成的工作流。
ESlint
安装依赖
pnpm i eslint -D
初始化
npx eslint --init
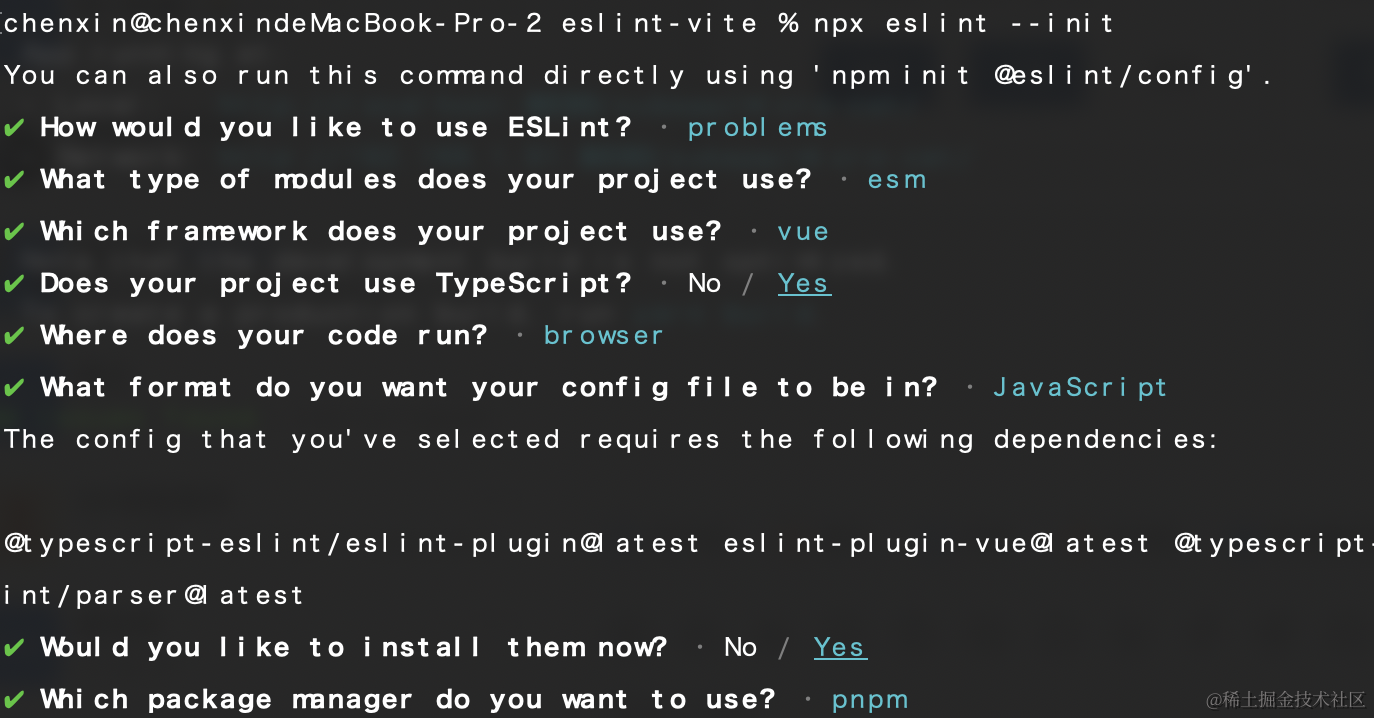
等待安装完毕后,ESlint就会自动为我们创建.eslintrc.cjs(cjs 是指 CommonJS 格式)
// .eslintrc.cjs
module.exports = {
  env: {
    browser: true,
    es2021: true,
  },
  extends: [
    "eslint:recommended",
    "plugin:@typescript-eslint/recommended",
    "plugin:vue/vue3-essential",
  ],
  overrides: [
    {
      env: {
        node: true,
      },
      files: [".eslintrc.{js,cjs}"],
      parserOptions: {
        sourceType: "script",
      },
    },
  ],
  parserOptions: {
    ecmaVersion: "latest",
    parser: "@typescript-eslint/parser",
    sourceType: "module",
  },
  plugins: ["@typescript-eslint", "vue"],
  rules: {},
};
修改package.json中script 中添加命令
"lint:eslint": "eslint --ext .js,.jsx,.ts,.tsx,.vue --fix --quiet ./src"
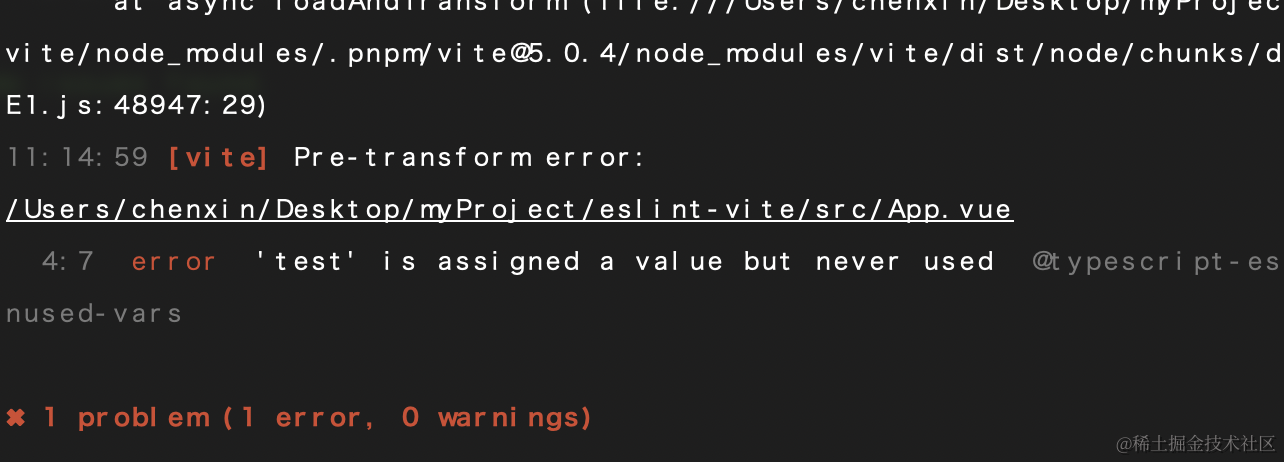
在App.vue中随便添加一个未使用变量
import { ref } from "vue";
const test = ref(null);
随后执行命令pnpm lint:eslint,这时就会看到
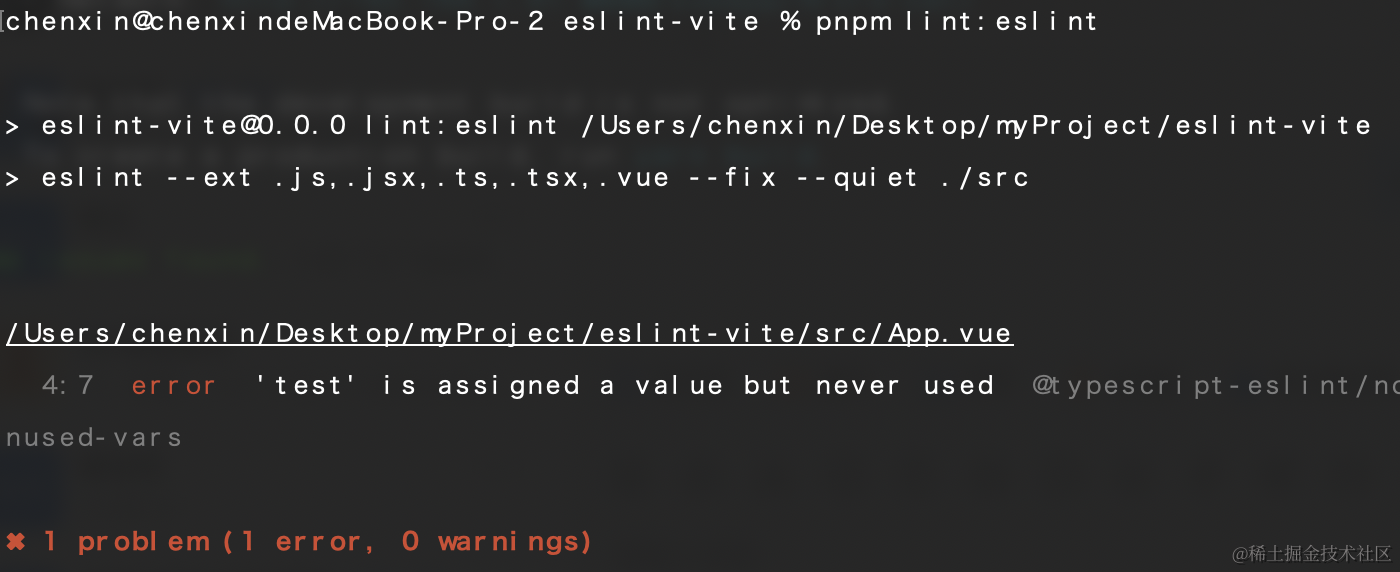
说明eslint已经生效;虽然ESlint具有代码格式功能--fix,但我们总不能边写代码边执行命令吧,有没有更加智能的方法,比如Ctrl+S自动格式化代码,自然是有的Prettier。
Prettier
通常ESlint只负责代码的风格检查并给出提示,配合Prettier对代码进行格式化
安装依赖
pnpm i prettier -D
然后再根目录创建 .prettierrc.js 配置文件
// .prettierrc.js
module.exports = {
  printWidth: 80, //一行的字符数,如果超过会进行换行,默认为80
  tabWidth: 2, // 一个 tab 代表几个空格数,默认为 2 个
  useTabs: false, //是否使用 tab 进行缩进,默认为false,表示用空格进行缩减
  singleQuote: true, // 字符串是否使用单引号,默认为 false,使用双引号
  semi: true, // 行尾是否使用分号,默认为true
  trailingComma: "none", // 是否使用尾逗号
  bracketSpacing: true // 对象大括号直接是否有空格,默认为 true
};
接下来我们将Prettier集成到ESlint中,首先安装依赖
pnpm i eslint-config-prettier eslint-plugin-prettier -D
修改.eslintrc.cjs,完整代码如下,可直接拷贝
module.exports = {
    env: {
            browser: true,
            es2021: true
    },
    extends: [
            'eslint:recommended',
            'plugin:@typescript-eslint/recommended',
            'plugin:vue/vue3-essential',
            'prettier',
            'plugin:prettier/recommended'
    ],
    overrides: [
            {
                    env: {
                            node: true
                    },
                    files: ['.eslintrc.{js,cjs}'],
                    parserOptions: {
                            sourceType: 'script'
                    }
            }
    ],
    parserOptions: {
            ecmaVersion: 'latest',
            parser: '@typescript-eslint/parser',
            sourceType: 'module',
            ecmaFeatures: {
                    jsx: true
            }
    },
    plugins: ['vue', '@typescript-eslint', 'prettier'],
    rules: {
            'prettier/prettier': 'error',
            quotes: ['error', 'single'],
            semi: ['error', 'always'],
            '@typescript-eslint/no-explicit-any': 'off',
            'vue/multi-word-component-names': 'off'
    }
};
最后我们可以在VSCode中安装ESLint和Prettier这两个插件,并且开启Format On Save,这样在你按Ctrl + S保存代码的时候,Prettier 便会自动帮忙修复代码格式。
将ESlint配置到Vite
为了在开发阶段能实时监测到ESlint报错,我还需要在Vite中稍作配置
安装依赖
pnpm i vite-plugin-eslint -D
再修改vite.config.js配置
import viteEslint from 'vite-plugin-eslint';

plugins:[
    viteEslint()
]
再重启项目,这时你就可以在命令窗口看到ESlint错误信息
Husky + lint-staged
Husky
通过Husky拦截git commit 命令,先进行代码格式检查,只有通过格式检查才允许正常提交代码。
安装依赖
pnpm i husky -D
执行下面命令在package.json中添加prepare脚本
npm pkg set scripts.prepare="husky install"
运行prepare脚本
pnpm prepare
添加 Husky 钩子,在终端执行如下命令:
npx husky add .husky/pre-commit "npm run lint:eslint"
这时你会在项目根目录的.husky目录中看到名为pre-commit的文件,这样每次commit之前就会先执行pnpm lint:eslint,检测通过后才允许提交。
lint-staged
当我们执行pnpm lint:eslint的时候会对整个项目代码进行全量检测,这显然是不行的,随着项目越来越大,检测过程会越来越慢,这时使用lint-staged就可以解决这个问题,它只会对缓存区文件进行检测,缩短了检测时间。
安装依赖
pnpm i lint-staged -D
然后在 package.json中添加相关配置:
"lint-staged": {
        "**/*.{vue,js,jsx,tsx,ts}": [
                "npm run lint:eslint"
        ]
}
接下来我们将.husky/pre-commit 中替换 npm run lint 为 npx --no -- lint-staged,这样一来我们就可以只对修改内容进行代码检测了。
Commitlint
对commit提交信息进行校验;
安装依赖
pnpm i commitlint @commitlint/cli @commitlint/config-conventional -D
接下来新建.commitlintrc.js:
// .commitlintrc.js
module.exports = {
  extends: ["@commitlint/config-conventional"]
};
然后把 commitlint 命令也添加 Husky里面。运行命令:
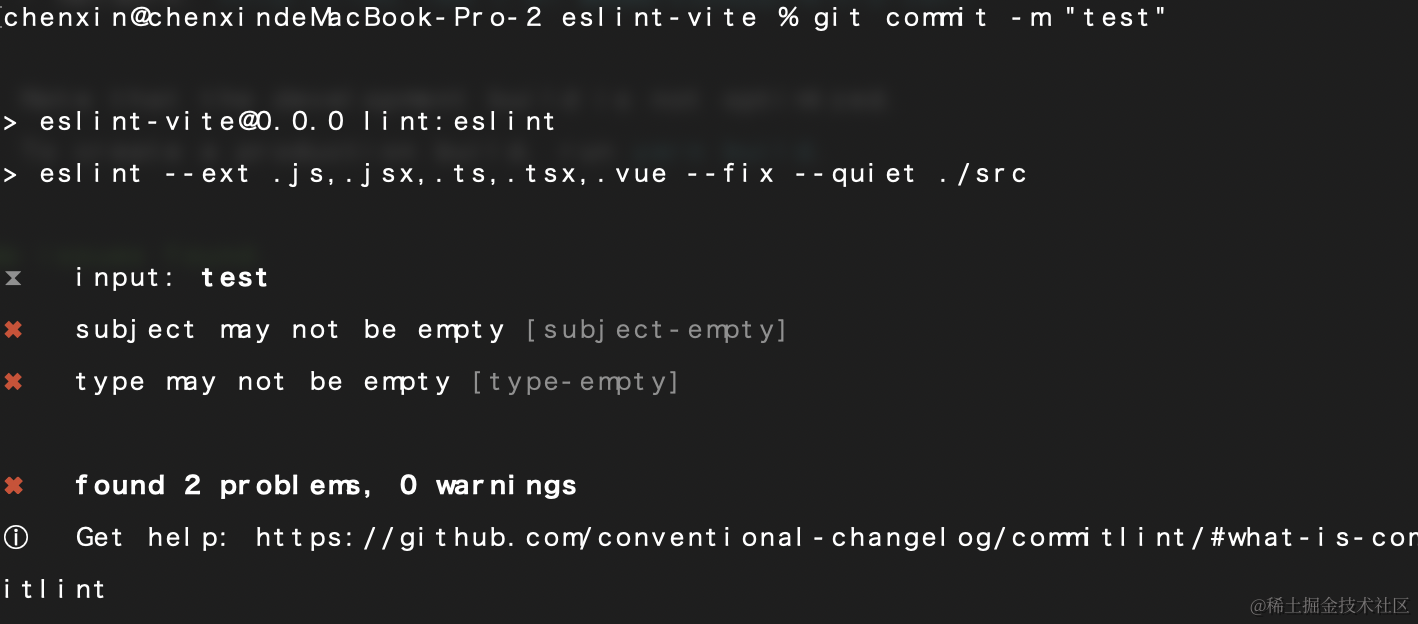
npx husky add .husky/commit-msg "npx --no-install commitlint -e $HUSKY_GIT_PARAMS"
运行命令 git add . && git commit -m "test",你会发现message校验不通过,成功被拦截。
commit message定义规则
// type 指提交的类型
// subject 指提交的摘要信息
<type>: <subject>
常用的 type 值包括如下:
feat: 添加新功能。fix: 修复 Bug。chore: 一些不影响功能的更改。docs: 专指文档的修改。perf: 性能方面的优化。refactor: 代码重构。test: 添加一些测试代码等等
我们再重新运行命令git commit -m "refactor: init",这时就能成功提交了。注: <type>: 后面有一个空格
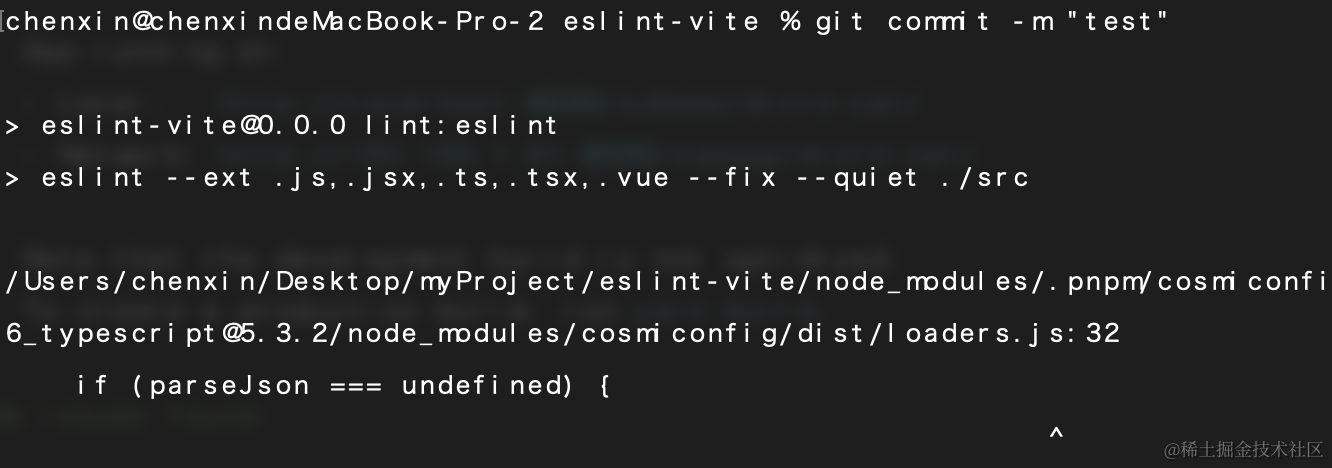
如果提交时出现以下类似情况,请把后缀改为.cjs
雪碧图优化
在实际项目中我们经常用加载svg图标,而Vite会将svg打包成单文件,这样会造成大量的HTTP请求,导致页面加载时间变长,那我们可不可以把所有svg合并在一起呢,万能的社区为我们提供了解决方案。
安装依赖
pnpm i vite-plugin-svg-icons -D
修改vite.config.js配置如下:
import { createSvgIconsPlugin } from 'vite-plugin-svg-icons';

plugins:[
   ....
   // 生成svg雪碧图
   // 将所需合并的svg图标放在统一的目录,如:src/assets/icons
    createSvgIconsPlugin({
        // 指定需要缓存的图标文件夹
        iconDirs: [path.join(__dirname, '/src/assets/icons')],
        // 指定symbolId格式,就是svg.use使用的href
        symbolId: 'icon-[name]'
    })
]
在main.js中添加:
import 'virtual:svg-icons-register';
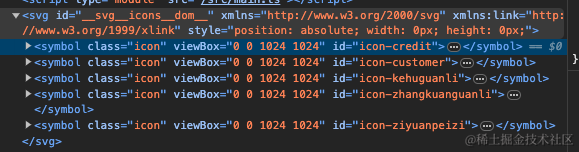
重启服务,这时在浏览器中就能发现雪碧图已生成:
svg使用
在 src/components目录下新建SvgIcon组件:
<template>
	<svg :class="svgClass" aria-hidden="true">
		<use :xlink:href="iconClassName" :fill="color" />
	</svg>
</template>

<script setup lang="ts">
import { computed } from 'vue';
const props = defineProps({
	iconName: {
		type: String,
		required: true
	},
	className: {
		type: String,
		default: ''
	},
	color: {
		type: String,
		default: '#409eff'
	}
});
// 图标在 iconfont 中的名字
const iconClassName = computed(() => {
	return `#${props.iconName}`;
});
// 给图标添加上类名
const svgClass = computed(() => {
	if (props.className) {
		return `svg-icon ${props.className}`;
	}
	return 'svg-icon';
});
</script>

<style scoped>
.svg-icon {
	width: 1em;
	height: 1em;
	position: relative;
	fill: currentColor;
	vertical-align: -2px;
}
</style>
<svg-icon iconName="icon-xinzeng" className="test" color="red"></svg-icon>
以组件的形式加载Svg
安装依赖
pnpm i vite-svg-loader -D
修改vite.config.js配置如下:
import svgLoader from 'vite-svg-loader';

plugins:[
    ....
    svgLoader()
]
使用
<template>
    <VueSvg></VueSvg>
</template>

<script setup lang="ts">
import VueSvg from '@/assets/vue.svg';
</script>
最后
文章暂时就写到这,如果本文对您有什么帮助,别忘了动动手指点个赞❤️。 本文如果有错误和不足之处,欢迎大家在评论区指出,多多提出您宝贵的意见!
最后分享项目地址:github地址

旨在为数千万中国开发者提供一个无缝且高效的云端环境,以支持学习、使用和贡献开源项目。
更多推荐


 35
35 1
1- 0


 已为社区贡献1条内容

所有评论(0)