
【详细案例】yoloV5 tensorRT加速 C++图片推理
@TOC前言因部署jetson nano需要,以yolov5为例提供一种tensorRT加速推理的实例。python训练出来的神经网络权重文件pt如果想要应用到实际设备上,需要进行权重文件的转换工作:pt->onnx-> engine(TensorRT),加载engine文件可以更流畅的运行推理,这在预测模型移植到小型设备上是有必要的工作。项目文件已上传至github源码一、权重文件p
文章目录
前言
因部署jetson nano需要,以yolov5为例提供一种tensorRT加速推理的实例。python训练出来的神经网络权重文件pt如果想要应用到实际设备上,需要进行权重文件的转换工作:pt -> onnx -> engine(TensorRT),加载engine文件可以更流畅的运行推理,这在预测模型移植到小型设备上是有必要的工作。
项目文件已上传至https://github.com/ZhengChuan-1/YoloV5-TensorRT-inference
视频和摄像头推理案例已完成yolo 视频和摄像头实时推理
一、权重文件pt转onnx
onnx是一种通用神经网络文件,使用这种文件格式可脱离pytorch、tensorflow、caffe等框架的依赖运行推理。
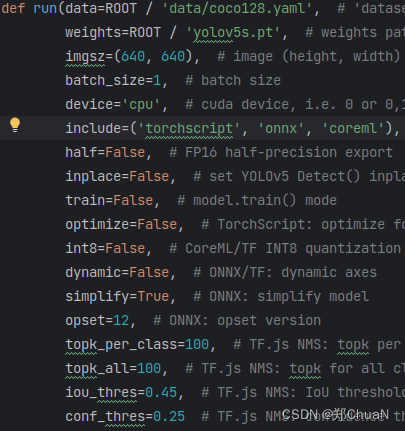
在官方源码中找到export.py脚本,由下图可看到run函数中的include参数默认输出三个模型,这里只需要onnx,所以指定include = onnx 。

终端运行:python export.py --weights yolov5s.pt --include = onnx
问题:
此时可能会遇到一个问题,导出的onnx放入netron查看网络结果会发现输出有四个(只有一个输出可跳过此步)。如图所示:
 其中第一个输出表示三个预测尺寸(8080,4040,20*20)的集合,也就是后面三个输出的总和,因此后面三个输出是多余的,删掉以避免后续推理产生不必要的麻烦。
解决方法:
找到源码中的yolo.py文件,在Detect类中的forword函数最后一行,如下图所示:

将 (torch.cat(z, 1), x) 改为 torch.cat(z, 1)
此时再使用export.py导出onnx输出就只剩1个了,如图:

二、onnx转engine文件
转成onnx模型已经可以独立运行推理,可自行搜索相关教程。为了追求效率的提升还需进一步转换成TensorRT对应的解析文件。
转engine可以使用TensorRT提供的C++或Python API进行编程转换,具体操作细节可参考官方文档和网上案例。
我选择使用官方集成好的trtexec可执行程序,文件位于TensorRT目录的bin文件夹里。
 进入文件夹打开终端,填入onnx路径和输出engine文件的路径(文件后缀名可以是engine也可以是trt,不影响):
./trtexec --onnx=/home/zc/桌面/onnx模型/yolov5s_2.onnx --saveEngine=/home/zc/桌面/onnx模型/yolov5s.trt
如上诉模型转换走不通,可百度云直接下载使用,链接: yolov5s.trt文件 提取码: QWER。
三、engine文件推理图片获得输出
接下来介绍获得engine文件后推理获得我们想要的预测结果。
1. 输入图像预处理
放入需要预测的图片前,需要把它resize成640*640尺寸与模型对应(长宽不等情况下使用素色填充边界),结果如下图。最后对图片像素进行归一化处理。参考出处(https://zhuanlan.zhihu.com/p/577205522)

#include<iostream>
#include<opencv2/opencv.hpp>
#include <opencv2/core/core.hpp>
#include <opencv2/imgproc.hpp>
using namespace std;

//一、图像处理
    const int model_width = 640;
    const int model_height = 640;

    //string image_path = "/home/zc/C++_TensorRT_inference/sample_photo/images/bus.jpg";
    string image_path = "/home/zc/C++_TensorRT_inference/sample_photo/images/zidane.jpg";  //填写自己图片路径(需要绝对路径)
    float* input_blob = new float[model_height * model_width * 3];

    cv::Mat input_image = cv::imread(image_path);
    cv::Mat resize_image;
	//比例
    const float ratio = std::min(model_width / (input_image.cols * 1.0f),
                            model_height / (input_image.rows * 1.0f));
    // 等比例缩放
    const int border_width = input_image.cols * ratio;
    const int border_height = input_image.rows * ratio;
    // 计算偏移值
    const int x_offset = (model_width - border_width) / 2;
    const int y_offset = (model_height - border_height) / 2;

    //将输入图像缩放至resize_image
    cv::resize(input_image, resize_image, cv::Size(border_width, border_height));
    //复制图像并且制作边界
    cv::copyMakeBorder(resize_image, resize_image, y_offset, y_offset, x_offset,
                        x_offset, cv::BORDER_CONSTANT, cv::Scalar(114, 114, 114));
    // 转换为RGB格式
    cv::cvtColor(resize_image, resize_image, cv::COLOR_BGR2RGB);

    //归一化
    const int channels = resize_image.channels();
    const int width = resize_image.cols;
    const int height = resize_image.rows;
    for (int c = 0; c < channels; c++) {
        for (int h = 0; h < height; h++) {
            for (int w = 0; w < width; w++) {
                input_blob[c * width * height + h * width + w] =
                    resize_image.at<cv::Vec3b>(h, w)[c] / 255.0f;  //at<Vec3b> 是 OpenCV 中用于访问图像像素的一种方法,使用 at<Vec3b> 获取彩色图像中特定位置的像素颜色值
            }
        }
    }
2. 模型解析推理
(1)读取engine(trt)信息
使用C++标准库fstream读取数据流,创建一个stringstream类的对象engine_file_stream用来接收engine(trt)数据流,求出文件流长度model_size,开辟一个一样长的空间model_mem,将engine_file_stream内容放进model_mem.
(2)反序列化
这时需要用到TensorRT中的NvInfer模块了,创建IRuntime类对象runtime,使用deserializeCudaEngine反序列化函数解析model_mem(engine模型的内容),创建ICudaEngine类对象engine接收解析结果。
(3)推理
通过IExecutionContext类对象 *context -> enqueueV2进行推理。推理计算是把数据从CPU拷贝到GPU进行计算,再把结果从GPU拷贝到CPU的过程。因此需要开辟CPU、GPU的输入输出空间:
CPU输入已存在(input_blob);
void *buffers[2]创建2个维度,buffers[0]存放GPU的输入,buffers[1]存放GPU的输出(对应第一节pt -> onnx输出个数的问题,如果模型是四个输出则需要更多的维度去接收);
开辟output_buffer存放CPU输出;
数据流转顺序为input_blob -> buffers[0] -> buffers[1] -> output_buffer
output_buffer则是yolov5预测的1 * 25200 * 85 = 2142000个输出。
#include<fstream>
#include "NvInfer.h"
#include "logging.h"
using namespace nvinfer1;

class MyLogger : public nvinfer1::ILogger {
 public:
  explicit MyLogger(nvinfer1::ILogger::Severity severity =
                        nvinfer1::ILogger::Severity::kWARNING)
      : severity_(severity) {}

  void log(nvinfer1::ILogger::Severity severity,
           const char *msg) noexcept override {
    if (severity <= severity_) {
      std::cerr << msg << std::endl;
    }
  }
  nvinfer1::ILogger::Severity severity_;
};

//二、模型反序列化
    MyLogger logger;
    //读取trt信息
    const std::string engine_file_path = "/home/zc/C++_TensorRT_inference/sample_photo/yolov5s.trt";  //填写自己trt文件路径(需要绝对路径)
    std::stringstream engine_file_stream;
    engine_file_stream.seekg(0, engine_file_stream.beg);  //从起始位置偏移0个字节,指针移动到文件流的开头
    std::ifstream ifs(engine_file_path);
    engine_file_stream << ifs.rdbuf();  //将读取到的数据流交给engine_file_stream
    ifs.close();

    engine_file_stream.seekg(0, std::ios::end); //先把文件输入流指针定位到文档末尾来获取文档的长度
    const int model_size = engine_file_stream.tellg();  //获取文件流的总长度
    engine_file_stream.seekg(0, std::ios::beg);
    void *model_mem = malloc(model_size);               //开辟一样长的空间
    engine_file_stream.read(static_cast<char *>(model_mem), model_size);    //将内容读取到model_mem中

    nvinfer1::IRuntime *runtime = nvinfer1::createInferRuntime(logger);
    nvinfer1::ICudaEngine *engine = runtime->deserializeCudaEngine(model_mem, model_size);

    free(model_mem);

//三、模型推理
    nvinfer1::IExecutionContext *context = engine->createExecutionContext();

    void *buffers[2];
    // 获取模型输入尺寸并分配GPU内存
    nvinfer1::Dims input_dim = engine->getBindingDimensions(0);
    int input_size = 1;
    for (int j = 0; j < input_dim.nbDims; ++j) {
        input_size *= input_dim.d[j];
    }
    cudaMalloc(&buffers[0], input_size * sizeof(float));

    // 获取模型输出尺寸并分配GPU内存
    nvinfer1::Dims output_dim = engine->getBindingDimensions(1);
    int output_size = 1;
    for (int j = 0; j < output_dim.nbDims; ++j) {
        output_size *= output_dim.d[j];
    }
    cudaMalloc(&buffers[1], output_size * sizeof(float));

    // 给模型输出数据分配相应的CPU内存
    float *output_buffer = new float[output_size];
    //数据投入
    cudaStream_t stream;
    cudaStreamCreate(&stream);
    // 拷贝输入数据
    cudaMemcpyAsync(buffers[0], input_blob,input_size * sizeof(float),
                    cudaMemcpyHostToDevice, stream);
    // 执行推理
    if(context->enqueueV2(buffers, stream, nullptr))
    {
        cout << "enqueueV2执行推理成功" << endl;
    }
    else{
        cout << "enqueueV2执行推理失败" << endl;
        return -1;
    }
    // 拷贝输出数据
    cudaMemcpyAsync(output_buffer, buffers[1],output_size * sizeof(float),
                    cudaMemcpyDeviceToHost, stream);

    cudaStreamSynchronize(stream);

    delete context;
    delete engine;
    delete runtime;
    delete[] input_blob;
3. 输出结果后处理
yoloV5的输出output_buffer包含xywh(中心点坐标+宽高),目标得分objectness(是物体还是背景),80个分类的得分,总共85个元素为一个预测框携带的信息量。
("processing.hpp"为自编写文件,包含标签名字、Object结构体、NMS算法)
(1)将预测框信息还原成原图比例的尺寸,将box框、标签、置信度丢入Object结构体obj中,全部预测框组成一个std::vector< Object >类型数组objs;
(2)NMS非极大值抑制
将重叠多余的预测框筛掉,在这张图片中输出预测框35个,经过NMS处理最终留下3个预测框。
NMS原理:https://blog.csdn.net/qq_22764813/article/details/124401541
(3)画框
最后将预测框画到原图上保存;
#include "processing.hpp"
//四、输出结果output_buffer,放入objs  xywh为中心点坐标 和宽高
    float *ptr = output_buffer;
    std::vector<Object> objs;
    for (int i = 0; i < 25200; ++i) {
        const float objectness = ptr[4];
        if (objectness >= 0.45f) {
            const int label = std::max_element(ptr + 5, ptr + 85) - (ptr + 5);  //std::max_element返回范围内的最大元素
            const float confidence = ptr[5 + label] * objectness;
            if (confidence >= 0.25f) {
                const float bx = ptr[0];
                const float by = ptr[1];
                const float bw = ptr[2];
                const float bh = ptr[3];

                Object obj;
                // 还原图像尺寸中box的尺寸比例,这里要减掉偏移值,并把box中心点坐标xy转成左上角坐标xy
                obj.box.x = (bx - bw * 0.5f - x_offset) / ratio;
                obj.box.y = (by - bh * 0.5f - y_offset) / ratio;
                obj.box.width = bw / ratio;
                obj.box.height = bh / ratio;
                obj.label = label;
                obj.confidence = confidence;
                objs.push_back(std::move(obj));
                }
        }
        ptr += 85;
    }  // i loop

//五、NMS非极大值抑制
    vector<list<Object>> finalll = NMS(objs);

//六、画框
    int row = finalll.size();
    for(int i = 0; i < row; i++){
        list<Object>::iterator it = finalll[i].begin();
        while(it != finalll[i].end()){
            cv::Point topLeft(it->box.x, it->box.y);
            cv::Point bottomRight(it->box.x + it->box.width, it->box.y + it->box.height);
            cv::rectangle(input_image, topLeft, bottomRight, cv::Scalar(0, 0, 255), 2);
            std::stringstream buff;
            buff.precision(2);  //覆盖默认精度,置信度保留2位小数
            buff.setf(std::ios::fixed);
            buff << it->confidence;
            string text =names[it->label] + " " + buff.str();
            cv::putText(input_image, text, topLeft, 0, 1, cv::Scalar(0, 255, 0), 2);
            it++;
        }
    }
    //cv::imwrite("_bus.jpg", input_image);
    cv::imwrite("_zidane.jpg", input_image);
最后附上"processing.hpp"头文件:
#include <iostream>
#include <vector>
#include <list>
using namespace std;

string names[] = {"person", "bicycle", "car", "motorcycle", "airplane", "bus", "train", "truck", "boat", "traffic light",
        "fire hydrant", "stop sign", "parking meter", "bench", "bird", "cat", "dog", "horse", "sheep", "cow",
        "elephant", "bear", "zebra", "giraffe", "backpack", "umbrella", "handbag", "tie", "suitcase", "frisbee",
        "'skis'", "'snowboard'", "'sports ball'", "'kite'", "'baseball bat'", "'baseball glove'", "'skateboard'", "'surfboard'",
        "'tennis racket'", "'bottle'", "'wine glass'", "'cup'", "'fork'", "'knife'", "'spoon'", "'bowl'", "'banana'", "'apple'",
        "'sandwich'", "'orange'", "'broccoli'", "'carrot'", "'hot dog'", "'pizza'", "'donut'", "'cake'", "'chair'", "'couch'",
        "'potted plant'", "'bed'", "'dining table'", "'toilet'", "'tv'", "'laptop'", "'mouse'", "'remote'", "'keyboard'", "'cell phone'",
        "'microwave'", "'oven'", "'toaster'", "'sink'", "'refrigerator'", "'book'", "'clock'", "'vase'", "'scissors'", "'teddy bear'",
        "'hair drier'", "'toothbrush'"};

struct BOX
{
    float x;
    float y;
    float width;
    float height;
};

struct Object
{
    BOX box;
    int label;
    float confidence;
};

bool cmp(Object &obj1, Object &obj2){
    return obj1.confidence > obj2.confidence;
}

vector<list<Object>> NMS(std::vector<Object> objs, float iou_thres = 0.45){
    //第一步:将所有矩形框按照不同的类别标签分组,组内按照置信度高低得分进行排序;

    list<Object> obj_l;
    vector<list<Object>> NMS_List;
    int a = 0;
    for(int i = 0; i < 80; i++){
        for(auto j : objs)
        {
            if(j.label == i){
                obj_l.push_back(j);
                obj_l.sort(cmp);        //依据置信度升序排序
                a = 1;
            }
        }
        if(a == 1){
            NMS_List.push_back(std::move(obj_l));
            a = 0;
            }
    }

    //第二步:计算IOU
    float x1, y1, x1_w, y1_h,x2, y2, x2_w, y2_h;
    float x_box, y_box, x_w_box, y_h_box, w_box, h_box;
    float S1,S2,SBOX,res_iou;
    int row = NMS_List.size();  //行数
    int tmp;
    for(int i = 0; i < row ; i++)  //不同分类的循环
    {
        tmp = 0;
        list<Object>::iterator it = NMS_List[i].begin();
        while(it != --NMS_List[i].end()){
            x1 = it->box.x;
            y1 = it->box.y;
            x1_w = x1 + it->box.width;
            y1_h = y1 + it->box.height;
            while(it != --NMS_List[i].end())
            {
                it++;
                x2 = it->box.x;
                y2 = it->box.y;
                x2_w = x2 + it->box.width;
                y2_h = y2 + it->box.height;
                //交集左上角坐标x_box,y_box  框1-x1和框2-x2的最大值   框1-y1和框2-y2的最大值
                x_box = std::max(x1, x2);
                y_box = std::max(y1, y2);
                //交集右下角坐标x_w_box,y_h_box  框1-x1_w和框2-x2_w的最小值  框1-y1_h和框2-y2_h的最小值
                x_w_box = std::min(x1_w, x2_w);
                y_h_box = std::min(y1_h, y2_h);
                //交集框宽高
                w_box = x_w_box - x_box;
                h_box = y_h_box - y_box;
                //无交集情况
                if(w_box <= 0 || h_box <= 0)
                {
                    it = NMS_List[i].erase(it);
                    if(it == NMS_List[i].end()){break;}
                    it--;
                    continue;
                }
                //有交集,计算IOU
                S1 = (x1_w - x1) * (y1_h - y1);
                S2 = (x2_w - x2) * (y2_h - y2);
                SBOX = w_box * h_box;
                if((res_iou = SBOX / (S1 + S2 - SBOX)) > iou_thres){
                    it = NMS_List[i].erase(it);
                    if(it == NMS_List[i].end()){break;}
                    it--;
                }

            }
            it = NMS_List[i].begin();
            if(it == --NMS_List[i].end()){break;}
            tmp++;
            for(int z = 0; z < tmp; z++){
                it++;
                if(it == --NMS_List[i].end()){break;}
            }
        }
    }

    return NMS_List;
}
最终预测如下图:

总结
看完整篇您应该对TensorRT的推理有了一定了解,难点在于预处理、后处理、NMS代码的理解,因为实际代码的数据存放形式会与学习中想象的格式有点出入,但表示的意思是一样。最好是读懂原理根据自己理解去编写。

旨在为数千万中国开发者提供一个无缝且高效的云端环境,以支持学习、使用和贡献开源项目。
更多推荐


 15
15 0
0- 0


 已为社区贡献1条内容

所有评论(0)