
(三)Vue项目——轻社区:实现用户注册功能
Vue项目“轻社区”,实现用户登录注册+用户中心+邮件激活+分类管理+点赞+回复操作等功能。打造微一站式互动轻社区。
目录
用户注册
1.创建用户表
在lightbbs项目中,安装迁移工具。
composer require topthink/think-migration=2.*
创建迁移文件。
php think migrate:create User
编写迁移文件。
database\migrations\…_user.php
public function change()
{
$table = $this->table(
'user',
['engine' => 'InnoDB', 'collation' => 'utf8mb4_general_ci']
);
$table->addColumn(
'name',
'string',
['limit' => 100, 'null' => false, 'default' => '', 'comment' => '用户名']
)
->addColumn(
'password',
'string',
['limit' => 255, 'null' => false, 'default' => '', 'comment' => '密码']
)
->addColumn(
'salt',
'char',
['limit' => 32, 'null' => false, 'default' => '', 'comment' => '密码salt']
)
->addColumn(
'email',
'string',
['limit' => 128, 'null' => false, 'default' => '', 'comment' => '邮箱']
)
->addColumn(
'is_active',
'boolean',
['null' => false, 'default' => 0, 'comment' => '邮箱是否激活']
)
->addColumn(
'role',
'string',
['limit' => 100, 'null' => false, 'default' => 'user', 'comment' => '用户角色']
)
->addColumn(
'img_url',
'string',
['limit' => 255, 'null' => false, 'default' => '', 'comment' => '用户头像地址']
)
->addIndex(['name', 'email'], ['unique' => true])
->addTimestamps()
->create();
}
执行迁移。
php think migrate:run
添加填充数据。
php think seed:create User
打开database\seeds\User.php,编写run()方法。
public function run()
{
$salt = md5(microtime(true));
$password = md5(md5('123456') . $salt);;
$this->table('user')->insert([
['id' => 1, 'name' => 'admin', 'password' => $password, 'salt' => $salt, 'email' => 'admin@localhost', 'is_active' => 1, 'role' => 'admin'],
])->save();
}
执行迁移。
php think seed:run
开启自动时间戳。
创建application\api\config\database.php。
<?php
return [
'auto_timestamp' => 'timestamp'
];
2.用户注册接口
修改route\route.php,删除自带的路由代码,添加服务器端路由。
<?php
……(原有的一些注释)
Route::group('api', function () {
Route::post('user/register', 'api/User/register');
})->allowCrossDomain();
return [
];
通过公共控制器用来检查登录。
创建application\api\controller\Common.php。
<?php
namespace app\api\controller;
use think\Controller;
class Common extends Controller
{
}
创建用户控制器application\api\controller\User.php。
<?php
namespace app\api\controller;
class User extends Common
{
public function register()
{
// 用户注册
}
}
接收变量。
public function register()
{
$data = [
'name' => $this->request->post('name/s', 'trim'),
'password' => $this->request->post('password/s'),
'email' => $this->request->post('email/s', 'trim')
];
}
编写验证器。
创建application\api\validate\User.php。
<?php
namespace app\api\validate;
use think\Validate;
class User extends Validate
{
protected $rule = [
'name' => 'require|min:3|max:25',
'password' => 'require|min:6|max:18',
];
protected $message = [
'name.require' => '用户名不能为空',
'name.min' => '用户名最少为3个字符',
'name.max' => '用户名最多为25个字符',
'password.require' => '密码不能为空',
'password.min' => '密码最少为6位',
'password.max' => '密码最多为18位',
'email.email' => '邮箱格式有误',
'email.max' => '邮箱最多128个字符',
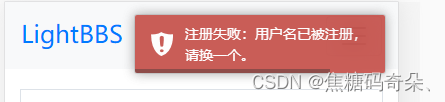
'name.unique' => '用户名已被注册,请换一个',
'email.unique' => '邮箱已被注册,请换一个'
];
public function sceneRegister()
{
return $this->append('email', 'require|email|max:128|unique:user')
->append('name', 'unique:user,name');
}
}
在application\api\controller\User.php中进行验证。
先导入命名空间。
use app\api\validate\User as UserValidate;
然后在register()方法中添加代码。
public function register()
{
……(原有代码)
$validate = new UserValidate();
if (!$validate->scene('register')->check($data)) {
$this->error('注册失败:' . $validate->getError() . '。');
}
}
创建application\api\model\User.php。
<?php
namespace app\api\model;
use think\Model;
class User extends Model
{
}
创建application\api\library\Auth.php。
<?php
namespace app\api\library;
class Auth
{
protected static $instance;
protected $error;
public static function getInstance($options = [])
{
if (is_null(self::$instance)) {
self::$instance = new static($options);
}
return self::$instance;
}
public function setError($error)
{
$this->error = $error;
return $this;
}
public function getError()
{
return $this->error;
}
}
导入UserModel和Session命名空间。
<?php
namespace app\api\library;
use app\api\model\User as UserModel;
use think\facade\Session;
……(原有代码)
编写register()方法。
public function register(array $data)
{
$data = array_merge([
'salt' => $this->salt(),
'password' => '',
'is_active' => 0,
'role' => 'user'
], $data);
$data['password'] = $this->passwordMD5($data['password'], $data['salt']);
$user = UserModel::create($data);
return [
'id' => $user->id,
'name' => $user->name,
'is_active' => $user->is_active,
'role' => $user->role
];
}
public function salt()
{
return md5(microtime(true));
}
public function passwordMD5($password, $salt)
{
return md5(md5($password) . $salt);
}
在Common控制器中创建Auth实例。
打开application\api\controller\Common.php。
先导入命名空间。
use app\api\library\Auth;
use think\Controller;
然后编写initialize()方法。
class Common extends Controller
{
protected $auth;
protected function initialize()
{
$this->auth = Auth::getInstance();
}
}
在application\api\controller\User.php中完成注册操作。
public function register()
{
……(原有代码)
$user = $this->auth->register($data);
if (!$user) {
$this->error('注册失败:' . $this->auth->getError() . '。');
}
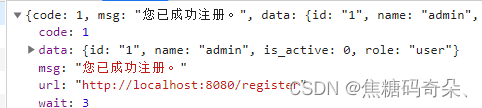
$this->success('您已成功注册。', null, $user);
}
创建application\api\config\app.php,将默认返回类型设置为JSON。
<?php
return [
'default_return_type' => 'json'
];
3.用户注册页面
在vue_lightbbs项目中开发前端页面。
打开src\pages\Register.vue文件,重新编写代码。
结构:
<template>
<div class="register">
<div class="row">
<div class="col register-logo">
<h2>LightBBS</h2>
</div>
<div class="col register-title">用户注册</div>
</div>
<div class="form-group">
<input type="text" class="form-control" placeholder="用户名" v-model="form.name" />
</div>
<div class="form-group">
<input type="email" class="form-control" placeholder="邮箱" v-model="form.email" />
</div>
<div class="form-group">
<input type="password" class="form-control" placeholder="密码" v-model="form.password" />
</div>
<div class="form-group">
<input type="password" class="form-control" placeholder="确认密码" v-model="repassword" />
</div>
<div class="form-group">
<button class="btn btn-success register-submit" @click="register">注册</button>
</div>
</div>
</template>
逻辑:
<script>
export default {
data () {
return {
form: {
name: '',
password: '',
email: ''
},
repassword: ''
}
},
methods: {
register () {
// 注册
}
}
}
</script>
样式:
<style scoped>
.register {
margin-top: 20px;
padding-top: 30px;
padding-left: 15px;
padding-right: 15px;
border-radius: 0px;
border: 1px solid #dde2e8;
background: #ffffff;
}
.register-logo {
text-align: left;
color: #fd7e14;
}
.register-title {
text-align: right;
font-size: 16px;
line-height: 60px;
}
.register-submit {
width: 100%;
}
</style>
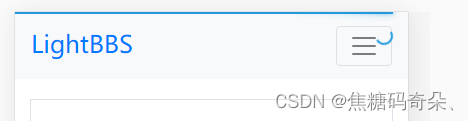
页面效果如下。
4.网络请求
在vue_lightbbs项目中封装网络请求。
安装axios。
npm install axios@0.19 --save
创建src\config.js。
export default {
install: function (vue) {
vue.prototype.$config = {
name: '轻社区',
baseURL: 'http://lightbbs.test/api/',
setTitle (title) {
document.title = title + ' - ' + this.name
},
}
}
}
创建src\http.js。
import axios from 'axios'
export default {
install: function (vue) {
var config = vue.prototype.$config
var obj = axios.create({
baseURL: config.baseURL
})
vue.prototype.$http = obj
}
}
打开src\main.js,引入config.js和http.js。
import config from './config.js'
Vue.use(config)
import http from './http.js'
Vue.use(http)
Vue.config.productionTip = false
打开src\pages\Register.vue文件,编写register()方法。
register () {
if (this.form.password && this.form.password !== this.repassword) {
alert('两次输入密码不一致。')
return
}
this.$http.post('user/register', this.form).then(res => {
window.console.log(res.data)
}).catch(() => {
alert('操作失败,服务器异常。')
})
}
测试程序。
5.加载进度条
为了优化用户体验,在发送网络请求的时候显示加载提示进度条。
安装nprogress进度条模块。
npm install nprogress@0.2 --save
在src\http.js中引入,并创建Loading对象对其进行控制。
import axios from 'axios'
import NProgress from 'nprogress'
import 'nprogress/nprogress.css'
var Loading = {
reqNum: 0,
start () {
if (this.reqNum === 0) {
NProgress.start()
}
this.reqNum++
},
end () {
if (this.reqNum <= 0) {
return
}
this.reqNum--
if (this.reqNum === 0) {
NProgress.done()
}
}
}
上述代码中,start()表示进度条开始,end()表示进度条结束,reqNum表示当前已经发出去的请求数。当最后一个请求接收到响应以后,将进度条设为完成的状态。
创建了axios实例obj以后,在发送请求和接收响应的拦截器中控制进度条。
install: function (vue) {
……(原有代码)
obj.interceptors.request.use(function (req) {
Loading.start()
return req
})
obj.interceptors.response.use(function (res) {
Loading.end()
return res
})
vue.prototype.$http = obj
}
测试程序,进度条的显示效果如下。
6.提示信息
alert()的用户体验不是很好,这里换成vue-toastr来实现。
执行命令,安装插件。
npm install vue-toastr@2.1 --save
在src\main.js中导入。
import toastr from 'vue-toastr'
Vue.use(toastr)
在src\pages\Register.vue中使用。
找到以下两处的alert(),改成this.$toastr.e()。
第1处:
// alert('两次输入密码不一致。')
this.$toastr.e('两次输入密码不一致。')
第2处:
// alert('操作失败,服务器异常。')
this.$toastr.e('操作失败,服务器异常。')
在接收到服务器返回的结果以后,显示提示信息。
this.$http.post('user/register', this.form).then(res => {
if (res.data.code === 0) {
this.$toastr.e(res.data.msg)
} else if (res.data.code === 1) {
this.$toastr.s(res.data.msg)
}
}).catch(() => {
this.$toastr.e('操作失败,服务器异常。')
})
效果演示:


瓜分20万奖金 获得内推名额 丰厚实物奖励 易参与易上手
更多推荐

 0
0 0
0- 0


 已为社区贡献5条内容

所有评论(0)