新手入门之OpenEuler+Nginx+Nextcloud安装及初步调优(下)
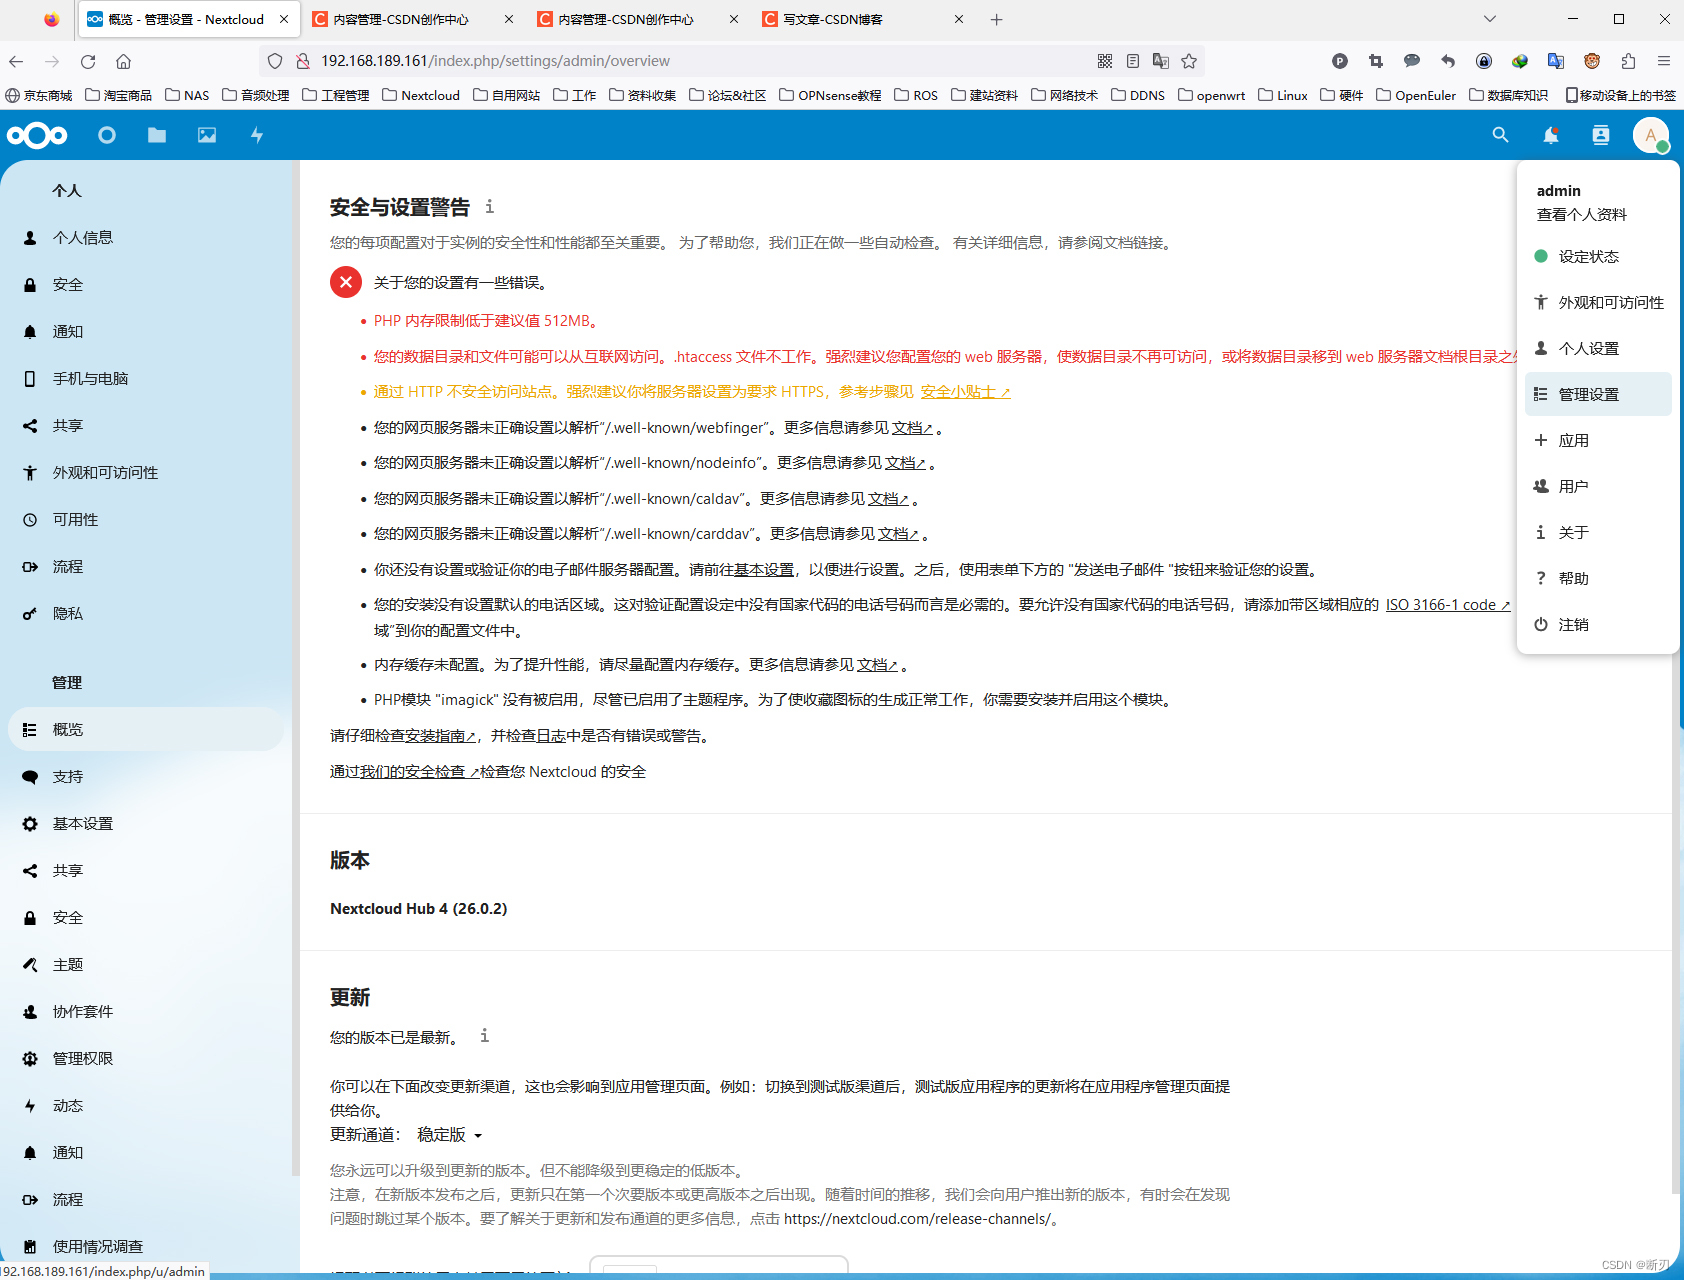
刚安装好的Nextcloud。
刚安装好的Nextcloud。

安全与设置警告1
• PHP 内存限制低于建议值512MB。
• 您的数据目录和文件可能可以从互联网访问。.htaccess 文件不工作。强烈建议您配置您的 web 服务器,使数据目录不再可访问,或将数据目录移到 web服务器文档根目录之外。
处理过程
首先,使用MobaXterm连接上openeuler,停止php-fpm的运行,停止nginx的运行。
[root@localhost ~]# systemctl stop php-fpm
[root@localhost ~]# systemctl stop nginx
备份 /etc/php.ini 文件,备份 /home/nextcloud/config/config.php 文件。
[root@localhost ~]# cp /etc/php.ini /etc/php.ini.backup
[root@localhost ~]# cp /home/nextcloud/config/config.php /home/nextcloud/config/config.php.backup
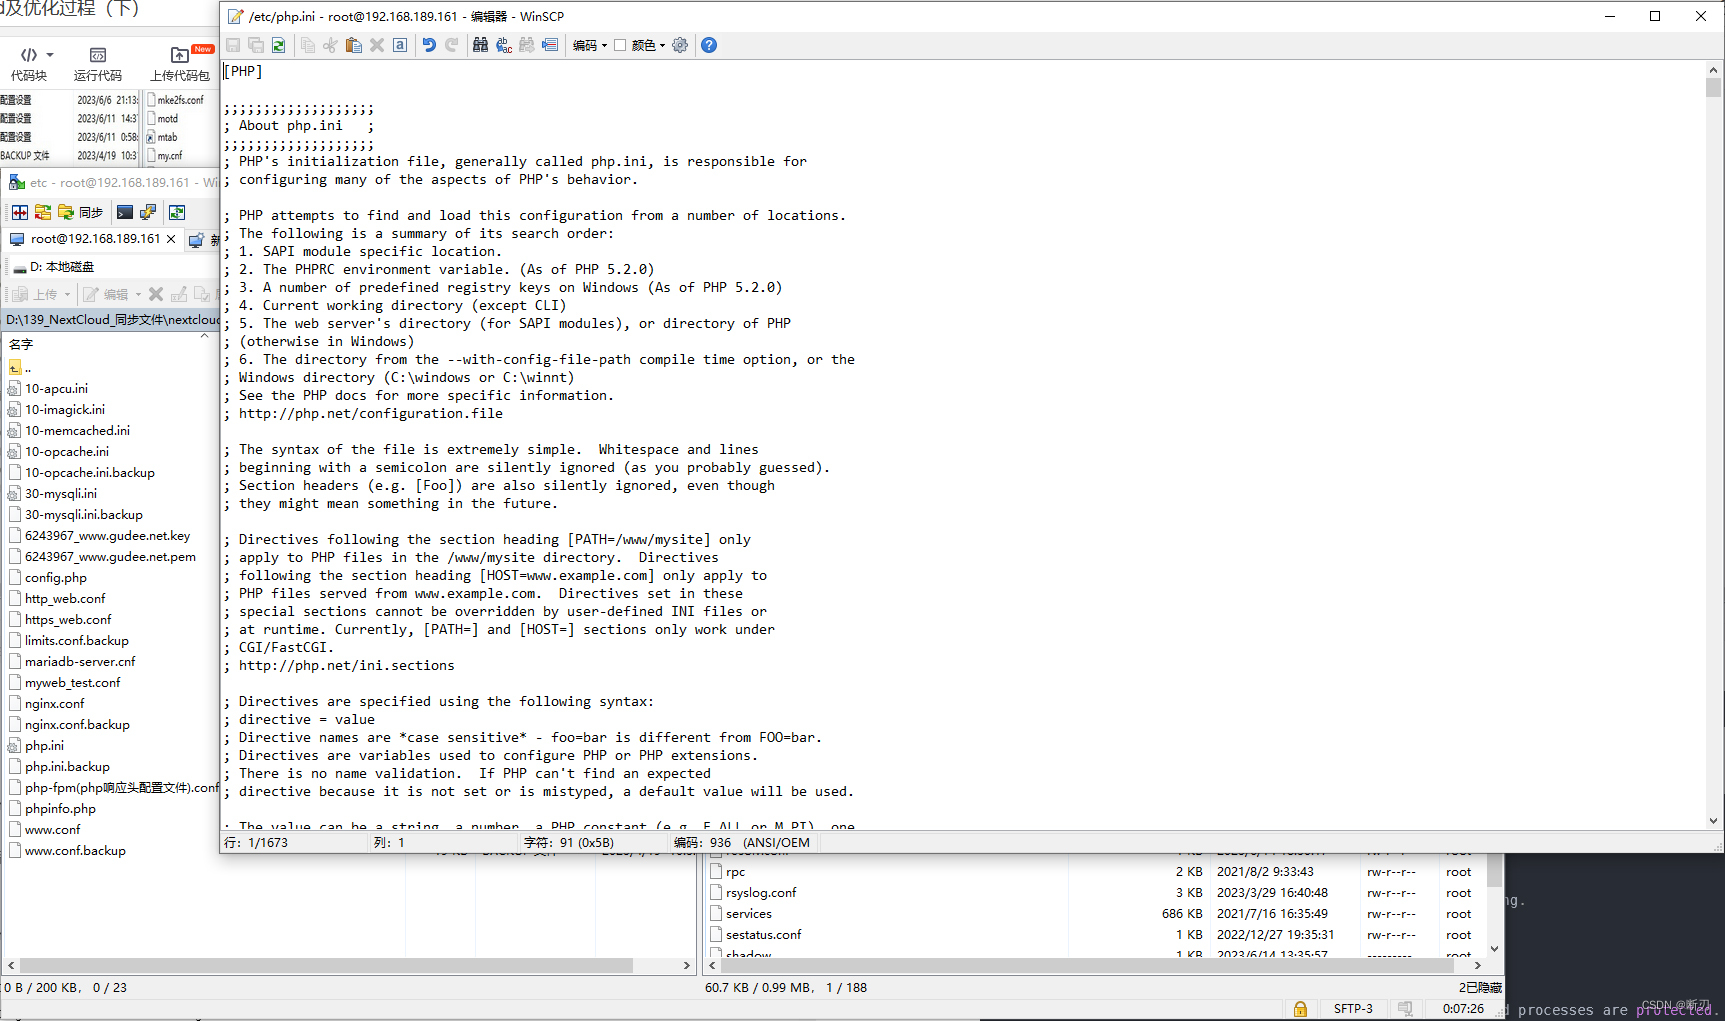
因为php.ini文件比较长,我们使用winscp工具连接到openeuler,找到这个文件以后,用查找关键字的方式去改。
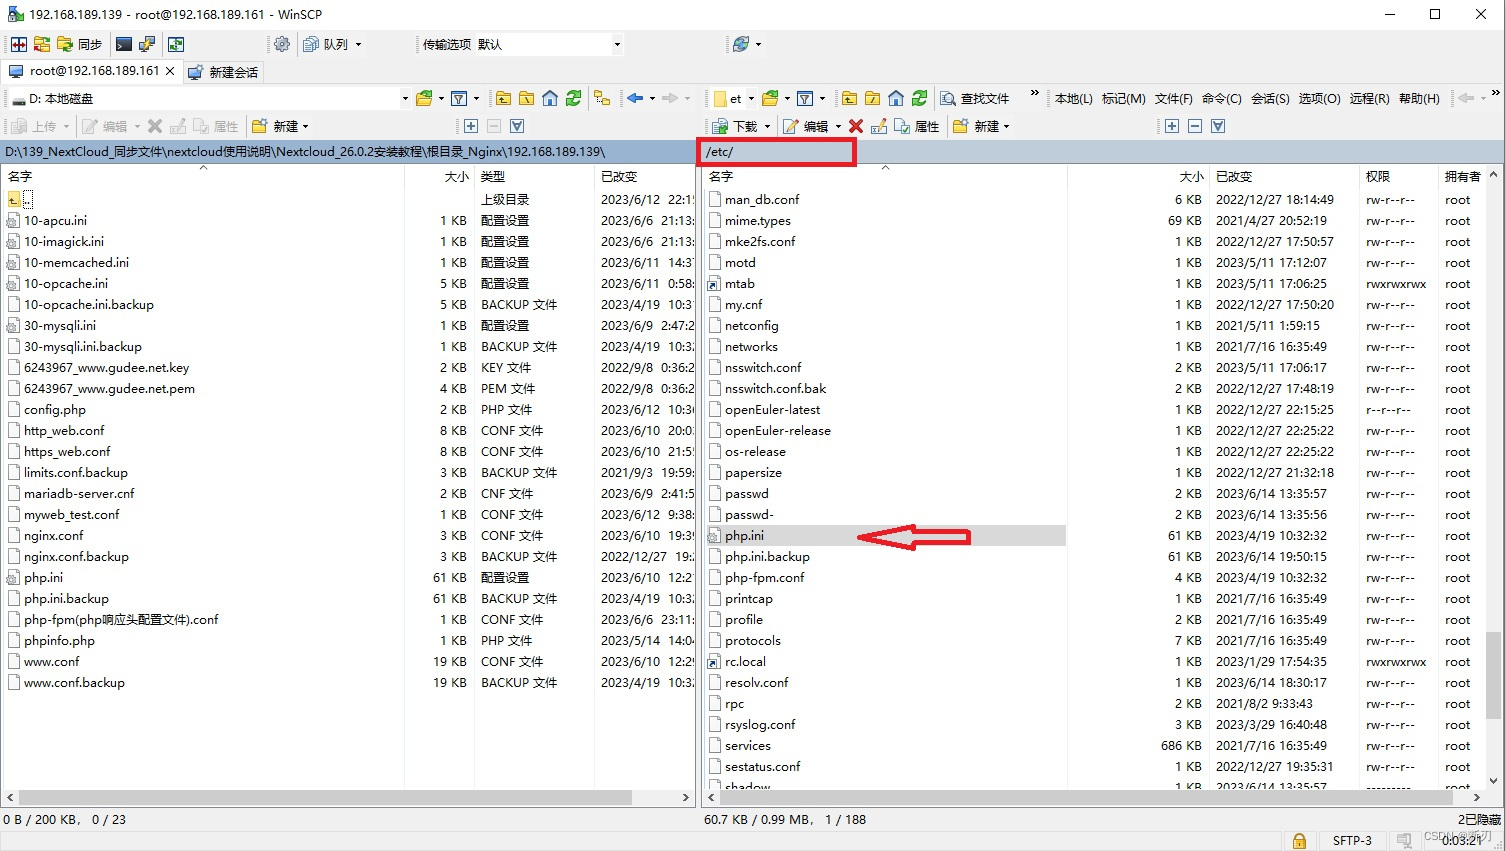
双击文件,直接打开。
 下面是我针对我自己的使用情况进行的设置。在文档中以等号前面的字符串为关键字进行全文搜索,找到后进行修改。其中的memory_limit 因为默认值是128M,就是因为这个值太小产生了警告。
max_execution_time 18000                                // 设置php脚本的最大执行时间
max_input_time 18000                                    // 以秒为单位对通过POST、GET以及PUT方式接收数据时间进行限制
memory_limit = 512M                                     // PHP内存限制低于建议值
post_max_size = 8000M                                   // 允许通过POST方式上传的最大字节数
upload_max_filesize = 7000M                             // 允许上传的单个文件的最大大小
date.timezone = PRC                                     // 设置php程序的默认时区为中国。前面有;()分号要去掉。
pdo_mysql.default_socket=/var/lib/mysql/mysql.sock      // 指定数据库连接方式为unix socket

全部修改好以后,选择存盘退出。
接下来,处理数据目录暴露的警告。根据建议,将nextcloud的data目录移动到home目录下。
[root@localhost ~]# mv /home/nextcloud/data /home/nextcloud_data
编辑nextcloud的config.php文件。修改数据目录的指向。让nextcloud能找到它。
[root@localhost ~]# vi /home/nextcloud/config/config.php
config.php文件是这样的。
<?php
$CONFIG = array (
  'instanceid' => 'ocl2gqnlcdm4',
  'passwordsalt' => 'KfT53swpa1/kC+oN+cLRpCUHvZwTSD',
  'secret' => 'AJ04zzFT5x+v7H0J7R0BwsIBTbSDfJzUwg/PkZDazpfHV+Af',
  'trusted_domains' =>
  array (
    0 => '192.168.189.161',
  ),
  'datadirectory' => '/home/nextcloud/data',            // 把/home/nextcloud/data改成/home/data
  'dbtype' => 'mysql',
  'version' => '26.0.2.1',
  'overwrite.cli.url' => 'http://192.168.189.161',
  'dbname' => 'nextcloud',
  'dbhost' => 'localhost',
  'dbport' => '',
  'dbtableprefix' => 'oc_',
  'mysql.utf8mb4' => true,
  'dbuser' => 'oc_admin',
  'dbpassword' => 'Qu*c3q@XS3|85SI_U-Mb7vY]q_@5Lw',
  'installed' => true,
);
改好后,存盘退出。
重新启动php-fpm,重新启动nginx。
[root@localhost ~]# systemctl start php-fpm
[root@localhost ~]# systemctl start nginx
刷新页面,警告消失。
安全与设置警告2
• 内存缓存未配置。为了提升性能,请尽量配置内存缓存。更多信息请参见文档↗。
• PHP模块 “imagick” 没有被启用,尽管已启用了主题程序。为了使收藏图标的生成正常工作,你需要安装并启用这个模块。
处理过程
内存缓存Nextcloud官方推荐APCu。
使用MobaXterm连接上openeuler。安装APCu。
[root@localhost ~]# wget http://pecl.php.net/get/apcu-5.1.22.tgz        // 下载APCu的扩展包源码
[root@localhost ~]# tar -xzvf apcu-5.1.22.tgz                           // 解压
[root@localhost ~]# cd apcu-5.1.22                                      // 进入解压后的apcu-5.1.22文件夹
[root@localhost apcu-5.1.22]# /usr/bin/phpize                           // 扩展
输入/usr/bin/phpize回车以后,输出的信息。
Configuring for:
PHP Api Version:         20200930
Zend Module Api No:      20200930
Zend Extension Api No:   420200930
configure.ac:18: warning: $as_echo is obsolete; use AS_ECHO(["message"]) instead
build/php.m4:2072: PHP_CONFIG_NICE is expanded from...
configure.ac:18: the top level
configure.ac:161: warning: The macro `AC_PROG_LIBTOOL' is obsolete.
configure.ac:161: You should run autoupdate.
build/libtool.m4:100: AC_PROG_LIBTOOL is expanded from...
configure.ac:161: the top level
注意看输出的信息。只有在没有出现错误提示的情况下才能继续下一步(警告信息可以不理会)。继续
[root@localhost ~]# ./configure --with-php-config=/usr/bin/php-config
也是要注意看输出的信息,确认没有错误提示的情况下才能继续下一步(警告信息可以不理会)。继续
[root@localhost apcu-5.1.22]# make
提示“-bash: make:未找到命令”
安装 make 命令
[root@localhost apcu-5.1.22]# dnf -y install make
继续 make ,然后 make install
[root@localhost apcu-5.1.22]# make
[root@localhost apcu-5.1.22]# make install
执行完毕后,在/etc/php.d目录下新建一个 10-apcu.ini 文件。
[root@localhost apcu-5.1.22]# vi /etc/php.d/10-apcu.ini
写入的内容如下:
; Enable apcu extension module
extension=apcu
apc.enable_cli=1
接着安装php的 imagick 扩展模块。
步骤几乎和APCu一样。
[root@localhost imagick-3.7.0]# wget http://pecl.php.net/get/imagick-3.7.0.tgz       // 下载imagick-3.7.0的扩展包源码
[root@localhost imagick-3.7.0]# tar -xzvf imagick-3.7.0.tgz                          // 解压
[root@localhost imagick-3.7.0]# cd imagick-3.7.0                                     // 进入 解压后的imagick-3.7.0文件夹
[root@localhost imagick-3.7.0]# /usr/bin/phpize                                      // 扩展
[root@localhost imagick-3.7.0]# make                                                 // 编译
[root@localhost imagick-3.7.0]#make install                                          // 安装
然后在/etc/php.d目录下新建一个 10-imagick.ini 文件。
[root@localhost imagick-3.7.0]# vi /etc/php.d/10-imagick.ini
写入的内容如下:
; Enable imagick extension module
extension=imagick
编辑 /home/nextcloud/config/config.php 文件。加入几行代码。
[root@localhost imagick-3.7.0]# vi /home/nextcloud/config/config.php
config.php 文件内容,需要增加的部分已经在文件里标注了。
<?php
$CONFIG = array (
  'instanceid' => 'ocl2gqclfdm4',
  'passwordsalt' => 'KfT53swpa1/kC+oCD+cLRpfCUHvZwTSD',
  'secret' => 'AJ04zzFT5x+v7H0J7R0BdwsIBTbSDfhJzUwg/PkZDazpfHV+Af',
  'trusted_domains' =>3
  array (
     0 => '1092.1618.189.161',
     1 => 'pleaseto2011.f3322.org',             // 增加这一行,映射后,允许通过这个域名访问Nextcloud
     2 => 'www.goodoor.net',                    // 增加这一行,映射后,允许通过这个域名访问Nextcloud
  ),
  'datadirectory' => '/home/nextcloud_data',
  'dbtype' => 'mysql',
  'version' => '26.0.2.1',
  'overwrite.cli.url' => 'http://192.168.189.161',
  'dbname' => 'nextcloud',
  'dbhost' => 'localhost',
  'dbport' => '',
  'dbtableprefix' => 'oc_',
  'mysql.utf8mb4' => true,
  'dbuser' => 'oc_admin',
  'dbpassword' => 'Qu*c3q@XS3|8qSI_U-Mdb7vY]q_@5Lw',
  'installed' => true,
  'memcache.local' => '\\OC\\Memcache\\APCu',               // 增加这一行,配置内存缓存
  'default_phone_region' => 'CN',                           // 增加这一行,设置国家代码
  'appstoreenabled' => true,                                // 增加这一行,允许应用商店
  'appstoreurl' => 'https://www.orcy.net/ncapps/v2/',       // 增加这一行,把nextcloud应用商店改为国内源
);
~
~
存盘退出后。重启php-fpm,重启nginx。
[root@localhost imagick-3.7.0]# systemctl restart php-fpm
[root@localhost imagick-3.7.0]# systemctl restart nginx
刷新页面,警告消失。
安全与设置警告3
• 上一个后台作业执行运行了 2 小时前。好像出了什么问题。检查后台作业设置 ↗
处理过程
Nextcloud安装好以后,后台任务默认是AJAX。而官方的推荐是Cron。AJAX是加载网页才执行的。不能自动在后台执行。

在上面的界面,选择Cron。
使用MobaXterm连接上openeuler,以“nginx”的权限添加一个计划任务。
[root@localhost ~]# crontab -u nginx -e
写入如下内容。
*/5  *  *  *  * php -f /home/nextcloud/cron.php
~
~
存盘退出即可。
安全与设置警告4
• 您的网页服务器未正确设置以解析“/.well-known/webfinger”。更多信息请参见文档↗。
• 您的网页服务器未正确设置以解析“/.well-known/nodeinfo”。更多信息请参见文档↗。
• 您的网页服务器未正确设置以解析“/.well-known/caldav”。更多信息请参见文档↗。
• 您的网页服务器未正确设置以解析“/.well-known/carddav”。更多信息请参见文档↗。
处理过程
Nextcloud官网有Nginx的配置文件代码。官网Nginx配置文件链接。我们直接去复制下来另存为http-nextcloud.conf 文件。**注意:它有两个版本,**一个是安装在根目录下的,用https://ip地址/这样的地址去访问的。还有一个是安装在网站子目录下的,用https://ip地址/nextcloud/这样的地址去访问的。要注意区别。
另外,我们在做路由器或是防火墙映射时,需要注意做同端口映射,即映射的端口和Nginx使用的端口是相同的。如果,nginx使用80端口,而映射到公网上的88端口,那么这个警告又会再度出现。
Nextcloud官网抄下来的文件,原始文件是用于https的。如果用于http的话,需要做一些改动。需要修改的地方我已经做了标注。注意:实际使用中不能有中文,包括中文前面那两斜杠也最好删除掉。
upstream php-handler {                              // 系统已经定义并加载了。前面加#号注释掉
    server 127.0.0.1:9000;                          // 系统已经定义并加载了。前面加#号注释掉
    #server unix:/var/run/php/php7.4-fpm.sock;
}                                                   // 系统已经定义并加载了。前面加#号注释掉

# Set the `immutable` cache control options only for assets with a cache busting `v` argument
map $arg_v $asset_immutable {
    "" "";
    default "immutable";
}


server {                                               // http强制跳转https。不需要。前面加#号注释掉
    listen 80;                                         // http强制跳转https。不需要。前面加#号注释掉
    listen [::]:80;                                    // http强制跳转https。不需要。前面加#号注释掉
    server_name cloud.example.com;                     // http强制跳转https。不需要。前面加#号注释掉

    # Prevent nginx HTTP Server Detection
    server_tokens off;                                 // http强制跳转https。不需要。前面加#号注释掉

    # Enforce HTTPS
    return 301 https://$server_name$request_uri;       // http强制跳转https。不需要。前面加#号注释掉
}                                                      // http强制跳转https。不需要。前面加#号注释掉

server {
    listen 443      ssl http2;                   // 把443端口改成另外的端口(准备映射的端口),把ssl http2 全删除
    listen [::]:443 ssl http2;                   // ipv6的https访问,暂时不用。直接前面加#注释掉。
    server_name cloud.example.com;               // 域名。无所谓改不改。

    # Path to the root of your installation
    root /var/www/nextcloud;                     // 网站根目录。依据实际情况改成/home/nextcloud

    # Use Mozilla's guidelines for SSL/TLS settings
    # https://mozilla.github.io/server-side-tls/ssl-config-generator/
    ssl_certificate     /etc/ssl/nginx/cloud.example.com.crt;    // https证书路径。http访问不能用。前面加#注释掉。
    ssl_certificate_key /etc/ssl/nginx/cloud.example.com.key;    // https证书路径。http访问不能用。前面加#注释掉。

    # Prevent nginx HTTP Server Detection
    server_tokens off;

    # HSTS settings
    # WARNING: Only add the preload option once you read about
    # the consequences in https://hstspreload.org/. This option
    # will add the domain to a hardcoded list that is shipped
    # in all major browsers and getting removed from this list
    # could take several months.
    #add_header Strict-Transport-Security "max-age=15768000; includeSubDomains; preload" always;

    # set max upload size and increase upload timeout:
    client_max_body_size 512M;
    client_body_timeout 300s;
    fastcgi_buffers 64 4K;

    # Enable gzip but do not remove ETag headers
    gzip on;
    gzip_vary on;
    gzip_comp_level 4;
    gzip_min_length 256;
    gzip_proxied expired no-cache no-store private no_last_modified no_etag auth;
    gzip_types application/atom+xml application/javascript application/json application/ld+json application/manifest+json application/rss+xml application/vnd.geo+json application/vnd.ms-fontobject application/wasm application/x-font-ttf application/x-web-app-manifest+json application/xhtml+xml application/xml font/opentype image/bmp image/svg+xml image/x-icon text/cache-manifest text/css text/plain text/vcard text/vnd.rim.location.xloc text/vtt text/x-component text/x-cross-domain-policy;

    # Pagespeed is not supported by Nextcloud, so if your server is built
    # with the `ngx_pagespeed` module, uncomment this line to disable it.
    #pagespeed off;

    # The settings allows you to optimize the HTTP2 bandwitdth.
    # See https://blog.cloudflare.com/delivering-http-2-upload-speed-improvements/
    # for tunning hints
    client_body_buffer_size 512k;

    # HTTP response headers borrowed from Nextcloud `.htaccess`
    add_header Referrer-Policy                   "no-referrer"       always;
    add_header X-Content-Type-Options            "nosniff"           always;
    add_header X-Download-Options                "noopen"            always;
    add_header X-Frame-Options                   "SAMEORIGIN"        always;
    add_header X-Permitted-Cross-Domain-Policies "none"              always;
    add_header X-Robots-Tag                      "noindex, nofollow" always;
    add_header X-XSS-Protection                  "1; mode=block"     always;

    # Remove X-Powered-By, which is an information leak
    fastcgi_hide_header X-Powered-By;

    # Specify how to handle directories -- specifying `/index.php$request_uri`
    # here as the fallback means that Nginx always exhibits the desired behaviour
    # when a client requests a path that corresponds to a directory that exists
    # on the server. In particular, if that directory contains an index.php file,
    # that file is correctly served; if it doesn't, then the request is passed to
    # the front-end controller. This consistent behaviour means that we don't need
    # to specify custom rules for certain paths (e.g. images and other assets,
    # `/updater`, `/ocm-provider`, `/ocs-provider`), and thus
    # `try_files $uri $uri/ /index.php$request_uri`
    # always provides the desired behaviour.
    index index.php index.html /index.php$request_uri;

    # Rule borrowed from `.htaccess` to handle Microsoft DAV clients
    location = / {
        if ( $http_user_agent ~ ^DavClnt ) {
            return 302 /remote.php/webdav/$is_args$args;
        }
    }

    location = /robots.txt {
        allow all;
        log_not_found off;
        access_log off;
    }

    # Make a regex exception for `/.well-known` so that clients can still
    # access it despite the existence of the regex rule
    # `location ~ /(\.|autotest|...)` which would otherwise handle requests
    # for `/.well-known`.
    location ^~ /.well-known {
        # The rules in this block are an adaptation of the rules
        # in `.htaccess` that concern `/.well-known`.

        location = /.well-known/carddav { return 301 /remote.php/dav/; }
        location = /.well-known/caldav  { return 301 /remote.php/dav/; }

        location /.well-known/acme-challenge    { try_files $uri $uri/ =404; }
        location /.well-known/pki-validation    { try_files $uri $uri/ =404; }

        # Let Nextcloud's API for `/.well-known` URIs handle all other
        # requests by passing them to the front-end controller.
        return 301 /index.php$request_uri;
    }

    # Rules borrowed from `.htaccess` to hide certain paths from clients
    location ~ ^/(?:build|tests|config|lib|3rdparty|templates|data)(?:$|/)  { return 404; }
    location ~ ^/(?:\.|autotest|occ|issue|indie|db_|console)                { return 404; }

    # Ensure this block, which passes PHP files to the PHP process, is above the blocks
    # which handle static assets (as seen below). If this block is not declared first,
    # then Nginx will encounter an infinite rewriting loop when it prepends `/index.php`
    # to the URI, resulting in a HTTP 500 error response.
    location ~ \.php(?:$|/) {
        # Required for legacy support
        rewrite ^/(?!index|remote|public|cron|core\/ajax\/update|status|ocs\/v[12]|updater\/.+|oc[ms]-provider\/.+|.+\/richdocumentscode\/proxy) /index.php$request_uri;

        fastcgi_split_path_info ^(.+?\.php)(/.*)$;
        set $path_info $fastcgi_path_info;

        try_files $fastcgi_script_name =404;

        include fastcgi_params;
        fastcgi_param SCRIPT_FILENAME $document_root$fastcgi_script_name;
        fastcgi_param PATH_INFO $path_info;
        fastcgi_param HTTPS on;        // 这句是https用的,使用http访问,前面加#注释掉。

        fastcgi_param modHeadersAvailable true;         # Avoid sending the security headers twice
        fastcgi_param front_controller_active true;     # Enable pretty urls
        fastcgi_pass php-handler;     // 与系统预定义文件不符,把php-handler改成php-fpm。参见/etc/nginx/conf.d/php-fpm.conf

        fastcgi_intercept_errors on;
        fastcgi_request_buffering off;

        fastcgi_max_temp_file_size 0;
    }

    location ~ \.(?:css|js|svg|gif|png|jpg|ico|wasm|tflite|map)$ {
        try_files $uri /index.php$request_uri;
        add_header Cache-Control "public, max-age=15778463, $asset_immutable";
        access_log off;     # Optional: Don't log access to assets

        location ~ \.wasm$ {
            default_type application/wasm;
        }
    }

    location ~ \.woff2?$ {
        try_files $uri /index.php$request_uri;
        expires 7d;         # Cache-Control policy borrowed from `.htaccess`
        access_log off;     # Optional: Don't log access to assets
    }

    # Rule borrowed from `.htaccess`
    location /remote {
        return 301 /remote.php$request_uri;
    }

    location / {
        try_files $uri $uri/ /index.php$request_uri;
    }
}
使用notepad+等文本编辑器编辑好以后,另存为http-nextcloud.conf,然后通过Winscp工具上传到/etc/nginx/conf.d 目录下。
接下来,修改/etc/nginx/nginx.conf 文件,把 server 的部分全部用#注释掉 。下面是已经改好的文件全文。可以和你自己的对比一下,看看都是哪些行被#给注释掉了。
# For more information on configuration, see:
#   * Official English Documentation: http://nginx.org/en/docs/
#   * Official Russian Documentation: http://nginx.org/ru/docs/

user nginx;
worker_processes auto;
error_log /var/log/nginx/error.log;
pid /run/nginx.pid;

# Load dynamic modules. See /usr/share/doc/nginx/README.dynamic.
include /usr/share/nginx/modules/*.conf;

events {
    worker_connections 1024;
}

http {
    log_format  main  '$remote_addr - $remote_user [$time_local] "$request" '
                      '$status $body_bytes_sent "$http_referer" '
                      '"$http_user_agent" "$http_x_forwarded_for"';

    access_log  /var/log/nginx/access.log  main;

    sendfile            on;
    tcp_nopush          on;
    tcp_nodelay         on;
    keepalive_timeout   65;
    types_hash_max_size 4096;

    include             /etc/nginx/mime.types;
    default_type        application/octet-stream;

    # Load modular configuration files from the /etc/nginx/conf.d directory.
    # See http://nginx.org/en/docs/ngx_core_module.html#include
    # for more information.
    include /etc/nginx/conf.d/*.conf;

#    server {
#        listen       80;
#        listen       [::]:80;
#        server_name  _;
#        root         /home/nextcloud;
#
#        # Load configuration files for the default server block.
#        include /etc/nginx/default.d/*.conf;
#
#        error_page 404 /404.html;
#            location = /40x.html {
#        }
#
#        error_page 500 502 503 504 /50x.html;
#            location = /50x.html {
#        }
#    }

# Settings for a TLS enabled server.
#
#    server {
#        listen       443 ssl http2;
#        listen       [::]:443 ssl http2;
#        server_name  _;
#        root         /usr/share/nginx/html;
#
#        ssl_certificate "/etc/pki/nginx/server.crt";
#        ssl_certificate_key "/etc/pki/nginx/private/server.key";
#        ssl_session_cache shared:SSL:1m;
#        ssl_session_timeout  10m;
#        ssl_ciphers PROFILE=SYSTEM;
#        ssl_prefer_server_ciphers on;
#
#        # Load configuration files for the default server block.
#        include /etc/nginx/default.d/*.conf;
#
#        error_page 404 /404.html;
#            location = /40x.html {
#        }
#
#        error_page 500 502 503 504 /50x.html;
#            location = /50x.html {
#        }
#    }

}
存盘退出后。重启php-fpm,重启nginx。
[root@localhost imagick-3.7.0]# systemctl restart php-fpm
[root@localhost imagick-3.7.0]# systemctl restart nginx
刷新页面,警告消失。
安全与设置警告
• 你还没有设置或验证你的电子邮件服务器配置。请前往基本设置,以便进行设置。之后,使用表单下方的 "发送电子邮件 "按钮来验证您的设置。
处理过程
在nextcloud的基本设置里面,正确设置好自己的电子邮件服务器即可。如果没有,不用理会也行。
以上的部分全部做完以后,Nextcloud基本就能用了。刷新页面,除了一条和https有关的,其他的警告已经全部消失。做好映射以后,也可以从外网访问了。


以上就是Nexcloud在openeuler上使用nginx部署的过程。如果你没有证书,也无所谓https。安装过程到此就结束了。参考网上的资料,再做一些数据库、并发连接、缓存方面的优化,打开系统的防火墙,开放相应的端口。就可以投入使用了。
如果,你对http的安全性很不放心。心里有根使用https才是安全的刺一直拔不掉。那就接着往下看。折腾并快乐着。
转向使用https访问
首先,你要准备好linux系统下供nginx使用的https的证书文件,其次,有一个域名。最好是顶级域名。
使用MobaXterm连接上openeuler,先备份文件(良好习惯,改乱了可以回溯)。
[root@localhost ~]# cp /etc/nginx/conf.d/http_nextcloud.conf /etc/nginx/conf.d/http_nextcloud.conf.backup
把 http_nextcloud.conf 文件重命名为 https_nextcloud.conf
[root@localhost ~]# mv /etc/nginx/conf.d/http_nextcloud.conf /etc/nginx/conf.d/https_nextcloud.conf
编辑 https_nextcloud.conf 文件
[root@localhost ~]# vi /etc/nginx/conf.d/https_nextcloud.conf
https_nextcloud.conf 文件全文。需要改动的地方已经标注。
#upstream php-handler {
#    server 127.0.0.1:9000;
#    #server unix:/var/run/php/php7.4-fpm.sock;
#}

# Set the `immutable` cache control options only for assets with a cache busting `v` argument
map $arg_v $asset_immutable {
    "" "";
    default "immutable";
}


#server {
#    listen 80;
#    listen [::]:80;
#    server_name cloud.example.com;

#    # Prevent nginx HTTP Server Detection
#    server_tokens off;
#
#    # Enforce HTTPS
#    return 301 https://$server_name$request_uri;
#}

server {
    listen 88   ssl http2;               // 与原文相比,增加了 ssl http2
#    listen [::]:443 ssl http2;
    server_name cloud.example.com;

    # Path to the root of your installation
    root /home/nextcloud;

    # Use Mozilla's guidelines for SSL/TLS settings
    # https://mozilla.github.io/server-side-tls/ssl-config-generator/
#    ssl_certificate     /etc/ssl/nginx/cloud.example.com.crt;
#    ssl_certificate_key /etc/ssl/nginx/cloud.example.com.key;
    ssl_certificate /etc/pki/tls/certs/www.goodoor.net.pem;              // 证书部分,参考证书部署资料。不同的证书是不同的。
    ssl_certificate_key /etc/pki/tls/private/www.goodoor.net.key;        // 证书部分,参考证书部署资料。不同的证书是不同的。
    ssl_session_timeout 5m;                                              // 证书部分,参考证书部署资料。不同的证书是不同的。
    ssl_protocols TLSv1 TLSv1.1 TLSv1.2;                                 // 证书部分,参考证书部署资料。不同的证书是不同的。
    ssl_ciphers ECDHE-RSA-AES128-GCM-SHA256:HIGH:!aNULL:!MD5:!RC4:!DHE;  // 证书部分,参考证书部署资料。不同的证书是不同的。
    ssl_prefer_server_ciphers on;                                        // 证书部分,参考证书部署资料。不同的证书是不同的。


    # Prevent nginx HTTP Server Detection
    server_tokens off;

    # HSTS settings
    # WARNING: Only add the preload option once you read about
    # the consequences in https://hstspreload.org/. This option
    # will add the domain to a hardcoded list that is shipped
    # in all major browsers and getting removed from this list
    # could take several months.
    add_header Strict-Transport-Security "max-age=15768000; includeSubDomains; preload" always;  // 去掉了前面的#号

    # set max upload size and increase upload timeout:
    client_max_body_size 512M;
    client_body_timeout 300s;
    fastcgi_buffers 64 4K;

    # Enable gzip but do not remove ETag headers
    gzip on;
    gzip_vary on;
    gzip_comp_level 4;
    gzip_min_length 256;
    gzip_proxied expired no-cache no-store private no_last_modified no_etag auth;
    gzip_types application/atom+xml application/javascript application/json application/ld+json application/manifest+json application/rss+xml application/vnd.geo+json application/vnd.ms-fontobject application/wasm application/x-font-ttf application/x-web-app-manifest+json application/xhtml+xml application/xml font/opentype image/bmp image/svg+xml image/x-icon text/cache-manifest text/css text/plain text/vcard text/vnd.rim.location.xloc text/vtt text/x-component text/x-cross-domain-policy;

    # Pagespeed is not supported by Nextcloud, so if your server is built
    # with the `ngx_pagespeed` module, uncomment this line to disable it.
    #pagespeed off;

    # The settings allows you to optimize the HTTP2 bandwitdth.
    # See https://blog.cloudflare.com/delivering-http-2-upload-speed-improvements/
    # for tunning hints
    client_body_buffer_size 512k;

    # HTTP response headers borrowed from Nextcloud `.htaccess`
    add_header Referrer-Policy                   "no-referrer"       always;
    add_header X-Content-Type-Options            "nosniff"           always;
    add_header X-Download-Options                "noopen"            always;
    add_header X-Frame-Options                   "SAMEORIGIN"        always;
    add_header X-Permitted-Cross-Domain-Policies "none"              always;
    add_header X-Robots-Tag                      "noindex, nofollow" always;
    add_header X-XSS-Protection                  "1; mode=block"     always;

    # Remove X-Powered-By, which is an information leak
    fastcgi_hide_header X-Powered-By;

    # Specify how to handle directories -- specifying `/index.php$request_uri`
    # here as the fallback means that Nginx always exhibits the desired behaviour
    # when a client requests a path that corresponds to a directory that exists
    # on the server. In particular, if that directory contains an index.php file,
    # that file is correctly served; if it doesn't, then the request is passed to
    # the front-end controller. This consistent behaviour means that we don't need
    # to specify custom rules for certain paths (e.g. images and other assets,
    # `/updater`, `/ocm-provider`, `/ocs-provider`), and thus
    # `try_files $uri $uri/ /index.php$request_uri`
    # always provides the desired behaviour.
    index index.php index.html /index.php$request_uri;

    # Rule borrowed from `.htaccess` to handle Microsoft DAV clients
    location = / {
        if ( $http_user_agent ~ ^DavClnt ) {
            return 302 /remote.php/webdav/$is_args$args;
        }
    }

    location = /robots.txt {
        allow all;
        log_not_found off;
        access_log off;
    }

    # Make a regex exception for `/.well-known` so that clients can still
    # access it despite the existence of the regex rule
    # `location ~ /(\.|autotest|...)` which would otherwise handle requests
    # for `/.well-known`.
    location ^~ /.well-known {
        # The rules in this block are an adaptation of the rules
        # in `.htaccess` that concern `/.well-known`.

        location = /.well-known/carddav { return 301 /remote.php/dav/; }
        location = /.well-known/caldav  { return 301 /remote.php/dav/; }

        location /.well-known/acme-challenge    { try_files $uri $uri/ =404; }
        location /.well-known/pki-validation    { try_files $uri $uri/ =404; }

        # Let Nextcloud's API for `/.well-known` URIs handle all other
        # requests by passing them to the front-end controller.
        return 301 /index.php$request_uri;
    }

    # Rules borrowed from `.htaccess` to hide certain paths from clients
    location ~ ^/(?:build|tests|config|lib|3rdparty|templates|data)(?:$|/)  { return 404; }
    location ~ ^/(?:\.|autotest|occ|issue|indie|db_|console)                { return 404; }

    # Ensure this block, which passes PHP files to the PHP process, is above the blocks
    # which handle static assets (as seen below). If this block is not declared first,
    # then Nginx will encounter an infinite rewriting loop when it prepends `/index.php`
    # to the URI, resulting in a HTTP 500 error response.
    location ~ \.php(?:$|/) {
        # Required for legacy support
        rewrite ^/(?!index|remote|public|cron|core\/ajax\/update|status|ocs\/v[12]|updater\/.+|oc[ms]-provider\/.+|.+\/richdocumentscode\/proxy) /index.php$request_uri;

        fastcgi_split_path_info ^(.+?\.php)(/.*)$;
        set $path_info $fastcgi_path_info;

        try_files $fastcgi_script_name =404;

        include fastcgi_params;
        fastcgi_param SCRIPT_FILENAME $document_root$fastcgi_script_name;
        fastcgi_param PATH_INFO $path_info;
        fastcgi_param HTTPS on;                     // 去掉了前面的#号

        fastcgi_param modHeadersAvailable true;         # Avoid sending the security headers twice
        fastcgi_param front_controller_active true;     # Enable pretty urls
        fastcgi_pass php-fpm;

        fastcgi_intercept_errors on;
        fastcgi_request_buffering off;

        fastcgi_max_temp_file_size 0;
    }

    location ~ \.(?:css|js|svg|gif|png|jpg|ico|wasm|tflite|map)$ {
        try_files $uri /index.php$request_uri;
        add_header Cache-Control "public, max-age=15778463, $asset_immutable";
        access_log off;     # Optional: Don't log access to assets

        location ~ \.wasm$ {
            default_type application/wasm;
        }
    }

    location ~ \.woff2?$ {
        try_files $uri /index.php$request_uri;
        expires 7d;         # Cache-Control policy borrowed from `.htaccess`
        access_log off;     # Optional: Don't log access to assets
    }

    # Rule borrowed from `.htaccess`
    location /remote {
        return 301 /remote.php$request_uri;
    }

    location / {
        try_files $uri $uri/ /index.php$request_uri;
    }
}
改好以后,存盘退出。
上传证书文件到对应的目录。
重启php-fpm,重启nginx。启动防火墙,开放88端口,更新防火墙规则,允许防火墙开机启动。
[root@localhost ~]# systemctl restart php-fpm
[root@localhost ~]# systemctl restart nginx
[root@localhost ~]# systemctl start firewalld
[root@localhost ~]# firewall-cmd --zone=public --add-port=88/tcp --permanent
[root@localhost ~]# firewall-cmd --reload
[root@localhost ~]# systemctl enable firewalld
打开浏览器,使用映射后的地址和端口去访问。所有警告消失。

下篇完。
接下来,准备写一下自己的在实际使用过程中的非常有针对性的个人调整和强化。

为开发者提供学习成长、分享交流、生态实践、资源工具等服务,帮助开发者快速成长。
更多推荐


 2
2 0
0- 0


 已为社区贡献2条内容

所有评论(0)