

springboot3深度学习
在jar包的同目录创建application.properties文件,直接在这个文件中配置对应的信息,就可以完成对应的修改,我们就可以做到不修改源代码。yml文件和properties文件都可以实现此功能,但必须保证这个配置文件的名字为application,才能生效。
jar包外进行配置文件的修改
在jar包的同目录创建application.properties文件,直接在这个文件中配置对应的信息,就可以完成对应的修改,我们就可以做到不修改源代码。
例子:

 测试结果为下:
yml文件和properties文件都可以实现此功能,但必须保证这个配置文件的名字为application,才能生效。
配置优先级
Spring Boot 允许将配置外部化,以便可以在不同的环境中使用相同的应用程序代码。
我们可以使用各种外部配置源,包括Java Properties文件、YAML文件、环境变量和命令行参数。
@Value可以获取值,也可以用@ConfigurationProperties将所有属性绑定到java object中
以下是 SpringBoot 属性源加载顺序。后面的会覆盖前面的值。由低到高,高优先级配置覆盖低优先级
- 默认属性(通过
SpringApplication.setDefaultProperties指定的) - @PropertySource指定加载的配置(需要写在@Configuration类上才可生效)
- 配置文件(application.properties/yml等)
- RandomValuePropertySource支持的random.*配置(如:@Value("${random.int}"))
- OS 环境变量
- Java 系统属性(System.getProperties())
- JNDI 属性(来自java:comp/env)
- ServletContext 初始化参数
- ServletConfig 初始化参数
- SPRING_APPLICATION_JSON属性(内置在环境变量或系统属性中的 JSON)
- 命令行参数
- 测试属性。(@SpringBootTest进行测试时指定的属性)
- 测试类@TestPropertySource注解
- Devtools 设置的全局属性。($HOME/.config/spring-boot)
结论:配置可以写到很多位置,常见的优先级顺序:
命令行>配置文件>springapplication配置
配置文件优先级如下:(后面覆盖前面)
- jar 包内的application.properties/yml
- jar 包内的application-{profile}.properties/yml
- jar 包外的application.properties/yml
- jar 包外的application-{profile}.properties/yml
建议:用一种格式的配置文件。如果.properties和.yml同时存在,则.properties优先
结论:包外 > 包内; 同级情况:profile配置 > application配置
所有参数均可由命令行传入,使用--参数项=参数值,将会被添加到环境变量中,并优先于配置文件。
比如java -jar app.jar --name="Spring",可以使用@Value("${name}")获取
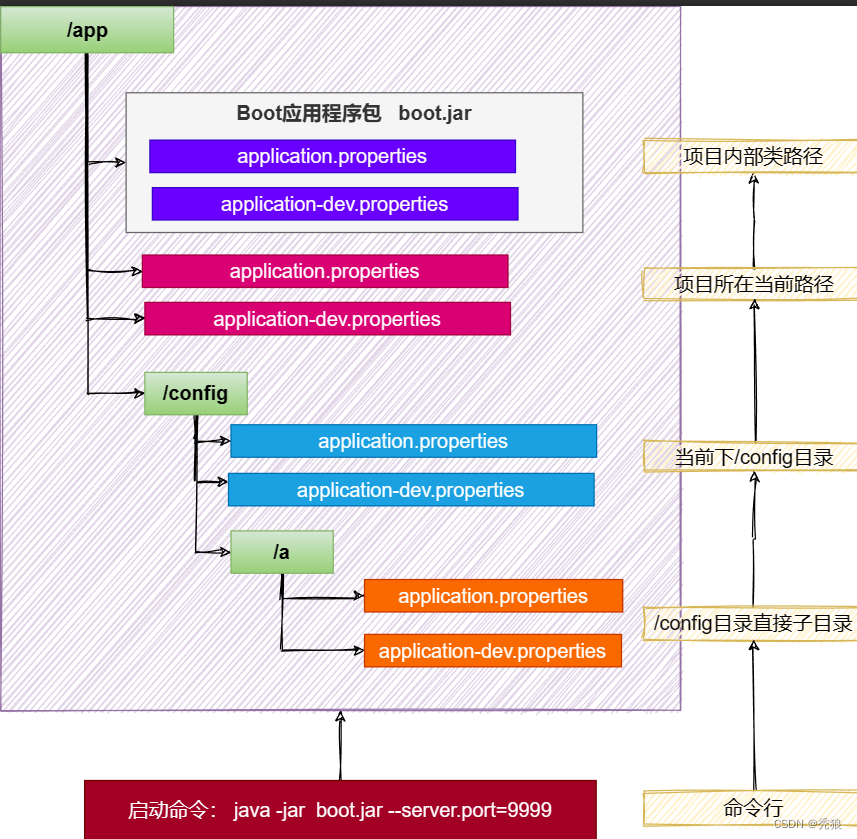
SpringBoot 应用启动时会自动寻找application.properties和application.yaml位置,进行加载。顺序如下:(后面覆盖前面)
- 类路径: 内部
-
- 类根路径
- 类下/config包
- 当前路径(项目所在的位置)
-
- 当前路径
- 当前下/config子目录
- /config目录的直接子目录
最终效果:优先级由高到低,前面覆盖后面
- 命令行 > 包外config直接子目录 > 包外config目录 > 包外根目录 > 包内目录
- 同级比较:
-
- profile配置 > 默认配置
- properties配置 > yaml配置
优先级图:
条件注释
通过对应的条件判断完成对Bean的配置。

例子测试:
配置类
import com.huang.pojo.Cat;
import com.huang.pojo.Dog;
import com.huang.pojo.People;
import com.huang.pojo.User;
import org.springframework.boot.SpringBootConfiguration;
import org.springframework.boot.autoconfigure.condition.ConditionalOnBean;
import org.springframework.boot.autoconfigure.condition.ConditionalOnClass;
import org.springframework.boot.autoconfigure.condition.ConditionalOnMissingBean;
import org.springframework.boot.autoconfigure.condition.ConditionalOnMissingClass;
import org.springframework.context.annotation.Bean;

@SpringBootConfiguration
public class SpringbootConfig {
    //条件注解测试
    @Bean
    public User getUser() {
        return new User("tolen", 22);
    }

    @ConditionalOnClass(value = com.huang.pojo.User.class)
    @Bean
    public Dog getDog() {
        return new Dog("haha", 1);
    }

    //此时是不会执行下面的方法
    @ConditionalOnMissingClass(value = "com.huang.pojo.Dog")
    @Bean
    public Cat getCat() {
        return new Cat("mimi", 2);
    }
    //因为在ioc容器中存在User,所以会执行
    @ConditionalOnBean(value = User.class)
    @Bean
    public Cat getCat2() {
        return new Cat("mimi", 2);
    }
    //因为在ioc容器中存在Cat,所以不会执行
    @ConditionalOnMissingBean(value = Cat.class)
    @Bean
    public People getPeople() {
        return new People("秃狼", 22);
    }
}
启动类
import com.huang.pojo.Cat;
import com.huang.pojo.Dog;
import com.huang.pojo.People;
import com.huang.pojo.User;
import org.springframework.boot.SpringApplication;
import org.springframework.boot.autoconfigure.SpringBootApplication;
import org.springframework.context.ConfigurableApplicationContext;

@SpringBootApplication(scanBasePackages = "com.huang")
public class Springboot3StudyApplication {

    public static void main(String[] args) {
        //返回spring的ioc容器
        var ioc = SpringApplication.run(Springboot3StudyApplication.class, args);
        var cat = ioc.getBeanNamesForType(Cat.class);
        if(cat != null) {
            System.out.println("cat被创建");
            System.out.println(cat[0]);
        };
        var dog = ioc.getBeanNamesForType(Dog.class);
        if(dog != null) {
            System.out.println("dog被创建");
            System.out.println(dog[0]);
        };
        var people = ioc.getBeanNamesForType(People.class);
        if(people != null) {
            System.out.println("people被创建");
            System.out.println(people[0]);
        };
        var user = ioc.getBeanNamesForType(User.class);
        if(user != null) {
            System.out.println("user被创建");
            System.out.println(user[0]);
//            这里报错说数组的索引越界了,说明没有查到people,也就说明ioc容器中没有people的Bean
        };
    }

}
测试结果为下
 这里报错说数组的索引越界了,说明没有查到people,也就说明ioc容器中没有people的Bean。
属性绑定注解
@ConfigurationProperties("前缀"): 声明组件的属性和配置文件哪些前缀开始项进行绑定。(配合@Compoment或@Bean使用)
@EnableConfigurationProperties:快速注册注解。(主要使用在外部引入的类上,因为外部类通常是没有注解扫描的,其上的注解是失效的,所以使用@EnableConfigurationProperties,使其类上的注解@ConfigurationProperties生效,这时就会和我们设置的配置文件中的信息绑定了。这个注解会自动将引入的文件配置到ioc容器中,无需添加@Bean)
例子
实体类
import lombok.AllArgsConstructor;
import lombok.Data;
import lombok.NoArgsConstructor;
import org.springframework.boot.context.properties.ConfigurationProperties;

@Data
@AllArgsConstructor
@NoArgsConstructor
@ConfigurationProperties("cat")
public class Cat {
    private String name;
    private Integer age;
}
import lombok.AllArgsConstructor;
import lombok.Data;
import lombok.NoArgsConstructor;
import org.springframework.boot.context.properties.ConfigurationProperties;

@Data
@AllArgsConstructor
@NoArgsConstructor
@ConfigurationProperties("dog")
public class Dog {
    private String name;
    private Integer age;
}
配置类
import com.huang.pojo.Cat;
import com.huang.pojo.Dog;
import org.springframework.boot.SpringBootConfiguration;
import org.springframework.boot.context.properties.EnableConfigurationProperties;
import org.springframework.context.annotation.Bean;

@SpringBootConfiguration
@EnableConfigurationProperties({Dog.class})
public class SpringbootConfig {
   @Bean
    public Cat getCat() {
        return new Cat();
    }
}
application.yml
cat:
  name: mimi
  age: 12
dog:
  name: wangwang
  age: 23
测试类
import com.huang.pojo.Cat;
import com.huang.pojo.Dog;
import org.junit.jupiter.api.Test;
import org.springframework.beans.factory.annotation.Autowired;
import org.springframework.boot.test.context.SpringBootTest;

@SpringBootTest
class Springboot3StudyApplicationTests {

    @Autowired
    Cat cat;
    @Autowired
    Dog dog;

    @Test
    void test1() {
        System.out.println(cat);
        System.out.println(dog);
    }

}
测试结果为下:

日志配置
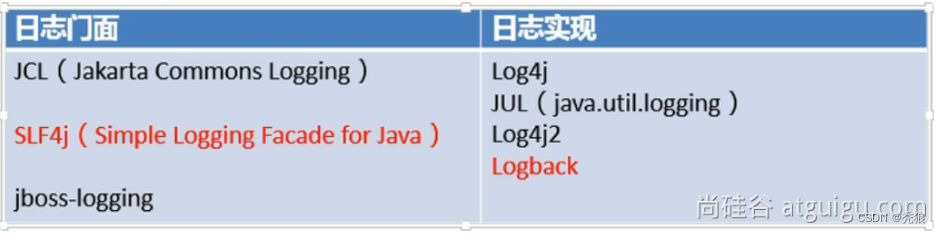
springboot默认使用lokback日志。
默认日志的打印信息:
2023-06-07T21:56:38.780+08:00  INFO 19264 --- [           main] com.huang.SpringbootDemo1Application     : Starting SpringbootDemo1Application using Java 17.0.7 with PID 19264 (D:\桌面\java\springboot3\springboot3Study\springboot-demo1\target\classes started by 86159 in D:\桌面\java\springboot3\springboot3Study)
2023-06-07T21:56:38.786+08:00  INFO 19264 --- [           main] com.huang.SpringbootDemo1Application     : No active profile set, falling back to 1 default profile: "default"
2023-06-07T21:56:39.719+08:00  INFO 19264 --- [           main] o.s.b.w.embedded.tomcat.TomcatWebServer  : Tomcat initialized with port(s): 8080 (http)
默认输出格式:
- 时间和日期:毫秒级精度
- 日志级别:ERROR, WARN, INFO, DEBUG, or TRACE.
- 进程 ID
- ---: 消息分割符
- 线程名: 使用[]包含
- Logger 名: 通常是产生日志的类名
- 消息: 日志记录的内容
添加日志信息
方法一:使用logger讲添加信息。
import org.slf4j.LoggerFactory;
import org.springframework.web.bind.annotation.GetMapping;
import org.springframework.web.bind.annotation.RestController;

@RestController
public class helloController {

    @GetMapping("hello")
    public String hello() {
        var logger = LoggerFactory.getLogger(this.getClass());
        logger.info("hhhh");
        logger.error("废了");
        return "hello, world";
    }
}
测试结果为下

方法二:使用lombok种的@log4j或@log4j2
import lombok.extern.log4j.Log4j;
import lombok.extern.log4j.Log4j2;
import org.springframework.web.bind.annotation.GetMapping;
import org.springframework.web.bind.annotation.RestController;

@RestController
@Log4j2
//@Log4j
public class helloController {

    @GetMapping("hello")
    public String hello() {
        log.info("hhhh");
        log.error("废了");
        return "hello, world";
    }
}
测试结果为下:

日志级别
- 由低到高:
ALL,TRACE, DEBUG, INFO, WARN, ERROR,FATAL,OFF;(就是越来越近精确)
-
- 只会打印指定级别及以上级别的日志
- ALL:打印所有日志
- TRACE:追踪框架详细流程日志,一般不使用
- DEBUG:开发调试细节日志
- INFO:关键、感兴趣信息日志
- WARN:警告但不是错误的信息日志,比如:版本过时
- ERROR:业务错误日志,比如出现各种异常
- FATAL:致命错误日志,比如jvm系统崩溃
- OFF:关闭所有日志记录
使用application.yml进行日志级别的配置
#logging:
#  level:
#    #表示项目所有的类的日志级别都为info
#    root: info

logging:
  level:
#    表示指定包路径中的所有类的日志级别都为info
    com.huang.controller: info
日志分组
有时我们想要对不同的包路径中的类设置相同的日志级别,这时我们就可以使用组。
logging:
  group:
#    将controller包和pojo包设置为名字为name的组
    name: com.huang.controller, com.huang.pojo
  level:
    name: DEBUG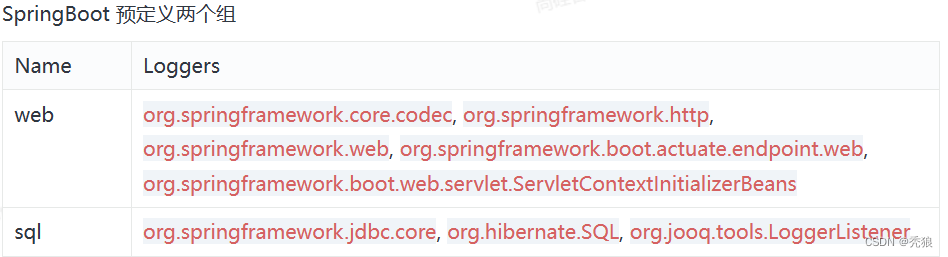
日志文件的输出
logging:
  file:
    #这里直接设置需要生成的文件的路径,如果只写了个文件名,文件就会默认生成在次项目下
    name: D:\\log
结果为下

日志文件的归档和滚动切割
归档:每天的日志单独存到一个文档中。
切割:每个文件10MB,超过大小切割成另外一个文件。
这里使用默认的日志logback,如果需要使用其他日志,则在resources中创建xxx-spring.xml的日志配置文件。(如:log4j2-spring.xml)
 例子:
例子:
logging:
  logback:
    rollingpolicy:
      #${LOG_FILE}.%d{yyyy-MM-dd}.%i.gz)为默认值.(格式:日志名+当前时间+今日的第几个日志+对应的压缩格式)
      file-name-pattern: ${LOG_FILE}.%d{yyyy-MM-dd}.%i.gz)
#      设置一个日志文件的大小
      max-file-size: 1KB
  file:
    name: haha
结果为下:
切换使用其他日志
 <dependency>
            <groupId>org.springframework.boot</groupId>
            <artifactId>spring-boot-starter-web</artifactId>
        </dependency>
<!--        在spring-boot-starter-web依赖中会引入spring-boot-starter依赖,
        而在boot-start中默认使用的log是logback,为了防止冲突我们需要将其进行排除,
        添加自己添加对应的日志依赖,这里使用log4j2-->
        <dependency>
            <groupId>org.springframework.boot</groupId>
            <artifactId>spring-boot-starter</artifactId>
            <exclusions>
                <exclusion>
                    <groupId>org.springframework.boot</groupId>
                    <artifactId>spring-boot-starter-logging</artifactId>
                </exclusion>
            </exclusions>
        </dependency>
        <dependency>
            <groupId>org.springframework.boot</groupId>
            <artifactId>spring-boot-starter-log4j2</artifactId>
        </dependency>
编辑日志步骤
1. 导入任何第三方框架,先排除它的日志包,因为Boot底层控制好了日志。
2. 修改 application.properties 配置文件,就可以调整日志的所有行为。如果不够,可以编写日志框架自己的配置文件放在类路径下就行,比如logback-spring.xml,log4j2-spring.xml。
3. 如需对接专业日志系统,也只需要把 logback 记录的日志灌倒 kafka之类的中间件,这和SpringBoot没关系,都是日志框架自己的配置,修改配置文件即可。
4. 业务中使用slf4j-api记录日志。不要再 sout 了。
WebMvcAutoConfiguration自动配置原理
webmvc的配置方法
生效条件:
//需要在前两个类配置后,再进行配置
@AutoConfiguration(after = { DispatcherServletAutoConfiguration.class, TaskExecutionAutoConfiguration.class,
		ValidationAutoConfiguration.class })
//项目要为serlet web类型才会生效
@ConditionalOnWebApplication(type = Type.SERVLET)
//要存在这三个类才会进行自动配置
@ConditionalOnClass({ Servlet.class, DispatcherServlet.class, WebMvcConfigurer.class })
@ConditionalOnMissingBean(WebMvcConfigurationSupport.class)
@AutoConfigureOrder(Ordered.HIGHEST_PRECEDENCE + 10)
@ImportRuntimeHints(WebResourcesRuntimeHints.class)
public class WebMvcAutoConfiguration {
自动配置效果
自动配置了HiddenHttpMethodFilter(表单的提交方式)和FormContentFilter(数据的格式化)。
因为要实现手自一体配置的话,我们需要引入webmvcConfigurer,这里源码通过实现WebMvcConfigurer接口的方式引入。

这里我们实现springmvc的配置只需要在apllication.yml中使用
spring.mvc和spring.web
webmvcConfigurer的底层方法:

静态资源处理器
@Override
		public void addResourceHandlers(ResourceHandlerRegistry registry) {
			if (!this.resourceProperties.isAddMappings()) {
				logger.debug("Default resource handling disabled");
				return;
			}
			addResourceHandler(registry, this.mvcProperties.getWebjarsPathPattern(),
					"classpath:/META-INF/resources/webjars/");
			addResourceHandler(registry, this.mvcProperties.getStaticPathPattern(), (registration) -> {
				registration.addResourceLocations(this.resourceProperties.getStaticLocations());
				if (this.servletContext != null) {
					ServletContextResource resource = new ServletContextResource(this.servletContext, SERVLET_LOCATION);
					registration.addResourceLocations(resource);
				}
			});
		}
默认设置了两个静态资源的访问路径。
1. 当访问/webjars/**路径时就会去classpath:/META-INF/resources/webjars/路径下查找对应的资源。
2.当访问/**路径时就会去
 "classpath:/META-INF/resources/",
      "classpath:/resources/", "classpath:/static/", "classpath:/public/"
这些路径下查找对应的资源。(按此顺序进行查找对应的路径资源)
两种设置静态资源规则的方法
1.通过application.properties配置
#访问静态资源的路径,这里就是添加了static前缀
spring.mvc.static-path-pattern=/static/**
#添加访问静态资源对应的服务器中的路径
#此时原本默认的设置就会失效
spring.web.resources.static-locations=classpath:/a/, classpath:/b/
2.通过配置类进行配置
import org.springframework.context.annotation.Configuration;
import org.springframework.web.servlet.config.annotation.EnableWebMvc;
import org.springframework.web.servlet.config.annotation.ResourceHandlerRegistry;
import org.springframework.web.servlet.config.annotation.WebMvcConfigurer;

@Configuration
@EnableWebMvc//此直接作用是使原本的默认配置失效
public class myConfig implements WebMvcConfigurer {
    @Override
    public void addResourceHandlers(ResourceHandlerRegistry registry) {
        //配置状态资源的访问前缀和添加访问静态资源对应的服务器中的路径
        registry.addResourceHandler("/static/**").addResourceLocations("classpath:/a/", "class[ath:/b/");
    }
}
状态资源缓存配置
在配置静态资源的访问路径时,webmvcConfigurer也配置了资源缓存。
private void addResourceHandler(ResourceHandlerRegistry registry, String pattern,
				Consumer<ResourceHandlerRegistration> customizer) {
			if (registry.hasMappingForPattern(pattern)) {
				return;
			}
			ResourceHandlerRegistration registration = registry.addResourceHandler(pattern);
			customizer.accept(registration);
			registration.setCachePeriod(getSeconds(this.resourceProperties.getCache().getPeriod()));
			registration.setCacheControl(this.resourceProperties.getCache().getCachecontrol().toHttpCacheControl());
			registration.setUseLastModified(this.resourceProperties.getCache().isUseLastModified());
			customizeResourceHandlerRegistration(registration);
		}
1.其可以通过在application.yml中的spring.web进行配置。
2.registration.setCachePeriod:设置缓存周期(周期过了就直接相服务器发请求,而不通过缓存),默认为0,也就不会过期。
3.registration.setCacheControl:http缓存设置。
4.registration.setUseLastModified:设置最后一次的修改时间。(通过修改时间是否相同来判断是否使用缓存中的数据)
欢迎页处理源码
@Configuration(proxyBeanMethods = false)
	@EnableConfigurationProperties(WebProperties.class)
	public static class EnableWebMvcConfiguration extends DelegatingWebMvcConfiguration implements ResourceLoaderAware
在EnableWebMvcConfiguration 的 welcomePageHandlerMapping 方法
@Bean
		public WelcomePageHandlerMapping welcomePageHandlerMapping(ApplicationContext applicationContext,
				FormattingConversionService mvcConversionService, ResourceUrlProvider mvcResourceUrlProvider) {
			return createWelcomePageHandlerMapping(applicationContext, mvcConversionService, mvcResourceUrlProvider,
					WelcomePageHandlerMapping::new);
		}
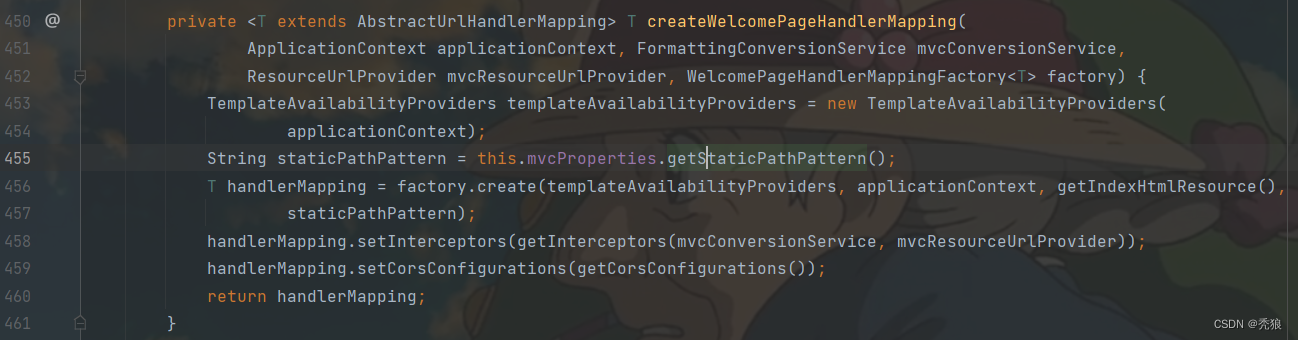


获取对应路径下的index.html
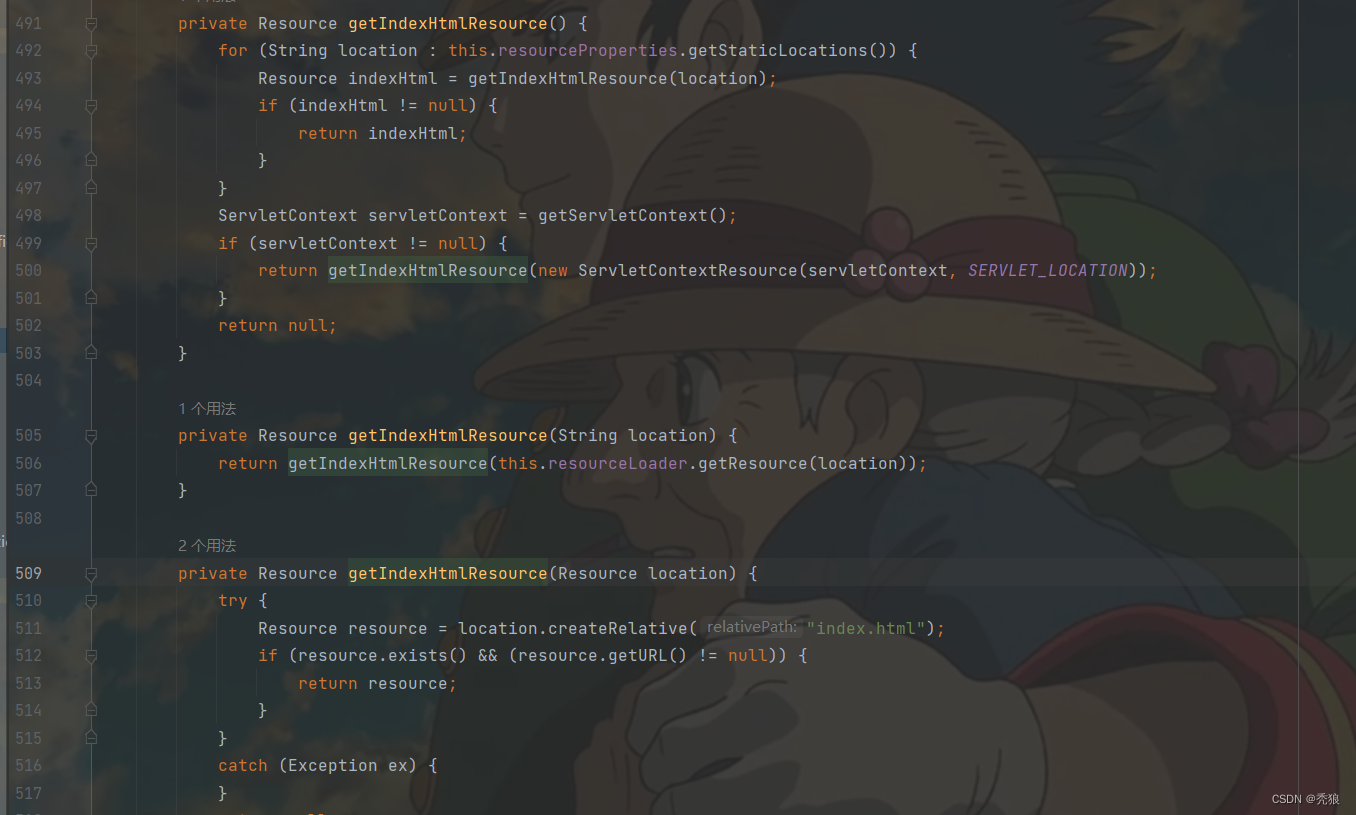
从源码中可以分析出,在访问路径为/**时,就"classpath:/META-INF/resources/", "classpath:/resources/", "classpath:/static/", "classpath:/public/"查找index.html,只要在对应的路径中存在index.html就将其作为欢迎页。
Favicon图标
Favicon图标就是自定义的网站小图标。
在static目录下创建一个favicon.ico文件就可以实现。
资源缓存配置测试
application.yml配置
spring:
  web:
    resources:
      #默认为ture,就是开启路径映射规则的自动配置
      add-mappings: true
      cache:
#        设置缓存的周期时间(如果不存在cachecontrol的配置,
#        也就是没有更详细的配置就是用period,如果有cachecontrol,period就会被覆盖,而失效)
        period: 3600
        cachecontrol:
#          此时的缓存的周期就是7200,而不是3600
          max-age: 7200
#          使最后一次修改时间进行缓存的匹配
        use-last-modified: true
测试结果为下:

使用到缓存里存放的资源。
内容协商
一个接口需要根据用户端返回不同的数据格式,这时我们就可以使用内容协商。
例子:需要一个既可以返回json数据有可以返回xml的接口。
1.通过配置请求头中的accpect。
引入支持写入xml的依赖
<dependency>
    <groupId>com.fasterxml.jackson.dataformat</groupId>
    <artifactId>jackson-dataformat-xml</artifactId>
</dependency>
在实体类上添加@JacksonXmlRootElement,可以写出为xml文档
import com.fasterxml.jackson.dataformat.xml.annotation.JacksonXmlRootElement;
import lombok.AllArgsConstructor;
import lombok.Data;

@Data
@AllArgsConstructor
@JacksonXmlRootElement
public class Cat {
    private String name;
    private Integer age;
}
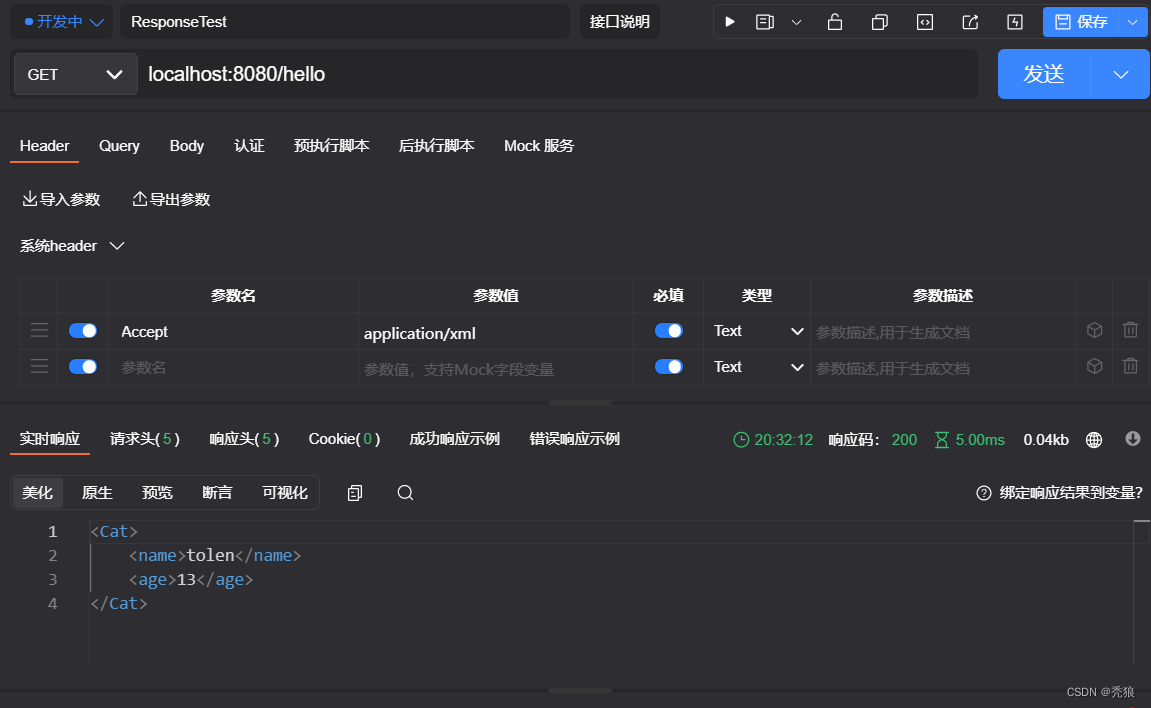
进行测试
返回json时:
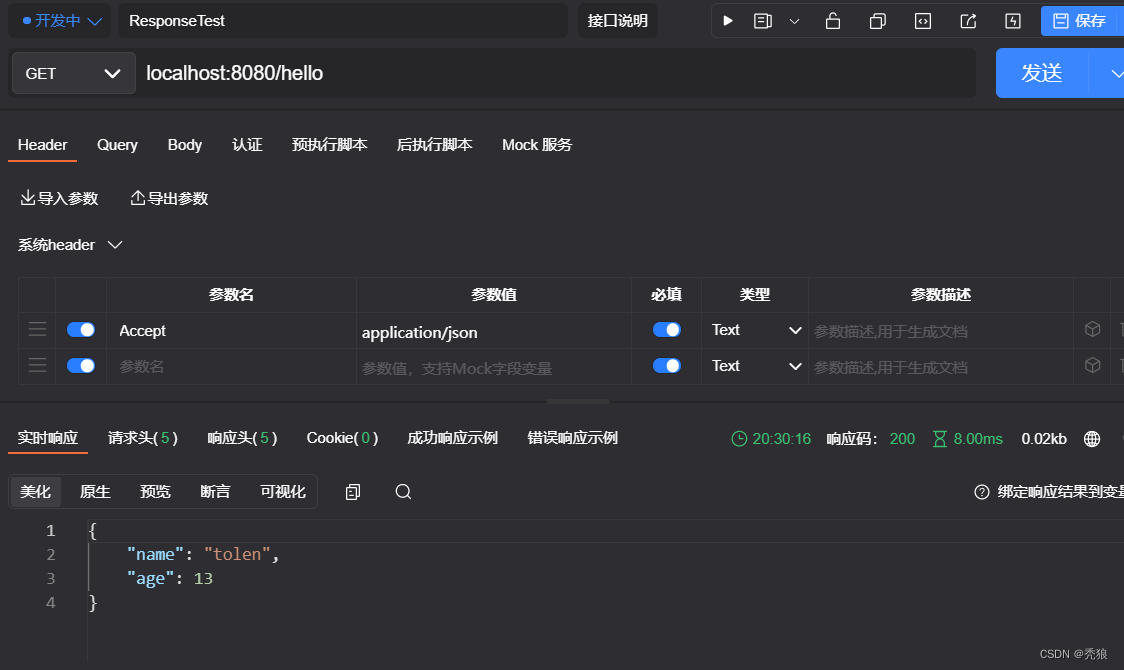
返回xml时:
2.通过设置对应的请求参数(在请求后面添加相应的参数)
在application.properties中配置开启信息,就可以实现功能。
#开启内容协商中的请求参数设置
spring.mvc.contentnegotiation.favor-parameter=true
#设置内容协商中请求参数的名字,默认名是format
spring.mvc.contentnegotiation.parameter-name=type
springboot新特性ProblemDetail
当发生错误时不再返回application/json,返回Content-Type: application/problem+json+ 额外扩展返回。
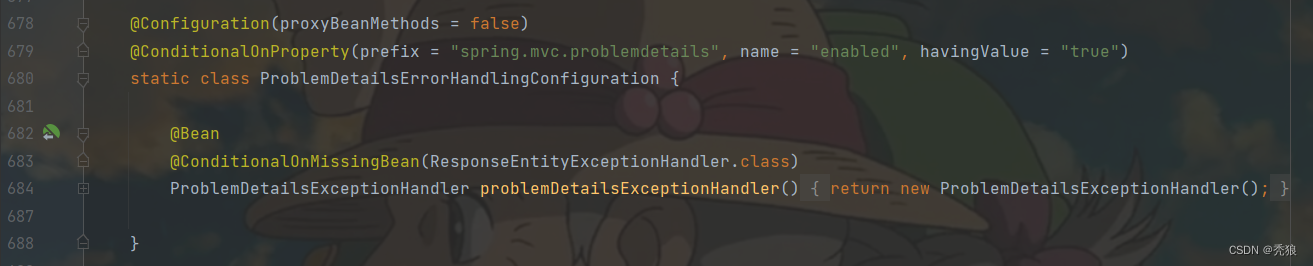
系统默认是不开启的,所以我们可以通过application配置文件配置开启。(spring.mvc.problemdetails)
@ExceptionHandler({HttpRequestMethodNotSupportedException.class,
 HttpMediaTypeNotSupportedException.class,
 HttpMediaTypeNotAcceptableException.class,
 MissingPathVariableException.class,
 MissingServletRequestParameterException.class,
 MissingServletRequestPartException.class,
 ServletRequestBindingException.class,
 MethodArgumentNotValidException.class,
 NoHandlerFoundException.class,
 AsyncRequestTimeoutException.class,
 ErrorResponseException.class,
 ConversionNotSupportedException.class,
 TypeMismatchException.class,
 HttpMessageNotReadableException.class, HttpMessageNotWritableException.class, BindException.class
})
处理以下异常。如果系统出现以下异常,会被SpringBoot支持以 RFC 7807规范方式返回错误数据。
banner
banner的默认文件就是在resources目录下的banner.txt,如果需要进行位置的修改我们可以在application.yml中进行配置。
spring:
  banner:
    #默认就是这么设置的
    location: banner.txt
如果需要关闭banner的显示,我们可以通过application.yml进行配置。
spring:
  main:
    banner-mode: off
springApplication基础特性
在启动类中的默认的写法为下
@SpringBootApplication
public class SpringbootapplicationApplication {

    public static void main(String[] args) {
        SpringApplication.run(SpringbootapplicationApplication.class, args);
    }

}
application.run方法的源码为下

其new了一个springApplication然后执行run。那么我们其实可以在启动类中模仿它的写法。
@SpringBootApplication
public class SpringbootapplicationApplication {

    public static void main(String[] args) {
        new SpringApplication(SpringbootapplicationApplication.class).run(args);
    }

}
最终的启动效果是一模一样的。
如果使用这种写法的话,我们就可以实现在启动类中配置对应的配置信息(作用和直接在application.yml配置的效果一样)。
@SpringBootApplication
public class SpringbootapplicationApplication {

    public static void main(String[] args) {
        SpringApplication application = new SpringApplication(SpringbootapplicationApplication.class);
        application.setBannerMode(Banner.Mode.OFF);
        application.run(args);
    }

}
如果启动类中配置的信息和application.yml中配置的信息冲突时,application.yml中的配置先生效,启动类中的配置失效。
FluentBuilder API
我们也可以采用流式编程的方式实现启动项目。
@SpringBootApplication
public class SpringbootapplicationApplication {

    public static void main(String[] args) {
        new SpringApplicationBuilder()
                .main(SpringbootapplicationApplication.class)
                .sources(SpringbootapplicationApplication.class)
                .bannerMode(Banner.Mode.OFF)
                .run(args);
    }

}
最终实现流式编程。(流式编程属于java8的特性)
profile配置文件
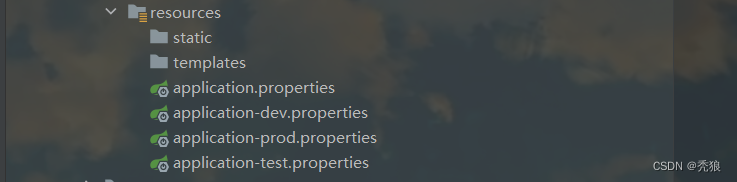
在我们开发的完成之后需要设置上线的application配置,需要修改时又需要再次进行修改,十分的麻烦,所以springboot为我们提供了profile环境隔离和切换的功能。(默认的隔离环境名为:default)
配置多个环境,并进行切换环境
1.场景对应的配置环境环境,名字规则为application-{profileName}.properties/yaml。
在application.properties,也就是主配置文件中激活对应的环境。
application.propertis:
server.port=8085

#在主配置文件中激活开发的隔离环境
#隔离环境的名字就是application-{profileName}中profileName
spring.profiles.active=dev
application-dev.properties:
server.port=9000进行启动测试。

我们发现其启动的端口为dev环境的配置,说明激活的环境中的配置信息优先级高于主配置文件中的配置信息,所以当发生冲突时按激活的环境的配置信息。
对类设置生效的隔离环境
有上线环境中不需要向ioc容器中配置某个类,而在开发环境需要将那个类配置到ioc容器中的,此时我们就可以使用@Profile。(@Profile中value是数组,所以我们可以配置多个隔离环境)
测试例子:Cat类在prod环境不需要,而在dev需要。
import lombok.Data;
import org.springframework.context.annotation.Profile;

@Data
public class Cat {
    private String name;
    private Integer age;
}
配置类,将Cat在对应的隔离环境下配置到ioc容器中。
import com.huang.pojo.Cat;
import org.springframework.context.annotation.Bean;
import org.springframework.context.annotation.Configuration;
import org.springframework.context.annotation.Profile;

@Configuration
public class springConfig {

    @Profile("dev")
    @Bean
    public Cat cat() {
        return new Cat();
    }
}
测试类
import com.huang.pojo.Cat;
import org.junit.jupiter.api.Test;
import org.springframework.beans.factory.annotation.Autowired;
import org.springframework.boot.test.context.SpringBootTest;

@SpringBootTest
class ProfileApplicationTests {

    @Autowired
    Cat cat;
    @Test
    void contextLoads() {
        System.out.println(cat);
    }

}
此时我们将环境切换到dev结果为下:
在dev环境下Cat会被配置到ioc容器中。
将隔离环境切换为prod,测试结果为下:
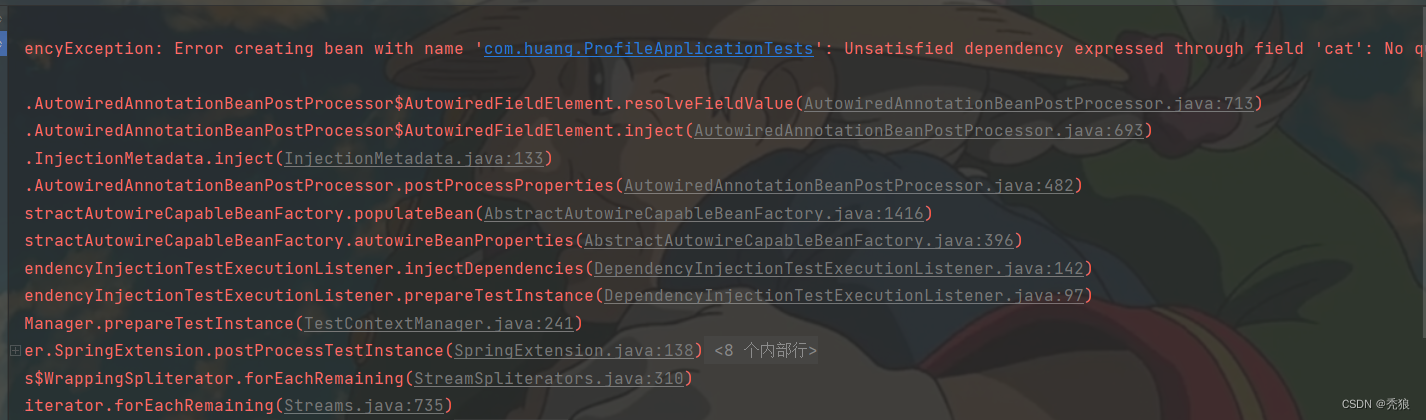
出现无法找到Bean的异常,说明Cat没有 被配置到cio容器中。
当然@Profile也可以写在配置类上,也就是说不符合隔离环境的要求整个配置类都不会配置到ioc容器,即使该配置类中的@Bean配置符合环境要求也不会执行Bean配置。(配置类都没被配置到ioc中,其方法怎么可能会执行)
profile在application中配置:
#有些配置可能是固定跟着结果隔离环境的,这时可以创建分组,便于后续操作
#这里的haha就是分组的名字,是自定义的
spring.profiles.group.haha=dev, test
#同时激活结几个隔离环境,如果此时环境间的配置发生冲突,就会使用最后一个被激活的环境(可以理解为被覆盖)
spring.profiles.active=haha
#我们可以使用include添加格外生效的配置文件
spring.profiles.include=haha
#就是默认的隔离环境为test
spring.profiles.default=test
自定义start
在开发的时候我们需要使用某些以前写过的业务模块,如果时通过复制搬运代码实在是太麻烦了,这时我们就可以自定义start,通过依赖引入的方式实现模块的导入。
例子:编写一个robot-start。
1.自定义application配置属性。
import lombok.AllArgsConstructor;
import lombok.Data;
import lombok.NoArgsConstructor;
import org.springframework.boot.context.properties.ConfigurationProperties;
import org.springframework.stereotype.Component;

@Data
@AllArgsConstructor
@NoArgsConstructor
@Component
//将此类设置为配置属性,且前缀时"robot"
@ConfigurationProperties(prefix = "robot")
public class Robot {
    private String name;
    private Integer age;
}
2.Service层
import com.huang.pojo.Robot;
import org.springframework.beans.factory.annotation.Autowired;
import org.springframework.stereotype.Service;

@Service
public class RobotService {

    @Autowired
    Robot robot;

    public String robotSayHello() {
        return robot.getName() + " say he is " + robot.getAge();
    }
}
3.controller层。
import com.huang.Service.RobotService;
import org.springframework.beans.factory.annotation.Autowired;
import org.springframework.web.bind.annotation.GetMapping;
import org.springframework.web.bind.annotation.RestController;

@RestController
public class RobotController {

    @Autowired
    RobotService robotService;

    //produces = "application/json;charset=utf-8"解决乱码问题
    @GetMapping("/hello",produces = "application/json;charset=utf-8")
    public String robotSayHello() {
        return robotService.robotSayHello();
    }
}
3.创建配置类。
import com.huang.Service.RobotService;
import com.huang.controller.RobotController;
import org.springframework.context.annotation.Configuration;
import org.springframework.context.annotation.Import;

@Configuration
//也可以通过@Bean将类配置到ioc容器中
@Import({RobotController.class, RobotService.class})
public class robotConfig {
}
此时这个start 就编写完成,接下来开始在其他包中使用该依赖。
4.添加对应的依赖
 <dependency>
            <groupId>com.huang</groupId>
            <artifactId>robot-start</artifactId>
            <version>0.0.1-SNAPSHOT</version>
        </dependency>

        <!--        在application.yml中自定义的配置属性会提示-->
        <dependency>
            <groupId>org.springframework.boot</groupId>
            <artifactId>spring-boot-configuration-processor</artifactId>
            <optional>true</optional>
        </dependency>
5.使用@import将对的类配置到ioc容器中,如果不配的话,start就会生效。(springboot默认只扫描主包)
@SpringBootApplication
@Import(robotConfig.class)
public class StarttestApplication {

    public static void main(String[] args) {
        SpringApplication.run(StarttestApplication.class, args);
    }

}
6.配置application.properties。
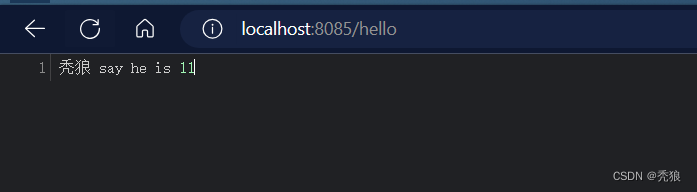
robot.name=秃狼
robot.age=11
启动并进行测试,测试结果为下: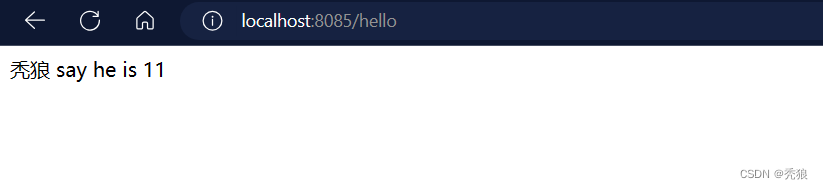
7.此时我们会发现还是很麻烦,如果时第一次使用该start的人,并不会找到要@Import哪个类,所以我们可以进行第一次优化,创建一个通俗易懂的注释,用户只要使用该注释就可以完成对应的@Import,这里我们将该注解名命为@EnableRoble。(这里二点注解我们可以模仿@EnableWebMvc)
@EnableRoble的创建为下:
import com.huang.configuration.robotConfig;
import org.springframework.context.annotation.Import;

import java.lang.annotation.*;

@Retention(RetentionPolicy.RUNTIME)
@Target({ElementType.TYPE})
@Documented
@Import(robotConfig.class)
public @interface EnableRobot {
}
在启动类中添加对应的注解。
import com.huang.Annotation.EnableRobot;
import com.huang.configuration.robotConfig;
import org.springframework.boot.SpringApplication;
import org.springframework.boot.autoconfigure.SpringBootApplication;
import org.springframework.context.annotation.Import;

@SpringBootApplication
@EnableRobot
public class StarttestApplication {

    public static void main(String[] args) {
        SpringApplication.run(StarttestApplication.class, args);
    }

}
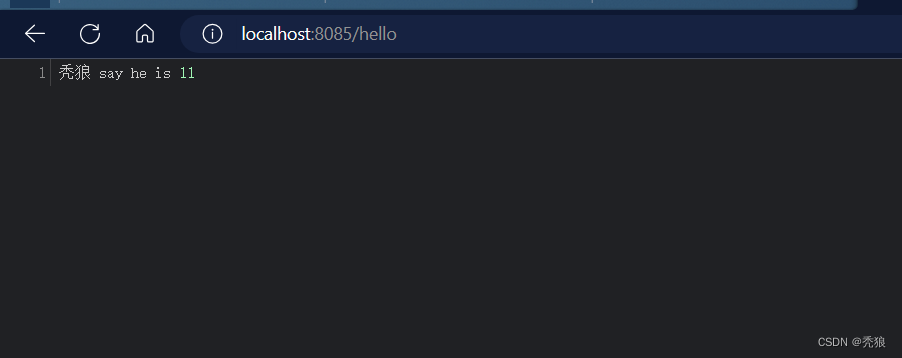
进行测试,测试结果为下:
8.如果使用者是零基础的用户,或者还是认为需要添加注解太麻烦了,我们就可以进行第二次优化,此时我们就会使用到spring的spi机制。
在resurces中创建/META-INF/spring/org.springframework.boot.autoconfigure.AutoConfiguration.imports。添加需要@Import的配置类。
在start中使用spi机制。
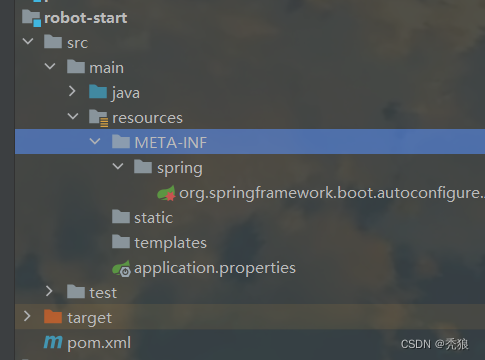
INF/spring/org.springframework.boot.autoconfigure.AutoConfiguration.imports的编写
com.huang.configuration.robotConfig此时我们再接启动项目,不需要添加然后的注解直接启动,结果为下:
最终实现自定义start。
自定义redisTemplate实现json格式
创建配置类,自定义redisTemplate。
import org.springframework.context.annotation.Bean;
import org.springframework.context.annotation.Configuration;
import org.springframework.data.redis.connection.RedisConnectionFactory;
import org.springframework.data.redis.core.RedisTemplate;
import org.springframework.data.redis.serializer.GenericJackson2JsonRedisSerializer;

@Configuration
public class configuration {

//将自定义的redisTemplate配置到ioc容器中
    @Bean
    RedisTemplate<Object, Object> redisTemplate(RedisConnectionFactory redisConnectionFactory) {
        RedisTemplate<Object, Object> template = new RedisTemplate<>();
        template.setConnectionFactory(redisConnectionFactory);
//将template默认的序列化设置为Json格式
        template.setDefaultSerializer(new GenericJackson2JsonRedisSerializer());
        return template;
    }
}
进行测试,测试类为下:
    @Test
    void test4() {
        //如果使用java自带的序列化接口,只能保证java项目中再正常使用,其他语言使用时可能为乱码,所以为了提高兼容性,
        //我们可以使用json格式
        User user = new User("tolen", 22);
        redisTemplate.opsForValue().set("user", user);
        System.out.println(redisTemplate.opsForValue().get("user"));
    }
测试结果为下: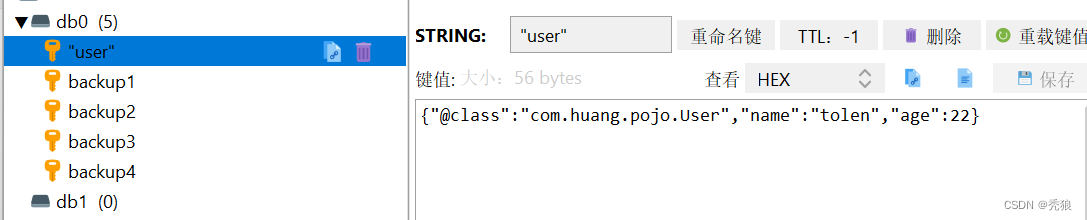
此后在redis中存储的实体类都会被保存为Json格式,此时就不需要担心兼容性的问题。
Swagger
在未来我们使用的项目大多时前后端分离的项目,这时为了让前端人员的找到后端人员开发的接口的作用,这时我们就可以使用swagger。
swagger依赖
<dependency>
    <groupId>org.springdoc</groupId>
    <artifactId>springdoc-openapi-starter-webmvc-ui</artifactId>
    <version>2.1.0</version>
</dependency>
常用注解
| 注解 | 标注位置 | 作用 |
| @Tag | controller 类 | 标识 controller 作用 |
| @Parameter | 参数 | 标识参数作用 |
| @Parameters | 参数 | 参数多重说明 |
| @Schema | model 层的 JavaBean | 描述模型作用及每个属性 |
| @Operation | 方法 | 描述方法作用 |
| @ApiResponse | 方法 | 描述响应状态码等 |
测试例子
controller层
import com.huang.pojo.Order;
import io.swagger.v3.oas.annotations.Operation;
import io.swagger.v3.oas.annotations.Parameter;
import io.swagger.v3.oas.annotations.tags.Tag;
import org.springframework.web.bind.annotation.GetMapping;
import org.springframework.web.bind.annotation.RequestMapping;
import org.springframework.web.bind.annotation.RestController;

@RestController
@RequestMapping("/order")
@Tag(name = "order",description = "order")
public class OrderController {

    @GetMapping("/getOrder")
    @Operation(description = "获取所有的订单")
    public Order getOrders() {
        return new Order("order1",1);
    }
    @GetMapping("/setOrder")
    public String setOrder(@Parameter(description = "订单的id") Integer id) {
        return "ok";
    }
}
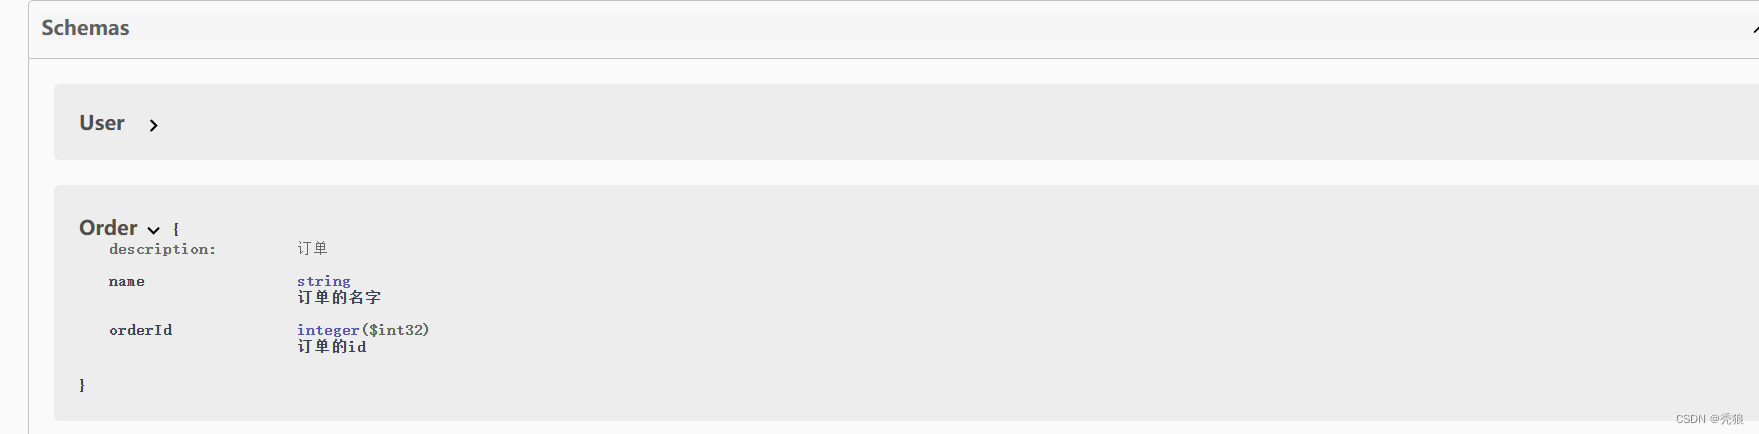
Order类
@Schema(description = "订单")
public class Order {
    @Schema(description = "订单的名字")
    private String name;
    @Schema(description = "订单的id")
    private Integer orderId;

    public String getName() {
        return name;
    }

    public void setName(String name) {
        this.name = name;
    }

    public Integer getOrderId() {
        return orderId;
    }

    public void setOrderId(Integer orderId) {
        this.orderId = orderId;
    }

    public Order(String name, Integer orderId) {
        this.name = name;
        this.orderId = orderId;
    }
}
启动测试

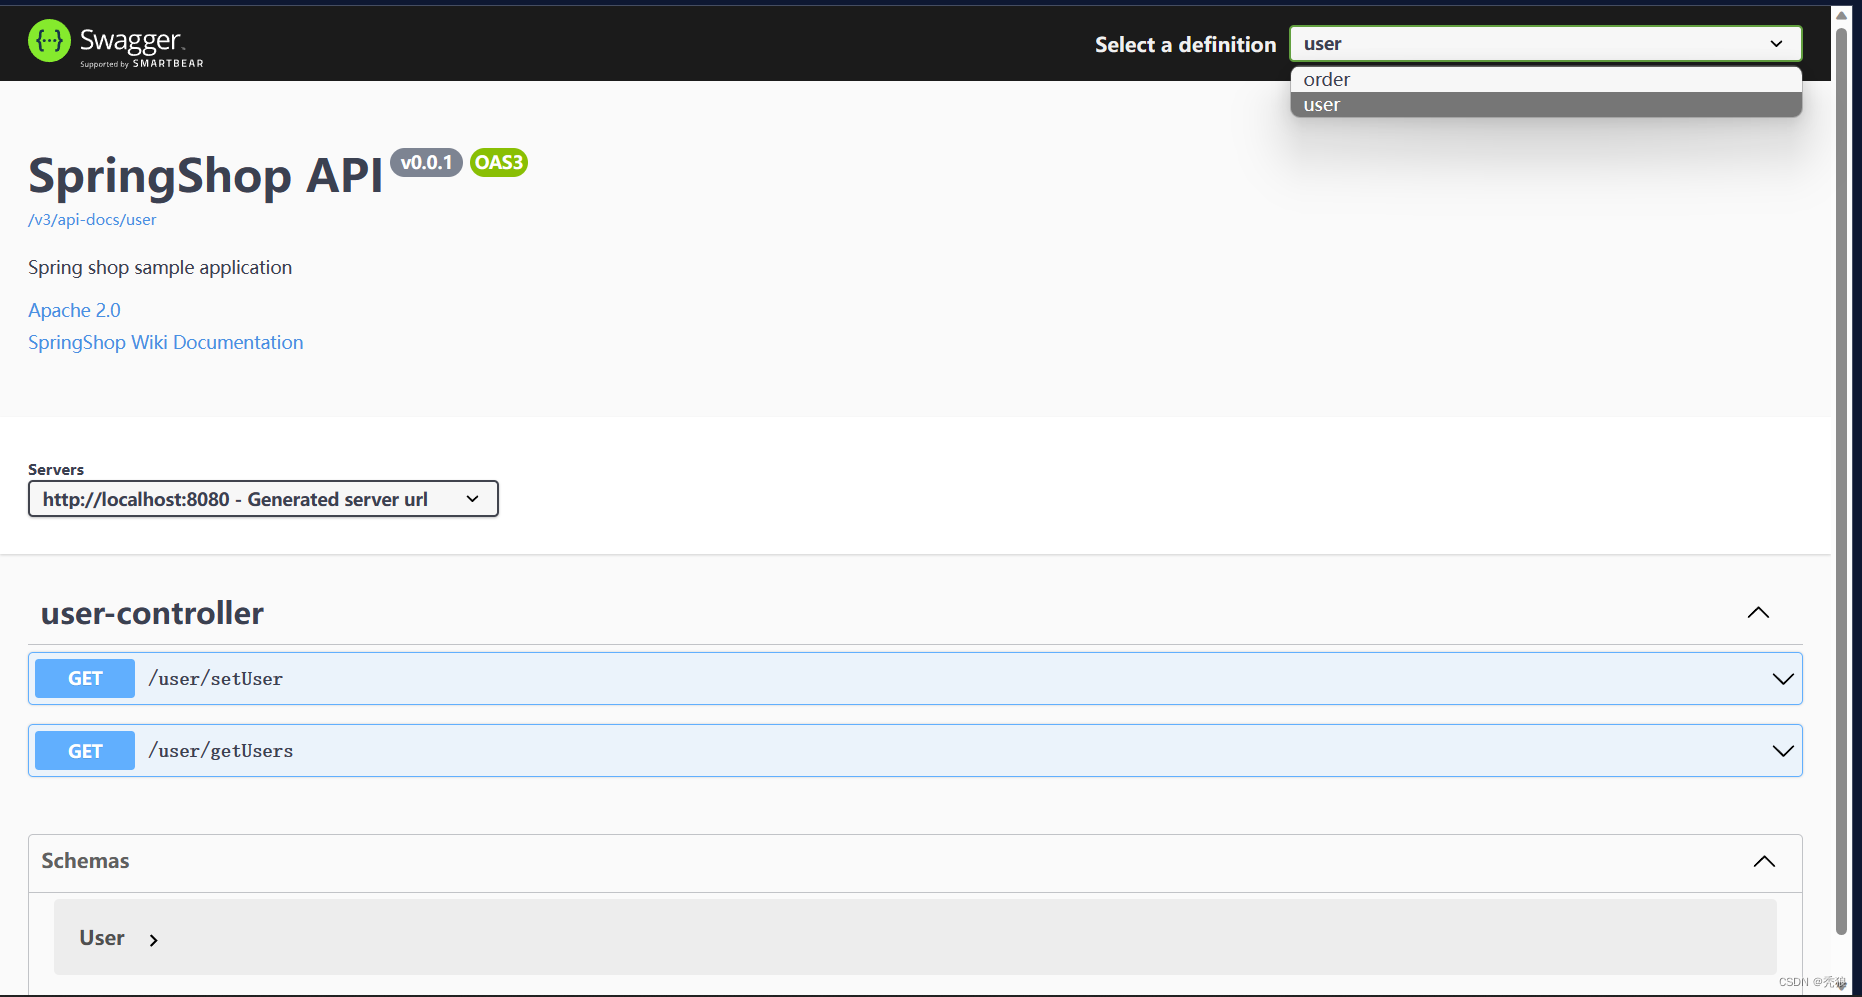
我们也可以为不同的controller设置其他的分组,还可以设置swagger文档的其他信息。
import io.swagger.v3.oas.models.ExternalDocumentation;
import io.swagger.v3.oas.models.OpenAPI;
import io.swagger.v3.oas.models.info.Info;
import io.swagger.v3.oas.models.info.License;
import org.springdoc.core.models.GroupedOpenApi;
import org.springframework.context.annotation.Bean;
import org.springframework.context.annotation.Configuration;

@Configuration
public class SwaggerConfig {
    @Bean
    //order的分组
    public GroupedOpenApi orderApi() {
        return GroupedOpenApi.builder()
                .group("order")
                .pathsToMatch("/order/**")
                .build();
    }

    @Bean
    //user的分组
    public GroupedOpenApi userApi() {
        return GroupedOpenApi.builder()
                .group("user")
                .pathsToMatch("/user/**")
                .build();
    }

    @Bean
    //通过将该类配置到ioc中,就可以设置文件的信息
    public OpenAPI springShopOpenAPI() {
        return new OpenAPI()
                .info(new Info().title("SpringShop API")
                        .description("Spring shop sample application")
                        .version("v0.0.1")
                        .license(new License().name("Apache 2.0").url("http://springdoc.org")))
                .externalDocs(new ExternalDocumentation()
                        .description("SpringShop Wiki Documentation")
                        .url("https://springshop.wiki.github.org/docs"));
    }
}
测试结果为下:
WebClient
可以使用外部的接口,通过WebClient。
例子:天气查询。
导入依赖。
 <dependency>
            <groupId>org.springframework.boot</groupId>
            <artifactId>spring-boot-starter-webflux</artifactId>
        </dependency>
在controller中编写WebClient。
import org.springframework.http.MediaType;
import org.springframework.web.bind.annotation.GetMapping;
import org.springframework.web.bind.annotation.PathVariable;
import org.springframework.web.bind.annotation.RestController;
import org.springframework.web.reactive.function.client.WebClient;
import reactor.core.publisher.Mono;

import java.util.LinkedHashMap;

@RestController
public class WebClientController {
    @GetMapping("/getWeather/{area}")
    public Mono<String> getWeather(@PathVariable("area") String area) {
        //设置路径参数
        LinkedHashMap<String, String> map = new LinkedHashMap<>();
        map.put("area",area);
        WebClient webClient = WebClient.create();
        Mono<String> data = webClient.get()
                .uri("https://ali-weather.showapi.com/area-to-weather-date?area={area}", map)
                //接收类型
                .accept(MediaType.APPLICATION_JSON)
                //编写对应的用户表示,编写请求头
                .header("Authorization", "APPCODE " + "4acb0398220b4bcd8476fef2a4bf42f9")
                .retrieve()
                .bodyToMono(String.class);
        System.out.println(data);
        return data;
    }
}
请求头中的参数必须填写。

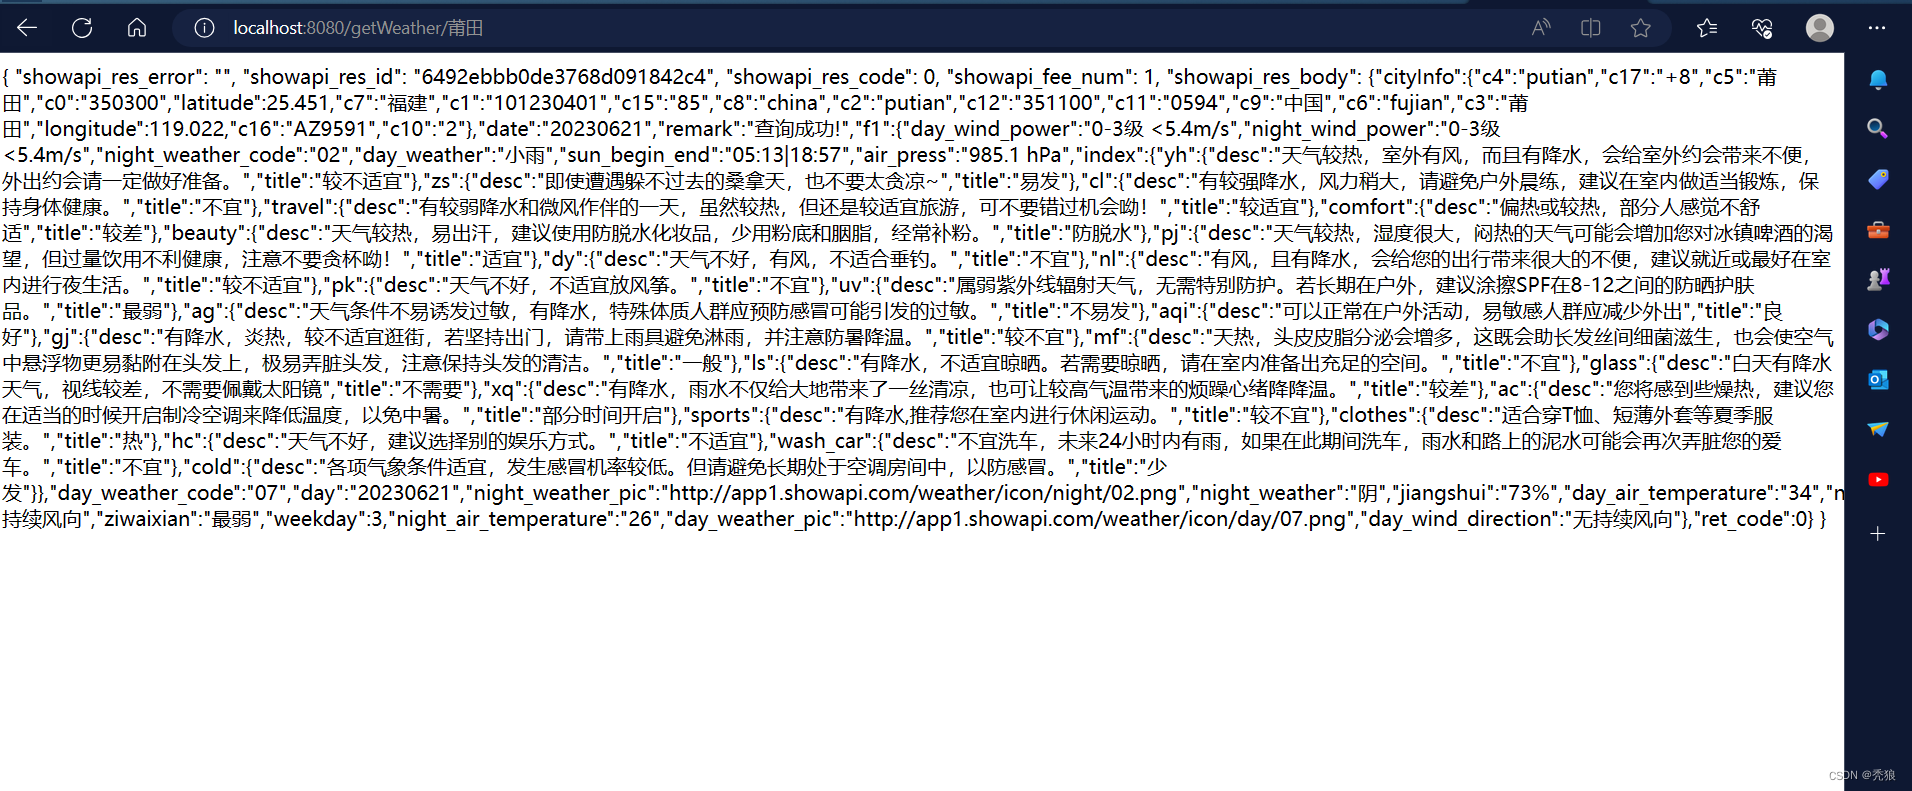
进行测试。

旨在为数千万中国开发者提供一个无缝且高效的云端环境,以支持学习、使用和贡献开源项目。
更多推荐


 1
1 0
0- 0


 已为社区贡献5条内容

所有评论(0)