openEuler22.03制作openstack平台使用的镜像
使用openEuler22.03的iso制作openstack平台使用的云主机镜像
·
系列文章目录
第一章 openEuler22.03制作openstack平台使用的镜像
文章目录
前言
使用openEuler22.03的iso制作openstack平台使用的云主机镜像。
使用的镜像:openEuler-22.03-LTS-SP1-x86_64-dvd.iso
使用的工具:virt-manager
一、virt-manager上的准备工作
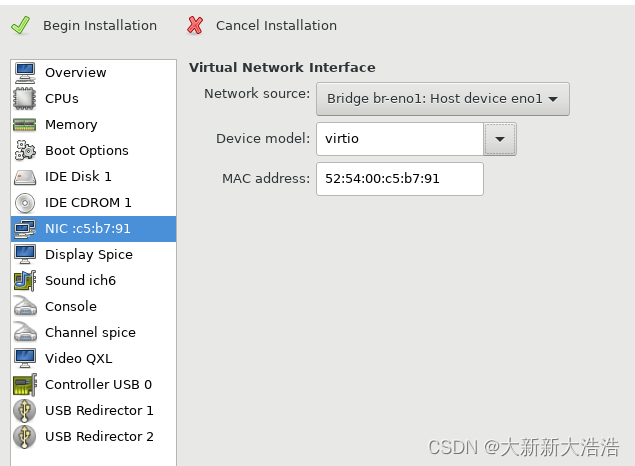
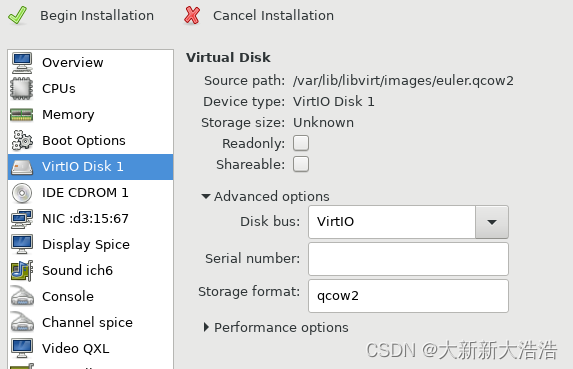
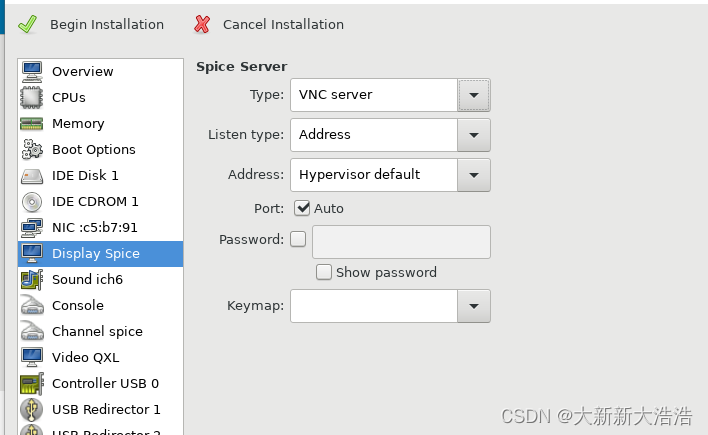
首先将网卡类型,硬盘类型修改为Virtio类型
1、网卡类型切换为virtio
2、IDE驱动设置成Virtio
3、Display设置成vnc
3、虚拟机系统分区
只保留一个跟目录分区即可
二、安装普通工具包
yum install -y vim-enhanced wget unzip zip tree tar sysstat iftop htop
yum install -y net-tools pciutils traceroute wget unzip zip psmisc bash-completion
yum install -y tcpdump yum-utils epel-release tar
三、安装云化工具包
1、安装工具包
yum install -y qemu-guest-agent cloud-init cloud-utils cloud-utils-growpart gdisk
2、修改配置文件
#默认是true,修改成false,打开root账户
disable_root: false
#默认是0,修改成1,打开密码登陆
ssh_pwauth:   1

system_info:
   default_user:
     #将openeuler修改成root
     name: root
     #默认是true,修改成false,放开管理员密码登陆
     lock_passwd: false
     增加下一行
     sudo: ["ALL=(ALL) NOPASSWD:ALL"]
3、服务状态设置
systemctl status cloud-init-local
systemctl status cloud-init
systemctl status cloud-config
systemctl status cloud-final

systemctl enable cloud-init-local
systemctl enable cloud-init
systemctl enable cloud-config
systemctl enable cloud-final

systemctl start cloud-init-local
systemctl start cloud-init
systemctl start cloud-config
systemctl start cloud-final
四、其他配置
1、关闭防火墙和selinux
#关闭selinux
sed -i 's/SELINUX=enforcing/SELINUX=disabled/g' /etc/sysconfig/selinux
sed -i 's/SELINUX=enforcing/SELINUX=disabled/g' /etc/selinux/config

#关闭防火墙
systemctl restart firewalld.service
systemctl disable firewalld.service
2、设定欢迎词
echo 'Welcome to openstack Cloud Elastic Compute Service !' >> /etc/motd;
3、SSHD服务配置
sed -i 's/GSSAPICleanupCredentials/#GSSAPICleanupCredentials/g' /etc/ssh/sshd_config;
sed -i 's/GSSAPIAuthentication/#GSSAPIAuthentication/g' /etc/ssh/sshd_config;
echo '#openstack-ssh-properties' >> /etc/ssh/sshd_config;
echo 'UseDNS no' >> /etc/ssh/sshd_config;
echo 'GSSAPICleanupCredentials no' >> /etc/ssh/sshd_config;
echo 'GSSAPIAuthentication no' >> /etc/ssh/sshd_config;
五、清理历史记录
rm -rf /var/log/*.0
rm -rf /var/log/*.1
rm -rf /var/log/*.2
rm -rf /var/log/*.3
rm -rf /var/log/*/*.0
rm -rf /var/log/*/*.1
rm -rf /var/log/*/*.2
rm -rf /var/log/*/*.3
for x in `find /var/log/ -name "*.log.*"`; do rm $x; done
for y in `find /var/log/ -name "*.gz"`; do rm $y; done
for z in `find /var/log/  -type f`; do cat /dev/null >$z; done
history -c && history -w

#执行下面命令,清理用户登录记录。
echo > /var/log/wtmp

echo > /var/log/btmp

#执行下面命令清除历史操作记录。
history -w;echo > /root/.bash_history;history -c;history -c;history -c;
总结
总体上制作方式一致,直接使用云计算的版本有点不好使,就自己做一版了

为开发者提供学习成长、分享交流、生态实践、资源工具等服务,帮助开发者快速成长。
更多推荐


 0
0 0
0- 0


 已为社区贡献3条内容

所有评论(0)