
android editText一键清空功能! 详细步骤
有LinearLayout+EditText+ImageView 的组合 也有自己封装实现在xml中使用
网上看了很多文章 大部分是三四年前的
有LinearLayout+EditText+ImageView 的组合 也有自己封装实现在xml中使用<com.xxx.xx ...的方法 但 大多不太详细 , 今天详细聊聊第二种在xml封装使用com.xx.xx的方法.以及清除图标的生成,很简单,废话不多说,开整!
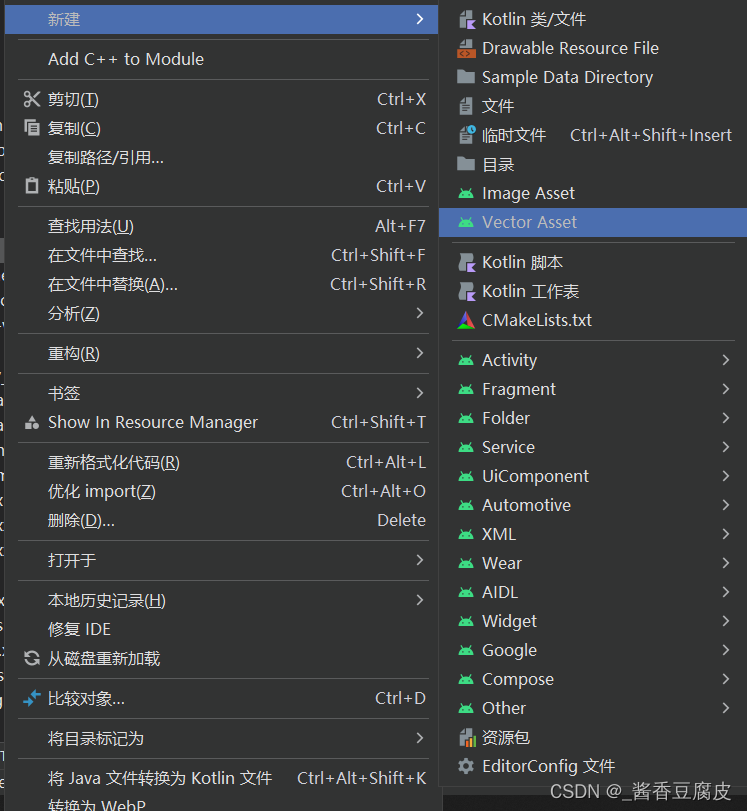
1.首先 在drawable中新建一个资源文件 res-drawable-new -Vector Asset 在弹出界面中的 Clip art中搜搜 cancel 找到后下一步(修改名称 颜色这里我就不多说了)生成一个xxx.xml的图标文件

2.接着嘞 在MainActivity中可以这么来获取设置这个小玩意到EditText中
edit=findViewById(R.id.qwe)


 //
// 设置清空监听器
editText.setOnTouchListener { _, event ->
    if (event.action == MotionEvent.ACTION_UP &&
        event.rawX >= editText.right - editText.compoundDrawables[2].bounds.width()
    ) {
        editText.text?.clear()  // 清空文本内容
        return@setOnTouchListener true
    }
    false
}
// 设置清空监听器
editText.setOnTouchListener { _, event ->
    if (event.action == MotionEvent.ACTION_UP &&
        event.rawX >= editText.right - editText.compoundDrawables[2].bounds.width()
    ) {
        editText.text?.clear()  // 清空文本内容
        return@setOnTouchListener true
    }
    false
}
这里就贴一下具体的代码 剩下的我想大家应该懂的都懂
然后嘞 我们这个东西肯定要封装起来用的啦,不然写一个edittext写一堆这个 岂不是人都麻了?!
那么接下来 我们封装一下:
1.创建CustomEditText类
创建 CustomEditText 类的主要目的是为了实现自定义功能,这样可以在 EditText 的基础上添加一些额外的行为和处理。通过继承自 EditText 并且重写其所需的方法,来扩展或修改默认行为,甚至可以添加全新的功能。
自定义EditText也是为了消除以下两个警告:
(1):“Custom view EditText has setOnTouchListener called on it but does not override performClick”。
这是由于 EditText 没有实现 performClick() 方法所导致的,因此我们需要创建一个自定义的 EditText 子类并重写该方法来解决这个问题。
(2):"onTouch lambda should call View#performClick when a click is detected"。
- 即使第一个警告已经被解决了,如果没有在
onTouch()方法中调用View.performClick()方法,那么仍然会收到此警告。通过在自定义EditText子类中重写performClick()方法,可以实现正确的点击事件处理,在onTouch()回调中调用editText.performClick()已经消除了这个警告。
因此,通过创建 CustomEditText 类,我们可以解决警告并为 EditText 添加自定义功能。
class CustomEditText(context: Context, attrs: AttributeSet?) : androidx.appcompat.widget.AppCompatEditText(context, attrs) {
    private var onClickListener: OnClickListener? = null

//    fun setOnEditTextClickListener(onClickListener: OnClickListener?) {
//        this.onClickListener = onClickListener
//    }

    override fun performClick(): Boolean {
        super.performClick()
        onClickListener?.onClick(this)
        return true
    }
}
2.创建ClearableEditText 类
创建 ClearableEditText 类的主要目的是为了处理清空按钮的显示、隐藏以及点击事件的逻辑。通过在 setClearButton() 方法中使用 CustomEditText 实例,我们可以在 EditText 上添加一个清除文本内容的图标按钮,并控制其何时显示和何时隐藏。
在 setClearButton() 方法中,我们还可以设置点击清除按钮后相应 EditText 的行为。例如,在清除按钮被点击时,将 EditText 中的文本内容清空以及展示关于清空操作的提示信息等。
通过创建 ClearableEditText 类,我们可以实现自定义的清空EditText功能,提高用户交互体验。
class ClearableEditText {
    fun setClearButton(editText: CustomEditText, context: Context) {
        val drawable = ContextCompat.getDrawable(context, R.drawable.baseline_cancel_24)

        editText.setOnTouchListener { _, event ->
            if (editText.compoundDrawables[2] == null) {
                return@setOnTouchListener false
            }
            if (event.action != MotionEvent.ACTION_UP) {
                return@setOnTouchListener false
            }
            if (event.rawX >= editText.right - editText.compoundDrawables[2].bounds.width()) {
                editText.setText("")
                editText.performClick()
                return@setOnTouchListener true
            }
            false
        }


//        设置输入框聚焦事件
        editText.setOnFocusChangeListener { _, hasFocus ->
            if (hasFocus && editText.text!!.isNotEmpty()) {
                editText.setCompoundDrawablesWithIntrinsicBounds(null, null, drawable, null)
            } else {
                editText.setCompoundDrawablesWithIntrinsicBounds(null, null, null, null)
            }
        }

        editText.addTextChangedListener(object : TextWatcher {
            override fun afterTextChanged(edit: Editable?) {}
            override fun beforeTextChanged(p0: CharSequence?, p1: Int, p2: Int, p3: Int) {}
            override fun onTextChanged(p0: CharSequence?, p1: Int, p2: Int, p3: Int) {
                if (editText.isFocused) {
                    if ((p0?.length ?: 0) > 0) {
                        editText.setCompoundDrawablesWithIntrinsicBounds(
                            null,
                            null,
                            drawable,
                            null
                        )
                    } else {
                        editText.setCompoundDrawablesWithIntrinsicBounds(
                            null,
                            null,
                            null,
                            null
                        )
                    }
                }
            }
        })
    }
}
好啦 完成以上操作之后呢 还有一个很多博主都忘记说的.很关键的步骤
那就是build一下:
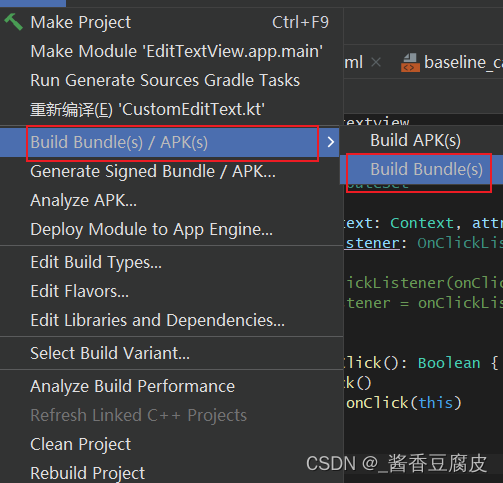
好啦 做到这里,你已经完成90%了 接着在xml中使用它:
注意:"com.xx.xx.CustomEditText" com后是你自己项目的包名 准确的说,是CustomEditText这个类所在的包名 别搞错了
还有一点 上一步的build 你没有build 这一步xml中也是不会显示滴
       <com.example.edittextview.CustomEditText
            android:id="@+id/qqq"
            android:layout_width="match_parent"
            android:layout_height="wrap_content"
            android:layout_marginStart="25dp"
            android:layout_marginTop="200dp"
            android:layout_marginEnd="25dp"
            android:text=""
            tools:ignore="TouchTargetSizeCheck"
            />
最后的最后 在MainActivity中使用我们封装的逻辑
class MainActivity : AppCompatActivity() {

    private var edit:CustomEditText?=null

    override fun onCreate(savedInstanceState: Bundle?) {
        super.onCreate(savedInstanceState)
        setContentView(R.layout.activity_main)

        edit=findViewById(R.id.qqq)

        ClearableEditText().setClearButton(edit!!,this@MainActivity)
    }
}参考文章来源:(16条消息) Android 带清除功能的输入框控件ClearEditText,仿IOS的输入框_android 输入验证码仿ios效果_xiaanming的博客-CSDN博客

为开发者提供学习成长、分享交流、生态实践、资源工具等服务,帮助开发者快速成长。
更多推荐


 1
1 0
0- 0


 已为社区贡献1条内容

所有评论(0)