
BehaviorTree 行为树详解 完整版 (参考官方文档)
行为树,学习纯英文官方文档所作记录,英文不好的学者可以借此学习,文末放了官方文档和官方代码链接。
行为树
1.基本概念
1.1 简介
行为树是控制“任务”执行流的分层节点树。
| 树节点的类型 | 子节点计数 | 笔记 |
|---|---|---|
| 控制节点 | 1...N | 通常,根据其兄弟姐妹或/和自己的状态的结果勾选孩子。 |
| 装饰器节点 | 1 | 除其他外,它可能会改变孩子的结果或多次勾选它。 |
| 条件节点 | 0 | 不应更改系统。不得返回运行。 |
| 动作节点 | 0 | 这是“做某事”的节点 |
注:条件节点和动作节点均为叶子节点。
1.2 基础知识
我们需要写叶子节点(条件节点和动作节点),将他们用逻辑组装成一棵树。这棵树除了利用C++在运行的时候组装,也可以使用 XML 文件直接再部署的时候组装。
每个节点都有回调函数,可以通过回调函数执行我们的代码。
// The simplest callback you can wrap into a BT Action
NodeStatus HelloTick()
{
std::cout << "Hello World\n";
return NodeStatus::SUCCESS;
}
// Allow the library to create Actions that invoke HelloTick()
factory.registerSimpleAction("Hello", std::bind(HelloTick));
上述例子用的是 函数指针 ,通常我们使用继承的方式来定义树的节点。一般继承 TreeNode , 特别的,我们也可以继承 ActionNodeBase , ConditionNode 和 DecoratorNode.
2.节点库
2.1 序列:( sequence )
勾选所有子节点,只有所有子节点军返回 SUCCESS 才返回 SUCCESS ,否则返回 FAILURE,过程中为 RUNNING。
共有三种类型,分别如下:
| Type of ControlNode | Child returns FAILURE | Child returns RUNNING |
|---|---|---|
| Sequence | Restart | Tick again |
| ReactiveSequence | Restart | Restart |
| SequenceWithMemory | Tick again | Tick again |
-
"Restart"意思是从第一个子节点重新开始。
-
"Tick again" : 意思是下一次序列被tick的时候 ,从该节点开始tick,之前的SUCCESS节点不再重复。
Sequence适合狙击手逻辑,ReactiveSequence适用于连续tick ,但是要判断执行时间和tick帧率,SequenceWithMemory适合各个点只执行一次。
2.2 装饰节点 (Decorators)
一个装饰节点只有一个孩子,它可以控制是否,什么时候tick孩子节点多少次。
InvertNode : tick孩子节点一次,孩子节点失败返回SUCCESS,成功返回FAILURE,孩子节点运行则返回RUNNING。
ForceSuccessNode : tick孩子节点一次,孩子节点失败或者成功均返回SUCCESS,孩子节点运行则返回RUNNING。
ForceFailureNode : tick孩子节点一次,孩子节点失败或者成功均返回FAILURE,孩子节点运行则返回RUNNING。
RepeatNode : 最多tick孩子节点n次,(n作为数据输入),直到孩子节点返回失败,则该节点返回FAILURE,若孩子节点返回RUNNING ,则同样返回RUNNING。
RetryNode:最多tick孩子节点n次 , (n 作为数据输入),直到孩子节点返回成功,则该节点返回 SUCCESS ,若孩子节点返回RUNNING ,则同样返回RUNNING。
2.3 回退(FallBack)
可称之为“选择器”或“优先级”,用于尝试不同策略:1.子项返回FAILURE , 回退并勾选下一个子项。2.若最后一个子项也返回FAILURE,则所有子项停止并回退返回失败。 3.如果有子项返回SUCCESS,停止并返回SUCCESS。
有两个类型:
| Type of ControlNode | Child returns RUNNING |
|---|---|
| Fallback | Tick again |
| ReactiveFallback | Restart |
ReactiveFallback : 用于中断某异步子节点。
3.接口(Ports) 和 键值对(Blackboard)
Blackboard : 可以被所有节点共享的键值对(entry)。
Ports : 节点间相互通讯的接口。
Ports 通过 blackboard 的相同的键连接, 输入ports 可以读取 entry , 而输出 Ports 可以写入 entry。
Ports 的数量,名称和类型在编译阶段就需要被知道,ports之间的连接在XML部署的时候完成。
可以通过值储存任意的C++类型。
注:1.输出的时候在文件中用 setOutput(“A”,”B”);
其中A为接口,B为数据.
然后在 XML 中将接口与键值对的 键 相连接。A="{C}"
其中A为接口
2.输入时 InputPort<T>("A") 做声明
通过 getInput<T>("A") 获取键值对的值
输出是往接口输出 , 输入是从接口读入 。
3.1 Inputs ports
一个有效的输入应该是: 1. 节点将会读取的一段静态字符串 2. 由键定义的对应Blackboard条目的指针。
如下:
 <SaySomething name="fist"   message="hello world" />  #法一:一段静态字符串
 <SaySomething name="second" message="{greetings}" />  #法二:条目“greeting”对应的在blackboard中的指针
注:条目“greeting”对应的值可能在运行期间发生改变。
ActionNode 例子:
// SyncActionNode (synchronous action) with an input port.
class SaySomething : public SyncActionNode
{
public:
//如果您的节点具有接口,则必须使用此构造函数标记
// If your Node has ports, you must use this constructor signature
SaySomething(const std::string& name, const NodeConfig& config)
: SyncActionNode(name, config)
{ }
//必须定义此静态方法
// It is mandatory to define this STATIC method.
static PortsList providedPorts()
{
// This action has a single input port called "message"
return { InputPort<std::string>("message") };
}
// Override the virtual function tick()
NodeStatus tick() override
{
Optional<std::string> msg = getInput<std::string>("message");
// Check if optional is valid. If not, throw its error
if (!msg)
{
throw BT::RuntimeError("missing required input [message]: ",
msg.error() );
}
//使用方法 value() 提取有效信息。
// use the method value() to extract the valid message.
std::cout << "Robot says: " << msg.value() << std::endl;
return NodeStatus::SUCCESS;
}
};
1.当自定义的节点具有输入输出端口时,这些端口必须是在静态方法中声明。
static MyCustomNode::PortsList providedPorts();
2.使用模板方法读取来自端口的输入。
TreeNode::getInput<T>(key) , 建议在 tik() 中使用,在运行时周期性的进行更改。
3.失败返回的情况很多,具体要怎么操作需要我们自己去判断确定。
3.2 Output ports
Input ports 要起作用必须用Output Ports 对 blackboard进行写入,使用对应的条目进行读取。
以下是例程:
class ThinkWhatToSay : public SyncActionNode
{
public:
ThinkWhatToSay(const std::string& name, const NodeConfig& config)
: SyncActionNode(name, config)
{ }
static PortsList providedPorts()
{
return { OutputPort<std::string>("text") };
}
// This Action writes a value into the port "text"
NodeStatus tick() override
{
// the output may change at each tick(). Here we keep it simple.
setOutput("text", "The answer is 42" );
return NodeStatus::SUCCESS;
}
};
注:写入只需要 接口名 和 写入的数据 ,键值对对应的键名不需要在此声明,直接在xml文件中声明即可。
有时候处于调试目的,我们可以编写 Script 使用内置操作把静态值放入条目中。
<Script code=" the_answer:='The answer is 42' " />
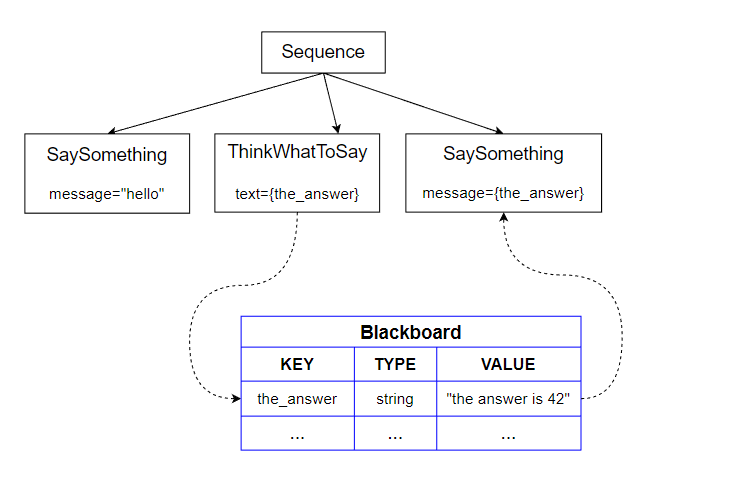
3.3 整体架构
 <root BTCPP_format="4" >
     <BehaviorTree ID="MainTree">
        <Sequence name="root_sequence">
            <SaySomething     message="hello" />
            <ThinkWhatToSay   text="{the_answer}"/>
            <SaySomething     message="{the_answer}" />
        </Sequence>
     </BehaviorTree>
 </root>
#include "behaviortree_cpp/bt_factory.h"
// file that contains the custom nodes definitions
#include "dummy_nodes.h"
using namespace DummyNodes;
int main()
{
BehaviorTreeFactory factory;
factory.registerNodeType<SaySomething>("SaySomething");
factory.registerNodeType<ThinkWhatToSay>("ThinkWhatToSay");
auto tree = factory.createTreeFromFile("./my_tree.xml");
tree.tickWhileRunning();
return 0;
}
/* Expected output:
Robot says: hello
Robot says: The answer is 42
*/
注:所有接口通过 键名 连接,前提是 类型相同 ,否则将会报错。
3.4 具有泛型类型的接口
BehaviorTree.CPP支持将字符串转化为各种普通类型,例如 int long double bool 等。同时用户自己定义的数据类型也能很好地被支持。
比如:
 // We want to use this custom type
 struct Position2D
 {
   double x;
   double y;
 };
为了允许 XML 从 string 实例化需要的类型,我们需要提供模板特例,比如:
Position2D BT::convertFromString<Position2D>(StringView)
其中如何进行操作取决于我们要怎么样去处理该字符串,比如:
 // Template specialization to converts a string to Position2D.
 namespace BT
 {
     template <> inline Position2D convertFromString(StringView str)
     {
         // We expect real numbers separated by semicolons
         auto parts = splitString(str, ';');
         if (parts.size() != 2)
         {
             throw RuntimeError("invalid input)");
         }
         else{
             Position2D output;
             output.x     = convertFromString<double>(parts[0]);
             output.y     = convertFromString<double>(parts[1]);
             return output;
         }
     }
 } // end namespace BT
StringView str 是C++11的一种类型,我们也可以使用 std::string 和 const char *。
splitString 是BehaviorTree提供的一种简单函数,也可以使用其他函数,比如 boost::algorithm::split。
convertFromString<double>() 是公共模板的特殊化。
例程:
class CalculateGoal: public SyncActionNode
{
public:
CalculateGoal(const std::string& name, const NodeConfig& config):
SyncActionNode(name,config)
{}
static PortsList providedPorts()
{
return { OutputPort<Position2D>("goal") };
}
NodeStatus tick() override
{
Position2D mygoal = {1.1, 2.3};
setOutput<Position2D>("goal", mygoal);
return NodeStatus::SUCCESS;
}
};
class PrintTarget: public SyncActionNode
{
public:
PrintTarget(const std::string& name, const NodeConfig& config):
SyncActionNode(name,config)
{}
static PortsList providedPorts()
{
// Optionally, a port can have a human readable description
const char* description = "Simply print the goal on console...";
return { InputPort<Position2D>("target", description) };
}
NodeStatus tick() override
{
auto res = getInput<Position2D>("target");
if( !res )
{
throw RuntimeError("error reading port [target]:", res.error());
}
Position2D target = res.value();
printf("Target positions: [ %.1f, %.1f ]\n", target.x, target.y );
return NodeStatus::SUCCESS;
}
};
static const char* xml_text = R"(
<root BTCPP_format="4" >
<BehaviorTree ID="MainTree">
<Sequence name="root">
<CalculateGoal goal="{GoalPosition}" />
<PrintTarget target="{GoalPosition}" />
<Script code=" OtherGoal:='-1;3' " />
#直接采用内置操作将 otherGoal 条目放入 blackboard 中
<PrintTarget target="{OtherGoal}" />
</Sequence>
</BehaviorTree>
</root>
)";
int main()
{
BT::BehaviorTreeFactory factory;
factory.registerNodeType<CalculateGoal>("CalculateGoal");
factory.registerNodeType<PrintTarget>("PrintTarget");
auto tree = factory.createTreeFromText(xml_text);
tree.tickWhileRunning();
return 0;
}
/* Expected output:
Target positions: [ 1.1, 2.3 ]
Converting string: "-1;3"
Target positions: [ -1.0, 3.0 ]
*/
string 类型 和 自定义类型会在存储,读取过程中自动进行转化。(转换目的类型是我们的模板特例类型,库中自带了模板可直接使用,但是自定义类型要自己写convertFromString<T>()。
4. XML
4.1 架构
  <root BTCPP_format="4">
      <BehaviorTree ID="MainTree">
         <Sequence name="root_sequence">
             <SaySomething   name="action_hello" message="Hello"/>
             <OpenGripper    name="open_gripper"/>
             <ApproachObject name="approach_object"/>
             <CloseGripper   name="close_gripper"/>
         </Sequence>
      </BehaviorTree>
  </root>
树的第一个tag为 <root>.它至少应该包含1个tag.
这个tag应该有属性 <BehaviorTree>[ID].
每个树节点都应该有一个标签,特别的:
1.标签的名字用于 factory 中注册该节点。
2.Ports 时使用属性配置的。如 Saysomething message
在子女方面:ControlNode 包含1个到多个子项,DecoratorNode 包含1个子树,ActionNode 没有孩子。
4.2 Ports重新映射
  <root BTCPP_format="4" >
      <BehaviorTree ID="MainTree">
         <Sequence name="root_sequence">
             <SaySomething message="Hello"/>
             <SaySomething message="{my_message}"/>
         </Sequence>
      </BehaviorTree>
  </root>
可以在 xml 中使用 Ports 读取键值对。{key_name}
如例程中使用 message = “{my_message}” 来读取了blackboards 中的键值对。
4.3 紧凑(Compact)和显式(Explicit )的表示
以下种表示方式均正确:
  <SaySomething               name="action_hello" message="Hello World"/>
  <Action ID="SaySomething"   name="action_hello" message="Hello World"/>
第一为紧凑,第二种为显式。
以下为第一个例程用显式语法表达:
  <root BTCPP_format="4" >
      <BehaviorTree ID="MainTree">
         <Sequence name="root_sequence">
            <Action ID="SaySomething"   name="action_hello" message="Hello"/>
            <Action ID="OpenGripper"    name="open_gripper"/>
            <Action ID="ApproachObject" name="approach_object"/>
            <Action ID="CloseGripper"   name="close_gripper"/>
         </Sequence>
      </BehaviorTree>
  </root>
显然紧凑的更容易写,但是记录的TreeNode模型的信息较少。像 Groot 这样的工具需要显式的信息,我们可以通过 tag 来添加。如下:
  <root BTCPP_format="4" >
      <BehaviorTree ID="MainTree">
         <Sequence name="root_sequence">
            <SaySomething   name="action_hello" message="Hello"/>
            <OpenGripper    name="open_gripper"/>
            <ApproachObject name="approach_object"/>
            <CloseGripper   name="close_gripper"/>
         </Sequence>
     </BehaviorTree>

     <!-- the BT executor don't require this, but Groot does -->
     <TreeNodeModel>
         <Action ID="SaySomething">
             <input_port name="message" type="std::string" />
         </Action>
         <Action ID="OpenGripper"/>
         <Action ID="ApproachObject"/>
         <Action ID="CloseGripper"/>
     </TreeNodeModel>
  </root>
4.4 子树 Subtrees
为简化代码的复杂性,我们可以将一棵树作为子树放到另一棵树下。如下:
  <root BTCPP_format="4" >

      <BehaviorTree ID="MainTree">
         <Sequence>
            <Action  ID="SaySomething"  message="Hello World"/>
            <SubTree ID="GraspObject"/>
         </Sequence>
      </BehaviorTree>
      #简化起见没有加上属性 "name"
      <BehaviorTree ID="GraspObject">
         <Sequence>
            <Action ID="OpenGripper"/>
            <Action ID="ApproachObject"/>
            <Action ID="CloseGripper"/>
         </Sequence>
      </BehaviorTree>
  </root>
可以看出整棵树都在 saysomething动作后面。
4.5 包含外部文件
可以使用标签轻松做到这一点。
<include path="relative_or_absolute_path_to_file">
例程如下:
  <!-- file maintree.xml -->
  <root BTCPP_format="4" >

      <include path="grasp.xml"/> #这里

      <BehaviorTree ID="MainTree">
         <Sequence>
            <Action  ID="SaySomething"  message="Hello World"/>
            <SubTree ID="GraspObject"/>
         </Sequence>
      </BehaviorTree>
   </root>
  <!-- file grasp.xml -->
  <root BTCPP_format="4" >
      <BehaviorTree ID="GraspObject">
         <Sequence>
            <Action ID="OpenGripper"/>
            <Action ID="ApproachObject"/>
            <Action ID="CloseGripper"/>
         </Sequence>
      </BehaviorTree>
  </root>
如果要在ROS包下查找文件,可以使用以下语法:
<include ros_pkg="name_package" path="path_relative_to_pkg/grasp.xml"/>
5. 创建行为树
5.1 创建 ActionNode
推荐使用继承创建。
// Example of custom SyncActionNode (synchronous action)
// without ports.
class ApproachObject : public BT::SyncActionNode
{
public:
ApproachObject(const std::string& name) :
BT::SyncActionNode(name, {})
{}
// You must override the virtual function tick()
BT::NodeStatus tick() override
{
std::cout << "ApproachObject: " << this->name() << std::endl;
return BT::NodeStatus::SUCCESS;
}
};
注意:必须重写 tick()虚函数。
TreeNode的任何实例都有name,意在人类可读,没有什么实际意义。
方法 tick() 是实际操作发生的地方,它必须返回 NodeStatus
我们也可以使用给函子依赖注入来创建给定的 TreeNode,(其实就是直接将某个类中的函数作为拿出来作为树节点)。
函子要求具有以下签名之一:
 BT::NodeStatus myFunction()
 BT::NodeStatus myFunction(BT::TreeNode& self)
例如:
using namespace BT;
// Simple function that return a NodeStatus
BT::NodeStatus CheckBattery()
{
std::cout << "[ Battery: OK ]" << std::endl;
return BT::NodeStatus::SUCCESS;
}
// We want to wrap into an ActionNode the methods open() and close()
class GripperInterface
{
public:
GripperInterface(): _open(true) {}
NodeStatus open()
{
_open = true;
std::cout << "GripperInterface::open" << std::endl;
return NodeStatus::SUCCESS;
}
NodeStatus close()
{
std::cout << "GripperInterface::close" << std::endl;
_open = false;
return NodeStatus::SUCCESS;
}
private:
bool _open; // shared information
};
以上任意一个函子均可用于构建 SimpleActionNode 。(注意:不同类型的节点我们创建的方式也不同)。
5.2 使用 XML 动态创建树
以my_tree.xml为文件命名。
  <root BTCPP_format="4" >
      <BehaviorTree ID="MainTree">
         <Sequence name="root_sequence">
             <CheckBattery   name="check_battery"/>
             <OpenGripper    name="open_gripper"/>
             <ApproachObject name="approach_object"/>
             <CloseGripper   name="close_gripper"/>
         </Sequence>
      </BehaviorTree>
  </root>
还需要将自定义的树节点注册到 BehaviorTreeFactory 中,然后从文件或者文本中加载XML。
5.3 注册
XML 中使用的标识符的名字必须与树节点中注册的标识符一致。
#include "behaviortree_cpp/bt_factory.h"
// file that contains the custom nodes definitions
#include "dummy_nodes.h"
using namespace DummyNodes;
int main()
{
// We use the BehaviorTreeFactory to register our custom nodes
BehaviorTreeFactory factory;
//推荐使用的继承法创建
// The recommended way to create a Node is through inheritance.
factory.registerNodeType<ApproachObject>("ApproachObject");
//以下两种行为均为指针函子创建的节点的注册方式,注意和上述方式的不同
// Registering a SimpleActionNode using a function pointer.
// Here we prefer to use a lambda,but you can use std::bind too
// factory.registerSimpleCondition("CheckBattery", std::bind(&CheckBattery(), this));
factory.registerSimpleCondition("CheckBattery", [&](){ return CheckBattery(); });
// You can also create SimpleActionNodes using methods of a class.
//实际上也就调用回调函数的地方加了个类名
GripperInterface gripper;
factory.registerSimpleAction("OpenGripper", [&](){ return gripper.open(); } );
factory.registerSimpleAction("CloseGripper", [&](){ return gripper.close(); }
// Trees are created at deployment-time (i.e. at run-time, but only
// once at the beginning).
// IMPORTANT: when the object "tree" goes out of scope, all the
// TreeNodes are destroyed
auto tree = factory.createTreeFromFile("./my_tree.xml");
// To "execute" a Tree you need to "tick" it.
// The tick is propagated to the children based on the logic of the tree.
// In this case, the entire sequence is executed, because all the children
// of the Sequence return SUCCESS.
tree.tickWhileRunning();
return 0;
}
/* Expected output:
*
[ Battery: OK ]
GripperInterface::open
ApproachObject: approach_object
GripperInterface::close
*/
6. 反应式(Reactive) 和 异步行为(Asynchronous)
异步操作 : 一个需要很长时间才能完成,并且会返回运行未满足标准。
按理说它应该具有以下要求:
它不应该阻塞方法太多时间,应尽快返回执行流。
如果调用 halt() 函数,应尽快终止该异步操作。
6.1 有状态异步操作 (StatefulAsyncAction)
此模式在 请求-答复模式中特别有用,当操作向另一个进程发送异步请求时 , 需要定期检查是否已收到回复,根据该回复它将返回成功或者失败。
StatefulAsyncAction 的派生类必须重写以下虚拟方法 , 而不是tick()。
-
NodeStatus onStart():当节点处于空闲状态时调用。 它可能会立即成功或失败,或者返回正在运行。在后一种情况下, 下次 tick 收到答复时,该方法将被执行。
-
NodeStatus onRunning():当节点处于 RUNNING 状态时调用。 返回新状态
onRunning。 -
void onHalted():当该节点被树上的另一个节点中断时执行。
例程:
// Custom type
struct Pose2D
{
double x, y, theta;
};
namespace chr = std::chrono;
class MoveBaseAction : public BT::StatefulAsyncAction
{
public:
// Any TreeNode with ports must have a constructor with this signature
MoveBaseAction(const std::string& name, const BT::NodeConfig& config)
: StatefulAsyncAction(name, config)
{}
// It is mandatory to define this static method.
static BT::PortsList providedPorts()
{
return{ BT::InputPort<Pose2D>("goal") };
}
// this function is invoked once at the beginning.
BT::NodeStatus onStart() override;
// If onStart() returned RUNNING, we will keep calling
// this method until it return something different from RUNNING
BT::NodeStatus onRunning() override;
// callback to execute if the action was aborted by another node
void onHalted() override;
private:
Pose2D _goal;
chr::system_clock::time_point _completion_time;
};
//-------------------------
BT::NodeStatus MoveBaseAction::onStart()
{
if ( !getInput<Pose2D>("goal", _goal))
{
throw BT::RuntimeError("missing required input [goal]");
}
printf("[ MoveBase: SEND REQUEST ]. goal: x=%f y=%f theta=%f\n",
_goal.x, _goal.y, _goal.theta);
// We use this counter to simulate an action that takes a certain
// amount of time to be completed (200 ms)
_completion_time = chr::system_clock::now() + chr::milliseconds(220);
return BT::NodeStatus::RUNNING;
}
BT::NodeStatus MoveBaseAction::onRunning()
{
//假设我们一直检查是否收到了答复
// Pretend that we are checking if the reply has been received
// you don't want to block inside this function too much time.
std::this_thread::sleep_for(chr::milliseconds(10));
// Pretend that, after a certain amount of time,
// we have completed the operation
if(chr::system_clock::now() >= _completion_time)
{
std::cout << "[ MoveBase: FINISHED ]" << std::endl;
return BT::NodeStatus::SUCCESS;
}
return BT::NodeStatus::RUNNING;
}
void MoveBaseAction::onHalted()
{
printf("[ MoveBase: ABORTED ]");
}
6.2 Sequence VS ReactiveSequence
例程:
  <root BTCPP_format="4">
      <BehaviorTree>
         <Sequence>
             <BatteryOK/>
             <SaySomething   message="mission started..." />
             <MoveBase           goal="1;2;3"/>
             <SaySomething   message="mission completed!" />
         </Sequence>
      </BehaviorTree>
  </root>
int main()
{
BT::BehaviorTreeFactory factory;
factory.registerSimpleCondition("BatteryOK", std::bind(CheckBattery));
factory.registerNodeType<MoveBaseAction>("MoveBase");
factory.registerNodeType<SaySomething>("SaySomething");
auto tree = factory.createTreeFromText(xml_text);
// Here, instead of tree.tickWhileRunning(),
// we prefer our own loop.
std::cout << "--- ticking\n";
status = tree.tickWhileRunning();
std::cout << "--- status: " << toStr(status) << "\n\n";
while(status == NodeStatus::RUNNING)
{
// Sleep to avoid busy loops.
// do NOT use other sleep functions!
// Small sleep time is OK, here we use a large one only to
// have less messages on the console.
tree.sleep(std::chrono::milliseconds(100));
std::cout << "--- ticking\n";
status = tree.tickOnce();
std::cout << "--- status: " << toStr(status) << "\n\n";
}
return 0;
}
Expected output:
--- ticking [ Battery: OK ] --- status: RUNNING --- ticking Robot says: mission started... --- status: RUNNING --- ticking [ MoveBase: SEND REQUEST ]. goal: x=1.0 y=2.0 theta=3.0 --- status: RUNNING --- ticking --- status: RUNNING --- ticking [ MoveBase: FINISHED ] Robot says: mission completed! --- status: SUCCESS
显然在这个 Sequence 中 , 我们的 BattertOK 只跑了一次,然后便一直在 tick MoveBase .
而如果使用 ReactiveSequence ,则会每次都跑 BattertOK 。
例程:
  <root>
      <BehaviorTree>
         <ReactiveSequence>
             <BatteryOK/>
             <Sequence>
                 <SaySomething   message="mission started..." />
                 <MoveBase           goal="1;2;3"/>
                 <SaySomething   message="mission completed!" />
             </Sequence>
         </ReactiveSequence>
      </BehaviorTree>
  </root>
--- ticking [ Battery: OK ] Robot says: mission started... --- status: RUNNING --- ticking [ Battery: OK ] [ MoveBase: SEND REQUEST ]. goal: x=1.0 y=2.0 theta=3.0 --- status: RUNNING --- ticking [ Battery: OK ] --- status: RUNNING --- ticking [ Battery: OK ] [ MoveBase: FINISHED ] Robot says: mission completed! --- status: SUCCESS
注:即使每次从头开始,中间的 MoveBase 节点也一直在运行,这就是异步操作的效果,如果不是异步操作,则由于运行时间短于 tick() ,必定失败。
注: 推荐使用 tree.sleep() 而不是 std::this_thread::sleep_for() ,因为前者在树中该方法被调用的时候能够被打断 TreeNode::emitStateChanged().
7. 子树组合
通过在XML插入小树组合成为大树能使我们的代码复用性提高。
例程:
XML
<root BTCPP_format="4"> <BehaviorTree ID="MainTree"> <Sequence> <Fallback> <Inverter> <IsDoorClosed/> </Inverter> <SubTree ID="DoorClosed"/> #!!!!!!!!!!!!!!!!!!!!!! </Fallback> <PassThroughDoor/> </Sequence> </BehaviorTree> <BehaviorTree ID="DoorClosed"> <Fallback> <OpenDoor/> <RetryUntilSuccessful num_attempts="5"> <PickLock/> </RetryUntilSuccessful> <SmashDoor/> </Fallback> </BehaviorTree> </root>
CPP:
class CrossDoor
{
public:
void registerNodes(BT::BehaviorTreeFactory& factory);
// SUCCESS if _door_open == true
BT::NodeStatus isDoorClosed();
// SUCCESS if _door_open == true
BT::NodeStatus passThroughDoor();
// After 3 attempts, will open a locked door
BT::NodeStatus pickLock();
// FAILURE if door locked
BT::NodeStatus openDoor();
// WILL always open a door
BT::NodeStatus smashDoor();
private:
bool _door_open = false;
bool _door_locked = true;
int _pick_attempts = 0;
};
// Helper method to make registering less painful for the user
void CrossDoor::registerNodes(BT::BehaviorTreeFactory &factory)
{
factory.registerSimpleCondition(
"IsDoorClosed", std::bind(&CrossDoor::isDoorClosed, this));
factory.registerSimpleAction(
"PassThroughDoor", std::bind(&CrossDoor::passThroughDoor, this));
factory.registerSimpleAction(
"OpenDoor", std::bind(&CrossDoor::openDoor, this));
factory.registerSimpleAction(
"PickLock", std::bind(&CrossDoor::pickLock, this));
factory.registerSimpleCondition(
"SmashDoor", std::bind(&CrossDoor::smashDoor, this));
}
int main()
{
BehaviorTreeFactory factory;
CrossDoor cross_door;
cross_door.registerNodes(factory);
// In this example a single XML contains multiple <BehaviorTree>
// To determine which one is the "main one", we should first register
//为了确定哪颗树是中心树,我们需要将它首先加入工厂。
// the XML and then allocate a specific tree, using its ID
factory.registerBehaviorTreeFromText(xml_text);
auto tree = factory.createTree("MainTree");
// helper function to print the tree
printTreeRecursively(tree.rootNode());
tree.tickWhileRunning();
return 0;
}
8.重映射子树端口
为了避免在一棵非常大的树中,各种树之间发生冲突,我们需要将树的接口显式地连接到那些子树中。
注:整个过程在 XML 文件中实现。
注: move_goal 和 result 为 接口 ; move_result 和 target 为 keyname
所以是:子树的 keyname 对应主树的 接口 ; 子树的 接口 对应主树的的 keyname
XML
<root BTCPP_format="4">
<BehaviorTree ID="MainTree">
<Sequence>
<Script script=" move_goal='1;2;3' " />
<SubTree ID="MoveRobot" target="{move_goal}" #!!!!!!!!!!!!!!!
result="{move_result}" /> #!!!!!!!!!!!!!!
<SaySomething message="{move_result}"/>
</Sequence>
</BehaviorTree>
<BehaviorTree ID="MoveRobot">
<Fallback>
<Sequence>
<MoveBase goal="{target}"/>
<Script script=" result:='goal reached' " />
</Sequence>
<ForceFailure>
<Script script=" result:='error' " />
</ForceFailure>
</Fallback>
</BehaviorTree>
</root>
cpp
int main()
{
BT::BehaviorTreeFactory factory;
factory.registerNodeType<SaySomething>("SaySomething");
factory.registerNodeType<MoveBaseAction>("MoveBase");
factory.registerBehaviorTreeFromText(xml_text);
auto tree = factory.createTree("MainTree");
// Keep ticking until the end
tree.tickWhileRunning();
// let's visualize some information about the current state of the blackboards.
std::cout << "\n------ First BB ------" << std::endl;
tree.subtrees[0]->blackboard->debugMessage();
std::cout << "\n------ Second BB------" << std::endl;
tree.subtrees[1]->blackboard->debugMessage();
return 0;
}
/* Expected output:
------ First BB ------
move_result (std::string)
move_goal (Pose2D)
------ Second BB------
[result] remapped to port of parent tree [move_result]
[target] remapped to port of parent tree [move_goal]
*/
注:并没有做什么改变,我们这里只是检查一下 blackboard 的值。
9. 使用多个XML文件
随着子树的增加,使用多个 XML 文件会很简单。
例程
subtree_A.xml:
 <root>
     <BehaviorTree ID="SubTreeA">
         <SaySomething message="Executing Sub_A" />
     </BehaviorTree>
 </root>
subtree_B.xml:
 <root>
     <BehaviorTree ID="SubTreeB">
         <SaySomething message="Executing Sub_B" />
     </BehaviorTree>
 </root>
9.1 手动在 CPP 中加载多个文件
假设一个 main_tree.xml ,它应该包含另外两个XML文件中的两个子树,则我们有两种方式来创建,分别是修改CPP文件和修改 XML 文件:
 <root>
     <BehaviorTree ID="MainTree">
         <Sequence>
             <SaySomething message="starting MainTree" />
             <SubTree ID="SubTreeA" />
             <SubTree ID="SubTreeB" />
         </Sequence>
     </BehaviorTree>
 <root>
需要手动添加多个文件
int main()
{
BT::BehaviorTreeFactory factory;
factory.registerNodeType<DummyNodes::SaySomething>("SaySomething");
//找到文件夹下的所有 XML 文件并注册他们
// Find all the XML files in a folder and register all of them.
// We will use std::filesystem::directory_iterator
std::string search_directory = "./";
using std::filesystem::directory_iterator;
for (auto const& entry : directory_iterator(search_directory))
{
if( entry.path().extension() == ".xml")
{
//注册!!!!!!!!!!!!!!
factory.registerBehaviorTreeFromFile(entry.path().string());
}
}
// This, in our specific case, would be equivalent to
// factory.registerBehaviorTreeFromFile("./main_tree.xml");
// factory.registerBehaviorTreeFromFile("./subtree_A.xml");
// factory.registerBehaviorTreeFromFile("./subtree_B.xml");
//创建主树,其他子树将会被自动添加到主树中
// You can create the MainTree and the subtrees will be added automatically.
std::cout << "----- MainTree tick ----" << std::endl;
auto main_tree = factory.createTree("MainTree");
main_tree.tickWhileRunning();
// ... or you can create only one of the subtrees
std::cout << "----- SubA tick ----" << std::endl;
auto subA_tree = factory.createTree("SubTreeA");
subA_tree.tickWhileRunning();
return 0;
}
/* Expected output:
Registered BehaviorTrees:
- MainTree
- SubTreeA
- SubTreeB
----- MainTree tick ----
Robot says: starting MainTree
Robot says: Executing Sub_A
Robot says: Executing Sub_B
----- SubA tick ----
Robot says: Executing Sub_A
9.2 在XML添加文件
也可以在XML文件中显式的添加我们的构建子树。
 <root BTCPP_format="4">
     <include path="./subtree_A.xml" />  #!!!!!!!!!!!!!!!!!!!!!!!!!!
     <include path="./subtree_B.xml" />   #!!!!!!!!!!!!!!!!!!!!!!!!!!!
     <BehaviorTree ID="MainTree">
         <Sequence>
             <SaySomething message="starting MainTree" />
             <SubTree ID="SubTreeA" />
             <SubTree ID="SubTreeB" />
         </Sequence>
     </BehaviorTree>
 <root>
然后就可以像往常一样创建树:
factory.createTreeFromFile("main_tree.xml")
10. 向函数中添加其他参数(argument)
目前我们被迫的使用了
MyCustomNode(const std::string& name, const NodeConfig& config);
构造函数,但是我们希望能够使用其他参数。
注:理论上可以用 blackboard来实现这一点,但若满足以下所有条件,则强烈建议不要使用它:
1.参数在部署时是已知的。
2.参数在运行时不会更改。
3.不需要从XML中设置参数。
10.1 向构造函数添加参数(参数)
实例
我们以 Action_A为例自定义节点。向其中传入三个额外的参数,不限于内置类型。
// Action_A has a different constructor than the default one.
class Action_A: public SyncActionNode
{
public:
// additional arguments passed to the constructor
Action_A(const std::string& name, const NodeConfig& config,
int arg_int, std::string arg_str ):
SyncActionNode(name, config),
_arg1(arg_int),
_arg2(arg_str) {}
// this example doesn't require any port
static PortsList providedPorts() { return {}; }
// tick() can access the private members
NodeStatus tick() override;
private:
int _arg1;
std::string _arg2;
};
然后进行注册:
BT::BehaviorTreeFactory factory;
factory.registerNodeType<Action_A>("Action_A", 42, "hello world");
// If you prefer to specify the template parameters
// factory.registerNodeType<Action_A, int , std::string>("Action_A", 42, "hello world");
10.2 使用“初始化”方法
有时候需要将不同的值传递给节点类型的单个实例,我们需要考虑以下模式:
实际上是利用内部函数传到了类成员变量上。
class Action_B: public SyncActionNode
{
public:
// The constructor looks as usual.
Action_B(const std::string& name, const NodeConfig& config):
SyncActionNode(name, config) {}
// We want this method to be called ONCE and BEFORE the first tick()
void initialize( int arg_int, const std::string& arg_str_ )
{
_arg1 = arg_int;
_arg2 = arg_str_;
}
// this example doesn't require any port
static PortsList providedPorts() { return {}; }
// tick() can access the private members
NodeStatus tick() override;
private:
int _arg1;
std::string _arg2;
};
我们注册和初始化Action_B的方式是不同的:
BT::BehaviorTreeFactory factory;
// Register as usual, but we still need to initialize
factory.registerNodeType<Action_B>( "Action_B" );
// Create the whole tree. Instances of Action_B are not initialized yet
auto tree = factory.createTreeFromText(xml_text);
// visitor will initialize the instances of
auto visitor = [](TreeNode* node)
{
if (auto action_B_node = dynamic_cast<Action_B*>(node))
{
action_B_node->initialize(69, "interesting_value");
}
};
// Apply the visitor to ALL the nodes of the tree
tree.applyVisitor(visitor);
11. 脚本
使用脚本允许我们快速地 读取/写入 blackboard 变量。
11.1 赋值运算符、字符串和数字
实例
 param_A := 42    #将数字 42 分配给黑板入口param_A。
 param_B = 3.14     #将数字 3.14 分配给黑板入口param_B。
 message = 'hello world'   #将字符串“hello world”分配给黑板条目消息。
运算符“:=”和“=”之间的区别在于前者 如果不存在,可能会在黑板中创建一个新条目,而后者会抛出异常 , 如果黑板不包含条目,则为例外。
还可以使用分号添加多个 单个脚本中的命令。、
A:= 42; B:=24
11.2 算术运算符和括号
实例
 param_A := 7
 param_B := 5
 param_B *= 2      #结果为 10
 param_C := (param_A * 3) + param_B   #结果为 31
支持以下运算符:
| 算子 | 分配运算符 | 描述 |
|---|---|---|
| + | += | 加 |
| - | -= | 减去 |
| * | *= | 乘 |
| / | /= | 分 |
注意:加法运算符是唯一也适用于字符串(用于连接两个字符串)的运算符。
11.3 按位运算符和十六进制数
仅当值可以转换为一个整数时使用。
实例
 value:= 0x7F
 val_A:= value & 0x0F    #0x0F(或15)
 val_B:= value | 0xF0    #0xFF(或255)
| 二元运算符 | 描述 |
|---|---|
| | | 按位或 |
| & | 按位和 |
| ^ | 按位异或 |
| 一元运算符 | 描述 |
|---|---|
| ~ | 否定 |
11.4 逻辑和比较运算符
返回布尔值的运算符。
 val_A := true
 val_B := 5 > 3
 val_C := (val_A == val_B)
 val_D := (val_A && val_B) || !val_C
| 运营商 | 描述 |
|---|---|
| 对/假 | 布尔 值。铸件分别为 1 和 0 |
| && | 逻辑和 |
| || | 逻辑或 |
| ! | 否定 |
| == | 平等 |
| != | 不等式 |
| < | 少 |
| <= | 不太平等 |
| > | 大 |
| >= | 更大的平等 |
11.5 三元运算符if-then-else
val_B = (val_A > 1) ? 42 : 24
11.6 实例
脚本语言演示,包括如何使用枚举 表示整数值。
xml
 <root >
     <BehaviorTree>
         <Sequence>
             <Script code=" msg:='hello world' " />
             <Script code=" A:=THE_ANSWER; B:=3.14; color:=RED " />
             <Precondition if="A>B && color!=BLUE" else="FAILURE">
                 <Sequence>
                   <SaySomething message="{A}"/>
                   <SaySomething message="{B}"/>
                   <SaySomething message="{msg}"/>
                   <SaySomething message="{color}"/>
                 </Sequence>
             </Precondition>
         </Sequence>
     </BehaviorTree>
 </root>
c++
int main()
{
// Simple tree: a sequence of two asynchronous actions,
// but the second will be halted because of the timeout.
BehaviorTreeFactory factory;
factory.registerNodeType<SaySomething>("SaySomething");
enum Color { RED=1, BLUE=2, GREEN=3 };
// We can add these enums to the scripting language
factory.registerScriptingEnums<Color>();
// Or we can do it manually
factory.registerScriptingEnum("THE_ANSWER", 42);
auto tree = factory.createTreeFromText(xml_text);
tree.tickWhileRunning();
return 0;
}
产出
 Robot says: 42.000000
 Robot says: 3.140000
 Robot says: hello world
 Robot says: 1.000000
12 前置和后置条件
可以再 tick()之前或者之后运行的脚本
所有节点都支持前置和后置条件,并且 不需要对C++代码进行任何修改。
12.1 前置条件
| 名字 | 描述 |
|---|---|
| _skipIf | 如果条件为 true,则跳过此节点的执行 |
| _failureIf | 如果条件为真true,跳过并返回失败 |
| _successIf | 如果条件为 true, 跳过并返回成功 |
| _while | 与 _skipIf 相同,但如果条件变为 false,也可能中断正在运行的节点。 |
实例
之前的版本:
 <Fallback>
     <Inverter>
         <IsDoorClosed/>
     </Inverter>
     <OpenDoor/>
 </Fallback>
现在我们可以用下例替换掉 IsDoorOpen
<OpenDoor _skipIf="!door_closed"/>
12.2 后置条件
| 名字 | 描述 |
|---|---|
| _onSuccess | 如果节点返回成功,则执行此脚本 |
| _onFailure | 如果节点返回失败,则执行此脚本 |
| _onHalted | 如果正在运行的节点已停止,则执行 |
| _while | 如果节点返回成功或失败,则执行脚本 |
则是之前的例程,我们用脚本来更改。
原本XML
 <Fallback>
     <Sequence>
         <MoveBase  goal="{target}"/>
         <SetBlackboard output_key="result" value="0" />
     </Sequence>
     <ForceFailure>
         <SetBlackboard output_key="result" value="-1" />
     </ForceFailure>
 </Fallback>
新加内容:
 <MoveBase goal="{target}"
           _onSuccess="result:=OK"
           _onFailure="result:=ERROR"/>
12.3 设计模式:error_code
行为树相较于状态机来说,困难在于要根据Action的结果执行不同的策略。因为行为树限制于返回成功和失败,可能不够直观。
解决方案是将结果/错误代码存储在 blackboard中 ,但这在 3.X 版本中很麻烦。
前提条件可以帮助我们实现更具可读性的代码,如下所示:
在上面的树中,我们向MoveBase添加了一个输出端口进行返回,我们将根据error_code的值来选取不同的分支。
12.4 设计模式:states and declarative trees
行为树如果没有状态,我们将很难推理逻辑。
使用状态可以使我们的树更容易理解。例如,我们可以在特定状态进入某一个树的分支。
当且仅当目前状态为 DO_LANDING 才会进入节点,同时当altitude下降到一定值后状态会切到 LANDED 。
注:这种模式另一个作用是,我们制作的节点更具声明性,即更容易将此特定节点/子树移动到树的不同部分。
13. 异步操作
清晰 异步"Asynchronous" Actions 和 同步 "Synchronous" Actions 的区别。
清晰 并发Concurrency 和 并行性Parallelism 的区别。
13.1 并发 与 并行
并发是指两个或多个任务可以在重叠的时间段内启动、运行和完成。 这并不一定意味着它们会在同一时刻运行。
并行性是指任务在不同的线程中同时运行,例如,在多核处理器上。
BT.CPP 同时执行所有节点,换句话说:
-
树的执行引擎是单线程的。
-
所有方法均按顺序执行。
tick() -
如果任何方法被阻塞,整个执行流将被阻塞。
tick()
我们通过“并发”和异步执行来实现反应行为。
换句话说,需要很长时间才能执行的操作应该尽快返回状态“正在运行”。同时我们需要再次勾选该节点,以了解状态是否更改(轮询)。
异步节点可以将此长时间执行委托给另一个进程 (使用进程间通信)或其他线程。
13.2 异步 和 同步
通常,异步节点是:
-
勾选时,可能会返回“正在运行”而不是“成功”或“失败”。
-
可以在调用
halt()时尽快停止。
通常,方法halt()必须由开发人员实现。
当树执行返回 RUNNING 的异步操作时, 该状态通常向后传播,并考虑整个树处于“正在运行”状态。
在下面的示例中,“ActionE”是异步且正在运行;
当 一个节点返回正在运行时,通常,它的父节点也返回正在运行。
让我们考虑一个简单的“SleepNode”。一个好的入门模板是 有状态异步操作。
using namespace std::chrono;
// Example of Asynchronous node that uses StatefulActionNode as base class
class SleepNode : public BT::StatefulAsyncAction
{
public:
SleepNode(const std::string& name, const BT::NodeConfig& config)
: BT::StatefulAsyncAction(name, config)
{}
static BT::PortsList providedPorts()
{
// amount of milliseconds that we want to sleep
return{ BT::InputPort<int>("msec") };
}
NodeStatus onStart() override
{
int msec = 0;
getInput("msec", msec);
if( msec <= 0 ) {
// No need to go into the RUNNING state
return NodeStatus::SUCCESS;
}
else {
// once the deadline is reached, we will return SUCCESS.
deadline_ = system_clock::now() + milliseconds(msec);
return NodeStatus::RUNNING;
}
}
/// method invoked by an action in the RUNNING state.
NodeStatus onRunning() override
{
if ( system_clock::now() >= deadline_ ) {
return NodeStatus::SUCCESS;
}
else {
return NodeStatus::RUNNING;
}
}
void onHalted() override
{
// nothing to do here...
std::cout << "SleepNode interrupted" << std::endl;
}
private:
system_clock::time_point deadline_;
};
在上面的代码中:
-
当第一次勾选 SleepNode时,将执行该方法
onStart()。 如果睡眠时间为 0,这可能会立即返回 SUCCESS,否则将返回 RUNNING。 -
我们应该继续循环打勾树
onRunning()。这将调用可能再次返回 RUNNING 或最终返回 SUCCESS 的方法。 -
另一个节点可能会触发信号。在这种情况下,该方法将被停止。
halt() onHalted()。
13.3 避免阻止树的执行
SleepNode 的错误实现如下:
// This is the synchronous version of the Node. Probably not what we want.
class BadSleepNode : public BT::ActionNodeBase
{
public:
BadSleepNode(const std::string& name, const BT::NodeConfig& config)
: BT::ActionNodeBase(name, config)
{}
static BT::PortsList providedPorts()
{
return{ BT::InputPort<int>("msec") };
}
NodeStatus tick() override
{
//单线程无限睡眠,卡住啦!!!!!!!
int msec = 0;
getInput("msec", msec);
// This blocking function will FREEZE the entire tree :(
std::this_thread::sleep_for( milliseconds(msec) );
return NodeStatus::SUCCESS;
}
void halt() override
{
// No one can invoke this method because I froze the tree.
// Even if this method COULD be executed, there is no way I can
// interrupt std::this_thread::sleep_for()
}
};
13.4 多线程的问题
在早期,生成一个新线程看起来像是构建异步操作的好解决方案。
但其实它并不好,原因有很多:
-
以线程安全的方式访问
blackboard更难(稍后会详细介绍)。 -
可能不需要。
-
我们仍然有责任“以某种方式”
halt()停止该线程并在某种情况下快速停止该线程 该方法被调用。
出于这个原因,通常不鼓励用户使用基类BT::ThreadedAction。让我们再来看看SleepNode。
// This will spawn its own thread. But it still has problems when halted
class BadSleepNode : public BT::ThreadedAction
{
public:
BadSleepNode(const std::string& name, const BT::NodeConfig& config)
: BT::ActionNodeBase(name, config)
{}
static BT::PortsList providedPorts()
{
return{ BT::InputPort<int>("msec") };
}
NodeStatus tick() override
{
//当前代码结束了,但我开的线程仍在运行,并且无法去停止
// This code runs in its own thread, therefore the Tree is still running.
// This seems good but the thread still can't be aborted
int msec = 0;
getInput("msec", msec);
std::this_thread::sleep_for( std::chrono::milliseconds(msec) );
return NodeStatus::SUCCESS;
}
// The halt() method can not kill the spawned thread :(
};
正确的版本是:
// I will create my own thread here, for no good reason
class ThreadedSleepNode : public BT::ThreadedAction
{
public:
ThreadedSleepNode(const std::string& name, const BT::NodeConfig& config)
: BT::ActionNodeBase(name, config)
{}
static BT::PortsList providedPorts()
{
return{ BT::InputPort<int>("msec") };
}
NodeStatus tick() override
{
// This code run in its own thread, therefore the Tree is still running.
int msec = 0;
getInput("msec", msec);
using namespace std::chrono;
const auto deadline = system_clock::now() + milliseconds(msec);
//一直检查,并且设置一个最大时间
// periodically check isHaltRequested()
// and sleep for a small amount of time only (1 millisecond)
while( !isHaltRequested() && system_clock::now() < deadline )
{
std::this_thread::sleep_for( std::chrono::milliseconds(1) );
}
return NodeStatus::SUCCESS;
}
// The halt() method will set isHaltRequested() to true
// and stop the while loop in the spawned thread.
};
这看起来比我们一开始实现的版本更复杂。 在某些情况下,此模式仍然有用,但必须记住,引入多线程使事情变得更加复杂,默认情况下应避免使用BT::StatefulActionNode。
13.5 高级示例:客户端/服务器通信
我们通常使用BT.CPP 在不同的进程中执行实际任务。
在 ROS 中执行此操作的典型(也是推荐的)方法是使用ActionLib。
ActionLib 提供了正确实现异步行为所需的 API:
-
用于启动操作的非阻塞函数。
-
一种监视操作当前执行状态的方法。
-
检索结果或错误消息的方法。
-
抢占/中止正在执行的操作的能力。
这些操作都不是“阻塞”的,因此我们不需要生成自己的线程。

旨在为数千万中国开发者提供一个无缝且高效的云端环境,以支持学习、使用和贡献开源项目。
更多推荐


 37
37 0
0- 0


 已为社区贡献1条内容

所有评论(0)