Uniapp——使用安卓原生插件
uniapp安卓原生插件
·
Uniapp——使用安卓原生插件
- 1. 开发环境
- 2. 解压SDK压缩包
- 3. 导入UniPlugin-Hello-AS项目、并切换为project显示
- 4. 可删除提供的demo文件
- 5. 新建module、并在build.gradle文件添加组件
- 6. 修改test-module项目文件
- 7. 新建UniTestModule.java
- 8. 编译项目、生成arr包
- 8. 新建uniapp项目、并在目录中增加新建插件目录
- 9. 把编译后的arr文件放进android文件夹中、并配置package.json文件
- 10. 页面引入test-module模块并使用
- 11. 使用安卓原生调试项目
- (1) 生成本地打包APP资源
- (2)生成后点击文件目录、复制__UNI__*****文件夹
- (3)复制__UNI__*****文件夹后,放入安卓APP项目apps目录中
- (4)登录DCloud开发者中心、在我的应用找到新建的项目、或创建一个应用
- (5)配置离线打包Key管理
- (6)Android证书签名SHA1生成并填入
- (7)把生成的文件放入安卓项目中,并配置build.gradle--signingConfigs--config
- (8)保存后复制安卓App Key 替换 项目AndroidManifest.xml中dcloud_appkey
- (9)修改dcloud_control.xml文件中的appid
- (10)修改dcloud_uniplugins.json
- (11)build.gradle文件中添加test-module组件
- (12)运行项目
- 12. Uniapp真机调试
1. 开发环境
- JAVA环境 jdk1.8
- Android Studio 下载地址:https://developer.android.google.cn/studio/index.html
- App离线SDK下载:https://nativesupport.dcloud.net.cn/AppDocs/download/android
- HBuilderX 下载地址:https://www.dcloud.io/hbuilderx.html
- Uniapp官方文档:https://nativesupport.dcloud.net.cn/NativePlugin/README
2. 解压SDK压缩包

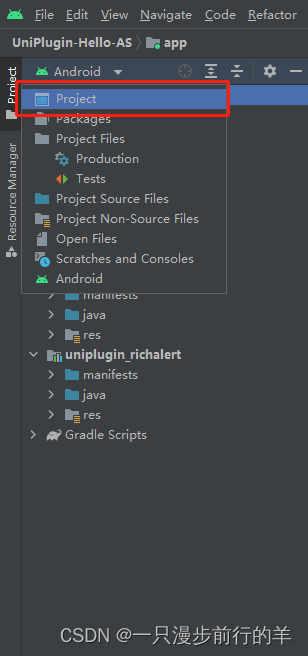
3. 导入UniPlugin-Hello-AS项目、并切换为project显示
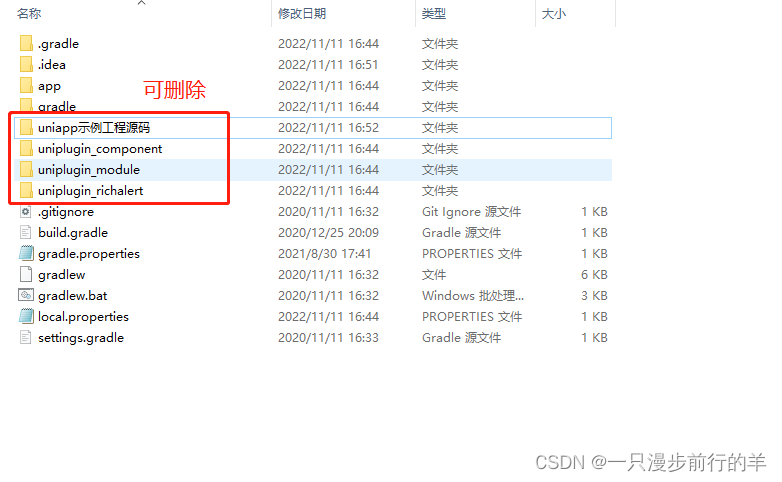
4. 可删除提供的demo文件
删除build.gradle插件

删除settings.gradle 设置

刷新一下项目

加载一下依赖
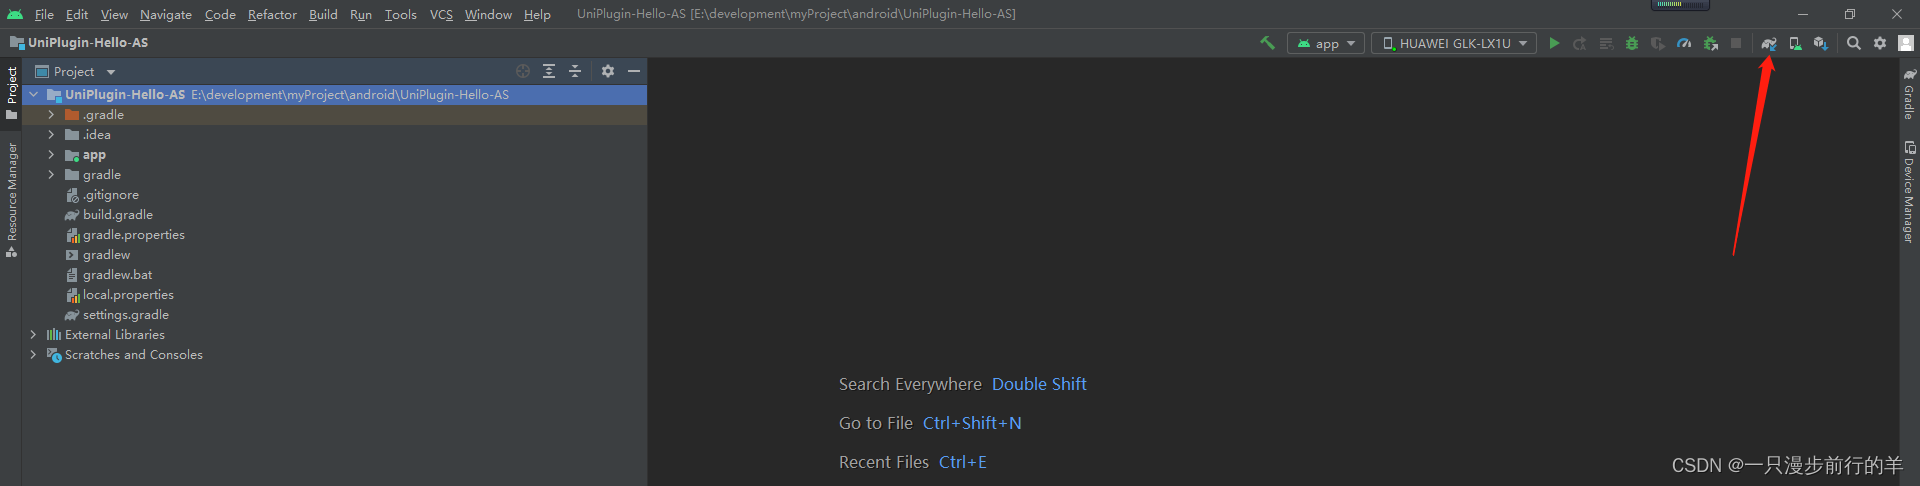
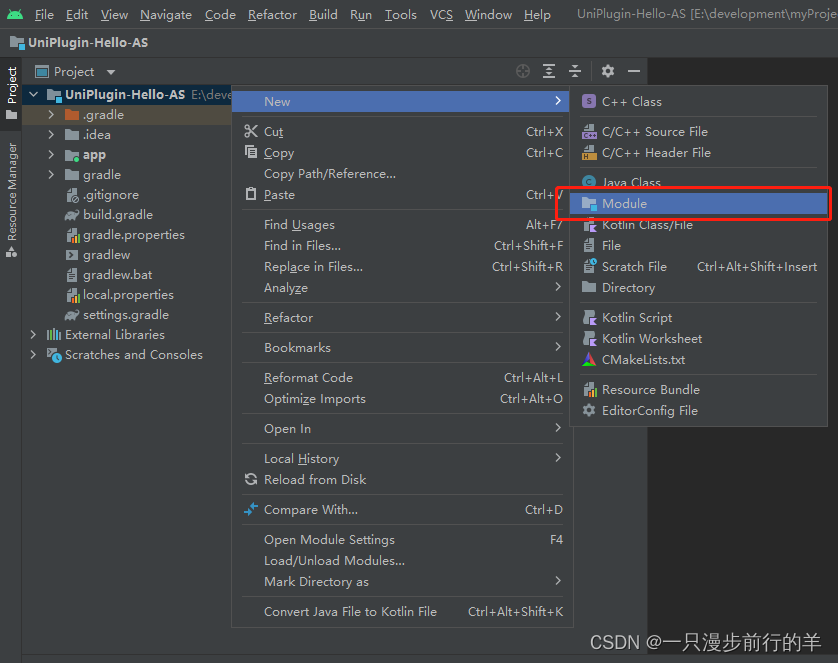
5. 新建module、并在build.gradle文件添加组件

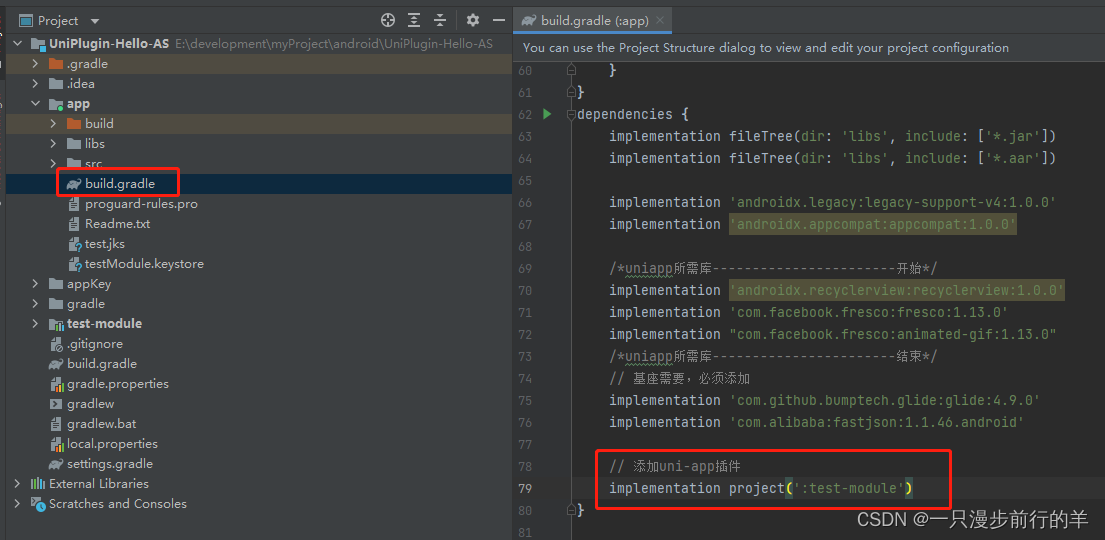
6. 修改test-module项目文件
test-module – build.gradle
apply plugin: 'com.android.library'

android {
    compileSdkVersion 29
    defaultConfig {
        minSdkVersion 16
        targetSdkVersion 28
        versionCode 1
        versionName "1.0"

        testInstrumentationRunner 'androidx.test.runner.AndroidJUnitRunner'

    }

    buildTypes {
        release {
            minifyEnabled false
            proguardFiles getDefaultProguardFile('proguard-android.txt'), 'proguard-rules.pro'
        }
    }

}

repositories {
    flatDir {
        dirs 'libs'
    }
}

dependencies {
    compileOnly fileTree(dir: 'libs', include: ['*.jar'])

    compileOnly fileTree(dir: '../app/libs', include: ['uniapp-v8-release.aar'])

    compileOnly 'androidx.recyclerview:recyclerview:1.0.0'
    compileOnly 'androidx.legacy:legacy-support-v4:1.0.0'
    compileOnly 'androidx.appcompat:appcompat:1.0.0'
    implementation 'com.alibaba:fastjson:1.1.46.android'
    implementation 'com.facebook.fresco:fresco:1.13.0'

    /*implementation 'com.android.support:appcompat-v7:28.0.0'
    testImplementation 'junit:junit:4.12'
    androidTestImplementation 'com.android.support.test:runner:1.0.2'
    androidTestImplementation 'com.android.support.test.espresso:espresso-core:3.0.2'*/
}
test-module – AndroidManifest.xml
<manifest xmlns:android="http://schemas.android.com/apk/res/android"
    package="com.example.test_module" />
修改完后再重写加载一下依赖
7. 新建UniTestModule.java
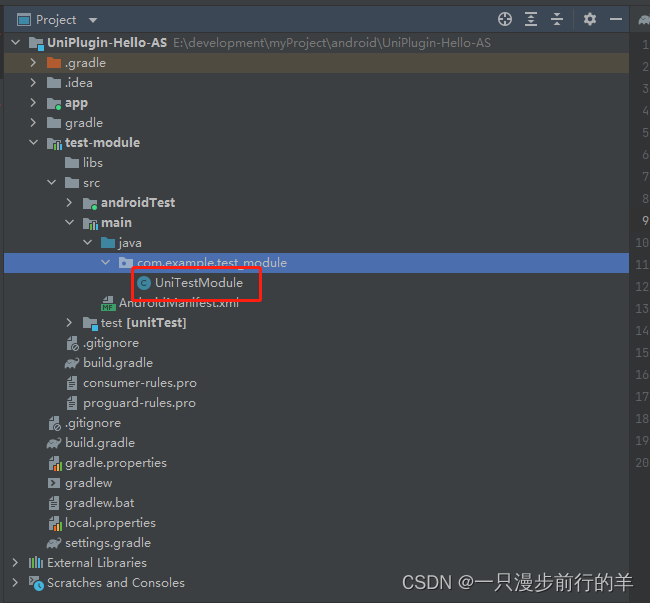
public class UniTestModule extends UniModule {

    @UniJSMethod(uiThread = false)
    public void testAsyncFunc(JSONObject options, UniJSCallback callback) {
        if(callback != null) {
            JSONObject data = new JSONObject();
            data.put("code", "success");
            callback.invoke(data);
        }
    }
}
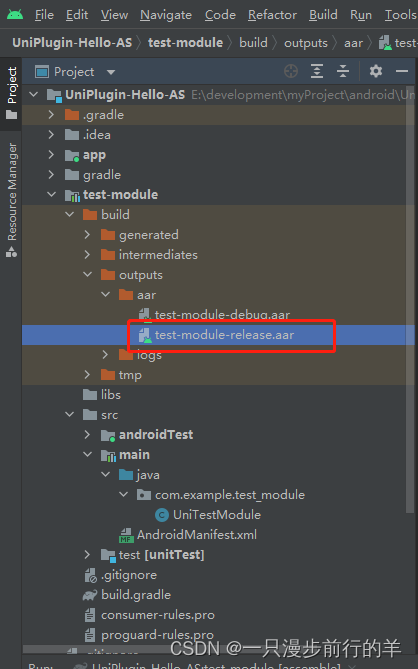
8. 编译项目、生成arr包

8. 新建uniapp项目、并在目录中增加新建插件目录
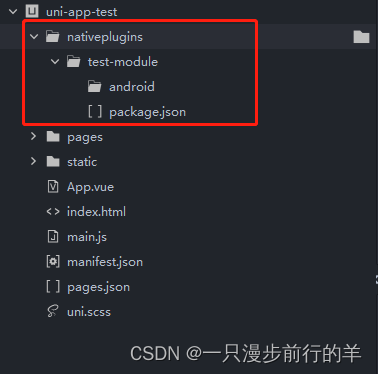
9. 把编译后的arr文件放进android文件夹中、并配置package.json文件
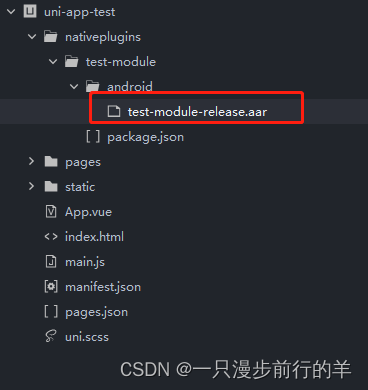
package.json 文件
{
	"name": "test-module",
	"id": "test-module",
	"version": "1.0.0",
	"description": "内置插件",
	"_dp_type": "nativeplugin",
	"_dp_nativeplugin": {
		"android": {
			"plugins": [{
				"type": "module", //module 或 component类型
				"name": "test-module", //注册名称 和后续uniapp项目模块导入名字一致
				"class": "com.example.test_module.UniTestModule" //原生项目实体类完整名称
			}],
			"integrateType": "aar",
			"abis": []
		}
	}
}
10. 页面引入test-module模块并使用
<template>
	<view>
		<button @click="handleTest">测试按钮</button>
		<view>
			返回信息:{{result}}
		</view>
	</view>
</template>

<script>
	const testModule = uni.requireNativePlugin('test-module')

	export default {
		data() {
			return {
				result:""
			}
		},
		onLoad() {

		},
		methods: {
			handleTest(){
				const param = {name:"张三"}
				testModule.testAsyncFunc(param,(res)=>{
					this.result = JSON.stringify(res)
				})
			}
		}
	}
</script>
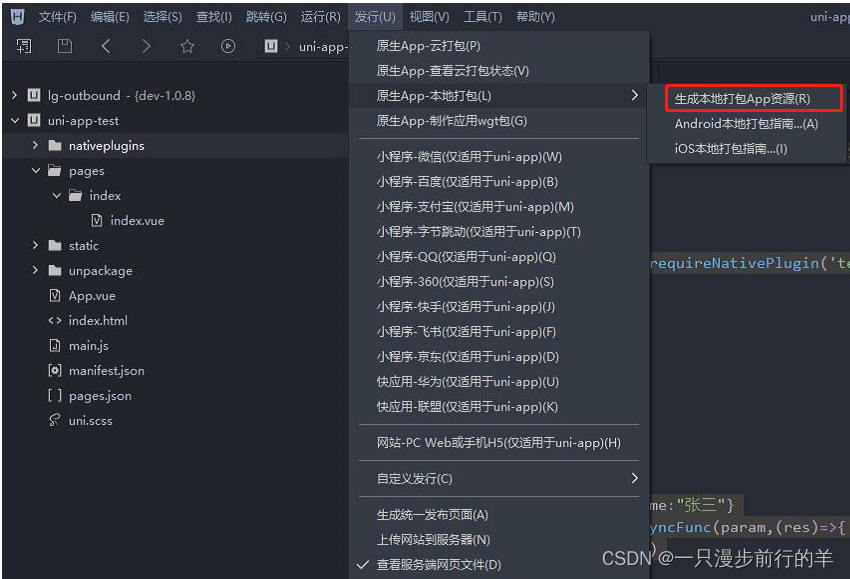
11. 使用安卓原生调试项目
(1) 生成本地打包APP资源
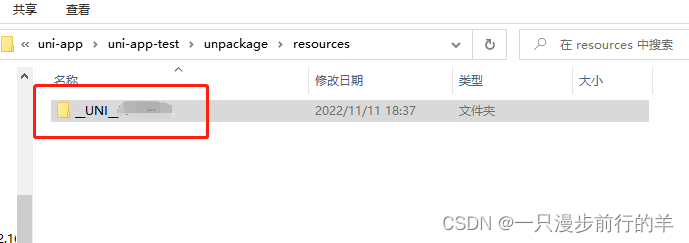
(2)生成后点击文件目录、复制__UNI__*****文件夹

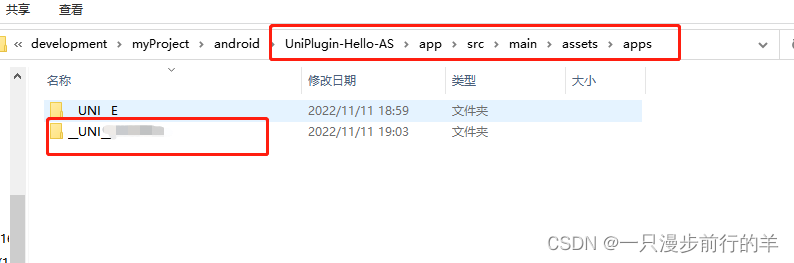
(3)复制__UNI__*****文件夹后,放入安卓APP项目apps目录中
(4)登录DCloud开发者中心、在我的应用找到新建的项目、或创建一个应用
DCloud开发者中心:https://dev.dcloud.net.cn/

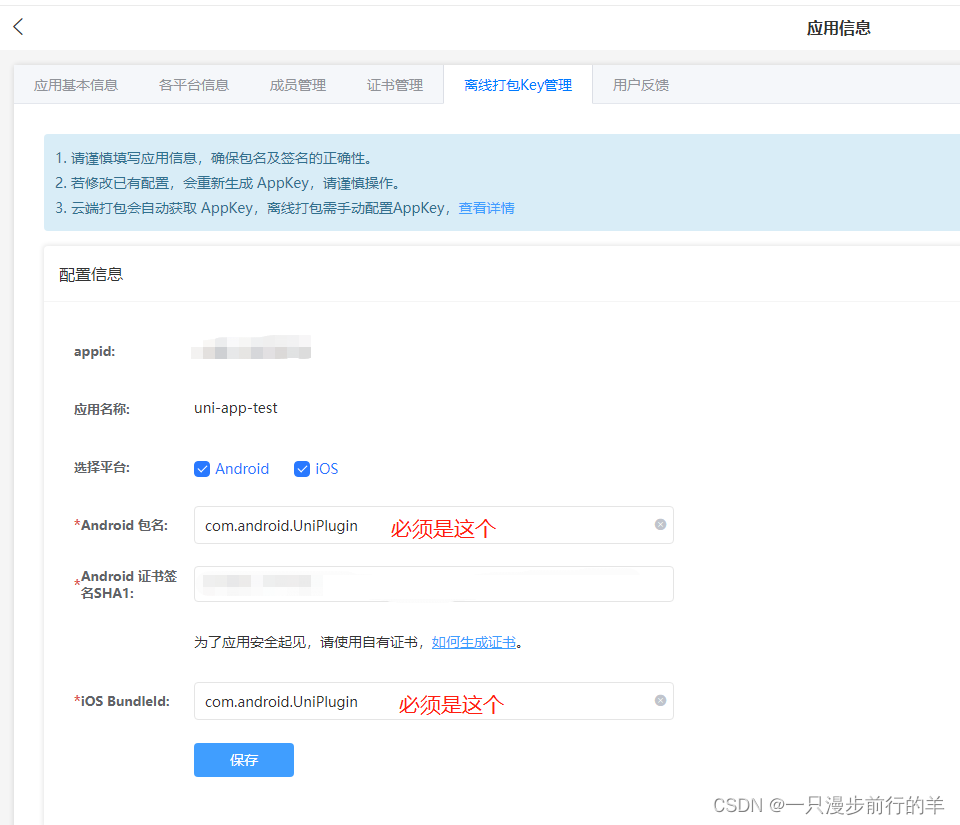
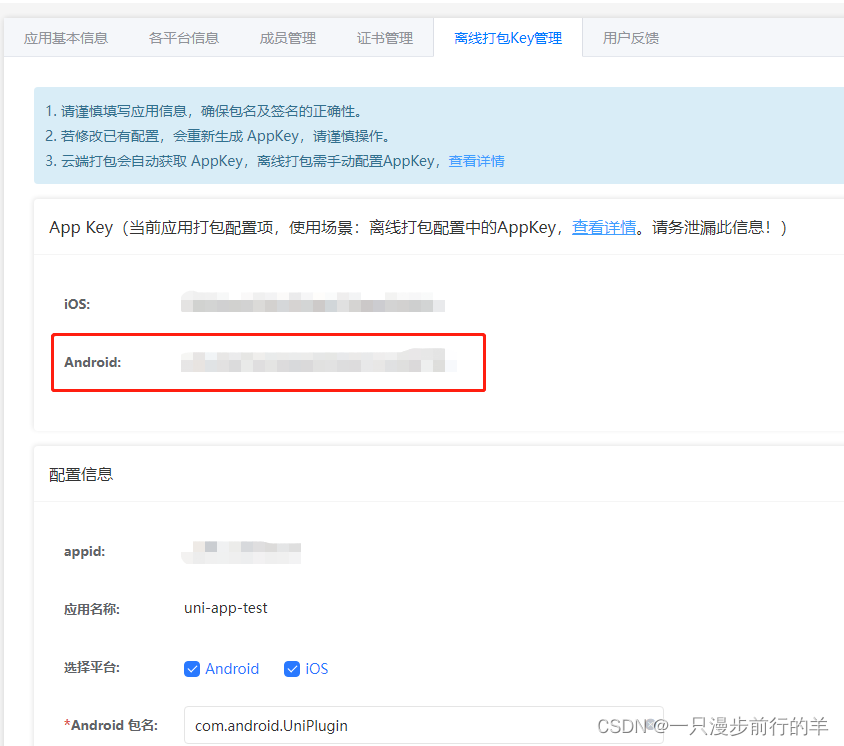
(5)配置离线打包Key管理
android 包名 与 ios 一致为:com.android.UniPlugin
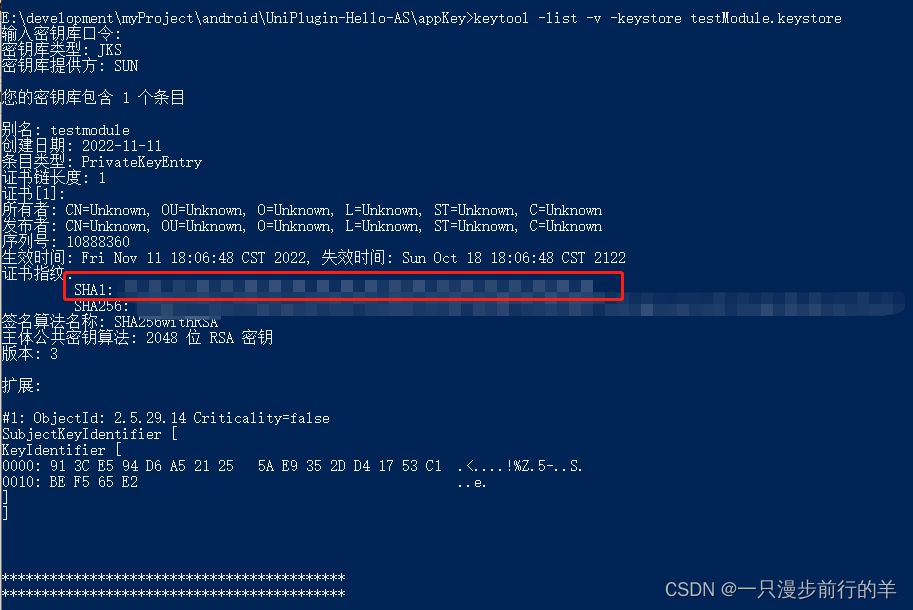
(6)Android证书签名SHA1生成并填入
生成步骤教程:https://blog.csdn.net/qq812457115/article/details/126011332
(7)把生成的文件放入安卓项目中,并配置build.gradle–signingConfigs–config

(8)保存后复制安卓App Key 替换 项目AndroidManifest.xml中dcloud_appkey

(9)修改dcloud_control.xml文件中的appid


(10)修改dcloud_uniplugins.json

{
  "nativePlugins": [
    {
      "plugins": [
        {
          "type": "module",
          "name": "test-module",
          "class": "com.example.test_module.UniTestModule"
        }
      ]
    }
  ]
}
(11)build.gradle文件中添加test-module组件
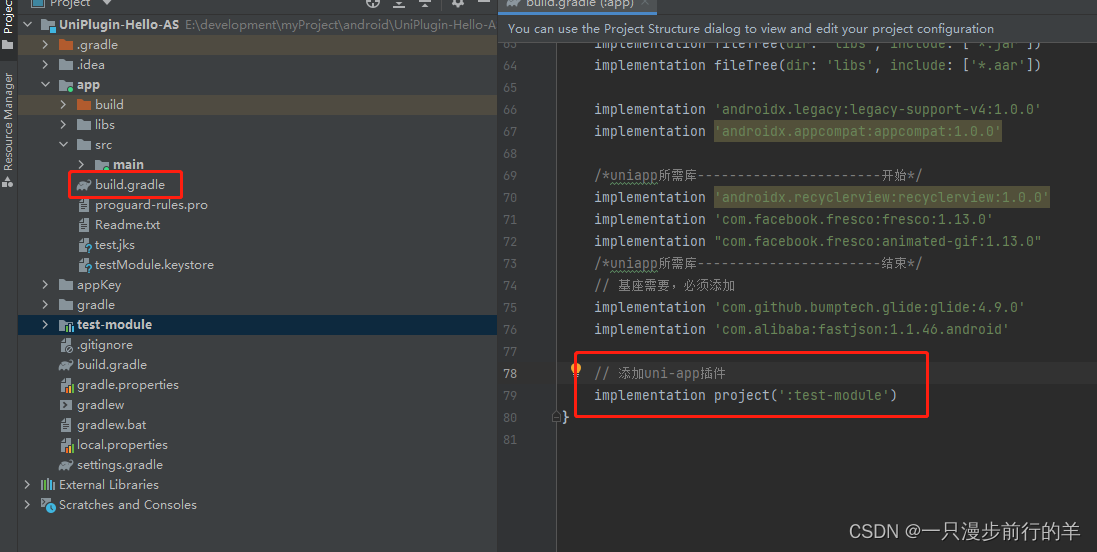
重新加载一下依赖
(12)运行项目


12. Uniapp真机调试
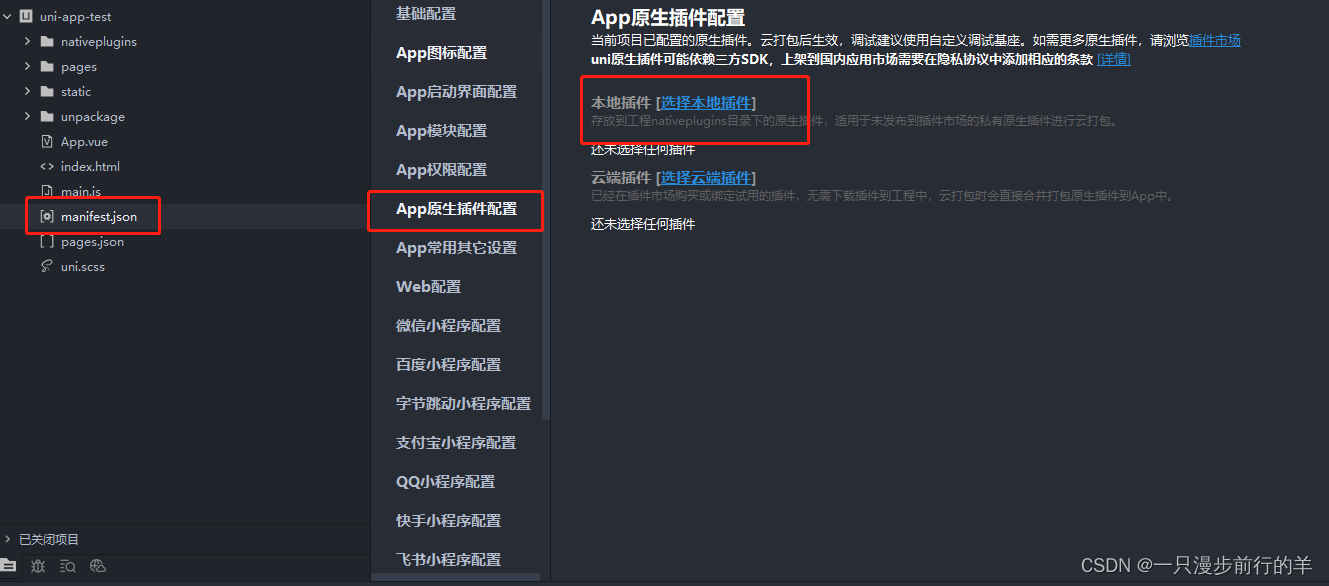
(1)配置本地插件,点击:manifest.json文件 – App原生插件配置 – 选择本地插件
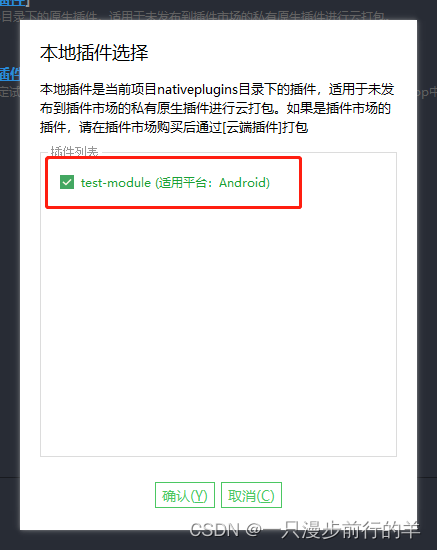
(2)勾选插件,确定
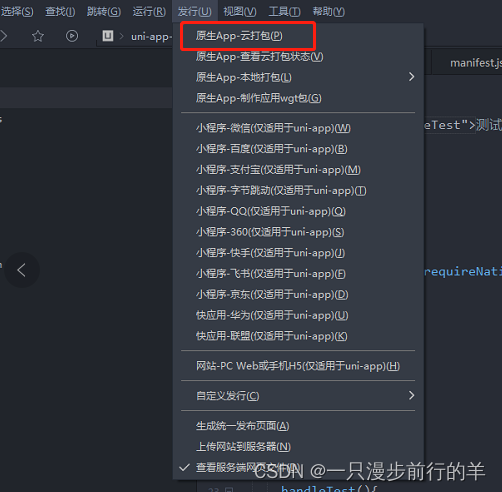
(3)打自定义调试基座,点击:发行 – 原生APP-云打包
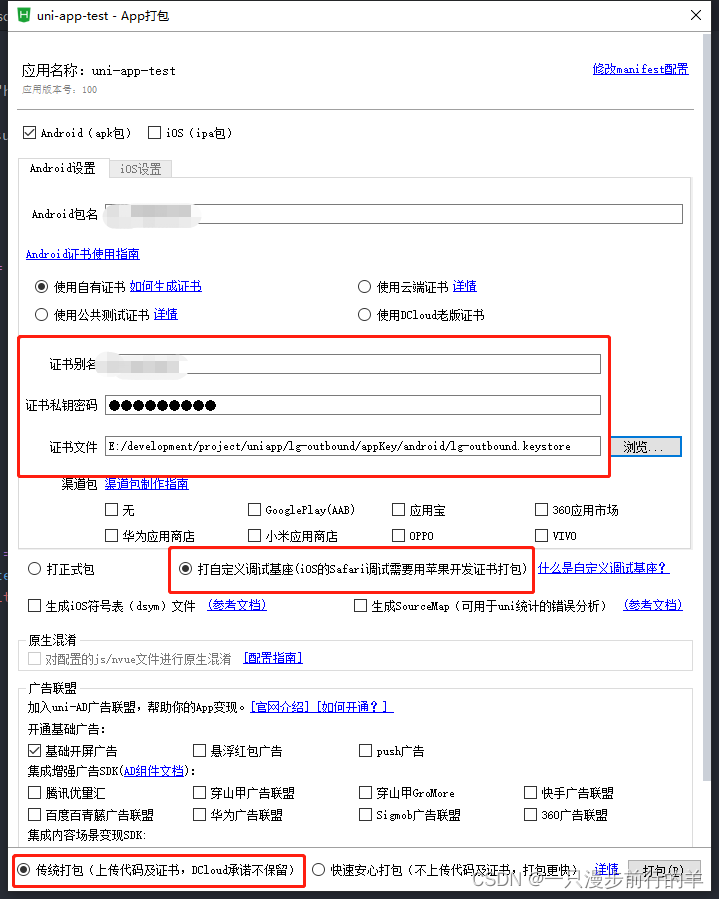
(4)填写证书信息、勾选打自定义调试基座、打包
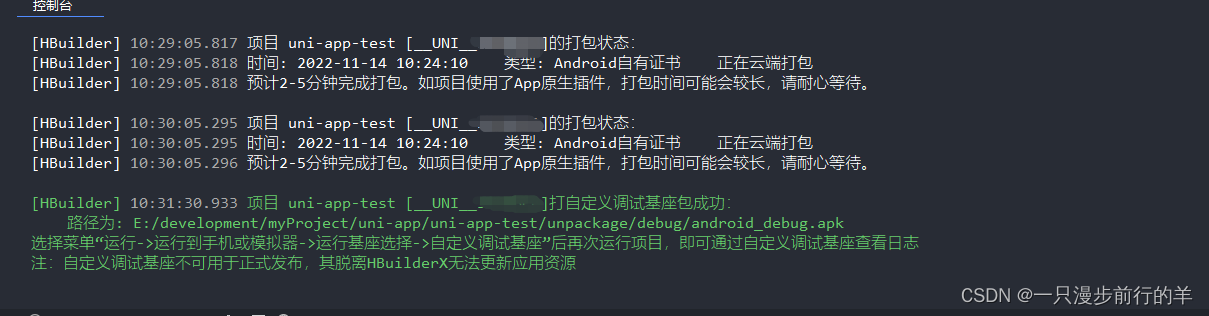
(5)打包成功后、连接安卓手机、点击:运行 – 运行到手机或模拟器 – 运行到Android App 基座

(6)勾选运行自定义基座 – 运行


为开发者提供学习成长、分享交流、生态实践、资源工具等服务,帮助开发者快速成长。
更多推荐


 5
5 0
0- 0


 已为社区贡献8条内容

所有评论(0)