基于vite中<script lang=‘ts‘ setup></script>使用
1. 发展历程> ##### 注意多个script使用时 lang的值要一致- **方法二:**unplugin-vue-define-options插件第一步:安装,安装的方式很常规,就是npm的安装```javascriptnpm install unplugin-vue-define-options -D第二步:集成,找到vite.config.ts文件,加入插件unplugin-vu
1. 发展历程
> ##### 注意多个script使用时 lang的值要一致


- **方法二:**unplugin-vue-define-options插件

第一步:安装,安装的方式很常规,就是npm的安装
```javascript
npm install unplugin-vue-define-options -D
第二步:集成,找到vite.config.ts文件,加入插件unplugin-vue-define-options
import { defineConfig } from 'vite';
import vue from '@vitejs/plugin-vue';

import DefineOptions from 'unplugin-vue-define-options/vite';

// https://vitejs.dev/config/
export default defineConfig({
  plugins: [vue(), DefineOptions()],
});
第三步:集成完成之后,那么可以直接使用了,
<template>
  <button> </button>
</template>

<script lang="ts" setup>
  defineOptions({
    name: 'TButton',
  });
</script>

<style scoped></style>
问题:
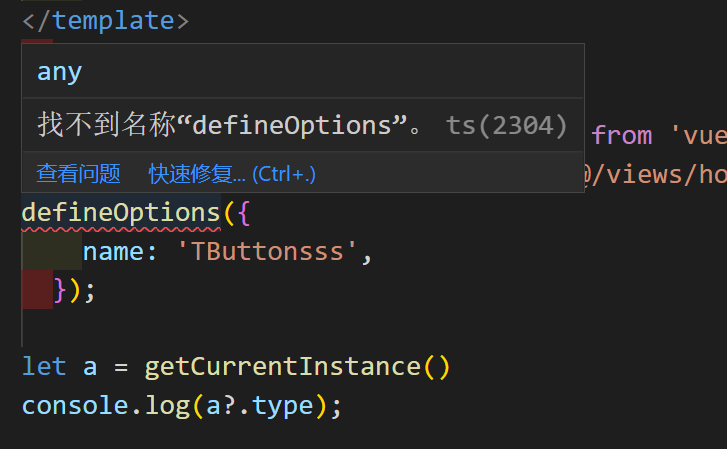
解决:
在项目tsconfig.json文件下**
"compilerOptions": {
   "types": [
      "unplugin-vue-define-options/macros-global"
    ],
}
- **方法三: **使用 vite-plugin-vue-setup-extend插件
第一步:安装,安装的方式很常规,就是npm的安装
npm install vite-plugin-vue-setup-extend -D
第二步:集成,找到vite.config.ts文件,加入插件vite-plugin-vue-setup-extend
import { defineConfig } from 'vite'
import vue from '@vitejs/plugin-vue'
import vueSetupExtend from 'vite-plugin-vue-setup-extend'

export default defineConfig({
  plugins: [vue(), vueSetupExtend()]
})
第三步:.vue文件的setup中直接使用name属性
<script setup lang="ts" name="Layout">

</script>
<template>
  <div>layout</div>
</template>

<style lang="less" scoped></style>
2. 全局编译器宏
- 在
如果你使用eslint ,会报错你没有导入
解决:
// 项目根目录下的 .eslintrc.js
module.exports = {
  // 原来的lint规则,补充下面的globals...
  globals: {
    defineProps: 'readonly',
    defineEmits: 'readonly',
    defineExpose: 'readonly',
    withDefaults: 'readonly',
  },
}
1. defineProps
获取组件传值(defineProps 接收的对象和组件选项 props 的值一样)
<template>
  <h1>{{ msg }}</h1>
  <div>{{ title }}</div>
</template>

<script setup lang="ts">
interface ListItem {
  name: string
  age: number
}

const props = defineProps<{
  msg: string
  title?: string
  list?: ListItem[]
}>()

</script>
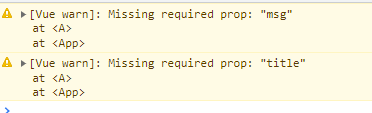
定义类型可以用,?来定义可以不传值,没有?是必传,组件会报错的
注意:
不要定义和 defineProps 的属性同名的顶层变量。
defineProps里面的变量不能与当前组件定义变量重名,当前组件定义变量重会覆盖defineProps里面的变量
如果想使用当前defineProps的变量和当前组件变量重名,可以重新一个定义新的变量接收defineProps里面的变量
- 组件A
<template>
  <h1>{{ msg }}</h1>
  <div>{{ title }}</div>
</template>

<script setup lang="ts">
import { ref } from "vue";
interface ListItem {
  name: string
  age: number
}
 defineProps<{
  msg: string
  title?: string
  list?: ListItem[]
}>()
let msg = ref<string|undefined>("我你")

</script>
- 引用组件A的组件
<template>
  <A :msg="'SADSA'" />
</template>
<script setup lang="ts">
import A from "./components/A.vue";
</script>

<style scoped>
</style>
**页面输出:**我你
解决:
<template>
  <h1>{{ msg }}</h1>
  <h1>{{ props.msg }}</h1>
  <div>{{ title }}</div>
</template>

<script setup lang="ts">
import { ref } from "vue";
interface ListItem {
  name: string
  age: number
}
const props = defineProps<{
  msg: string
  title?: string
  list?: ListItem[]
}>()
let msg = ref<string|undefined>("我你")

</script>
从上面实例代码中可以发现 TS 写法里 props 没有定义默认值。
2. withDefaults
给 props 提供默认值
语法
withDefaults(defineProps<{}>(),{})
第二个参数便是默认参数设置,会被编译为运行时 props 的 default 选项
<template>
  <h1>{{ msg }}</h1>
  <div>{{ title }}</div>
</template>

<script setup lang="ts">

withDefaults(defineProps<{
  msg: string
  title: string
}>(),{
  msg:"哈哈哈",
  title:"学习中ing",
})

</script>
当组件defineProps有默认值时,控制台还是会出现警告时
那是因为,msg和title都是必传值
如果想非必传
<template>
  <h1>{{ msg }}</h1>
  <div>{{ title }}</div>
</template>

<script setup lang="ts">

withDefaults(defineProps<{
  msg?: string
  title?: string
}>(),{
  msg:"哈哈哈",
  title:"学习中ing",
})


</script>
就没有警告了
3. defineEmits
子组件向父组件事件传递
- 父组件
<template>
  <div>11</div>
  <A @changeMsg="changeMsg" @changeMsg1="changeMsg1" />
</template>
<script setup lang="ts">
import A from "./components/A.vue";

const  changeMsg = (value:string)=>{
  console.log(value);

}
const  changeMsg1 = (value:string)=>{
  console.log(value);

}


</script>

<style scoped>
</style>
- 子组件
<template>
  <button @click="handleChangeMsg">向父组件传值</button>
  <button @click="handleChangeMsg1">向父组件传值1</button>
</template>

<script setup lang="ts">

const emits = defineEmits<{
  (e: 'changeMsg', value: string): void,
  (e: 'changeMsg1', value: string): void,
}>()
const handleChangeMsg = () => {
  emits('changeMsg', '子组件传过来的值:Hello TS')
}
const handleChangeMsg1 = () => {
  emits('changeMsg1', '子组件传过来的值12312312:Hello TS123123')
}


</script>
4. defineExpose
可以显式地暴露需要暴露的组件中声明的变量和方法
<template>
  <div></div>
  <A ref="root" />
  <button @click="hanldeClick">点击</button>
</template>
<script setup lang="ts">
import A from "./components/A.vue";

import {ref} from "vue"

let root = ref<InstanceType<typeof A>|null>(null)

// let root = ref<any|null>(null)

const hanldeClick = ()=>{
  console.log(root.value?.title);
 root.value?.handleChangeMsg()

}
</script>

<style scoped>
</style>
<template>

</template>

<script setup lang="ts">
import { ref } from "vue";
let title = ref<string>("主题")

const handleChangeMsg = ():void => {
  console.log(666);
}
// 对外暴露的属性
defineExpose({
  title,
  handleChangeMsg,
})


</script>
3. 辅助函数
在
1. useAttrs
在模板中使用 $attrs 来访问 attrs 数据
与 Vue2 相比,Vue3 的 $attrs 还包含了 class 和 style 属性
- 父组件
<template>
    <grandson class="shuai" id="noce" style="font-weight: 600;" />
</template>

<script setup lang='ts'>
import grandson from "./grandson.vue"


</script>
<style lang='scss' scoped>

</style>
- 子组件
<!-- 孙子组件 -->
<template>
     <!-- 模板使用 -->
    <!-- 模板使用 -->
    <div>{{$attrs}}</div>
    <div>{{$attrs.id}}</div>
    <div>{{$attrs.class}}</div>
    <div>{{useAtt.id}}</div>
    <div>{{useAtt.class}}</div>
</template>

<script setup lang='ts'>
import { useAttrs} from 'vue'
const useAtt = useAttrs()
console.log("获取组件上的属性",useAtt);


</script>
<style lang='scss' scoped>

</style>
模板使用 :
- 模板使用 $attrs
- 变量引用 useAtt.xxx
2. useSlots
slots可以获取父组件中插槽传递的虚拟Dom对象。
在模板中使用 $slots 来访问 slots 数据。
在
- 父组件
<script setup>
import HelloWorld from './components/HelloWorld.vue'
</script>

<template>
  <HelloWorld>
    <div>默认插槽</div>
    <template v-slot:footer>
      <div>具名插槽footer</div>
    </template>
  </HelloWorld>
</template>
- 子组件
<script setup>
import { useSlots } from 'vue'

const slots = useSlots()
// 在js中访问插槽默认插槽default、具名插槽footer
console.log(slots.default)
console.log(slots.footer)
</script>

<template>
  <div>
    <!-- 在模板中使用插槽 -->
    <slot></slot>
    <slot name="footer"></slot>
  </div>
</template>
4. useCssModule
在 Vue3 中,也是支持 CSS Modules 的,在
<script setup lang="ts">
import { useCssModule } from 'vue'

// 不传递参数,获取<style module>代码块编译后的css类对象
const style = useCssModule()
console.log(style.success)  // 获取到的是success类名经过 hash 计算后的类名

// 传递参数content,获取<style module="content">代码块编译后的css类对象
const contentStyle = useCssModule('content')
</script>

<template>
  <div class="success">普通style red</div>

  <div :class="$style.success">默认CssModule pink</div>
  <div :class="style.success">默认CssModule pink</div>

  <div :class="contentStyle.success">具名CssModule blue</div>
  <div :class="content.success">具名CssModule blue</div>
</template>

<!-- 普通style -->
<style>
.success {
  color: red;
}
</style>

<!-- 无值的css module -->
<style module lang="less">
.success {
  color: pink;
}
</style>

<!-- 具名的css module -->
<style module="content" lang="less">
.success {
  color: blue;
}
</style>
注意,同名的CSS Module,后面的会覆盖前面的。
5. 组件
在组件选项中,模板需要使用组件(除了全局组件),需要在 components 选项中注册。
而在
6. 状态驱动的动态 CSS
Vue3 中
<script setup>
const theme = {
  color: 'red'
}
</script>

<template>
  <p>hello</p>
</template>

<style scoped>
p {
  // 使用顶层绑定
  color: v-bind('theme.color');
}
</style>
7. 自定义指令
这里讲的是组件上,自定义局部指令
<script setup>
import { ref } from 'vue'
const total = ref(10)

// 自定义指令
// 必须以 小写字母v开头的小驼峰 的格式来命名本地自定义指令
// 在模板中使用时,需要用中划线的格式表示,不可直接使用vMyDirective
const vMyDirective = {
  beforeMount: (el, binding, vnode) => {
    el.style.borderColor = 'red'
  },
  updated(el, binding, vnode) {
    if (el.value % 2 !== 0) {
      el.style.borderColor = 'blue'
    } else {
      el.style.borderColor = 'red'
    }
  },
}

const add = () => {
  total.value++
}
</script>

<template>
  <input :value="total" v-my-directive />
  <button @click="add">add+1</button>
</template>
导入的指令:
<script setup>
// 导入的指令同样需要满足命名规范
import { directive as vClickOutside } from 'v-click-outside'
</script>

<template>
  <div v-click-outside>tang</div>
</template
8. getCurrentInstance
在 vue2 中,我们用 this 访问组件的实例,在 vue3 的 setup() 选项或
<script setup>
import { getCurrentInstance, ref, onMounted } from 'vue'
import HelloWorld from './components/HelloWorld.vue'

// 获取当前组件的实例对象,相当于 vue2 的 this
const instance = getCurrentInstance()
console.log(instance)

// 获取 HelloWorld 组件实例
const helloWorld = ref(null)

onMounted(() => {
  console.log(instance.$el)
  console.log(helloWorld.value.$el)
  helloWorld.value.$el.setAttribute('data-name', '定义name');
})
</script>

<template>
  <div>标题</div>
  <HelloWorld title="11" ref="helloWorld" />
</template>
注意:
- 请不要把它当作在组合式 API 中获取 this 的替代方案来使用。
- getCurrentInstance 只能在 setup 或生命周期钩子中调用。
最后建议:
- 严格按照TS规范来要求自己
- 不要与Vue2配置混用,Vue2配置能在setup访问,但Vue3不能访问Vue2的配置
- 如果Vue2和Vue3混用,而且都定义重名的变量与方法,Vue3优先级大于Vue2。
- 建议vue3就别用vue2来写项目,防止不可解决的BUG

Vue社区为您提供最前沿的新闻资讯和知识内容
更多推荐


 0
0 0
0- 0


 已为社区贡献2条内容

所有评论(0)