配置vscode C语言运行环境(保姆级教程)
新建一个文件夹 .vscode(注意前面有个点)和一个以.c为结尾的c语言程序
·
首先是安装一个软件,安装完成之后就需要配置了
因为VSCode不能直接拿来写C,所以需要相关插件,
然后任何语言的程序在运行前都需要编译,那还需要一个编译器,很可惜VSCode插件里面不自带,所以要自己下载然后配置;
最后在VSCode中进行相关配置,就可以愉快的编写代码了。
- 下载并安装vscode
vscode下载地址 - 安装相关插件
如同所示

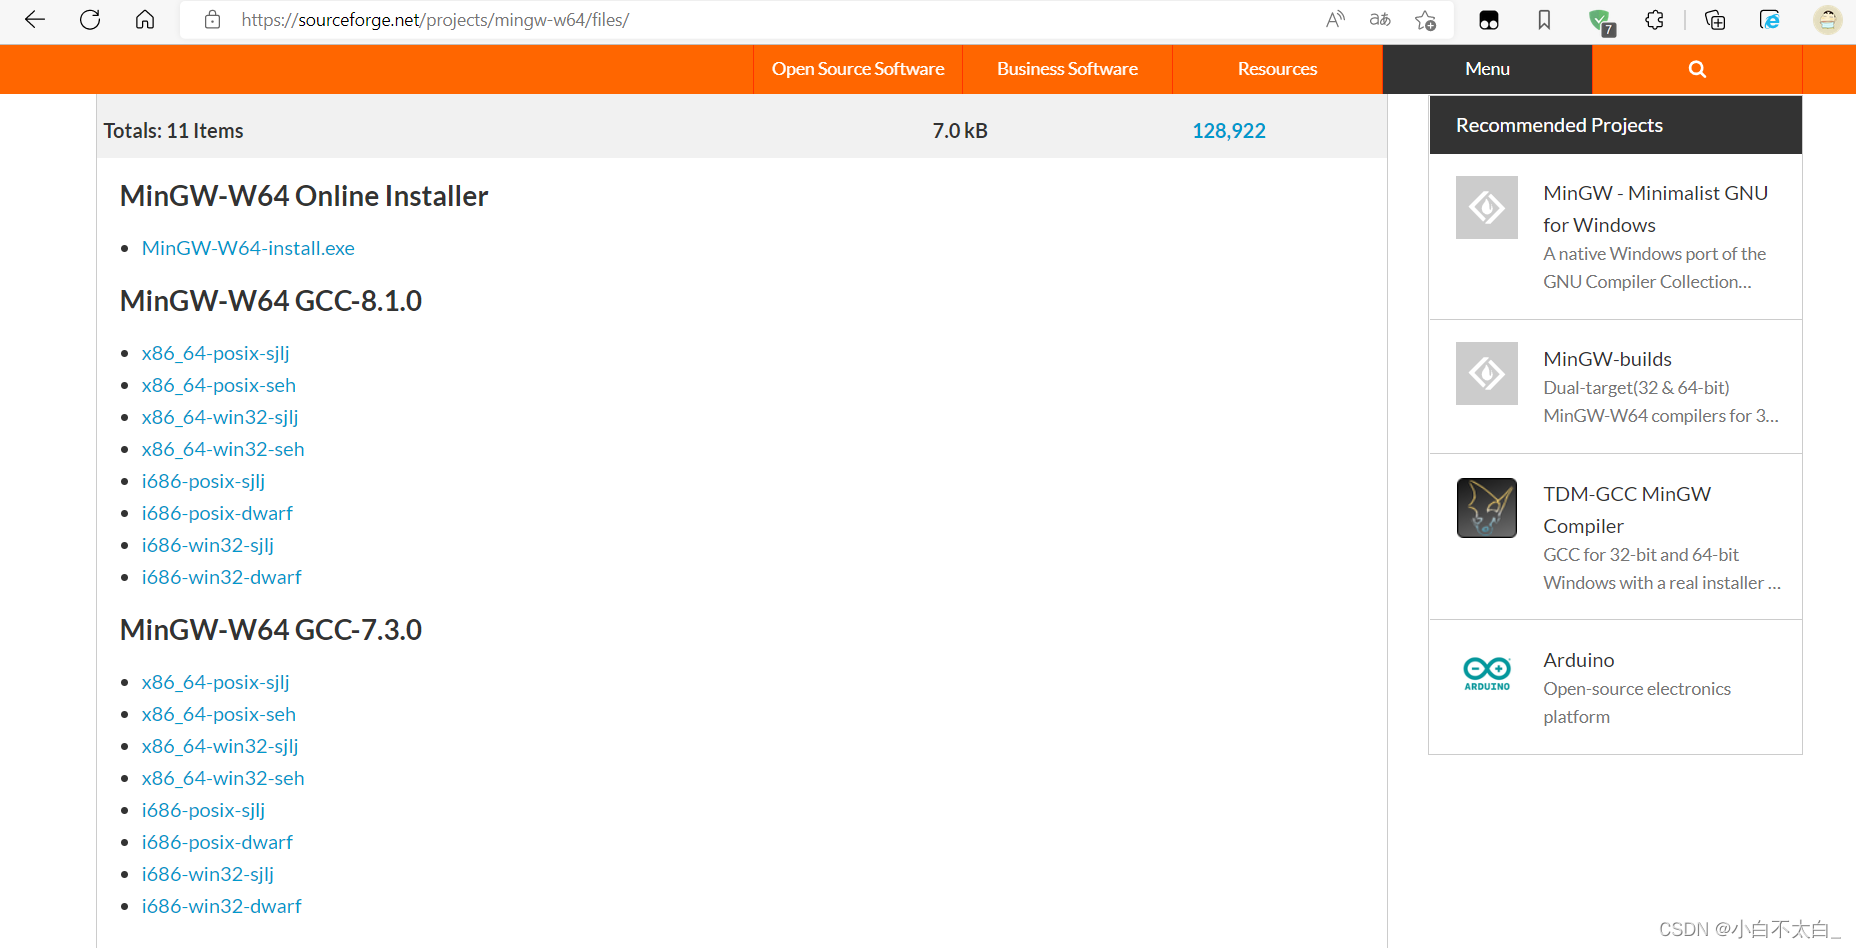
- 安装编译器(MinGW-W64 GCC)
离线下载地址
下拉后按需下载 正常的Win电脑下载“x86_64-posix-sjij”就可以了
下载得到压缩包,解压保存打开下载好的文件夹里面有一个bin文件
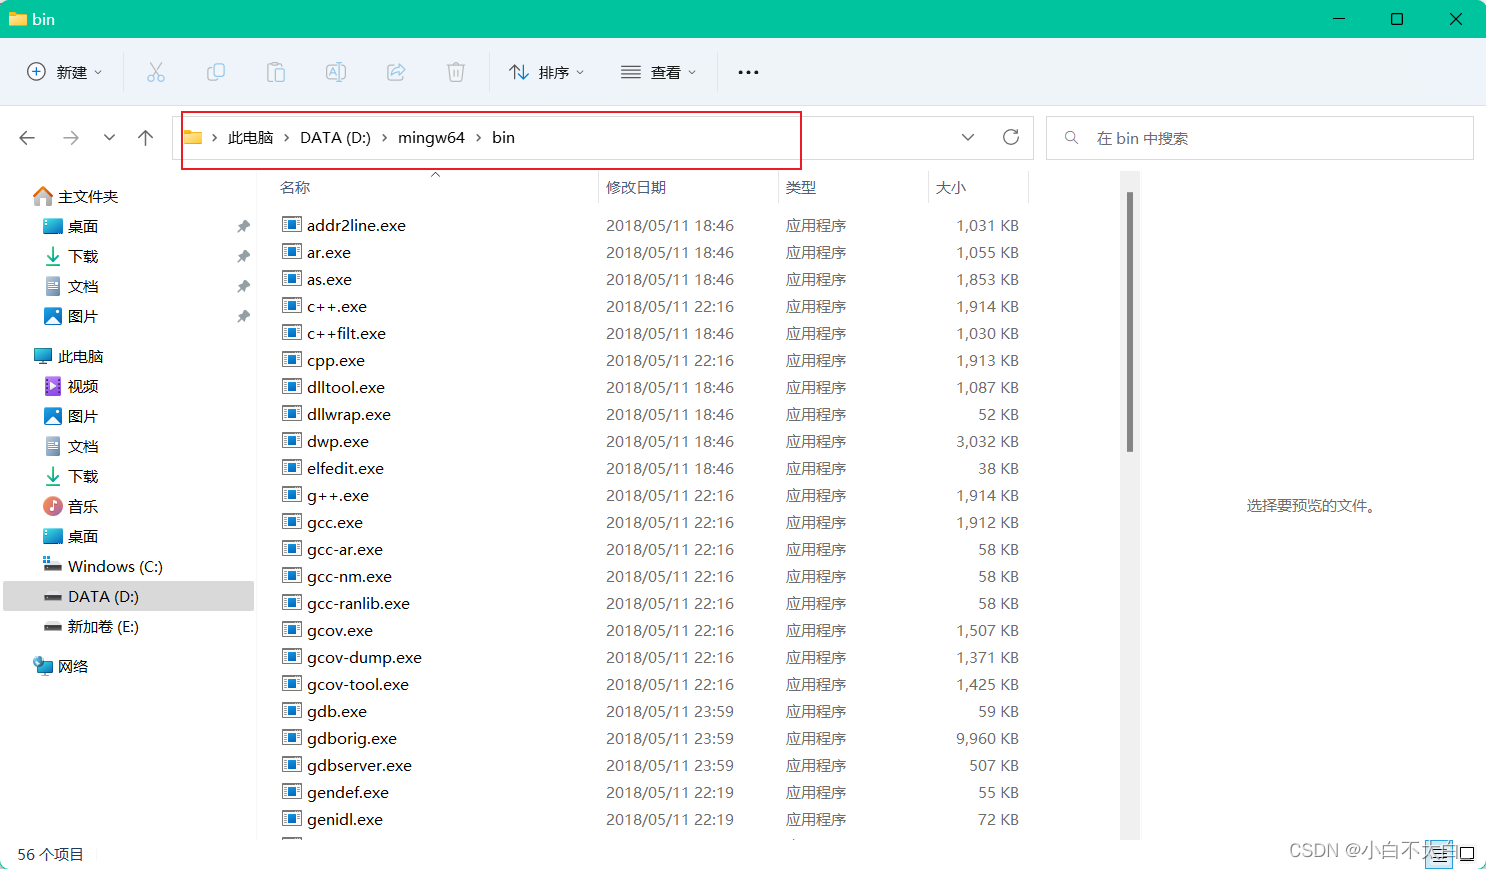
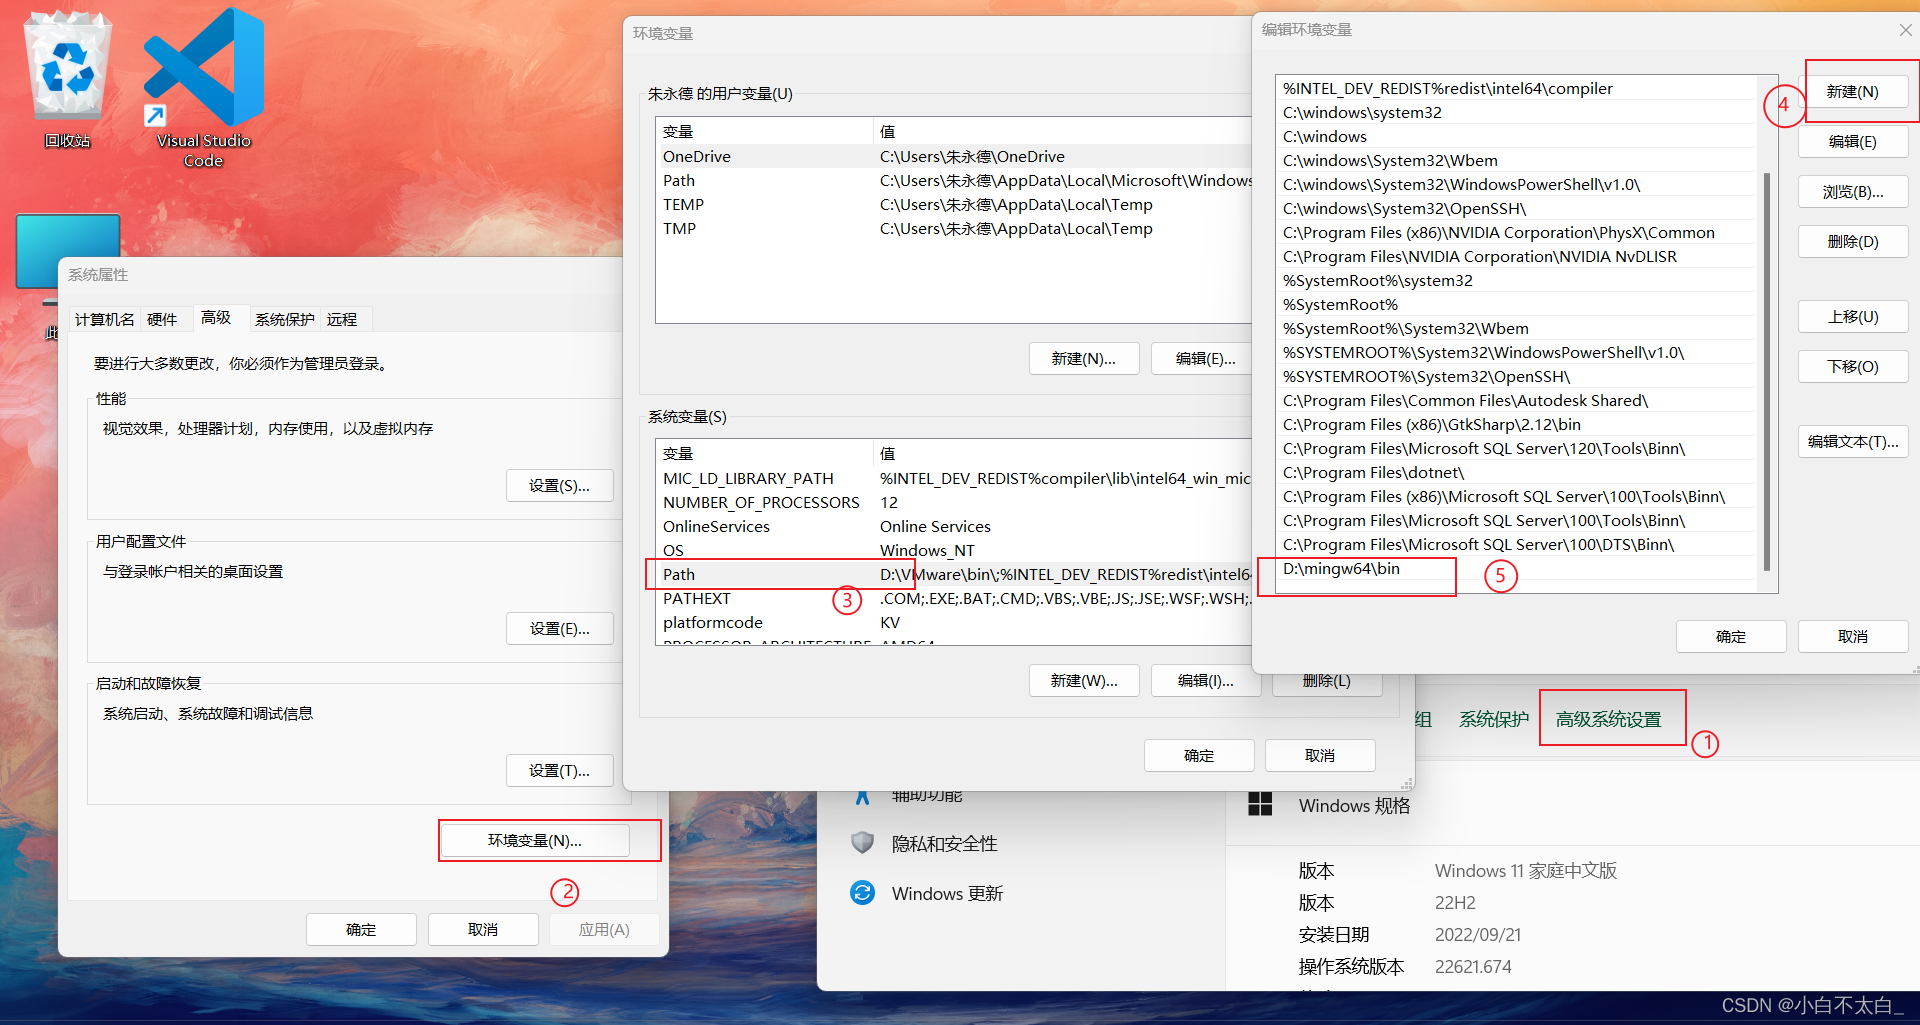
打开bin 并且复制地址 然后右键点击此电脑,点击属性后
点击高级系统设置
点击环境变量
在系统变量里双击Path
新建一个变量,粘贴bin的地址
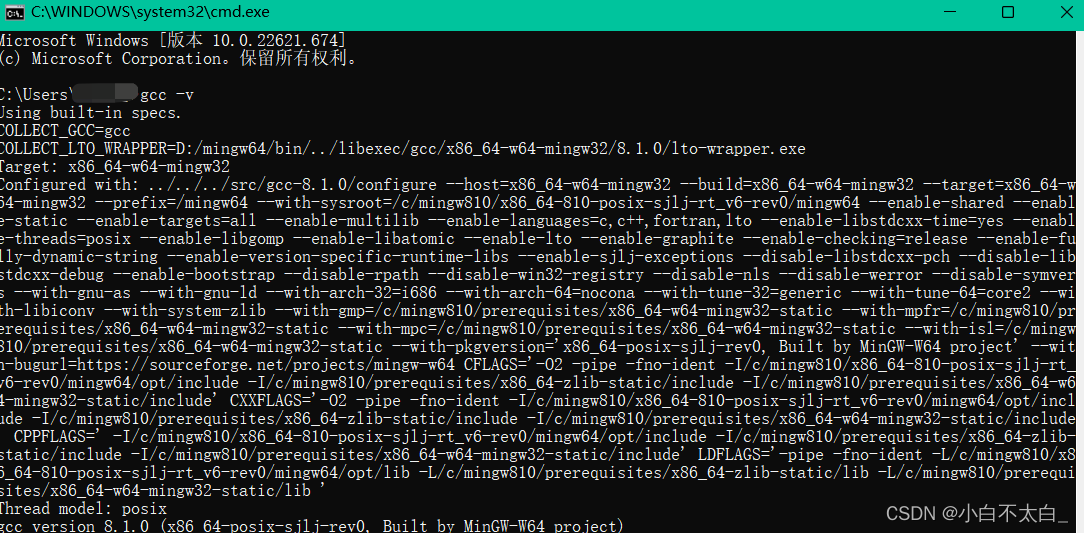
win+r打开运行框,输入cmd打开

输入gcc -v 回车
这样表示完成
最后配置
先新建一个文件夹作为c语言项目文件 最好不要中文
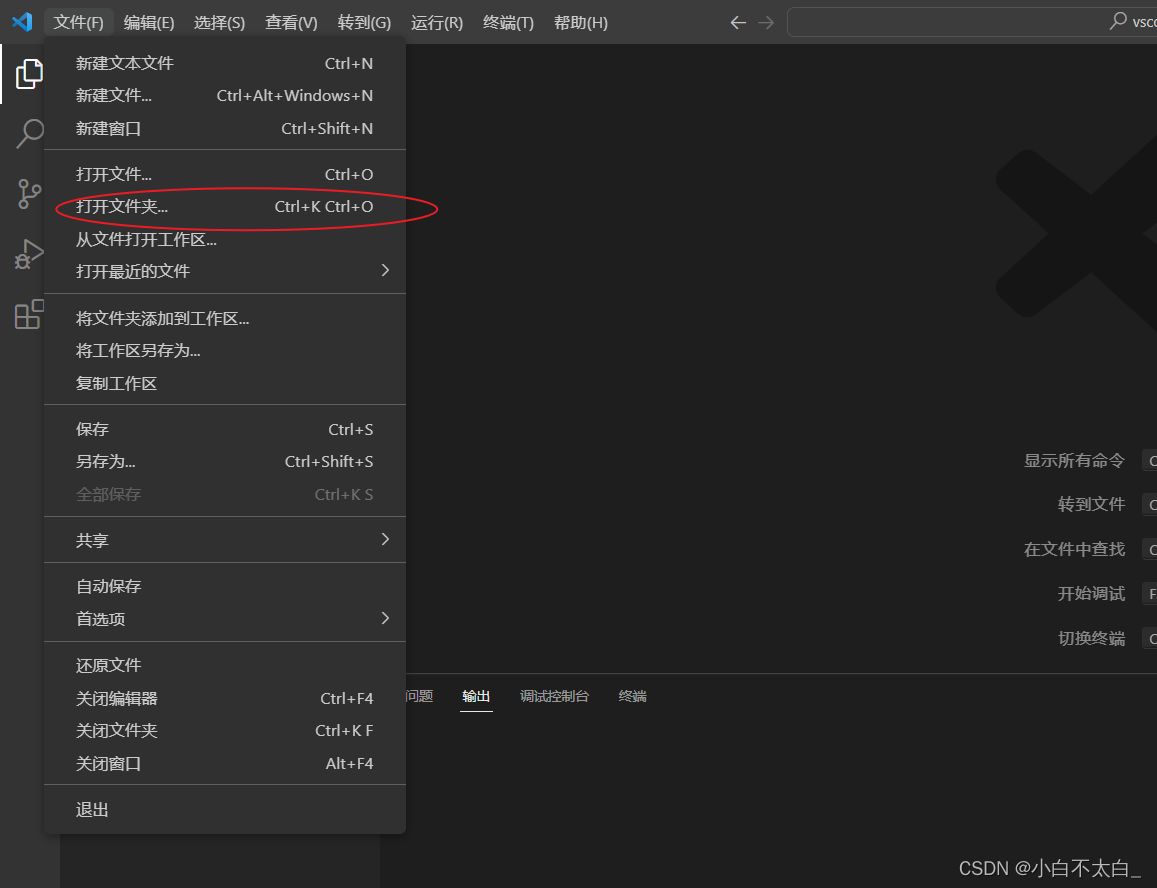
在面板打开刚才新建的文件夹
在里面新建一个文件夹 .vscode(注意前面有个点)
和一个以.c为结尾的c语言程序
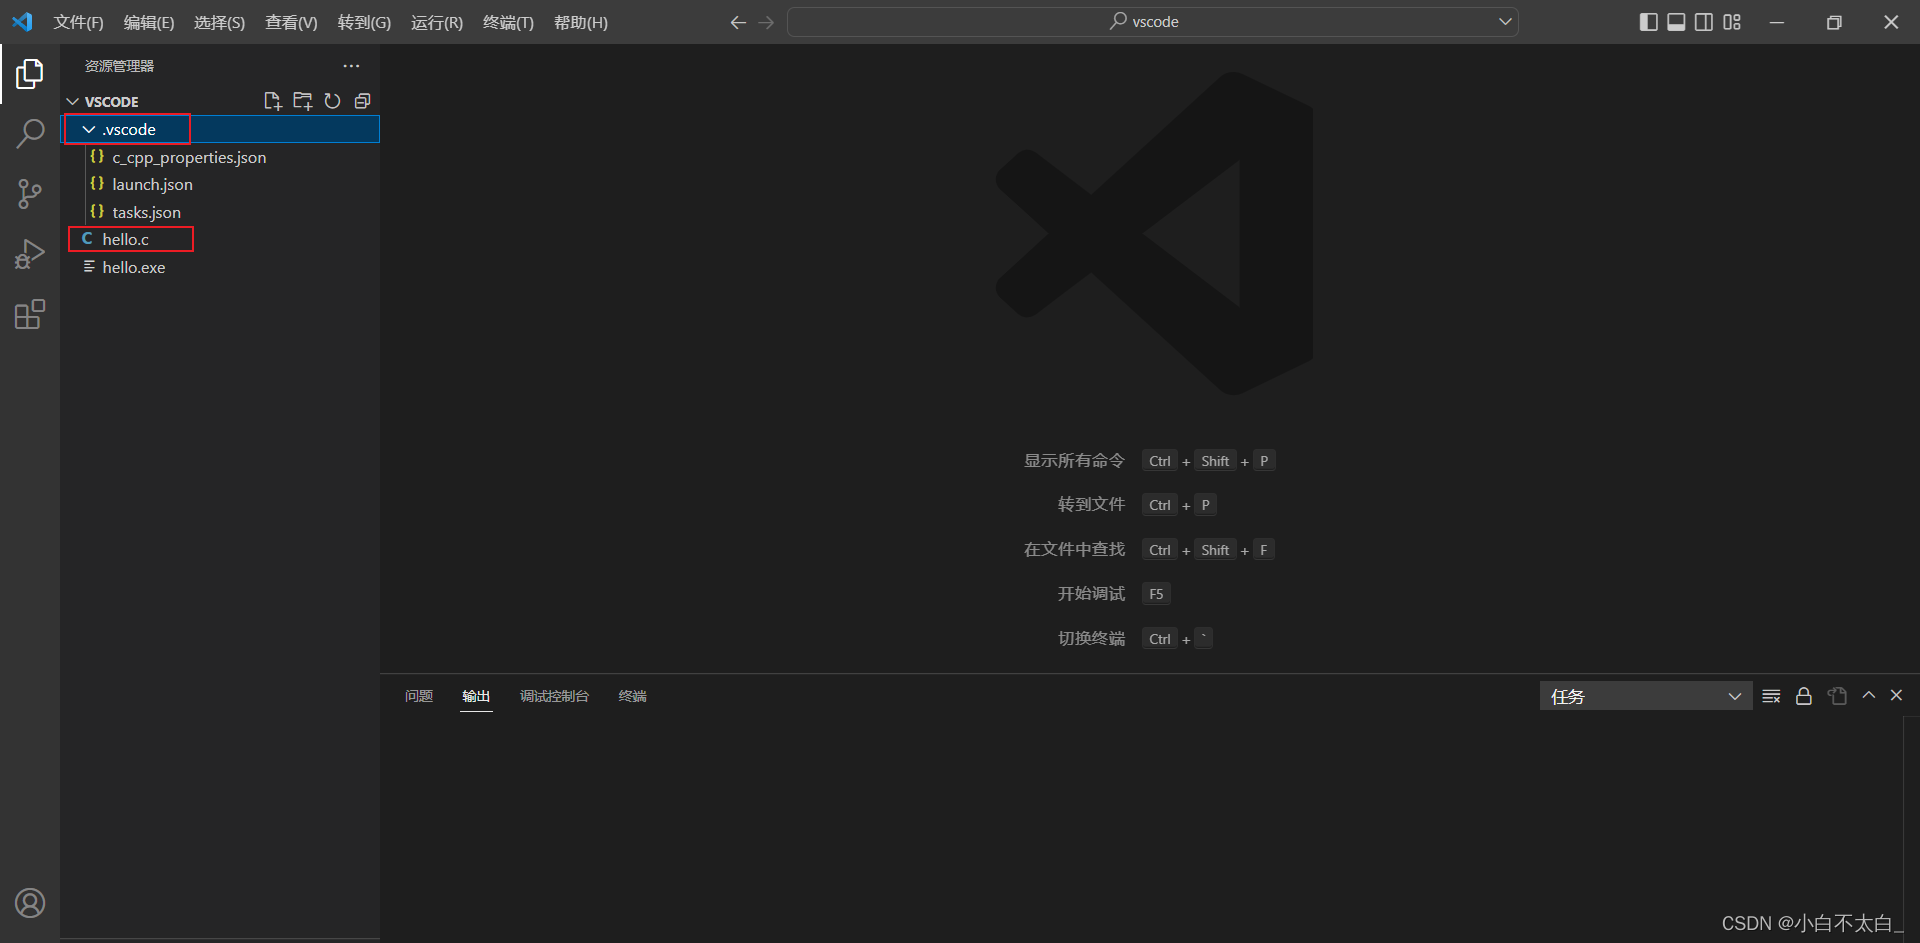
在.vscode里新建三个文件
c_cpp_properties.json、launch.json、tasks.json
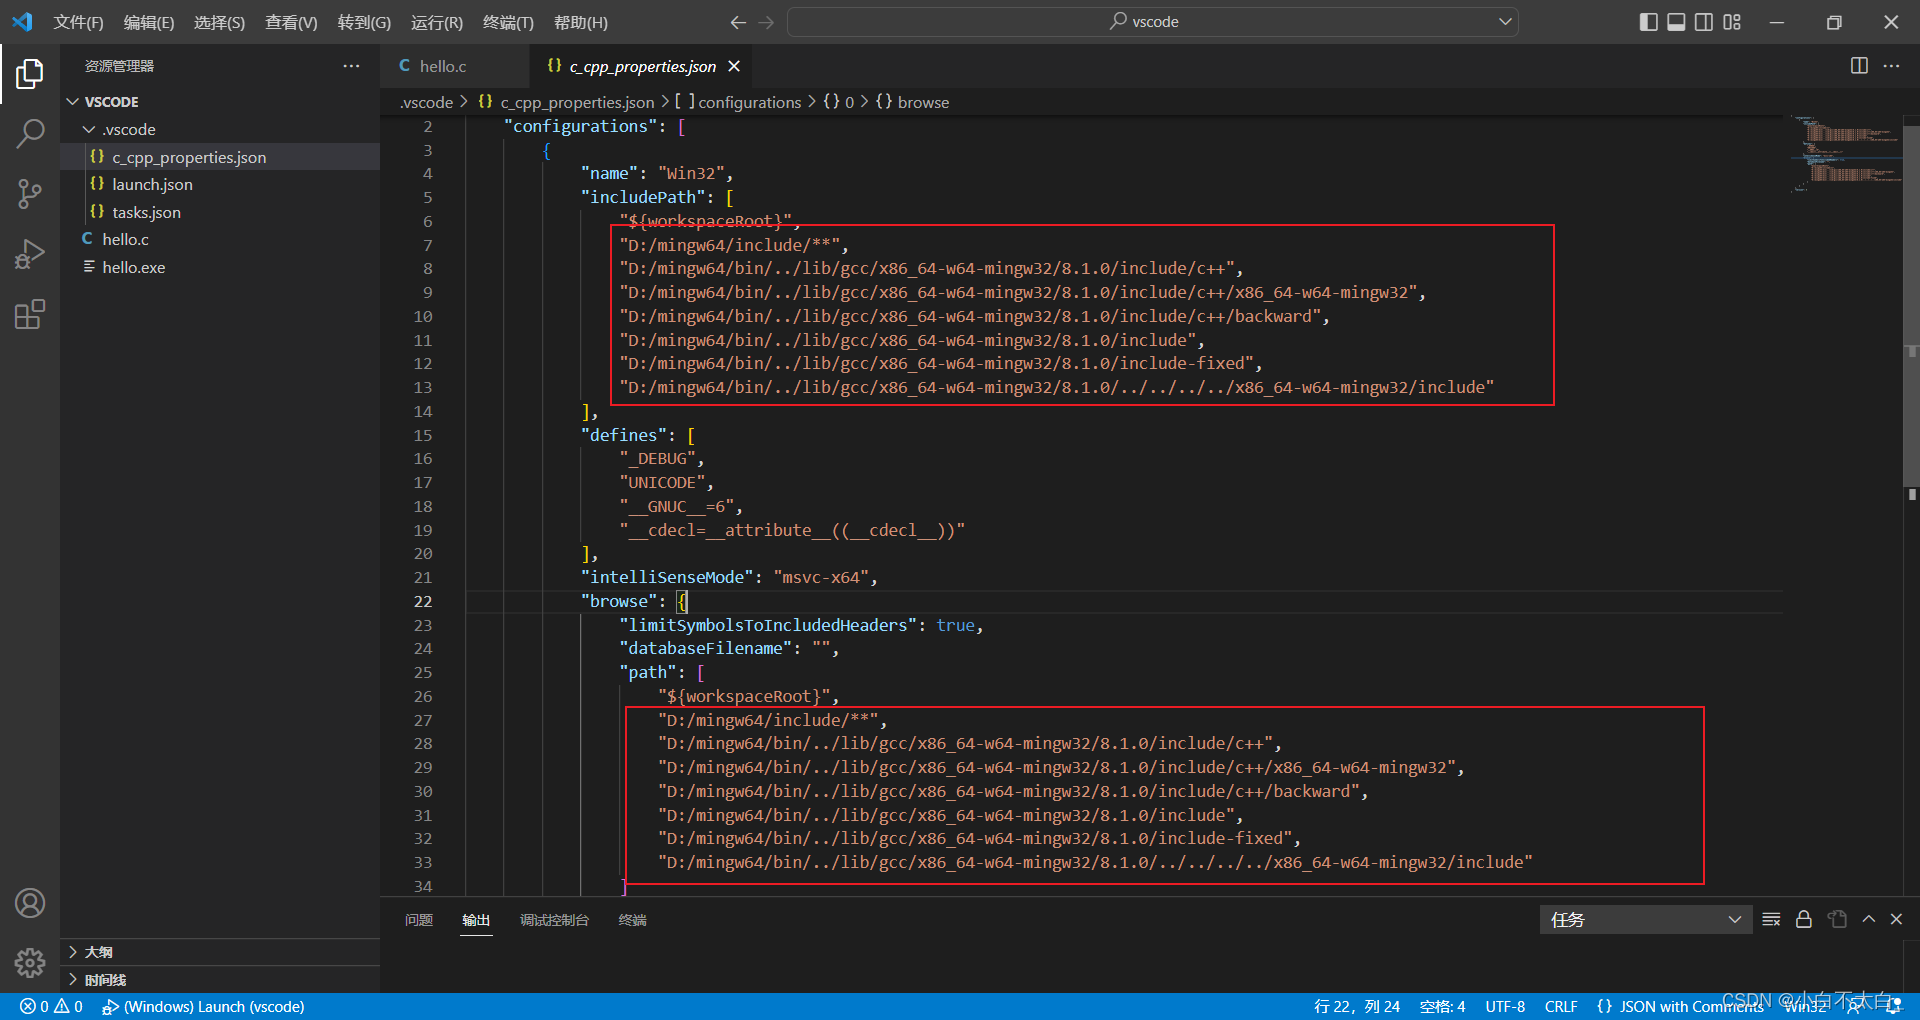
- c_cpp_properties.json:将这段代码复制进去
{
    "configurations": [
        {
            "name": "Win32",
            "includePath": [
                "${workspaceRoot}",
                "D:/mingw64/include/**",
                "D:/mingw64/bin/../lib/gcc/x86_64-w64-mingw32/8.1.0/include/c++",
                "D:/mingw64/bin/../lib/gcc/x86_64-w64-mingw32/8.1.0/include/c++/x86_64-w64-mingw32",
                "D:/mingw64/bin/../lib/gcc/x86_64-w64-mingw32/8.1.0/include/c++/backward",
                "D:/mingw64/bin/../lib/gcc/x86_64-w64-mingw32/8.1.0/include",
                "D:/mingw64/bin/../lib/gcc/x86_64-w64-mingw32/8.1.0/include-fixed",
                "D:/mingw64/bin/../lib/gcc/x86_64-w64-mingw32/8.1.0/../../../../x86_64-w64-mingw32/include"
            ],
            "defines": [
                "_DEBUG",
                "UNICODE",
                "__GNUC__=6",
                "__cdecl=__attribute__((__cdecl__))"
            ],
            "intelliSenseMode": "msvc-x64",
            "browse": {
                "limitSymbolsToIncludedHeaders": true,
                "databaseFilename": "",
                "path": [
                    "${workspaceRoot}",
                    "D:/mingw64/include/**",
                    "D:/mingw64/bin/../lib/gcc/x86_64-w64-mingw32/8.1.0/include/c++",
                    "D:/mingw64/bin/../lib/gcc/x86_64-w64-mingw32/8.1.0/include/c++/x86_64-w64-mingw32",
                    "D:/mingw64/bin/../lib/gcc/x86_64-w64-mingw32/8.1.0/include/c++/backward",
                    "D:/mingw64/bin/../lib/gcc/x86_64-w64-mingw32/8.1.0/include",
                    "D:/mingw64/bin/../lib/gcc/x86_64-w64-mingw32/8.1.0/include-fixed",
                    "D:/mingw64/bin/../lib/gcc/x86_64-w64-mingw32/8.1.0/../../../../x86_64-w64-mingw32/include"
                ]
            }
        }
    ],
    "version": 4
}
然后,下方红框里的内容需要修改,将所有的 改为自己的安装路径,就是我们之前下载的编译器的地址:
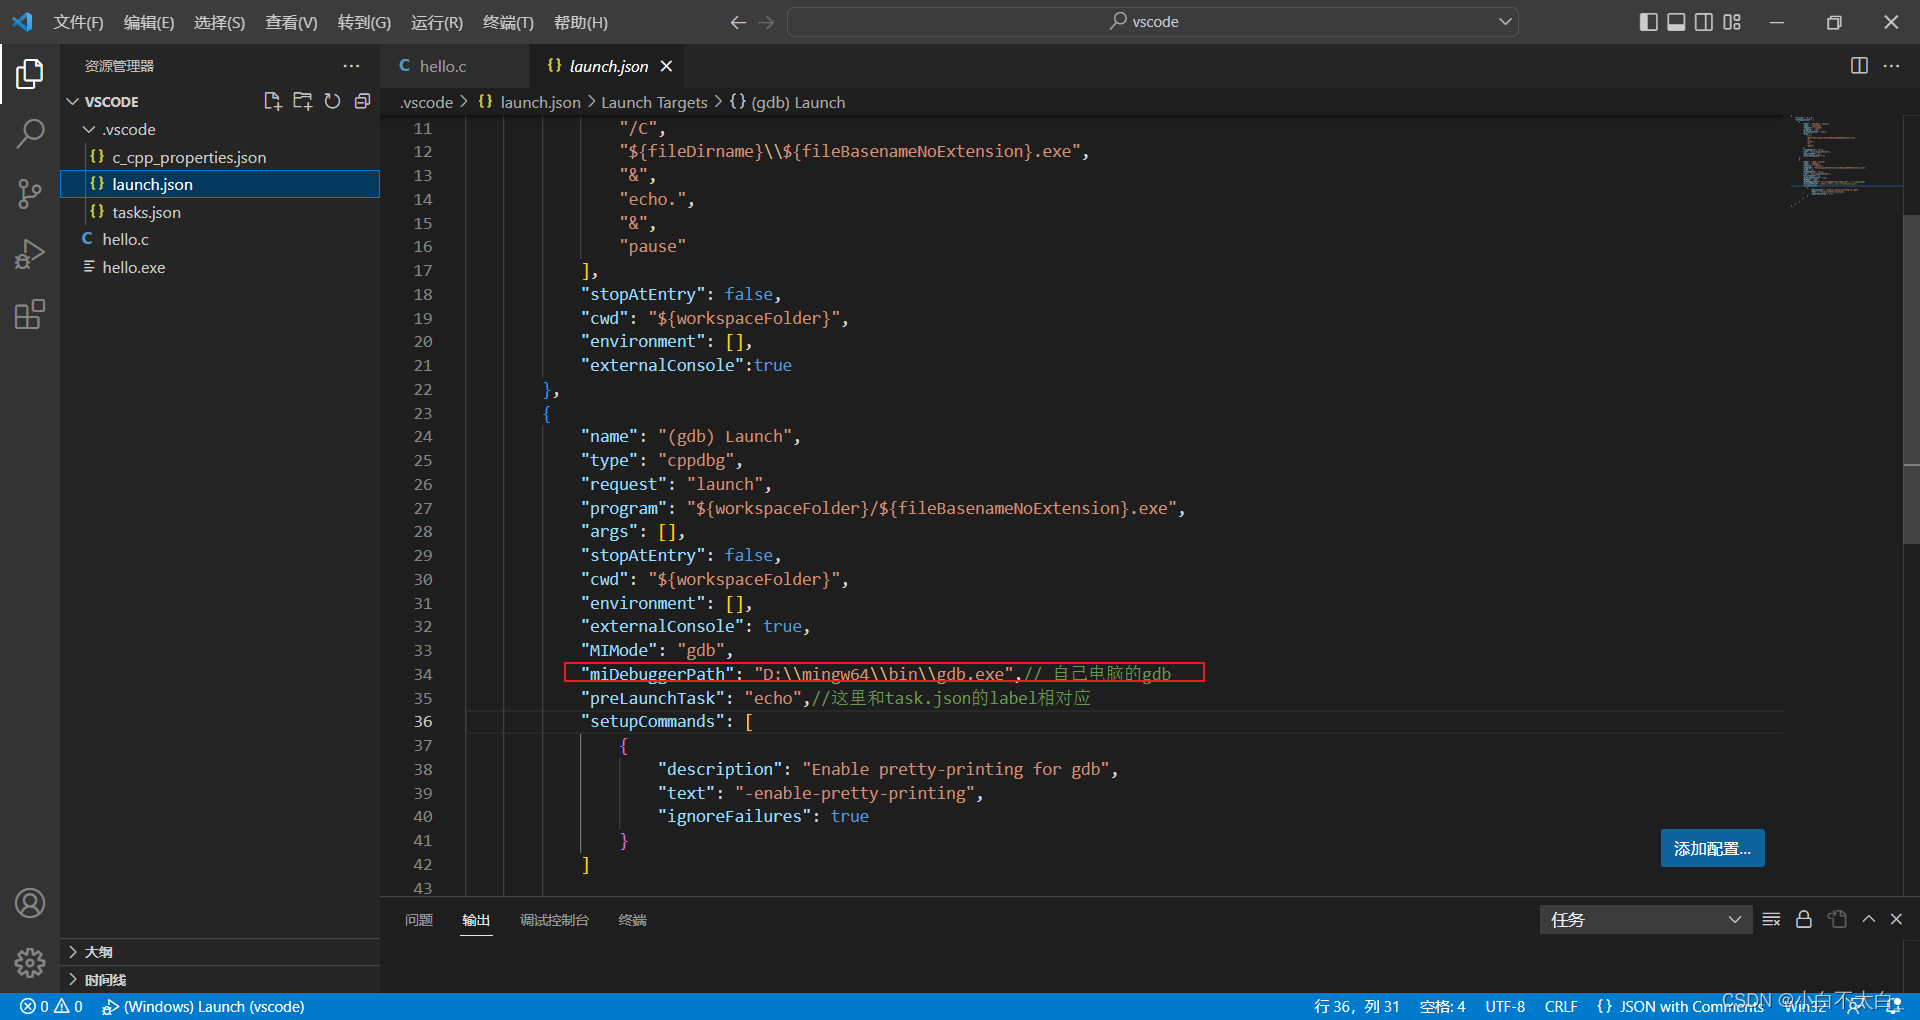
- launch.json:复制粘贴,然后miDebuggerPath属性里的内容也要改成自己的路径
{
    "version": "0.2.0",
    "configurations": [
        {
            "name": "(Windows) Launch",
            "type": "cppvsdbg",
            "request": "launch",
            "program": "cmd",
            "preLaunchTask": "echo",
            "args": [
                "/C",
                "${fileDirname}\\${fileBasenameNoExtension}.exe",
                "&",
                "echo.",
                "&",
                "pause"
            ],
            "stopAtEntry": false,
            "cwd": "${workspaceFolder}",
            "environment": [],
            "externalConsole":true
        },
        {
            "name": "(gdb) Launch",
            "type": "cppdbg",
            "request": "launch",
            "program": "${workspaceFolder}/${fileBasenameNoExtension}.exe",
            "args": [],
            "stopAtEntry": false,
            "cwd": "${workspaceFolder}",
            "environment": [],
            "externalConsole": true,
            "MIMode": "gdb",
            "miDebuggerPath": "D:\\mingw64\\bin\\gdb.exe",// 自己电脑的gdb
            "preLaunchTask": "echo",//这里和task.json的label相对应
            "setupCommands": [
                {
                    "description": "Enable pretty-printing for gdb",
                    "text": "-enable-pretty-printing",
                    "ignoreFailures": true
                }
            ]

        }
    ]
}
- tasks.json:复制粘贴
{
    // See https://go.microsoft.com/fwlink/?LinkId=733558
    // for the documentation about the tasks.json format
    "version": "2.0.0",
    "tasks": [
        {
            "label": "echo",
            "type": "shell",
            "command": "gcc",
            "args": [
                "-g",
                "${file}",
                "-o",
                "${fileBasenameNoExtension}.exe",
                "-fexec-charset=GBK"//解决中文乱码
            ]
        }
    ],
    "presentation": {
        "echo": true,
        "reveal": "always",
        "focus": false,
        "panel": "shared",
        "showReuseMessage": true,
        "clear": false
    }
}
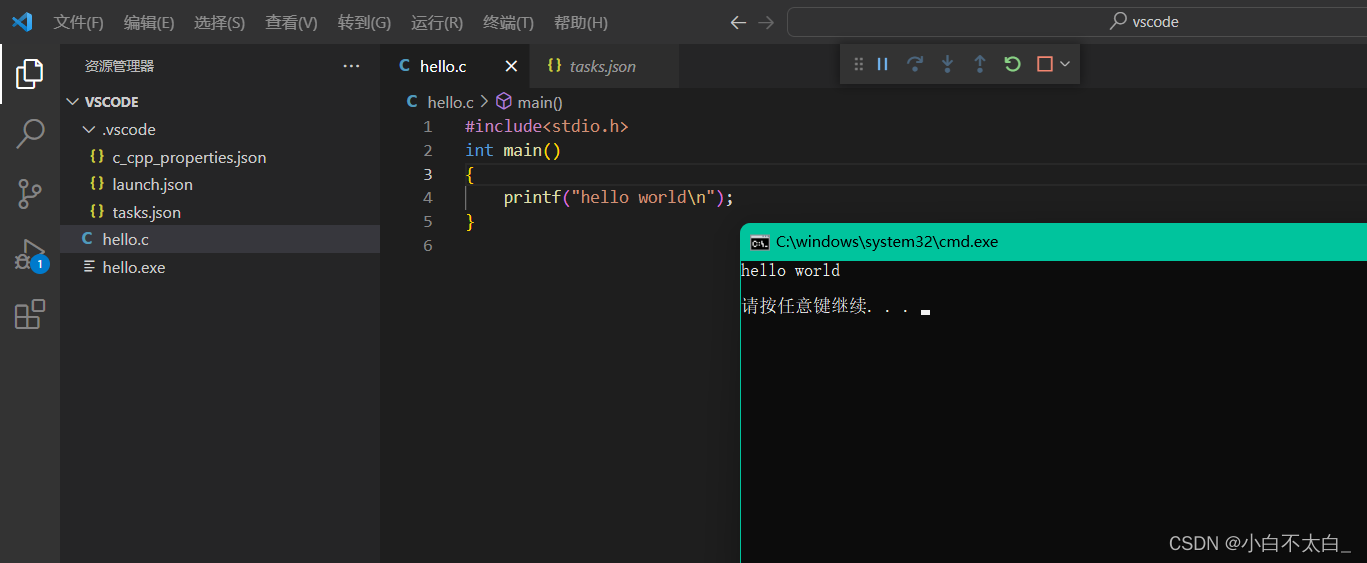
然后就可以在之前建的hello.c文件里面写程序啦,比如我们熟悉的helloworld:

为开发者提供学习成长、分享交流、生态实践、资源工具等服务,帮助开发者快速成长。
更多推荐


 3
3 0
0- 0


 已为社区贡献1条内容

所有评论(0)