TypeScript 封装 Axios
查看 element-plus 文档集成 loading,我们可以在全局拦截器中集成,给所有请求加上 loading 效果,但是可能有一些请求不需要 loading,所以我们还可以在自定义类型中添加一个 loading 布尔开关选项,控制 loading 在请求中的开启关闭。方法一样是个全能方法,通过 config 配置中的 method 选项,就能指定请求类型,所以我们可以基于 request
TypeScript 封装 Axios
为什么需要封装 axios
因为直接在项目中使用 axios,axios 的 api 将会嵌入代码的各个地方,耦合程度太高。如果后期更换 Ajax 请求库,将会非常麻烦。
封装思路
目录结构:
├─service
│  │  index.ts
│  │
│  └─request
│          config.ts
│          request.ts
我们打算最终以请求实例的方式对外提供,所以我们在 request.ts 中要定义好基于 axios 的请求类。
- 为什么选择以类来封装而不选择函数?
因为 axios 中方法比较多,而类的封装能力要比函数更强。就像 Java 中的工具类。
class DdRequest { }

export default Ddrequest;
import Ddrequest from "./request/request";

const ddrequest1 = new Ddrequest();
const ddrequest2 = new Ddrequest();

// 对外导出多个请求实例
export default { ddrequest1, ddrequest2 };
封装
1. 请求配置
新建实例的时候,我们希望能对实例进行一些配置。我们就可以在构造函数中传入 config 配置对象
import axios from "axios/index"; // 注意:可能导入失败,可以手动加上 index
import type { AxiosInstance, AxiosRequestConfig } from "axios/index"; // 类型

class Ddrequest {
  instance: AxiosInstance; // 最好把这隐藏,要不然类对象访问这个属性,形成套娃

  constructor(config: AxiosRequestConfig) {
    this.instance = axios.create(config); // 创建 axios 实例
  }
}

export default Ddrequest;
2. 拦截器
发送请求我们会有携带 token,添加 loading 动画等等操作,这些操作我们通常是写入到拦截器中。axios 本身支持拦截器,但是现在又不能直接使用 axios,所以我们要对拦截器进行一个封装。
2.1 封装实例范围内的拦截器
为了方便我们希望能在请求配置对象 config 中给请求实例添加拦截器,但是 config 对象中又没有配置拦截器的选项。所以 axios 原生的 config 对象类型AxiosRequestConfig就不够用了。
我们需要一个自定义的类型对默认的 config 对象类型进行类型扩展。可以新建一个接口,定义好拦截器函数,这些函数最后会被传入 axios.intercepters.xxx.use()中使用。然后在自定义的类型中添加拦截器选项,类型为定义好的接口,并且让自定义类型继承默认类型,这样就拥有了一个扩展后的 config 对象类型。
import axios from "axios/index";
import type {
  AxiosInstance,
  AxiosRequestConfig,
  AxiosResponse
} from "axios/index";

// 定义拦截器选项的类型,拦截器函数不一定全要用上,所以设计成可选的
interface DdRequsetInterceptors {
  // 请求的拦截函数,拦截器正常和拦截器失败
  requestInterceptor?: (config: AxiosRequestConfig) => AxiosRequestConfig;
  requestInterceptorCatch?: (error: any) => any;
  // 响应的拦截函数,拦截器正常和拦截器失败
  responseInterceptor?: (config: AxiosResponse) => AxiosResponse;
  responseInterceptorCatch?: (error: any) => any;
}

// 自定义的配置对象类型
interface DdRequsetConifg extends AxiosRequestConfig {
  // 扩展的拦截器选项,并且拦截器是可选的
  interceptors?: DdRequsetInterceptors;
}

class Ddrequest {
  instance: AxiosInstance;
  instanceInterceptor!: DdRequsetInterceptors; // 保存拦截器

  // 将类型更换成自己定义的类型
  constructor(config: DdRequsetConifg) {
    this.instance = axios.create(config);
    // 获取构造实例时传入的拦截器选项并保存在一个属性中,由于拦截器是可选的,所以可能是 undefined
    if (config.interceptors) {
      this.instanceInterceptor = config.interceptors;
      // 将获取到的拦截器函数在该实例中启用
      this.instance.interceptors.request.use(
        this.instanceInterceptor?.requestInterceptor,
        this.instanceInterceptor?.requestInterceptorCatch
      );
      this.instance.interceptors.response.use(
        this.instanceInterceptor?.responseInterceptor,
        this.instanceInterceptor?.responseInterceptorCatch
      );
    }
  }
  // 测试请求
  request(config: AxiosRequestConfig) {
    this.instance.request(config).then((res) => console.log(res));
  }
}

export default Ddrequest;
类型代码过多,可以选择独立出一个类型模块request.d.ts
import Ddrequest from "./request/request";
// 导入根据运行环境自动切换的环境变量
import { BASE_URL } from "./request/config";

const ddrequest1 = new Ddrequest({
  baseURL: BASE_URL,
  interceptors: {
    requestInterceptor(config) {
      console.log("请求拦截成功");
      return config;
    },
    responseInterceptor(res) {
      console.log("响应拦截成功");
      return res;
    }
  }
});
// const ddrequest2 = new Ddrequest();

// 对外导出多个请求实例
export default ddrequest1;
2.2 封装全局的拦截器
上面是我们给请求实例对象封装了拦截器,让实例化对象时可以配置拦截器函数。当然我们也可以选择不走配置,直接写死一些拦截函数默认给所有实例,这些拦截器就是相当于是全局拥有的,任何一个请求实例都有。
  // 将类型更换成自己定义的类型
  constructor(config: DdRequsetConifg) {
    this.instance = axios.create(config);

    // 获取构造实例时传入的拦截器选项并保存在一个属性中,由于拦截器是可选的,所以可能是 undefined
    if (config.interceptors) {
      this.instanceInterceptor = config.interceptors;
      // 将获取到的拦截器函数在该实例中启用
      this.instance.interceptors.request.use(
        this.instanceInterceptor?.requestInterceptor,
        this.instanceInterceptor?.requestInterceptorCatch
      );
      this.instance.interceptors.response.use(
        this.instanceInterceptor?.responseInterceptor,
        this.instanceInterceptor?.responseInterceptorCatch
      );
    }

    // 添加全局拦截器
    this.instance.interceptors.request.use(
      // 为什么能直接使用 config 对象?因为我们定义的类型继承了原类型,作为它的子类,自然能通过类型检测
      (config) => {
        console.log("全局请求拦截成功");
        return config;
      },
      (err) => console.log(err)
    );
    this.instance.interceptors.response.use(
      (res) => {
        console.log("全局响应拦截成功");
        return res.data; // 处理一下返回结果,只返回请求数据
      },
      (err) => console.log(err)
    );
  }
2.3 封装请求的拦截器
当然我们也可以给请求封装一下,针对每个请求都能配置拦截器,给请求添加拦截器有两种方式:
因为拦截器本质就是个函数,所以一种是和上面一样将函数放入 use 方法中,让 axios 内部来执行这个钩子函数;还有一种就是我们自己手动来执行这个函数。
手动执行拦截器函数的话,相当于自己定义的一些 处理 config 的 hook 和一些处理请求结果 res 的 hook,和普通函数没两样,所以执行时机就需要自己控制。请求拦截一定要在发送请求之前,响应拦截一定要在请求之后。
import axios from "axios/index";
import type {
  AxiosInstance,
  AxiosRequestConfig,
  AxiosResponse
} from "axios/index";

// 定义拦截器选项的类型,拦截器函数不一定全要用上,所以设计成可选的
interface DdRequsetInterceptors {
  // 请求的拦截函数,拦截器正常和拦截器失败
  requestInterceptor?: (config: AxiosRequestConfig) => AxiosRequestConfig;
  requestInterceptorCatch?: (error: any) => any;
  // 响应的拦截函数,拦截器正常和拦截器失败
  responseInterceptor?: (config: AxiosResponse) => AxiosResponse;
  responseInterceptorCatch?: (error: any) => any;
}

// 自定义的配置对象类型
interface DdRequsetConifg extends AxiosRequestConfig {
  // 扩展的拦截器选项,并且拦截器是可选的
  interceptors?: DdRequsetInterceptors;
}

class Ddrequest {
  instance: AxiosInstance;
  instanceInterceptor!: DdRequsetInterceptors;

  // 将类型更换成自己定义的类型
  constructor(config: DdRequsetConifg) {
    this.instance = axios.create(config);

    // 获取构造实例时传入的拦截器选项并保存在一个属性中,由于拦截器是可选的,所以可能是 undefined
    if (config.interceptors) {
      this.instanceInterceptor = config.interceptors;
      // 将获取到的拦截器函数在该实例中启用
      this.instance.interceptors.request.use(
        this.instanceInterceptor?.requestInterceptor,
        this.instanceInterceptor?.requestInterceptorCatch
      );
      this.instance.interceptors.response.use(
        this.instanceInterceptor?.responseInterceptor,
        this.instanceInterceptor?.responseInterceptorCatch
      );
    }

    // 添加全局拦截器
    this.instance.interceptors.request.use(
      // 为什么能直接使用 config 对象?因为我们定义的类型继承了原类型,作为它的子类,自然能通过类型检测
      (config) => {
        console.log("全局请求拦截成功");

        return config;
      },
      (err) => console.log(err)
    );
    this.instance.interceptors.response.use(
      (res) => {
        console.log("全局响应拦截成功");
        return res.data; // 处理一下返回结果,只返回请求数据
      },
      (err) => console.log(err)
    );
  }
  // 这里对 request() 封装,使其可以配置拦截器函数
  request(config: DdRequsetConifg) {
    // 添加拦截器
    this.instance.interceptors.request.use(
      config.interceptors?.requestInterceptor,
      config.interceptors?.requestInterceptorCatch
    );
    this.instance.interceptors.response.use(
      config.interceptors?.responseInterceptor,
      config.interceptors?.responseInterceptorCatch
    );
    // 配置对象类型要换成我们自定义的,以或得配置拦截器的选项
    this.instance.request(config).then((res) => {
      console.log(res);
    });
  }
}

export default Ddrequest;
request(config: DdRequsetConifg) {
  if (config.interceptors?.requestInterceptor) {
    // 在发起请求之前,手动执行请求拦截器中的成功处理函数
    // 执行这个函数和执行一个普通函数没两样,只是这个函数来自请求配置对象中
    config = config.interceptors.requestInterceptor(config);
  }

  // 发送请求
  this.instance.request(config).then((res) => {
    // 请求成功后,手动执行响应拦截器中的成功处理函数
    if (config.interceptors?.responseInterceptor) {
      res = config.interceptors.responseInterceptor(res);
    }

    // 获取请求结果后的一些普通处理
    console.log(res);
  });
}
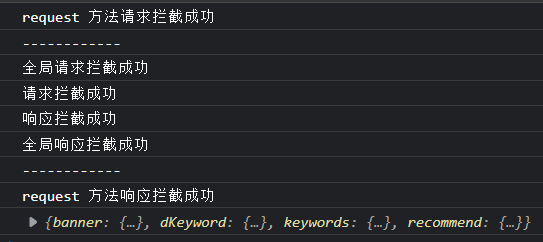
import ddrequest1 from "@/service";

ddrequest1.request({
  url: "/home/multidata",
  method: "get",
  interceptors: {
    requestInterceptor(config) {
      console.log("request 方法请求拦截成功");
      console.log("------------");
      return config;
    },
    responseInterceptor(res) {
      console.log("request 方法响应拦截成功");
      return res.data;
    }
  }
});

2.4 拦截器集成 token,请求失败和 loading
token 我们可以在实例拦截器中携带
const ddrequest1 = new Ddrequest({
  baseURL: BASE_URL,
  interceptors: {
    requestInterceptor(config) {
      console.log("请求拦截成功");

      // 从 vuex 中或者本地获取到 token
      const token = "token";
      if (token && config.headers) {
        // 将 token 设置到请求头中,也可能会设置在 post 的 data 里携带过去
        config.headers.Authorization = `Bearer ${token}`;
      }

      return config;
    },
    responseInterceptor(res) {
      console.log("响应拦截成功");
      return res;
    }
  }
});
客户端知道请求失败的方式有两种:
- httpCode
- 200 成功
- 4xx 失败
- 5xx 服务器内部错误
- 服务器自定义了状态
- 比如请求成功,httpCode 为 200,返回数据,但是数据内容是
{success: false, returnCode: -1001}
- 比如请求成功,httpCode 为 200,返回数据,但是数据内容是
请求失败的处理可以在 responseCatch 拦截函数中处理。可以通过 error 对象中 error.response.status获取错误代码,以此来进行失败处理。
如果是服务器自定义了状态的方式,则因为需要拿到请求内容 res,所以要在 response 拦截函数中手动判断,然后进行失败处理。
请求失败的拦截一般定义在全局拦截中:
class Ddrequest {
  // 略
  constructor(config: DdRequsetConifg) {
    // 略
    // 添加全局拦截器
    this.instance.interceptors.request.use(
      (config) => {
        console.log("全局请求拦截成功");
        return config;
      },
      (err) => console.log(err)
    );
    this.instance.interceptors.response.use(
      (res) => {
        console.log("全局响应拦截成功");
        // 通知请求失败的方式:自定义状态,
        // 假设返回数据结构为:{success: false, returnCode: xxx}
        switch (res.data.returnCode) {
          case -1001: // 具体的错误代码需要和服务端对接
            console.log("请求失败");
            break;
          case 200:
            console.log("请求成功");
            return res.data; // 请求成功就预处理下请求内容
          default:
            break;
        }
        // return res.data; // 处理一下返回结果,只返回请求数据
      },
      (err) => {
        console.log(err);
        // 通知请求失败方式:httpCode
        switch (err.response.state) {
          case 404:
            // 错误处理
            console.log(`${err.response.state}: 客户端请求错误`);
            break;
          case 500:
            // 错误处理
            console.log(`${err.response.state}: 服务器响应错误`);
            break;
          default:
            break;
        }
      }
     );
  }
}
查看 element-plus 文档集成 loading,我们可以在全局拦截器中集成,给所有请求加上 loading 效果,但是可能有一些请求不需要 loading,所以我们还可以在自定义类型中添加一个 loading 布尔开关选项,控制 loading 在请求中的开启关闭。
import axios from "axios/index";
import type {
  AxiosInstance,
  AxiosRequestConfig,
  AxiosResponse
} from "axios/index";
import { ElLoading } from "element-plus";
// 因为是以服务的形式引入 loading,所以要手动引入类型和样式
import { LoadingInstance } from "element-plus/es/components/loading/src/loading";
// import "element-plus/es/components/loading/style/index"; // 需要 sass-loader,太麻烦了还是全局引入样式吧

// 设置 loading 默认开启
const DEFAULT_LOADING = true;

// 自定义的配置对象类型
interface DdRequsetConifg extends AxiosRequestConfig {
  interceptors?: DdRequsetInterceptors;
  showLoading?: boolean; // 通过配置控制请求是否需要 loading 效果
}

class Ddrequest {
  instance: AxiosInstance;
  instanceInterceptor!: DdRequsetInterceptors;
  loadingInstance!: LoadingInstance; // 非空断言
  showLoading!: boolean; // 保存 showLoading 的结果,方便后续使用

  // 将类型更换成自己定义的类型
  constructor(config: DdRequsetConifg) {
    this.instance = axios.create(config);
    this.showLoading = config.showLoading ?? DEFAULT_LOADING; // 空值合并,没有配置 showLoading 默认值为 DEFAULT_LOADING

    if (config.interceptors) {
      this.instanceInterceptor = config.interceptors;
      // 将获取到的拦截器函数在该实例中启用
      this.instance.interceptors.request.use(
        this.instanceInterceptor?.requestInterceptor,
        this.instanceInterceptor?.requestInterceptorCatch
      );
      this.instance.interceptors.response.use(
        this.instanceInterceptor?.responseInterceptor,
        this.instanceInterceptor?.responseInterceptorCatch
      );
    }

    // 添加全局拦截器
    this.instance.interceptors.request.use(
      (config) => {
        console.log("全局请求拦截成功");

        if (this.showLoading) {
          // 添加 loading
          this.loadingInstance = ElLoading.service({
            lock: true, // 遮罩
            text: "正在请求中...",
            background: "rgba(0,0,0,0.5)"
          });
        }

        return config;
      },
      (err) => console.log(err)
    );
    this.instance.interceptors.response.use(
      (res) => {
        console.log("全局响应拦截成功");

        if (this.showLoading) {
            // 取消 loading
            this.loadingInstance.close();
        }

        switch (res.data.returnCode) {
          case -1001: // 具体的错误代码需要和服务端对接
            console.log("请求失败");
            break;
          case 200:
            console.log("请求成功");
            return res.data; // 请求成功就预处理下请求内容
          default:
            break;
        }
        return res.data;
      },
      (err) => {
        console.log(err);

        switch (err.response.status) {
          // case err.response.status >= 400 && err.response.status < 500:
          case 404:
            // 错误处理
            console.log(`${err.response.status}: 客户端请求错误`);
            break;
          // case err.response.status >= 500 && err.response.status < 600:
          case 500:
            // 错误处理
            console.log(`${err.response.status}: 服务器响应错误`);
            break;
          default:
            break;
        }
      }
    );
  }

  request(config: DdRequsetConifg) {
    if (config.interceptors?.requestInterceptor) {
      // 在发起请求之前,手动执行请求拦截器中的成功处理函数
      // 执行这个函数和执行一个普通函数没两样,只是这个函数来自请求配置对象中
      config = config.interceptors.requestInterceptor(config);
    }

    // 根据单个请求配置,控制 loading 开关
    if (config.showLoading === false) {
      this.showLoading = config.showLoading;
    }

    // 发送请求
    this.instance
      .request(config)
      .then((res) => {
        if (config.interceptors?.responseInterceptor) {
          res = config.interceptors.responseInterceptor(res);
        }

        // 请求完成后对 showLoading 进行复位,要不然下一个请求也没有 loading
        this.showLoading = DEFAULT_LOADING;

      })
      .catch((err) => {
        // 请求完成后对 showLoading 进行复位,要不然下一个请求也没有 loading
        this.showLoading = DEFAULT_LOADING;

        console.log(err);
      });
  }
}

export default Ddrequest;
3. 数据处理
我们现在在 request 方法中封装了 axios.request 发送请求,并且暂时在 request 方法中直接进行了结果处理,调用 then 和 catch。真实的情况下,用户使用 request 方法发送请求后,对请求的结果肯定是用户自己来处理的,所以我们可以返回一个 promise 。
请求回的数据是什么结构类型,这只有用户自己知道,所以封装的时候 promise 的类型可以定义为泛型。
import ddrequest1 from "@/service";

// 用户定义期望的返回数据类型
type returnDataType = {
  data: any;
  returnCode: string;
  success: boolean;
};

ddrequest1
  .request<returnDataType>({
    url: "/home/multidata",
    method: "get"
  })
  // 请求成功,用户对数据处理
  .then((res) => {
    console.log(res);
  })
  // 请求失败,用户对错误处理
  .catch((err) => {
    console.log(err);
  });
但是泛型又带来新的问题:
我们知道 axios 发起真正的请求,请求回的数据在 axios.request().then(res)的 res 中,我们需要让 resolve 函数将这个 res 传递出去,好让用户在使用的时候能通过 then 获取数据。
- 注意:promise 在 ts 中是有类型的,它的类型和请求回的数据 res 的类型是一样的。
现在 promise 的类型为泛型 T,也就是resolve(res)中 res 的类型必须为泛型 T,但是在 axios 库中axios.request().then(res)中 res 有自己的类型AxiosResponse,这就造成类型冲突了。
我们需要将 axios.request 请求的默认类型也改成泛型 T。axios.request 本身也有泛型,我们在 axios.request 方法的泛型中将 AxiosResponse 类型改成 T 即可。

但是修改后还有一个问题:
此时 axios.requesnt().then(res) 中 res 类型已经为 T 了,这就会影响一些其他需要使用原先类型 res 的地方。
比如给请求单独设计的响应拦截函数,我们之前设计的就是它要接受一个 AxiosResponse类型的 res,并且返回它。
interface DdRequsetInterceptors {
  requestInterceptor?: (config: AxiosRequestConfig) => AxiosRequestConfig;
  requestInterceptorCatch?: (error: any) => any;
  responseInterceptor?: (config: AxiosResponse) => AxiosResponse;
  responseInterceptorCatch?: (error: any) => any;
}
现在这里又有类型冲突了,怎么解决?
我们有两个办法,修改我们的类型定义,全给改成 any,(config: any) => any;,可以这么做,但是失去了类型检测的意义,不好。第二个办法就是希望类型定义也能泛型化,动态的由使用者来控制。
这个时候就需要给整个接口添加泛型了。
// 给接口增加泛型,并且设置默认值,
// 因为需要用户指定类型的地方比较少,大部分还是使用原先的类型 AxiosResponse
interface DdRequsetInterceptors<T = AxiosResponse> {
  requestInterceptor?: (config: AxiosRequestConfig) => AxiosRequestConfig;
  requestInterceptorCatch?: (error: any) => any;
  responseInterceptor?: (config: T) => T; // 用泛型定义响应拦截函数
  responseInterceptorCatch?: (error: any) => any;
}
但是根据我们前面的设计,我们在代码中实际应用的是DdRequsetInterceptors的子类DdRequsetConifg,所以运行时传递确切的类型给泛型需要通过DdRequsetConifg接口做个中间人传给DdRequsetInterceptors,因为代码只能看到DdRequsetConifg这个类型,所以它也要设置接口泛型。
// 自定义的配置对象类型
// 直接使用的类型是我们自定义的类型,所以需要把泛型传递到这,从而可以再往上传到真正需要泛型的接口 DdRequsetInterceptors
interface DdRequsetConifg<T = AxiosResponse> extends AxiosRequestConfig {
  interceptors?: DdRequsetInterceptors<T>; // 传递泛型结果
  showLoading?: boolean;
}
// 返回 promise 并设置 Promise 类型为泛型,并且将泛型传递给定义类型的接口
  request<T>(config: DdRequsetConifg<T>): Promise<T> {
    // 返回一个 promise 让用户处理请求结果
    return new Promise((resolve, reject) => {
      // 单个请求级别的请求拦截函数
      if (config.interceptors?.requestInterceptor) {
        config = config.interceptors.requestInterceptor(config);
      }

      // 根据请求配置,控制 loading 开关
      if (config.showLoading === false) {
        this.showLoading = config.showLoading;
      }

      // 通过 axios.request 真正地发送请求
      this.instance
        .request<any, T>(config) // 修改 request 方法默认类型
        .then((res) => {
          // 请求成功后,手动执行响应拦截器中的成功处理函数
          if (config.interceptors?.responseInterceptor) {
            res = config.interceptors.responseInterceptor(res);
          }
          // 请求完成后对 showLoading 进行复位
          this.showLoading = DEFAULT_LOADING;

          // 获取请求结果后的一些普通处理
          console.log(res);

          // 将由 axios.request 发起的真正请求请求回来的数据传递出去给 then
          resolve(res);
        })
        .catch((err) => {
          // 请求完成后对 showLoading 进行复位
          this.showLoading = DEFAULT_LOADING;

          // 将失败传递给用户处理
          reject(err);

          console.log(err);
        });
    });
  }
4. 其他请求方法的封装
上面封装的是 request 方法,axios 自身也提供了 get、post、delete 等方法。我们也可以封装一下这些方法。
我们知道 request 方法和 axios() 方法一样是个全能方法,通过 config 配置中的 method 选项,就能指定请求类型,所以我们可以基于 request 手动配置好 method 选项就能封装出 get、post 等请求类型的请求方法。
class Ddrequest {
  // 属性略
  constructor(config: DdRequsetConifg) {
    // 略
  }

  request<T>(config: DdRequsetConifg<T>): Promise<T> {
    // 略
  }

  get<T>(config: DdRequsetConifg<T>): Promise<T> {
    // 调用 request 方法,并手动指定请求类型
    return this.request({ ...config, method: "GET" });
  }
  post<T>(config: DdRequsetConifg<T>): Promise<T> {
    return this.request({ ...config, method: "POST" });
  }
  delete<T>(config: DdRequsetConifg<T>): Promise<T> {
    return this.request({ ...config, method: "DELETE" });
  }
  patch<T>(config: DdRequsetConifg<T>): Promise<T> {
    return this.request({ ...config, method: "PATCH" });
  }
  head<T>(config: DdRequsetConifg<T>): Promise<T> {
    return this.request({ ...config, method: "HEAD" });
  }

}
手稿版
import axios from "axios/index";
import type {
  AxiosInstance,
  AxiosRequestConfig,
  AxiosResponse
} from "axios/index";
import { ElLoading } from "element-plus";
// 因为是以服务的形式引入 loading,所以要手动引入类型和样式
import { LoadingInstance } from "element-plus/es/components/loading/src/loading";

// import "element-plus/es/components/loading/style/index"; // 需要 sass-loader,太麻烦了还是全局引入样式吧

// 定义拦截器选项的类型,拦截器函数不一定全要用上,所以设计成可选的
interface DdRequsetInterceptors<T = AxiosResponse> {
  // 请求的拦截函数,拦截器正常和拦截器失败
  requestInterceptor?: (config: AxiosRequestConfig) => AxiosRequestConfig;
  requestInterceptorCatch?: (error: any) => any;
  // 响应的拦截函数,拦截器正常和拦截器失败
  responseInterceptor?: (config: T) => T;
  responseInterceptorCatch?: (error: any) => any;
}

// 设置 loading 默认开启
const DEFAULT_LOADING = true;

// 自定义的配置对象类型
// 直接使用的类型是我们自定义的类型,所以需要把泛型传递到这,从而可以再往上传到真正需要泛型的接口 DdRequsetInterceptors
interface DdRequsetConifg<T = AxiosResponse> extends AxiosRequestConfig {
  // 扩展的拦截器选项,并且拦截器是可选的
  interceptors?: DdRequsetInterceptors<T>;
  showLoading?: boolean; // 通过配置控制请求是否需要 loading 效果
}

class Ddrequest {
  instance: AxiosInstance;
  instanceInterceptor!: DdRequsetInterceptors;
  loadingInstance!: LoadingInstance; // 非空断言
  showLoading!: boolean; // 保存 showLoading 的结果,方便后续使用

  // 将类型更换成自己定义的类型
  constructor(config: DdRequsetConifg) {
    this.instance = axios.create(config);
    this.showLoading = config.showLoading ?? DEFAULT_LOADING; // 空值合并,没有配置 showLoading 默认值为 DEFAULT_LOADING

    // 获取构造实例时传入的拦截器选项并保存在一个属性中,由于拦截器是可选的,所以可能是 undefined
    if (config.interceptors) {
      this.instanceInterceptor = config.interceptors;
      // 将获取到的拦截器函数在该实例中启用
      this.instance.interceptors.request.use(
        this.instanceInterceptor?.requestInterceptor,
        this.instanceInterceptor?.requestInterceptorCatch
      );
      this.instance.interceptors.response.use(
        this.instanceInterceptor?.responseInterceptor,
        this.instanceInterceptor?.responseInterceptorCatch
      );
    }

    // 添加全局拦截器
    this.instance.interceptors.request.use(
      // 为什么能直接使用 config 对象?因为我们定义的类型继承了原类型,作为它的子类,自然能通过类型检测
      (config) => {
        console.log("全局请求拦截成功");

        if (this.showLoading) {
          // 添加 loading
          this.loadingInstance = ElLoading.service({
            lock: true, // 遮罩
            text: "正在请求中...",
            background: "rgba(0,0,0,0.5)"
          });
        }

        return config;
      },
      (err) => console.log(err)
    );
    this.instance.interceptors.response.use(
      (res) => {
        console.log("全局响应拦截成功");

        if (this.showLoading) {
          setTimeout(() => {
            // 取消 loading
            this.loadingInstance.close();
          }, 3000);
        }

        // 通知请求失败的方式:自定义状态,假设返回数据结构为:{success: false, returnCode: xxx}
        switch (res.data.returnCode) {
          case -1001: // 具体的错误代码需要和服务端对接
            console.log("请求失败");
            break;
          case 200:
            console.log("请求成功");
            return res.data; // 请求成功就预处理下请求内容
          default:
            break;
        }
        return res.data; // 处理一下返回结果,只返回请求数据
      },
      (err) => {
        console.log(err);

        // 通知请求失败方式:httpCode
        switch (err.response.status) {
          // case err.response.status >= 400 && err.response.status < 500:
          case 404:
            // 错误处理
            console.log(`${err.response.status}: 客户端请求错误`);
            break;
          // case err.response.status >= 500 && err.response.status < 600:
          case 500:
            // 错误处理
            console.log(`${err.response.status}: 服务器响应错误`);
            break;
          default:
            break;
        }
      }
    );
  }
  // 这里对 request() 封装,使其可以配置拦截器函数
  // request(config: DdRequsetConifg) {
  //   // 添加拦截器
  //   this.instance.interceptors.request.use(
  //     config.interceptors?.requestInterceptor,
  //     config.interceptors?.requestInterceptorCatch
  //   );
  //   this.instance.interceptors.response.use(
  //     config.interceptors?.responseInterceptor,
  //     config.interceptors?.responseInterceptorCatch
  //   );
  //   // 配置对象类型要换成我们自定义的,以或得配置拦截器的选项
  //   this.instance.request(config).then((res) => {
  //     console.log(res);
  //   });
  // }

  // 返回 promise 并设置 Promise 类型为泛型
  request<T>(config: DdRequsetConifg<T>): Promise<T> {
    // 返回一个 promise 让用户处理请求结果
    return new Promise((resolve, reject) => {
      if (config.interceptors?.requestInterceptor) {
        // 在发起请求之前,手动执行请求拦截器中的成功处理函数
        // 执行这个函数和执行一个普通函数没两样,只是这个函数来自请求配置对象中
        config = config.interceptors.requestInterceptor(config);
      }

      // 根据请求配置,控制 loading 开关
      if (config.showLoading === false) {
        this.showLoading = config.showLoading;
      }

      // 发送请求
      this.instance
        .request<any, T>(config)
        .then((res) => {
          // 请求成功后,手动执行响应拦截器中的成功处理函数
          if (config.interceptors?.responseInterceptor) {
            res = config.interceptors.responseInterceptor(res);
          }

          // 请求完成后对 showLoading 进行复位,要不然下一个请求也没有 loading
          this.showLoading = DEFAULT_LOADING;

          // 获取请求结果后的一些普通处理
          // console.log(res);

          // 将由 axios.request 发起的真正请求请求回来的数据传递出去给 then
          // 注意:promise 类型为 T,所以这里 resolve(res) 中 res 类型必须为 T
          // axios.request() 发起真正的请求,请求回的数据在 res 中,但是 .then(res)  res 的类型为 AxiosResponse
          resolve(res);
        })
        .catch((err) => {
          // 请求完成后对 showLoading 进行复位,要不然下一个请求也没有 loading
          this.showLoading = DEFAULT_LOADING;

          // 将失败传递给用户处理
          reject(err);
          console.log(err);
        });
    });
  }
  get<T>(config: DdRequsetConifg<T>): Promise<T> {
    // 调用 request 方法,并手动指定请求类型
    return this.request({ ...config, method: "GET" });
  }
  post<T>(config: DdRequsetConifg<T>): Promise<T> {
    return this.request({ ...config, method: "POST" });
  }
  delete<T>(config: DdRequsetConifg<T>): Promise<T> {
    return this.request({ ...config, method: "DELETE" });
  }
  patch<T>(config: DdRequsetConifg<T>): Promise<T> {
    return this.request({ ...config, method: "PATCH" });
  }
  head<T>(config: DdRequsetConifg<T>): Promise<T> {
    return this.request({ ...config, method: "HEAD" });
  }
}

export default Ddrequest;
更多推荐
 已为社区贡献1条内容


所有评论(0)