mock的基本使用-------axios篇
mock
一.mock介绍
在开发过程中,有时候后端接口还没完善,前端需要一些假数据进行测试,这时候可以用到mock模拟假数据进行测试。
1.mock的安装
npm install mockjs axios --save2.在项目中创建mock文件 在文件下创建index.js文件
import Mock from 'mockjs'
var Random = Mock.Random;


export default Mock.mock('/api/picUrl','post',(item)=>{
    //  console.log(item);
    const url = "E:\picture/"+JSON.parse(item.body).data
    return {
        'code':0,
        'success':"ok",
        'msg':"NO",
        'lastName':"GIEGIE",
        'email':Mock.mock('@EMAIL'),
        'sex':'男',
        'adress':"宇宙省银河市童话镇温柔乡",
        'data':{
            'imgeUrl':url,
            'token':"1218513485"+Random.mock

        },
        "code":200
    }
})
-
Mock.mock( template )
根据数据模板生成模拟数据。
-
Mock.mock( rurl, template )
记录数据模板。当拦截到匹配
rurl的 Ajax 请求时,将根据数据模板template生成模拟数据,并作为响应数据返回。 -
Mock.mock( rurl, function(options) )
记录用于生成响应数据的函数。当拦截到匹配
rurl的 Ajax 请求时,函数function(options)将被执行,并把执行结果作为响应数据返回。 -
Mock.mock( rurl, rtype, template )
记录数据模板。当拦截到匹配
rurl和rtype的 Ajax 请求时,将根据数据模板template生成模拟数据,并作为响应数据返回。 -
Mock.mock( rurl, rtype, function(options) )
记录用于生成响应数据的函数。当拦截到匹配
rurl和rtype的 Ajax 请求时,函数function(options)将被执行,并把执行结果作为响应数据返回。
3.在main.js文件中引入mock.js文件
import Vue from 'vue'
import App from './App.vue'
import router from './router'
import ElementUI from 'element-ui'
import 'element-ui/lib/theme-chalk/index.css';
import axios from "axios"
import "./mockjs/index"

Vue.prototype.$http = axios;
Vue.config.productionTip = false;
Vue.use(ElementUI)
new Vue({
  router,
  render: h => h(App)
}).$mount('#app')
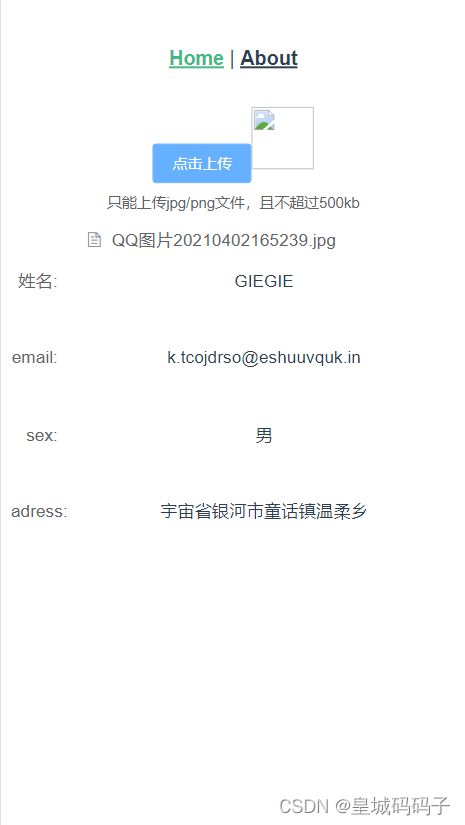
4.在组件中使用 这里我们安装axios请求 在页面中使用
<template>
  <div class="home">
    <el-upload class="upload-demo" :http-request="getFileUrl" action="#" :on-preview="handlePreview"
      :on-remove="handleRemove" :before-remove="beforeRemove" multiple :limit="3" :on-exceed="handleExceed">
      <el-button size="small" type="primary">点击上传</el-button>
      <img style="width:50px;height:50px" :src="imgUrl">
      <div slot="tip" class="el-upload__tip">只能上传jpg/png文件,且不超过500kb</div>
    </el-upload>

    <el-form :model="formDate">
      <el-form-item label="姓名:" label-width="50px" prop="lastName">
       <span>{{this.imgUrl.lastName}}</span>
      </el-form-item>
      <el-form-item label="email:" label-width="50px" prop="email">
         <span>{{this.imgUrl.email}}</span>
      </el-form-item>
      <el-form-item label="sex:"  label-width="50px" prop="sex">
         <span>{{this.imgUrl.sex}}</span>
      </el-form-item>
      <el-form-item label="adress:"  label-width="50px" prop="adress">
          <span>{{this.imgUrl.adress}}</span>
      </el-form-item>

    </el-form>

  </div>
</template>

<script>
export default {
  data() {
    return {
      imgUrl: "",
      formDate: {
        lastName: "",
        email: "",
        sex: "",
        adress:""
      }
    };
  },
  methods: {
    getFileUrl(file) {

      const isJPG = file.file.type == "image/jpeg" || file.file.type == "image/png";
      const isSize = file.file.size / 1024 / 1024 < 2;
      if (!isSize) {
        this.$message.error("上传的片大小不能超过2MB");
      }
      if (!isJPG) {
        this.$message.error("上传的图片只能是JPEG 或者 JPG 或者 PNG!")
      }
      if (isJPG && isSize) {
        this.$http.post("/api/picUrl",
          { data: file.file.name }
        ).then((res) => {
          if (res.data.code == 0) {

            this.imgUrl = res.data
            console.log(this.imgUrl);


          }
        })
      }
    },
    handleRemove(file, fileList) {
      console.log(file, fileList);
    },
    handlePreview(file) {
      console.log(file);
    },
    handleExceed(files, fileList) {
      this.$message.warning(`当前限制选择 3 个文件,本次选择了 ${files.length} 个文件,共选择了 ${files.length + fileList.length} 个文件`);
    },
    beforeRemove(file, fileList) {
      return this.$confirm(`确定移除 ${file.name}?`);
    }
  }
}
</script>
总结:这里我做了一个上传图片获取接口信息案例,不过缺点是图片显示不出来,我去查了一下原因,竟然是浏览器不支持file开头的文件显示,解决方法是在后端服务器加一个映射路径

为开发者提供学习成长、分享交流、生态实践、资源工具等服务,帮助开发者快速成长。
更多推荐


 0
0 0
0- 0


 已为社区贡献2条内容

所有评论(0)