docker部署prometheus+Grafana+altermanager+钉钉推送
docker部署prometheus+Grafana+altermanager+钉钉推送
目录
一.组件说明
Prometheus Server: 普罗米修斯的主服务器,端口号9090
NodeEXporter: 负责收集Host硬件信息和操作系统信息,端口号9100
cAdvisor:负责收集Host上运行的容器信息,端口号占用8080
Grafana:负责展示普罗米修斯监控界面,端口号3000
altermanager:等待接收prometheus发过来的告警信息,altermanager再发送给定义的收件人prometheus-webhook-dingtalk:钉钉发送警报
二.环境说明
网络互通,防火墙添加对应的端口
| hostname | ip | 组件 |
| master | 10.10.10.101 | Prometheus Server,NodeEXporter,cAdvisor,altermanager,prometheus-webhook-dingtalk |
| slave1 | 10.10.10.102 | NodeEXporter,cAdvisor |
| slave2 | 10.10.10.103 | NodeEXporter,cAdvisor |
三.部署node-EXporter
三台主机都要安装,收集硬件和系统信息
docker run -d -p 9100:9100 -v /proc:/host/proc -v /sys:/host/sys -v /:/rootfs --net=host prom/node-exporter --path.procfs /host/proc --path.sysfs /host/sys --collector.filesystem.ignored-mount-points "^/(sys|proc|dev|host|etc)($|/)"四.部署安装cAdvisor
主机都要安装,收集节点容器信息
docker run -v /:/rootfs:ro -v /var/run:/var/run/:rw -v /sys:/sys:ro -v /var/lib/docker:/var/lib/docker:ro -p 8080:8080 --detach=true --name=cadvisor --net=host google/cadvisor查看网址:ip:8080/containers
五.master安装prometheus
prometheus配置文件
# my global config
global:
  scrape_interval: 15s # Set the scrape interval to every 15 seconds. Default is every 1 minute.
  evaluation_interval: 15s # Evaluate rules every 15 seconds. The default is every 1 minute.
  # scrape_timeout is set to the global default (10s).

# Alertmanager configuration
alerting:
  alertmanagers:
    - static_configs:
        - targets:
           - 10.10.10.101:9093

# Load rules once and periodically evaluate them according to the global 'evaluation_interval'.
rule_files:
   - "/usr/local/prometheus/rules/*.yml"
  # - "first_rules.yml"
  # - "second_rules.yml"

# A scrape configuration containing exactly one endpoint to scrape:
# Here it's Prometheus itself.
scrape_configs:
  # The job name is added as a label `job=<job_name>` to any timeseries scraped from this config.
  - job_name: "prometheus"

    # metrics_path defaults to '/metrics'
    # scheme defaults to 'http'.

    static_configs:
      - targets: ["10.10.10.101:9090",'10.10.10.101:8080','10.10.10.101:9100','10.10.10.102:8080','10.10.10.102:9100','10.10.10.103:8080','10.10.10.103:9100']
  - job_name: "springboot_prometheus"
    scrape_interval: 5s
    metrics_path: '/actuator/prometheus'
    static_configs:
      - targets: ['10.10.10.103:8081']
1.rule_files是配置规则的路径,要和你部署docker指令的路径一致
2.job_name,我这边配置了两个job,一个用来检测服务器状态,一个用来查看自定义的服务的状态,job_name会用在下面配置的规则中
规则都放到映射的路径下/home/prometheus/rules
服务器状态的配置文件:server.yml
groups:
  - name: Warning
    rules:
      - alert: NodeMemoryUsage
        expr: 100 - (node_memory_MemFree_bytes + node_memory_Cached_bytes + node_memory_Buffers_bytes) / node_memory_MemTotal_bytes*100 > 80
        for: 1m
        labels:
          status: Warning
        annotations:
          summary: "{{$labels.instance}}: 内存使用率过高"
          description: "{{$labels.instance}}: 内存使用率大于 80% (当前值: {{ $value }}"

      - alert: NodeCpuUsage
        expr: (1-((sum(increase(node_cpu_seconds_total{mode="idle"}[1m])) by (instance)) / (sum(increase(node_cpu_seconds_total[1m])) by (instance)))) * 100 > 70
        for: 1m
        labels:
          status: Warning
        annotations:
          summary: "{{$labels.instance}}: CPU使用率过高"
          description: "{{$labels.instance}}: CPU使用率大于 70% (当前值: {{ $value }}"

      - alert: NodeDiskUsage
        expr: 100 - node_filesystem_free_bytes{fstype=~"xfs|ext4"} / node_filesystem_size_bytes{fstype=~"xfs|ext4"} * 100 > 80
        for: 1m
        labels:
          status: Warning
        annotations:
          summary: "{{$labels.instance}}: 分区使用率过高"
          description: "{{$labels.instance}}: 分区使用大于 80% (当前值: {{ $value }}"

      - alert: Node-UP
        expr: up{job='prometheus'} == 0
        for: 1m
        labels:
          status: Warning
        annotations:
          summary: "{{$labels.instance}}: 服务宕机"
          description: "{{$labels.instance}}: 服务中断超过1分钟"

      - alert: TCP
        expr: node_netstat_Tcp_CurrEstab > 1000
        for: 1m
        labels:
          status: Warning
        annotations:
          summary: "{{$labels.instance}}: TCP连接过高"
          description: "{{$labels.instance}}: 连接大于1000 (当前值: {{$value}})"

      - alert: IO
        expr: 100 - (avg(irate(node_disk_io_time_seconds_total[1m])) by(instance)* 100) < 60
        for: 1m
        labels:
          status: Warning
        annotations:
          summary: "{{$labels.instance}}: 流入磁盘IO使用率过高"
          description: "{{$labels.instance}}:流入磁盘IO大于60%  (当前值:{{$value}})"
自定义springboot服务的规则java_server.yml
groups:
  - name: Warning
    rules:
      - alert: Node-UP
        expr: up{job='springboot_prometheus'} == 0
        for: 1m
        labels:
          status: Warning
        annotations:
          summary: "{{$labels.instance}}: 服务停止"
          description: "{{$labels.instance}}: 服务中断超过1分钟"
安装prometheus:
docker run -d --restart always --name prometheus -p 9090:9090 -v /home/prometheus/prometheus.yml:/etc/prometheus/prometheus.yml -v /home/prometheus/rules:/usr/local/prometheus/rules prom/prometheus --config.file=/etc/prometheus/prometheus.yml --web.enable-lifecycle网址:10.10.10.101:9090/alerts
看到自定义的报警规则即可
六.master安装钉钉插件
dingding.tmpl是报警的模版,在网上搜了一个
{{ define "__subject" }}[{{ .Status | toUpper }}{{ if eq .Status "firing" }}:{{ .Alerts.Firing | len }}{{ end }}] {{ .GroupLabels.SortedPairs.Values | join " " }} {{ if gt (len .CommonLabels) (len .GroupLabels) }}({{ with .CommonLabels.Remove .GroupLabels.Names }}{{ .Values | join " " }}{{ end }}){{ end }}{{ end }}
{{ define "__alertmanagerURL" }}{{ .ExternalURL }}/#/alerts?receiver={{ .Receiver }}{{ end }}
{{ define "__text_alert_list" }}{{ range . }}
告警程序:prometheus_alert
告警级别:{{ .Labels.severity }}
告警类型:{{ .Labels.alertname }}
主机: {{ .Labels.instance }}
命名空间: {{ .Labels.namespace }}
Pod: {{ .Labels.pod }}
告警主题: {{ .Annotations.summary }}
告警描叙: {{ .Annotations.description }}
触发时间: {{ .StartsAt.Format "2006-01-02 15:04:05" }}
------------------------
{{ end }}{{ end }}
{{ define "__text_resolve_list" }}{{ range . }}
恢复程序:{{ .Labels.alertname }}
主机: {{ .Labels.instance }}
恢复描叙: {{ .Annotations.description }}
触发时间: {{ .StartsAt.Format "2006-01-02 15:04:05" }}
------------------------
{{ end }}{{ end }}
{{ define "ding.link.title" }}{{ template "__subject" . }}{{ end }}
{{ define "ding.link.content" }}#### \[{{ .Status | toUpper }}{{ if eq .Status "firing" }}:{{ .Alerts.Firing | len }}{{ end }}\] **[{{ index .GroupLabels "alertname" }}]({{ template "__alertmanagerURL" . }})**
{{ if gt (len .Alerts.Firing) 0 -}}

**====侦测到故障====**
{{ template "__text_alert_list" .Alerts.Firing }}
{{- end }}
{{ if gt (len .Alerts.Resolved) 0 -}}
恢复列表:
{{ template "__text_resolve_list" .Alerts.Resolved }}
{{- end }}
{{- end }}
运行指令
docker run -d --restart always -p 8060:8060 --name webhook-dingding -v /home/prometheus-webhook-dingtalk/dingding.tmpl:/root/dingding.tmpl -v /etc/localtime:/etc/localtime timonwong/prometheus-webhook-dingtalk:v0.3.0 --template.file="/root/dingding.tmpl" --ding.profile="webhook1=https://oapi.dingtalk.com/robot/send?access_token=**********"注意版本0.3.0,新版不能这么使用,后面是*****是自己的钉钉机器人的token,机器人的安全设置设置的自定义关键词

七.安装altermanager
配置文件alertmanager.yml
global:
  resolve_timeout: 5m
route:
  receiver: webhook
  group_wait: 30s
  group_interval: 5m
  repeat_interval: 5m
  group_by: [alertname]
  routes:
  - receiver: webhook
    group_wait: 10s
receivers:
- name: webhook
  webhook_configs:
  - url:'http://10.10.10.101:8060/dingtalk/webhook1/send'
    send_resolved: true     # 表示服务恢复后会收到恢复告警
运行指令
docker run -d --name alertmanager -p 9093:9093 -v /home/alertmanager/alertmanager.yml:/etc/alertmanager/alertmanager.yml prom/alertmanager查看页面:10.10.10.101:9093/#/status
状态是ready,能看到你的配置即可
八.安装grafana
docker run -d -p 3000:3000 --name grafana -v /home/grafana:/var/lib/grafana -e "GF_SECURITY_ADMIN_PASSWORD=admin@123456" grafana/grafana1.配置grafana,添加数据源

2.选择添加prometheus,添加自己的地址,保存即可

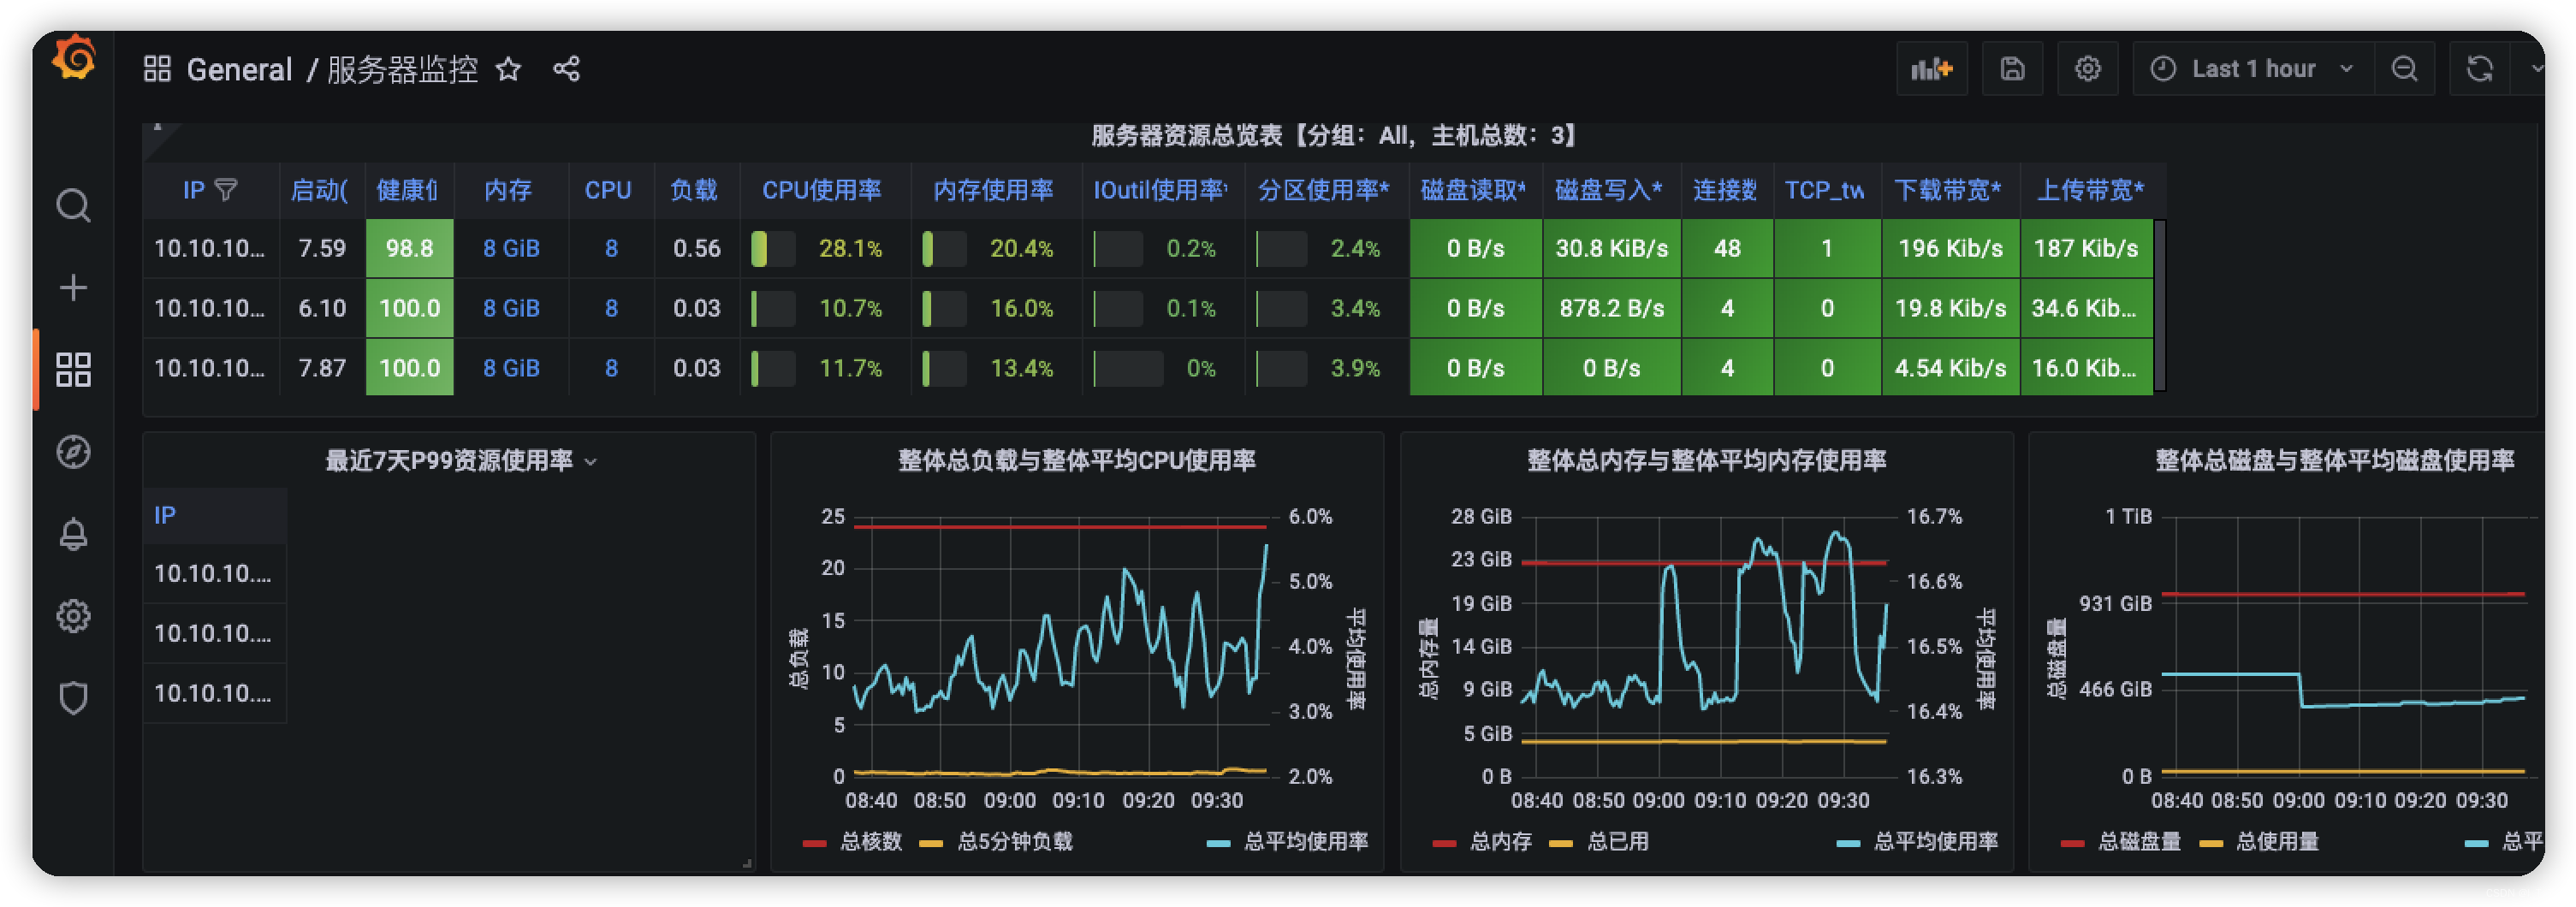
3.导入模版,输入8919(从官方模版去查需要的模版),load

4.配置名称和对应的prometheus,import


九.监控springboot运行状态
1.引入以来pom
<?xml version="1.0" encoding="UTF-8"?>
<project xmlns="http://maven.apache.org/POM/4.0.0" xmlns:xsi="http://www.w3.org/2001/XMLSchema-instance"
         xsi:schemaLocation="http://maven.apache.org/POM/4.0.0 https://maven.apache.org/xsd/maven-4.0.0.xsd">
    <modelVersion>4.0.0</modelVersion>
    <parent>
        <groupId>org.springframework.boot</groupId>
        <artifactId>spring-boot-starter-parent</artifactId>
        <version>2.7.1</version>
        <relativePath/> <!-- lookup parent from repository -->
    </parent>
    <groupId>com.example</groupId>
    <artifactId>springboot_prometheus</artifactId>
    <version>0.0.1-SNAPSHOT</version>
    <name>springboot_prometheus</name>
    <description>Demo project for Spring Boot</description>
    <properties>
        <java.version>1.8</java.version>
    </properties>
    <dependencies>
        <dependency>
            <groupId>org.springframework.boot</groupId>
            <artifactId>spring-boot-starter-actuator</artifactId>
        </dependency>
        <dependency>
            <groupId>org.springframework.boot</groupId>
            <artifactId>spring-boot-starter-web</artifactId>
        </dependency>

        <dependency>
            <groupId>org.projectlombok</groupId>
            <artifactId>lombok</artifactId>
            <optional>true</optional>
        </dependency>
        <dependency>
            <groupId>org.springframework.boot</groupId>
            <artifactId>spring-boot-starter-test</artifactId>
            <scope>test</scope>
        </dependency>
        <!-- https://mvnrepository.com/artifact/io.micrometer/micrometer-registry-prometheus -->
        <dependency>
            <groupId>io.micrometer</groupId>
            <artifactId>micrometer-registry-prometheus</artifactId>
            <version>1.9.1</version>
        </dependency>

    </dependencies>

    <build>
        <plugins>
            <plugin>
                <groupId>org.springframework.boot</groupId>
                <artifactId>spring-boot-maven-plugin</artifactId>
                <configuration>
                    <excludes>
                        <exclude>
                            <groupId>org.projectlombok</groupId>
                            <artifactId>lombok</artifactId>
                        </exclude>
                    </excludes>
                </configuration>
            </plugin>
        </plugins>
    </build>

</project>
2.配置application.yml
server:
  port: 8081
#prometheus监控平台配置
spring:
  application:
    name: springboot-prometheus-server
management:
  endpoints:
    web:
      exposure:
        include: '*'
      # 监控路径前缀
      base-path: /actuator
  endpoint:
    # 开启允许远程shutdown,通过post请求。
    shutdown:
      enabled: true
    health:
      show-details: always
  metrics:
    tags:
      application: ${spring.application.name}
3.打docker镜像,部署到10.10.10.103
1.创建dockerfile文件,和jar包在同一目录
FROM java:8
VOLUME /tmp
ADD *.jar  /app.jar
RUN bash -c 'touch /app.jar'
ENTRYPOINT ["java","-jar","-Xms128m","-Xmx300m","/app.jar"]
EXPOSE 8081
2.进入jar的目录,进行打包
docker build -t springboot_prometheus:0.1 .3.镜像导出压缩包
docker save springboot_prometheus:0.1 > springboot_prometheus.tar4.将压缩包上传到103服务器,导入,运行
docker load < springboot_prometheus.tar docker run -p 8081:8081 springboot_prometheus:0.15.grafana导入jvm的模版(4701)

参考
更多推荐
 已为社区贡献1条内容


所有评论(0)