
一小时学会使用pinia
1、官方内容Pinia 已经被纳入官方账户下了(http://github.com/vuejs/pinia),那么,Pinia的定位是啥,有什么优势。选择Pina的优势有没有mutations,更好的typescript支持,不需要注入、导入函数、调用时会自动补全,无需动态添加stores,没有命名空间,有Vue专用开发工具Vue DevTools支持。Pinia从使用角度和之前的Vuex一样。S
Pinia 是 Vue 新一代的轻量级状态管理库,相当于Vuex,也是Vue核心团队推荐的状态管理库。并且实现了一些Vuex 5的RFCs,同时支持 Vue2 和 Vue3。未来很有可能替代Vuex,比Vuex更容易上手。

一、Pinia的介绍
1、官方内容
Pinia 已经被纳入官方账户下了(http://github.com/vuejs/pinia),那么,Pinia的定位是啥,有什么优势。选择Pina的优势有没有mutations,更好的typescript支持,不需要注入、导入函数、调用时会自动补全,无需动态添加stores,没有命名空间,有Vue专用开发工具Vue DevTools支持。
1、核心概念
Pinia从使用角度和之前的Vuex一样。
Store是保存状态与业务逻辑的实体,有三个核心概念。
◆ state:存储全局状态
◆ getters:类似于组件的computed,根据已有state封装派生数据,也具有缓存的特性
◆ actions:类似于组件的methods,用来封装业务逻辑,支持同步和异步
2、特性
Pinia具有以下几点特性:
- 直观,像定义components一样地定义 store
- 完整的Typescript支持
- 去除 mutations,只有 state,getters,actions
- actions支持同步和异步
- Vue Devtools支持Pinia,提供更好的开发体验
- 能够构建多个 stores ,并实现自动地代码拆分
- 极其轻量(1kb),甚至感觉不到它的存在
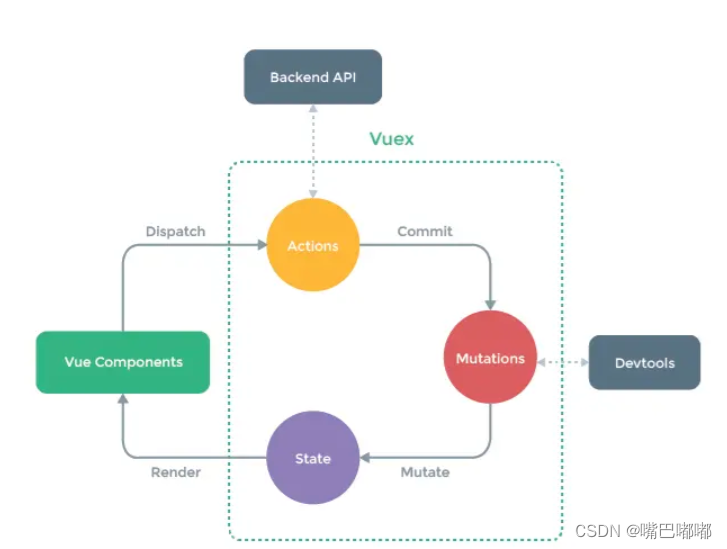
3、图解
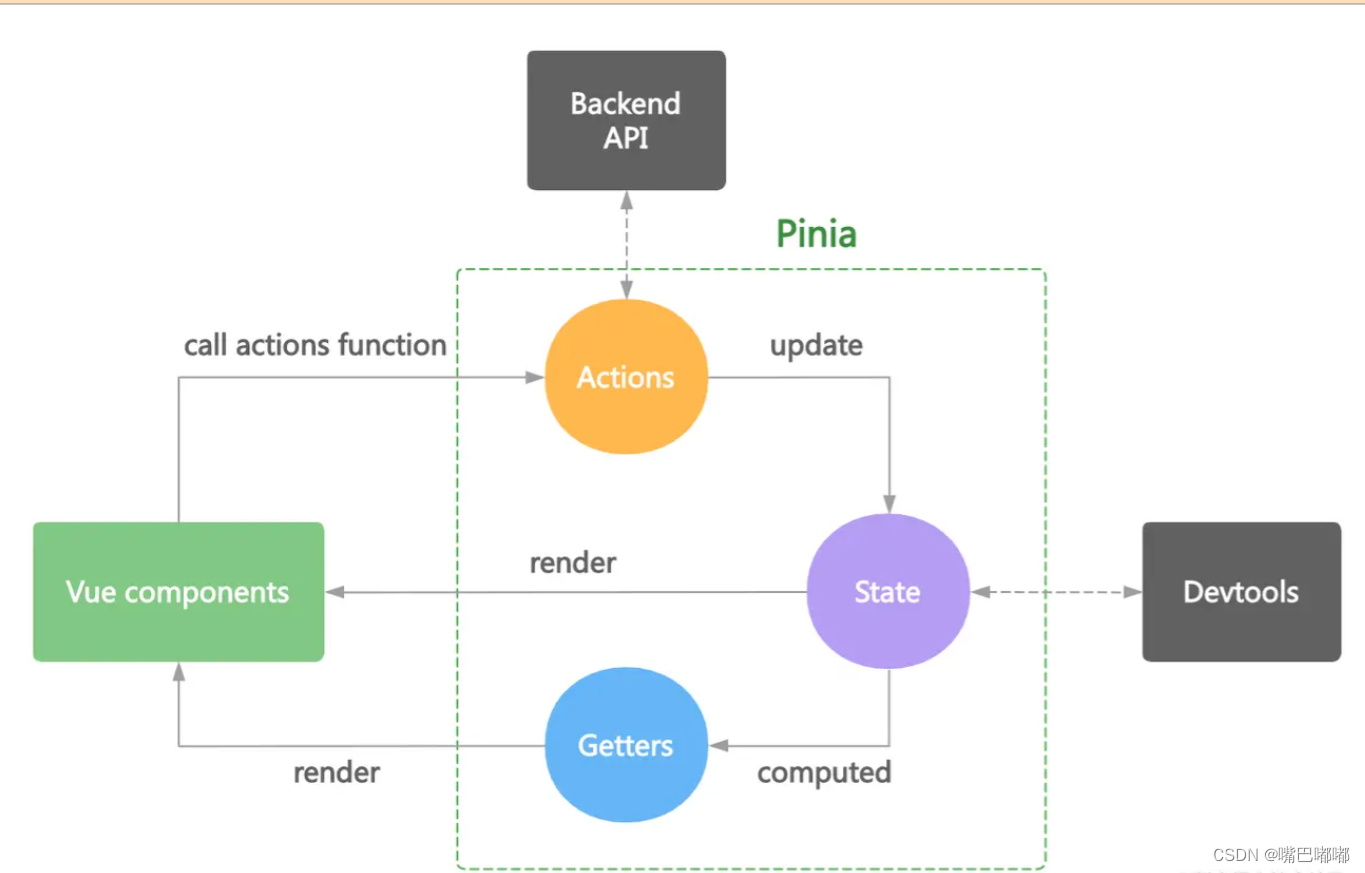
对比vuex
二、Pinia使用
1、安装
下述demo使用vue3, 先用vite快速创建一个vue项目:
npm init vite@latest
安装pinia
npm install pinia
在 src/main.ts 文件,使用Vue.use()方法将pinia作为插件使用:
import { createApp } from 'vue'
import { createPinia } from 'pinia'
import App from './App.vue'
createApp(App).use(createPinia()).mount('#app')
2、使用
1)defineStore定义容器
参数1:是对仓库的命名,名称必须具备唯一性;
参数2:配置的选项对象,即state、getters、actions,其中state的写法必须是函数,为了避免在服务端交叉请求导致的状态数据污染,而且必须是箭头函数,为了更好的TS类型推导。
创建store文件:index.ts
import { defineStore } from 'pinia'
export default defineStore('myGlobalState', {
    // other options
      state: () => {
        return {
            count: 1,
	    	message: 'Hello world',
	    	phone: 13811111199
        }
    }
});
1、使用 store
通过 import 导入 javascript 模块的方式引入,引入后,直接使用变量接收即可。
<script setup lang="ts">
import useCommonStore from '../store/index';
// setup内不用导出,定义变量即可使用
const store = useCommonStore();
</script>
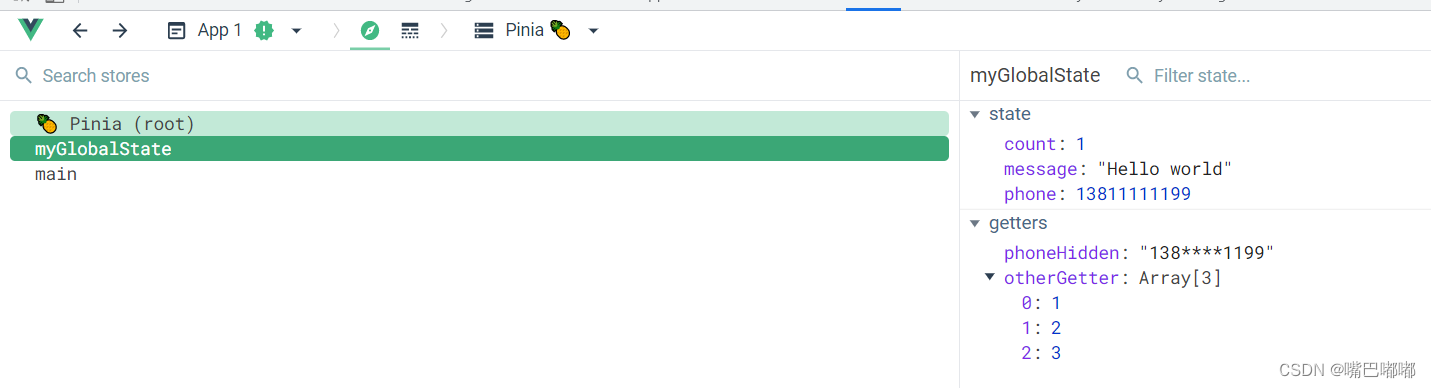
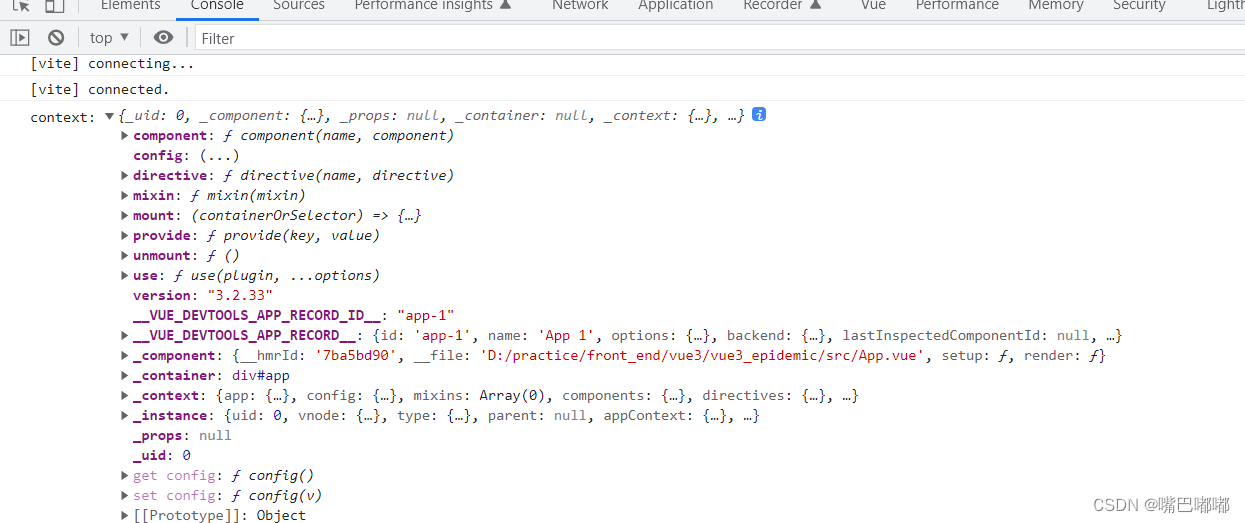
引入后,F12打开Vue Devtools查看,如下图所示:
可以看到定义的变量以及pinia定义的store
对比Vuex
从以上的Pinia定义store和使用store,可以看出,Pinia不同于Vuex:
Vuex:
Vuex的store需要一个主入口
通过modules属性,拆分成不同的模块
自动挂载在Vue实例上,通过this.$store去调用或者mapGetters等方法
Pinia:
Pinia的store不需要主入口
直接创建不同的store文件即可实现多模块
在使用时,直接通过javascript的模块导入,即可使用,可方便看到从哪个文件导入
2)State(数据)
state存储store的数据部分,Pinia的state是一个返回不同data对象的函数,完整类型推断建议使用箭头函数。
非常类似于我们组件定义中的data项。
import { defineStore } from 'pinia'
export default defineStore('myGlobalState', {
    // other options
      state: () => {
        return {
            count: 1,
	    	message: 'Hello world',
	    	phone: 13811111199
        }
    }
});
1、使用state
以javascript中的模块导出的方式导出store数据,state中的数据均可通过变量.state数据名获取:
直接获取:
<script setup lang="ts">
import useCommonStore from '../store/index';

const store = useCommonStore();
</script>
<template>
    <div>
        {{ store.count}}
    </div>
</template>
解构获取:
store是一个reactive响应式对象,直接解构会使其失去响应式,类似setup中的props,为了既可解构又可保持其响应式,可使用storeToRefs,它将为每个reactive属性创建refs
2、修改state
- 直接修改state:
import { useStore } from '@/store'

const store = useStore()
const handleClickChangeOne = () => {
  store.count++
  store.message = 'hahah'
}
- $patch以对象形式修改:
const handleClickChangeTwo = () => {
  store.$patch({
    count: store.count + 1,
    message: 'Abalam',
  })
}
缺点: 如果只需修改state数据中的某一项,仍然需要将整个对象传给store。
3. $patch接收函数:
接收一个函数做为参数,函数参数为state对象,可直接针对要修改的属性进行修改。
const handleClickChangeThree = () => {
  store.$patch((state) => {
    state.count = store.count + 1
    state.message = 'Abalam'
  })
}
- 替换state:
可以通过设置 store 的 $state 属性为一个新对象,来替换 store 的整个state。
const handleClickChangeFour = () => {
  store.$state = {
    count: count + 1,
    message: 'Abalam',
  }
}
- 重置state:
可以通过 store 的 $reset() 方法重置 state 的值为初始值,比如修改了name、库存等,可一键重置,将值初始化为初始状态的值。
store.$reset()
- 订阅state
通过store的$subscribe()方法监听state及其变化,类似于Vuex的subscribe方法。与常规watch()相比,使用$subscribe()的优点是,在patch之后,ubscribe只会触发一次。
// 监听数据变化
store.$subscribe((mutation, state) => {
  console.log(mutation, state)
})
当我们触发页面上更改 store 的操作时,则会触发 subscribe 监听,监听函数有两个参数 mutation 和 state。
mutation:包含3个参数
type:操作类型,‘direct’ | ‘patch object’ | ‘patch function’
storeId:操作的store id
events:操作的事件详情,包括针对的数据、新值、旧值等
state:Proxy类型的对象

- state订阅与组件分离
默认情况下,状态订阅绑定到添加它们的组件(如果store是在组件的setup()中)。也就是说,当卸载组件时,它们将自动删除。如果要在卸载组件后保留它们,可将{detached:true}作为第二个参数传递,以从当前组件分离state订阅。
store.$subscribe(function () {
  console.log('')
}, { detached: true })
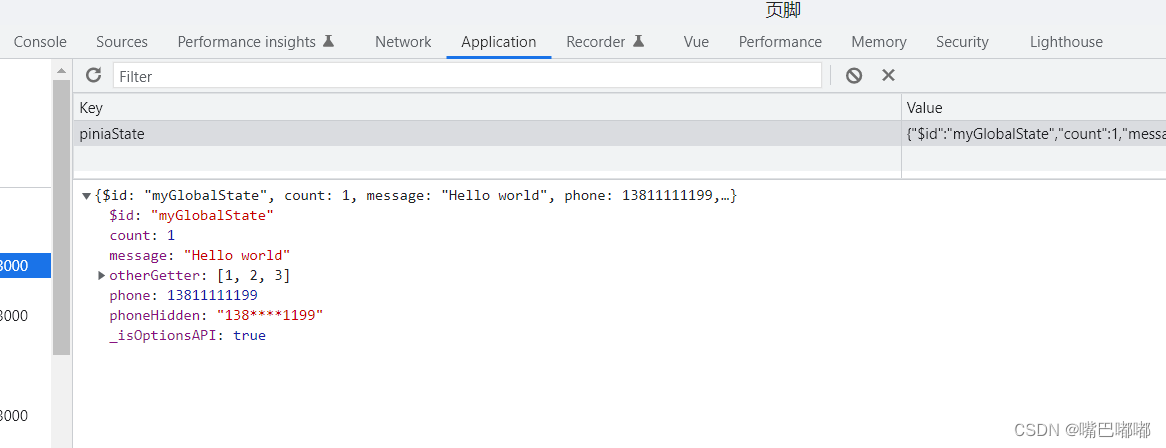
在pinia实例上监听整个state
watch(
  store,
  (state) => {
    // 每当它发生变化时,将整个状态持久化到本地存储
    localStorage.setItem('piniaState', JSON.stringify(state))
  },
  { deep: true }
)
3)Getters(计算数据)
Getters 完全等同于 store 中 state 的 computed values。可以使用defineStore() 中的 getters 属性定义它们。
接收state作为第一个参数,推荐使用箭头函数。
定义getters
    getters: {
        phoneHidden (state) {
            console.log('Getter被调用')
            return state.phone.toString().replace(/^(\d{3})\d{4}(\d{4})$/, '$1****$2')
        }
使用getters
<p>getter:{{store.phoneHidden}}</p>
访问其他getters
与计算属性一样,可以组合多个 getters,通过this.去访问其他getters。
other-sotre.ts
import { defineStore } from "pinia";
export const useOtherStore = defineStore('main', {
    state: () => ({
        data: [1, 2, 3]
    })
})
index.ts
    getters: {
        phoneHidden (state) {
            console.log('Getter被调用')
            return state.phone.toString().replace(/^(\d{3})\d{4}(\d{4})$/, '$1****$2')
        },
        otherGetter (state) {
            const otherStore = useOtherStore()
            return otherStore.data
        },
    },
给getters传递参数
getters只是一个计算属性,因此不可能向其传递任何参数。但是,可以从getters返回一个函数来接受任何参数。
export default defineStore('common', {
    getListById: state => {
       return (id: number) => state.list.find((item) => item.id === id);
    }
});
<script setup lang="ts">
import useCommonStore from '../store/common';
const common = useCommonStore();
const { getListById } = storeToRefs(useCommonStore());
</script>
<template>
    <div> {{ getListById(2) }} </div>
</template>
注意:使用这种方式的时候,getters 不再被缓存,只是函数调用。
4)Actions(方法)
Actions 相当于组件中的方法,可以用 defineStore() 中的 actions 属性定义,非常适合定义业务逻辑。
定义actions
export const useStore = defineStore('common', {
  state: () => ({
    count: 0,
  }),
  actions: {
    increment() {
      this.count++
    },
    randomizeCounter() {
      this.count = Math.round(100 * Math.random())
    },
  },
})
使用actions
同步的方式:
<script setup lang="ts">
import useCommonStore from '../store/common';
const common = useCommonStore();
</script>
<template>
    <button @click="common.increment()">触发actions</button>
</template>
异步的方式:
import { mande } from 'mande'

const api = mande('/api/users')

export const useUsers = defineStore('users', {
  state: () => ({
    userData: null,
    // ...
  }),

  actions: {
    async registerUser(login, password) {
      try {
        this.userData = await api.post({ login, password })
        showTooltip(`Welcome back ${this.userData.name}!`)
      } catch (error) {
        showTooltip(error)
        // let the form component display the error
        return error
      }
    },
  },
})
访问其他store的actions
import { useAuthStore } from './auth-store'

export const useSettingsStore = defineStore('settings', {
  state: () => ({
    // ...
  }),
  actions: {
    async fetchUserPreferences(preferences) {
      const auth = useAuthStore()
      if (auth.isAuthenticated) {
        this.preferences = await fetchPreferences()
      } else {
        throw new Error('User must be authenticated')
      }
    },
  },
})
订阅actions
使用store.$onAction()订阅actions,传递给它的回调函数在action之前执行,after在actions resolves之后执行,onError在actions抛出异常和错误的时候执行。
const unsubscribe = someStore.$onAction(
  ({
    name, // name of the action
    store, // store instance, same as `someStore`
    args, // array of parameters passed to the action
    after, // hook after the action returns or resolves
    onError, // hook if the action throws or rejects
  }) => {
    // a shared variable for this specific action call
    const startTime = Date.now()
    // this will trigger before an action on `store` is executed
    console.log(`Start "${name}" with params [${args.join(', ')}].`)

    // this will trigger if the action succeeds and after it has fully run.
    // it waits for any returned promised
    after((result) => {
      console.log(
        `Finished "${name}" after ${
          Date.now() - startTime
        }ms.\nResult: ${result}.`
      )
    })

    // this will trigger if the action throws or returns a promise that rejects
    onError((error) => {
      console.warn(
        `Failed "${name}" after ${Date.now() - startTime}ms.\nError: ${error}.`
      )
    })
  }
)

// manually remove the listener
unsubscribe()
$onAction 一般是在组件的 setup 建立,它会随着组件的 unmounted 而自动取消。如果你不想让它取消订阅,可以将第二个参数设置为 true:
someStore.$onAction(callback, true)
5)Plugins(插件)
通过一些low level Api(底层API),可以对pinia store进行扩展:
- 给 store 添加新的属性
- 给 store 添加新的选项
- 给 store 添加新的方法
- 包装已经存在的方法
- 修改或者删除 actions
- 基于特定的 store 做扩展
Plugins 通过 pinia.use() 添加到 pinia 实例中。
在store目录下创建pinia-plugin.ts,存储plugins相关:
import { PiniaPluginContext } from "pinia";
export default function piniaPlugin(context: PiniaPluginContext) {
    console.log('context:', context);
}
然后在main.ts中引入插件
import { createApp } from 'vue'
import { createPinia } from 'pinia'
import piniaPlugin from './store/pinia-plugin'
import App from './App.vue'

const pinia = createPinia();
pinia.use(piniaPlugin);

createApp(App).use(pinia).mount('#app')
context内容分为4部分:
- createApp() 中创建的 app 实例
- defineStore 中的配置
- createPinia() 中创建的 pinia 实例
- 当前 store 对象
我们可以基于上面的context进行扩展。
三、结束
如有不对之处,欢迎批评指正!也可以留言相互交流学习!

瓜分20万奖金 获得内推名额 丰厚实物奖励 易参与易上手
更多推荐

 6
6 0
0- 0


 已为社区贡献3条内容

所有评论(0)