
使用Idea连接Mysql以及基本的连接Mysql方式
首先,连接Mysql数据库先下载相应的Jar包,首先前往Mysql官网下载https://dev.mysql.com/downloads/j/选择对应的jar包下载就可以了就像这样:然后就是把jar包放在模块的libs包里面就行啦,就像这样然后点击添加的jar包,右键点击 Add as library准备工作就做完了。连接数据库的步骤分为四步1 注册驱动-加载Driver2 获取连接-得到Conn
首先,连接Mysql数据库先下载相应的Jar包,首先前往Mysql官网下载
https://dev.mysql.com/downloads/j/选择对应的jar包下载就可以了
就像这样:


然后就是把jar包放在模块的libs包里面就行啦,就像这样
然后点击添加的jar包,右键点击 Add as library准备工作就做完了。
连接数据库的步骤分为四步
1 注册驱动-加载Driver
2 获取连接-得到Connection
3 执行增删改查-发送Sql语句,数据库执行
4 释放资源
第一种方式,利用DriverManager获取数据库url
public class Test01{
public static void main(String[]args)throws ClassNotFoundException,SQLException{
Connection   con = null;//定义连接对象
Class.forName("com.mysql.cj.jdbc.Driver");//加载数据库驱动类
con=DriverManager.getConnection("jdbc:mysql://localhost:3306/jdbc_text","root","*****");//通过访问数据库的URL,获取数据库对象,进行连接,第一个为数据库URL,第二个为用户,第三个为本地Mysql数据库登录密码

if(con!=null)
{
System.out.println("第一种方式数据库连接成功");
System.out.println(con);
}
con.close();//关闭连接
    }
}
第二种连接方式,通过反射机制连接数据库,使用反射加载Driver,动态加载更为灵活,减少依赖性
public class Test02{
public static void main(String[]args) throws ClassNotFoundException,InstantiationException,IllegalAccessException,SQLException
{
   Class cl= Class.forName("com.mysql.cj.jdbc.Driver");
    Driver driver = (Driver)cl.newInstance();
    String url = "jdbc:mysql://localhost:3306/jdbc_text";

    Properties info = new Properties();
    info.setProperty("user","root");//写入用户
    info.setProperty("password","*****");//密码

    Connection  connection = driver.connect(url,info);//得到连接

    System.out.println("第二种方式连接数据库\n"+connection);
    connection.close();//关闭连接
   }
}

第三种连接方式
public class Test03{
    public static void main(String[] args) throws ClassNotFoundException, InstantiationException, IllegalAccessException, SQLException {
      Class cl = Class.forName("com.mysql.cj.jdbc.Driver");//注册驱动
      Driver driver = (Driver) cl.newInstance();
      String url = "jdbc:mysql://localhost:3306/jdbc_text";
           //前面jdbc:mysql://localhost:3306/ //3306是Mysql监听端口号,后面填写你要连接的数据库名字

      String user = "root";//用户名

      String password = "*****";您的Mysql启动密码
      DriverManager.registerDriver(driver);//注册驱动程序
      Connection connection = DriverManager.getConnection(url,user,password);//传入参数
      System.out.println("使用DriverManager连接数据库"+connection);

      connection.close();//关闭连接
      //在编写代码过程中出现异常都可抛出
   }
}
第三种方式和第二种方式区别不大,大同小异,值得注意的是mysqL驱动5.1.6可以无需CLass . forName(com.mysql.jdbc.Driver"),从jdk1.5以后使用了jdbc4,不再需要显示调用class.forName()注册驱动而是自动调用驱动jar包下META-INF\services\java .sql.Driver文本中的类名称自动去注册
第四种连接方式,通过配置文件连接
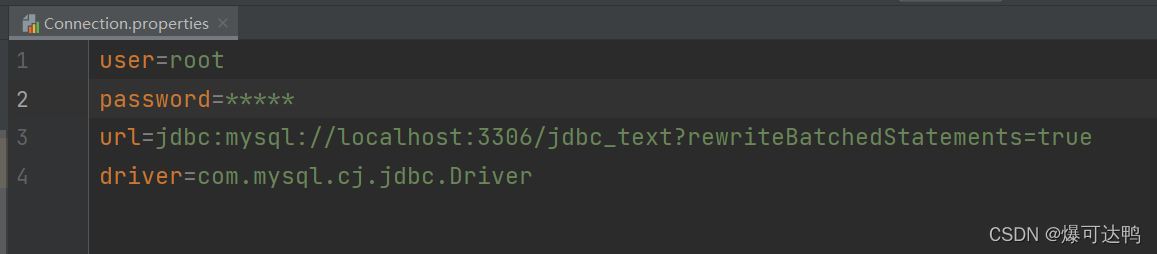
将配置文件的后缀写为properties放入同一个src目录下面
public class Test04 {
public static void main(String[] args) throws IOException, ClassNotFoundException, SQLException {
Properties properties = new Properties();
properties.load(new FileInputStream("E:\\JavaAllFile\\IADEJavaFile\\JDBC\\src\\Connection\\Connection.properties"));
String user = properties.getProperty("user");
String password = properties.getProperty("password");
String url = properties.getProperty("url");
String driver = properties.getProperty("driver");
Class.forName(driver);
Connection connection = DriverManager.getConnection(url,user,password);
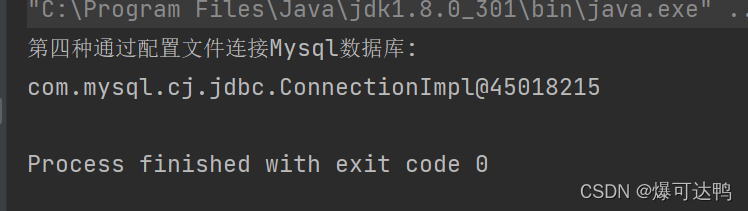
System.out.println("第四种通过配置文件连接Mysql数据库:\n"+connection);
connection.close();
}
}连接成功!
总结:
这四种方式是最基础的数据库连接方式,现在都通过数据库连接池来连接数据库,例如老牌的C3P0,阿里提供的Druid数据库连接池等,感谢你的阅读,如有错误请多多指教。感谢阅读啦,如果能点赞那就更好了。
完

为开发者提供学习成长、分享交流、生态实践、资源工具等服务,帮助开发者快速成长。
更多推荐


 19
19 0
0- 0


 已为社区贡献2条内容

所有评论(0)