
vue中pixi 引擎使用,图片移动、添加边框,根据按钮缩放、旋转、删除的实现
vue
vuejs/vue: 是一个用于构建用户界面的 JavaScript 框架,具有简洁的语法和丰富的组件库,可以用于开发单页面应用程序和多页面应用程序。
项目地址:https://gitcode.com/gh_mirrors/vu/vue
·
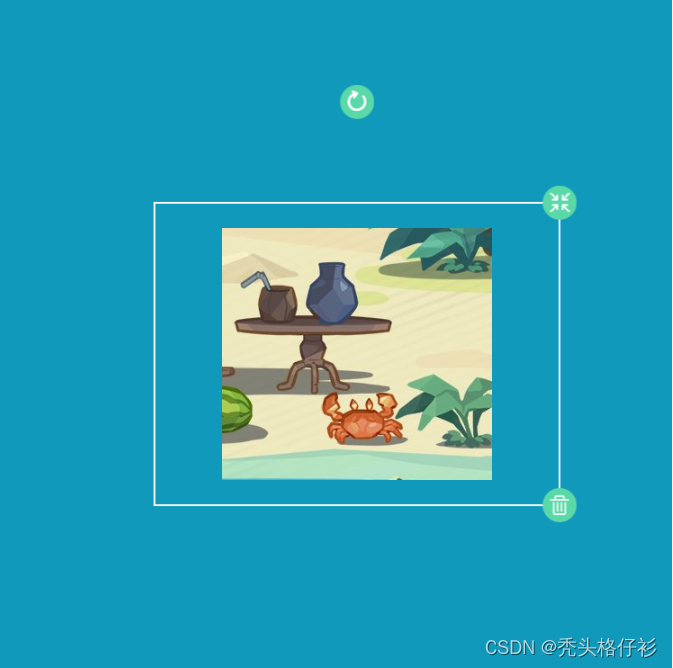
效果展示:


移动
 旋转
旋转
缩放
注意事项:
1.注意pixi.js 使用版本,例子展示是 4.8.4 版本
2.注意数学问题,记得注意坐标的正负
3.点击获取 坐标 (clientX,clientY) ,clientY 类似,实在找不到 百度吧
PC在:InteractionEvent.data.originalEvent.clientX
移动端在: InteractionEvent.data.originalEvent.changedTouches[0].clientX
4.调用pixi 渲染器函数,不能放在created(){} 中,可以放在mouted(){}中
5.设置sprite 和container 记得设置有交互性 sprite.interactive = true;
pixi使用步骤:
学习新的知识是最好就是看官方文档和api ,有详细的教程
pixi.js 中文 https://pixijs.huashengweilai.com/
pixi 使用步骤就跟着代码一步一步的进行
1.vue使用pixi 先安装对应的依赖
yarn add pixi.js@4.8.4
vue
vuejs/vue: 是一个用于构建用户界面的 JavaScript 框架,具有简洁的语法和丰富的组件库,可以用于开发单页面应用程序和多页面应用程序。
项目地址:https://gitcode.com/gh_mirrors/vu/vue

2.在页面创建一个div 放置pixi渲染器
<template>
<div>
<div ref="page_canvas"></div>
</div>
</template>
3.引用pixi.js到页面
<script>
import * as PIXI from "pixi.js";
export default {}
data()
export default {
name: "App",
data() {
return {
app: "", //pixi 渲染器
sprite: "", //sprite
container: "", //container
touchType: "", //触摸类型
//manifest 加载到纹理缓存使用的资源
manifest: [
{
name: "delete_btn",
url: require("@/assets/pixiImages/delete_btn.png"),
},
{
name: "rotate_btn",
url: require("@/assets/pixiImages/rotate_btn.png"),
},
{
name: "scale_btn",
url: require("@/assets/pixiImages/scale_btn.png"),
},
{ name: "test0", url: require("@/assets/pixiImages/0.png") },
],
startPoint: {
// x,y 记录点击的x,y坐标
x: null,
y: null,
// sprite x,y 初始位置
sprite: {
x: null,
y: null,
scale:1,
},
// scale x,y 按钮初始位置 x2,y2 原点
scale: { x: null, y: null, x2: null, y2: null },
//rotate 旋转按钮 初始的位置
rotate: { x: null, y: null },
container: { x: null, y: null },
deg: 0,
},
resources: null, //资源加载
deleteBtn: null, //删除按钮
scaleBtn: null, //缩放按钮
rotateBtn: null, //旋转按钮
graphics: null, //矩形框
};
},
3.创建 pixi 渲染器 函数 调用这个函数记得不要放在created(){}中
mounted() {
this.createStickerCanvas();
},
// 创建 PIXI 渲染器 函数
createStickerCanvas() {
// 创建一个pixi渲染器
this.app = new PIXI.Application({
backgroundColor: 0x1099bb,
// transparent: true,// 透明
width: 750,
height: 750,
});
// 把pixi渲染器 放到页面page_canvas元素中
this.$refs.page_canvas.appendChild(this.app.view);
//加载纹理函数
this.loadTexture();
},
4.加载图片到纹理缓存
//loader 加载图片资源到纹理缓存函数
loadTexture() {
var loader = new PIXI.loaders.Loader();
loader.add(this.manifest);
loader.on("progress", () => {
console.log("加载完成");
});
loader.load((e) => {
this.resources = e.resources;
this.createPIXIImg("test0");
});
},
5.创建container 和 Sprite,并加载资源到pixi中
sprite.interactive = true; 记得设置有交互性,默认为flase
// sprite container 函数
createPIXIImg(name) {
// 创建 container
var container = new PIXI.Container();
container.scale.set(1, 1);
container.rotation = 0;
container.name = name;
this.container = container;
// 创建sprite
var sprite = new PIXI.Sprite(this.resources[name].texture);
this.sprite = sprite;
// 精灵设置缩放
sprite.scale.set(1, 1);
// sprite设置定位
sprite.position.set(400, 400);
// 设置锚点在中间
sprite.anchor.set(0.5);
// 设置有交互性
sprite.interactive = true;
sprite.name = name;
// 设置sprite 点击事件
sprite.on("pointerdown", (e) => {
this.onDragStart(e);
});
sprite.on("pointerup", (e) => {
this.onDragEnd(e);
});
sprite.on("pointerupoutside", (e) => {
this.onDragEnd(e);
});
sprite.on("pointermove", (e) => {
this.onDragMove(e);
});
// 把sprite 添加到container中
container.addChild(sprite);
// 把container 添加到 pixi 渲染器中
this.app.stage.addChild(container);
// 按钮函数
this.createInteractiveButton();
},
6.按钮sprite和边框sprite的创建
createInteractiveButton() {
//删除按钮
this.deleteBtn = new PIXI.Sprite(this.resources["delete_btn"].texture);
this.deleteBtn.name = "delete_btn";
this.deleteBtn.interactive = true;
this.deleteBtn.anchor.set(0.5)
this.deleteBtn.position.set(
this.sprite.width / this.sprite.scale.x / 2*1.5,
this.sprite.height / this.sprite.scale.y / 2*1.2
);
this.deleteBtn.alpha = 1;
// 设置缩放
// this.deleteBtn.scale.set()
this.deleteBtn.on("pointerdown", (e) => {
console.log("onDelButton");
this.onDelButton(e);
});
// 旋转按钮
this.rotateBtn = new PIXI.Sprite(this.resources["rotate_btn"].texture);
this.rotateBtn.name = "rotate_btn";
this.rotateBtn.interactive = true;
// this.rotateBtn.anchor(0.5)
this.rotateBtn.anchor.set(0.5);
this.rotateBtn.position.set(0, -this.sprite.height / this.sprite.scale.y);
this.rotateBtn.alpha = 1;
// 设置缩放
// this.rotateBtn.scale.set()
this.rotateBtn.on("pointerdown", (e) => {
console.log("onRotateButStart");
this.onRotateButStart(e);
});
this.rotateBtn.on("pointerup", (e) => {
console.log("onRotateButEnd");
this.onRotateButEnd(e);
});
this.rotateBtn.on("pointerupoutside", (e) => {
console.log("onRotateButEnd");
this.onRotateButEnd(e);
});
this.rotateBtn.on("pointermove", (e) => {
// console.log("onRotateButMove");
this.onRotateButMove(e);
});
// 缩放按钮
this.scaleBtn = new PIXI.Sprite(this.resources["scale_btn"].texture);
this.scaleBtn.name = "scale_btn";
this.scaleBtn.interactive = true;
this.scaleBtn.anchor.set(0.5);
this.scaleBtn.position.set(
this.sprite.width / this.sprite.scale.x / 2*1.5,
-(this.sprite.height / this.sprite.scale.y / 2*1.2)
);
this.scaleBtn.alpha = 1;
// 设置缩放
// this.scaleBtn.scale.set()
this.scaleBtn.on("pointerdown", (e) => {
this.onScaleButStart(e);
});
this.scaleBtn.on("pointerup", (e) => {
this.onScaleButEnd(e);
});
this.scaleBtn.on("pointerupoutside", (e) => {
this.onScaleButEnd(e);
});
this.scaleBtn.on("pointermove", (e) => {
this.onScaleButMove(e);
});
this.graphics = new PIXI.Graphics();
this.graphics.lineStyle(2, 0xffffff, 1);
let lineX = this.sprite.width / this.sprite.scale.x*1.5;
let lineY = this.sprite.height / this.sprite.scale.y*1.2;
this.graphics.drawRect(-lineX /2, -lineY / 2, lineX, lineY);
this.graphics.endFill();
this.graphics.alpha = 1;
this.graphics.name = "graphics";
// 挂载 graphics,deleteBtn,scaleBtn,rotateBtn 到pixi渲染器上
this.sprite.addChild(
this.graphics,
this.deleteBtn,
this.scaleBtn,
this.rotateBtn
);
},
7.按钮、边框和 图片触发事件函数
7.1. 图片移动: 很简单,就是改变 sprite 的定位就可以了,或者改变 container容器的定位,根据需求自行使用
//Img 开始 函数
onDragStart(e) {
console.log(this.sprite)
if (this.touchType === "") {
this.startPoint.x = e.data.originalEvent.clientX;
this.startPoint.y = e.data.originalEvent.clientY;
this.startPoint.sprite.x = this.sprite.x;
this.startPoint.sprite.y = this.sprite.y;
this.sprite.dragging = true;
}
},
//Img 结束 函数
onDragEnd(e) {
console.log(e);
this.sprite.dragging = false;
},
//Img 移动 函数
onDragMove(e) {
if (this.touchType === "") {
if (this.sprite.dragging) {
this.sprite.x =
e.data.originalEvent.clientX -
this.startPoint.x +
this.startPoint.sprite.x;
this.sprite.y =
e.data.originalEvent.clientY -
this.startPoint.y +
this.startPoint.sprite.y;
}
}
},
7.2 删除直接把container 中的children 删了就好了(removeChild)
// 点击删除按钮 函数
onDelButton(e) {
console.log(e);
this.touchType = "delete";
this.app.stage.removeChild(this.container);
this.container = "";
this.sprite = "";
},
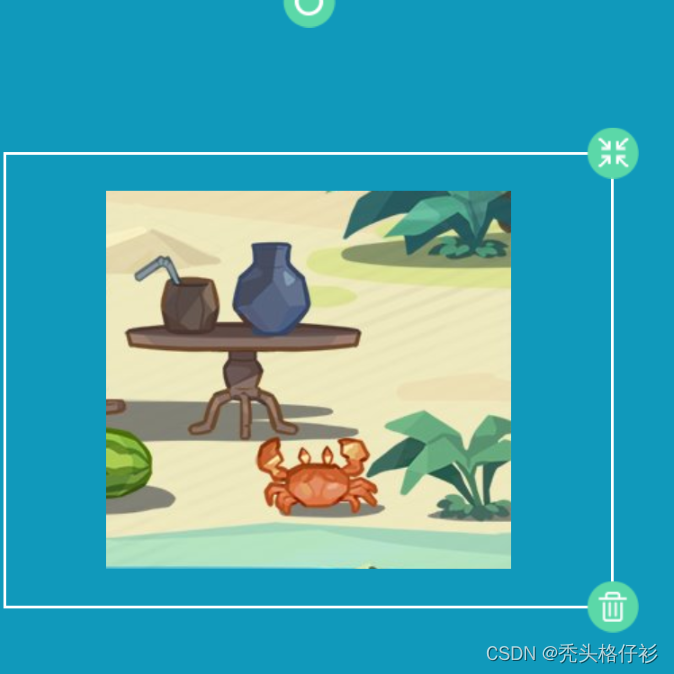
7.3 旋转套入旋转函数,求出deg 然后设置sprite的rotation
// 点击旋转按钮 函数
onRotateButStart(e) {
this.touchType = "rotate";
this.startPoint.rotate.x = e.data.originalEvent.clientX;
this.startPoint.rotate.y = e.data.originalEvent.clientY;
this.sprite.rotation = this.startPoint.deg;
},
// 结束旋转按钮
onRotateButEnd(e) {
// console.log("onRotateButEnd");
console.log(e);
this.touchType = "";
},
// 弧度角度函数
degree(x1, x2, y1, y2) {
console.log("degree");
if (x2 === x1) {
if (y2 > y1) return Math.PI;
else return 2 * Math.PI;
}
var k = (y2 - y1) / (x2 - x1);
if (x1 > x2)
return (((Math.atan(k) * 180) / Math.PI - 90) / 360) * 2 * Math.PI;
else return (((Math.atan(k) * 180) / Math.PI - 270) / 360) * 2 * Math.PI;
},
// 移动旋转按钮 函数
onRotateButMove(e) {
if (this.touchType === "rotate") {
var deg = this.degree(
this.sprite.position.x,
e.data.originalEvent.clientX,
this.sprite.position.y,
e.data.originalEvent.clientY
);
console.log(deg)
this.startPoint.deg = deg;
this.sprite.rotation = deg;
}
},
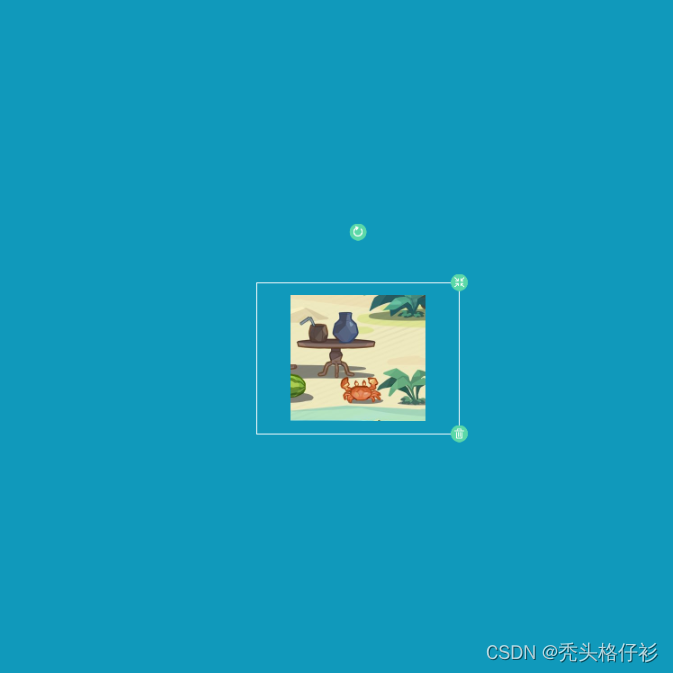
7.4 缩放,我是根据记录一开始缩放按钮的坐标求出和图片原点的距离,然后看移动之后的位置和图片原点的距离比,注意求图片原点 符号
tip: 我把按钮和边框都加载到sprite 中,所以放大和缩小也会改变边框和按钮的大小,如果想只改变sprite 的大小,不改变边框的大小的话,可以加载到container中,然后再移动缩放那缩放sprite,根据自己的实际情况来进行调整
// 点击缩放按钮 函数
onScaleButStart(e) {
this.touchType = "scale";
//e.data.originalEvent.changedTouches[0].clientX; 是移动端获取坐标
//e.data.originalEvent.clientX; 是电脑端获取坐标
//记录点击缩放按钮的位置
this.startPoint.scale.x = e.data.originalEvent.clientX;
this.startPoint.scale.y = e.data.originalEvent.clientY;
//求图片原点的位置,注意正负号,数学问题
this.startPoint.scale.x2 = this.startPoint.scale.x - this.sprite.width / 2;
this.startPoint.scale.y2 = this.startPoint.scale.y + this.sprite.height / 2;
//记录sprite 缩放的大小
this.startPoint.sprite.scale = this.sprite.scale.x;
},
// 结束缩放按钮 函数
onScaleButEnd(e) {
console.log(e);
this.touchType = "";
},
// 移动缩放按钮 函数
onScaleButMove(e) {
if (this.touchType === "scale") {
let x3 = this.startPoint.scale.x;
let y3 = this.startPoint.scale.y;
let x4 = this.startPoint.scale.x2;
let y4 = this.startPoint.scale.y2;
let scaleX = e.data.originalEvent.clientX;
let scaleY = e.data.originalEvent.clientY;
let distance = (x1, x2, y1, y2) => {
return Math.sqrt(Math.pow(x1 - x2, 2) + Math.pow(y1 - y2, 2));
};
var s = distance(x3, x4, y3, y4);
var r = distance(scaleX, x4, scaleY, y4);
var scale = Math.min(1.5, Math.max(0.5, r / s));
this.sprite.scale.set(scale*this.startPoint.sprite.scale, scale*this.startPoint.sprite.scale);
}
},
pixi 的使用、图片移动,加边框,添加按钮,按钮进行旋转、缩放、删除就已经实现,pixi 不知道咋使用的可以查看官方文档,官网的例子写的还是比较详细。
移动和删除算是比较简单的,缩放和旋转重要的知道如何通过函数去运算,知道思想其实剩下的就是数学问题。打印出来看看效果最直接。
阅读全文
AI总结
vuejs/vue: 是一个用于构建用户界面的 JavaScript 框架,具有简洁的语法和丰富的组件库,可以用于开发单页面应用程序和多页面应用程序。
最近提交(Master分支:8 个月前 )
9e887079
[skip ci] 6 个月前
73486cb5
* chore: fix link broken
Signed-off-by: snoppy <michaleli@foxmail.com>
* Update packages/template-compiler/README.md [skip ci]
---------
Signed-off-by: snoppy <michaleli@foxmail.com>
Co-authored-by: Eduardo San Martin Morote <posva@users.noreply.github.com> 10 个月前

旨在为数千万中国开发者提供一个无缝且高效的云端环境,以支持学习、使用和贡献开源项目。
更多推荐

 14
14 0
0- 0


 已为社区贡献1条内容
相关推荐
查看更多
vue
Vue.js 是一款构建用户界面的 JavaScript 框架,以其简洁的语法和丰富的组件库著称,适用于开发单页面及多页面应用程序。
vue
Javascript Powered forms and JSON form builder for Vue.js
vue
Vue implementation of Geist
目录

所有评论(0)