
ffmpeg多路同时推流
ffmpeg多路同时推流ffmpeg常见使用方法利用FFMPEG命令进行文件分割转换格式推流查看nginx启动是否成功ffmpeg推流——>ngnix单路推流多(大于两路)路同时推流:-mapffmpeg常见使用方法后端推流,使用ffmpeg将本地视频推送至ngnix,再拉流,单独推送一路简单,但同时推送多路网上没找到相关的介绍,本文使用ffmpeg的“-map“方法解决了。利用FFMPEG
·
ffmpeg多路同时推流
一、ffmpeg常见使用方法
后端推流,使用ffmpeg将本地视频推送至ngnix,再拉流,单独推送一路简单,但同时推送多路网上没找到相关的介绍,本文使用ffmpeg的“-map“方法解决了。
1.1利用FFMPEG命令进行文件分割
ffmpeg -ss 00:00:00 -i input.mp4 -c copy -t 60 output.mp4
或者
ffmpeg -ss 00:04:10 -i JC-02.flv -c copy -t 00:30:00 JC-02-output.flv
-ss 表示视频分割的起始时间,-t 表示分割时长,同时也可以用 00:01:00表示
注意 :-ss 要放在 -i 之前
1.2转换格式
ffmpeg -i JC-02.flv JC-02-output.mp4
1.3推流配置
方法一:ngnix(不推荐,推流不好使)
下载配置不再说明,网上一堆
配置文件主要是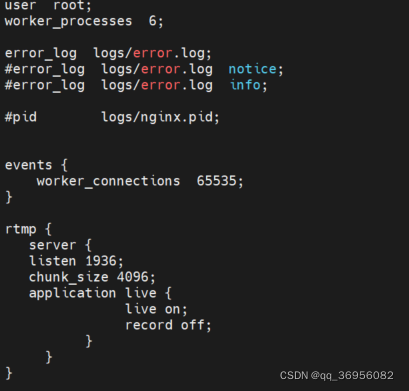
ngnix.conf
user  root;
worker_processes  6;

error_log  logs/error.log;
#error_log  logs/error.log  notice;
#error_log  logs/error.log  info;

#pid        logs/nginx.pid;


events {
    worker_connections  65535;
}

rtmp {
   server {
   listen 1935;
   chunk_size 4096;
   application live {
			   live on;
			   record off;
          }
     }
}

http {
    include       mime.types;
    default_type  application/octet-stream;

    #log_format  main  '$remote_addr - $remote_user [$time_local] "$request" '
    #                  '$status $body_bytes_sent "$http_referer" '
    #                  '"$http_user_agent" "$http_x_forwarded_for"';

    #access_log  logs/access.log  main;

    sendfile        on;
    #tcp_nopush     on;

    #keepalive_timeout  0;
    keepalive_timeout  65;

    #gzip  on;

    server {
        listen       10025;
        #server_name  localhost;
        root /root/smart_transport-deploy/digital_twin_2022_01_12_img;

        #charset koi8-r;

        #access_log  logs/host.access.log  main;

        #location / {
        #    root   html;
        #    index  index.html index.htm;
        #}

        #error_page  404              /404.html;

        # redirect server error pages to the static page /50x.html
        #
        error_page   500 502 503 504  /50x.html;
        location = /50x.html {
            root   html;
        }

        # proxy the PHP scripts to Apache listening on 127.0.0.1:80
        #
        #location ~ \.php$ {
        #    proxy_pass   http://127.0.0.1;
        #}

        # pass the PHP scripts to FastCGI server listening on 127.0.0.1:9000
        #
        #location ~ \.php$ {
        #    root           html;
        #    fastcgi_pass   127.0.0.1:9000;
        #    fastcgi_index  index.php;
        #    fastcgi_param  SCRIPT_FILENAME  /scripts$fastcgi_script_name;
        #    include        fastcgi_params;
        #}

        # deny access to .htaccess files, if Apache's document root
        # concurs with nginx's one
        #
        #location ~ /\.ht {
        #    deny  all;
        #}
    }


    # another virtual host using mix of IP-, name-, and port-based configuration
    #
    #server {
    #    listen       8000;
    #    listen       somename:8080;
    #    server_name  somename  alias  another.alias;

    #    location / {
    #        root   html;
    #        index  index.html index.htm;
    #    }
    #}


    # HTTPS server
    #
    #server {
    #    listen       443 ssl;
    #    server_name  localhost;

    #    ssl_certificate      cert.pem;
    #    ssl_certificate_key  cert.key;

    #    ssl_session_cache    shared:SSL:1m;
    #    ssl_session_timeout  5m;

    #    ssl_ciphers  HIGH:!aNULL:!MD5;
    #    ssl_prefer_server_ciphers  on;

    #    location / {
    #        root   html;
    #        index  index.html index.htm;
    #    }
    #}

}
启动nginx:
/usr/local/nginx-1.18.0/sbin/nginx -c /usr/local/nginx-1.18.0/conf/nginx.conf
查看nginx启动是否成功
netstat -an | grep 1935
如果出现则成功
杀死nginx
killall nginx
方法二:srs(强烈推荐)
配置启动srs
git clone -b develop https://gitee.com/ossrs/srs.git &&
cd srs/trunk && ./configure && make && ./objs/srs -c conf/srs.conf
启动srs(默认端口1935):
./objs/srs -c ./conf/srs.conf
查看1935端口推流情况
lsof -i:1935
1.4查看nginx启动是否成功
netstat -an | grep 1935
如果有信息则成功
二、ffmpeg推流——>ngnix
单路推流
ffmpeg -re -stream_loop -1 -i /root/video/flv/JC-02-output.flv -vcodec copy -acodec copy -f flv -y rtmp://your_ip/live/JC-02
ffmpeg -re -stream_loop -1 -i /root/video/flv/JC-03-output.flv -vcodec copy -acodec copy -f flv -y rtmp://your_ip/live/JC-03
多(大于两路)路同时推流:
方法一:
-nostdin
nohup ffmpeg -nostdin -re -i /root/smart_transport-deploy/video/flv/JC-02-output.flv -vcodec copy -acodec copy -f flv -y rtmp://your_ip/live/JC-02  >> /dev/null 2>&1 &
nohup ffmpeg -nostdin -re -i /root/smart_transport-deploy/video/flv/JC-03-output.flv -vcodec copy -acodec copy -f flv -y rtmp://your_ip/live/JC-03  >> /dev/null 2>&1 &
nohup ffmpeg -nostdin -re -i /root/smart_transport-deploy/video/flv/JC-06-02-output.flv -vcodec copy -acodec copy -f flv -y rtmp://your_ip/live/JC-06-02  >> /dev/null 2>&1 &
nohup ffmpeg -nostdin -re -i /root/smart_transport-deploy/video/flv/JC-20-01-output.flv -vcodec copy -acodec copy -f flv -y rtmp://your_ip/live/JC-20-01 >> /dev/null 2>&1 &

设置输入重定向 </dev/null
nohup ffmpeg -re -i /root/smart_transport-deploy/video/flv/JC-02-output.flv -vcodec copy -acodec copy -f flv -y rtmp://your_ip/live/JC-02 >> /dev/null 2>&1 </dev/null &
nohup ffmpeg -re -i /root/smart_transport-deploy/video/flv/JC-03-output.flv -vcodec copy -acodec copy -f flv -y rtmp://your_ip/live/JC-03 >> /dev/null 2>&1 </dev/null &
nohup ffmpeg -re -i /root/smart_transport-deploy/video/flv/JC-06-02-output.flv -vcodec copy -acodec copy -f flv -y rtmp://your_ip/live/JC-06-02 >> /dev/null 2>&1 </dev/null &
nohup ffmpeg -re -i /root/smart_transport-deploy/video/flv/JC-20-01-output.flv -vcodec copy -acodec copy -f flv -y rtmp://your_ip/live/JC-20-01 >> /dev/null 2>&1 </dev/null &
ffmpeg -re -stream_loop -1 -i /root/video/flv/JC-02-output.flv -re -stream_loop -1 -i /root/video/flv/JC-03-output.flv -map 0:v -map 0:a -c:v:0 copy -c:a:0 copy -f flv -y rtmp://your_ip/live/JC-02 -map 1:v -map 1:a -c:v:0 copy -c:a:0 copy -f flv -y rtmp://your_ip/live/JC-03
方法二:-map
ffmpeg -re -stream_loop -1 -i /root/video/flv/JC-02-output.flv -re -stream_loop -1 -i /root/video/flv/JC-03-output.flv -map 0:v -map 0:a -c:v:0 copy -c:a:0 copy -f flv -y rtmp://your_ip/live/JC-02 -map 1:v -map 1:a -c:v:0 copy -c:a:0 copy -f flv -y rtmp://your_ip/live/JC-03
被主进程调用推流脚本后台推流
可参考: https://blog.csdn.net/qq_37788558/article/details/108218037
ffmpeg -re -stream_loop -1 -i /root/video/flv/JC-02-output.flv -re -stream_loop -1 -i /root/video/flv/JC-03-output.flv -map 0:v -map 0:a -c:v:0 copy -c:a:0 copy -f flv -y rtmp://your_ip/live/JC-02 -map 1:v -map 1:a -c:v:0 copy -c:a:0 copy -f flv -y rtmp://your_ip/live/JC-03
杀死进程
ps -ef | grep ffmpeg | grep smart_transport-deploy | grep -v grep | awk -F ' ' '{print $2}' | xargs kill -9
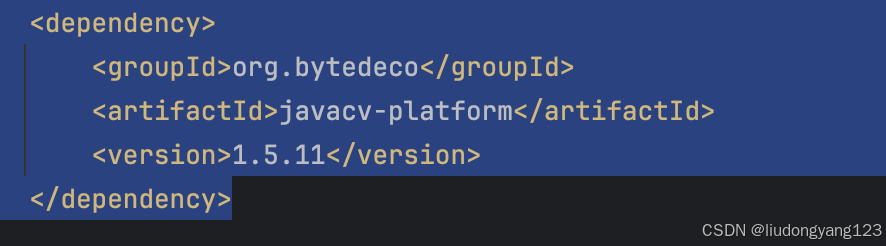
三、推送h.264编码的flv视频
环境搭建需要x264安装
link
https://www.cnblogs.com/shunzi115/p/14869437.html
多路推流执行脚本
nohup ffmpeg -re -i /root/smart_transport-deploy/video/flv/JC-02-output.flv -vcodec libx264 -acodec libx264  -f flv -y rtmp://your_ip/live/JC-02 >> /dev/null 2>&1 </dev/null &
nohup ffmpeg -re -i /root/smart_transport-deploy/video/flv/JC-03-output.flv -vcodec libx264 -acodec libx264 -f flv -y rtmp://your_ip/live/JC-03 >> /dev/null 2>&1 </dev/null &
nohup ffmpeg -re -i /root/smart_transport-deploy/video/flv/JC-06-02-output.flv -vcodec libx264 -acodec libx264 -f flv -y rtmp://your_ip/live/JC-06-02 >> /dev/null 2>&1 </dev/null &
nohup ffmpeg -re -i /root/smart_transport-deploy/video/flv/JC-20-01-output.flv -vcodec libx264 -acodec libx264 -f flv -y rtmp://your_ip/live/JC-20-01 >> /dev/null 2>&1 </dev/null &

音视频技术社区,一个全球开发者共同探讨、分享、学习音视频技术的平台,加入我们,与全球开发者一起创造更加优秀的音视频产品!
更多推荐

 7
7 0
0- 0


 已为社区贡献1条内容

所有评论(0)