【VUE项目实战】29.实现修改用户功能
接上篇《28.实现添加用户功能(2)-预校验与发起新增请求》上一篇我们完成了用户新增的功能,本篇我们来完成用户修改的功能。一、要实现的效果我们要实现的效果就是,找到要修改的用户,点击操作一栏的修改按钮:然后会弹出修改用户的对话框,当前用户的基本信息会加载出来(用户名只读):我们可以修改允许修改的内容,然后点击“确定”按钮后,就完成修改用户信息了。二、实现修改对话框的弹出首先实现点击修改按钮弹出修改
接上篇《28.实现添加用户功能(2)-预校验与发起新增请求》
上一篇我们完成了用户新增的功能,本篇我们来完成用户修改的功能。
一、要实现的效果
我们要实现的效果就是,找到要修改的用户,点击操作一栏的修改按钮:
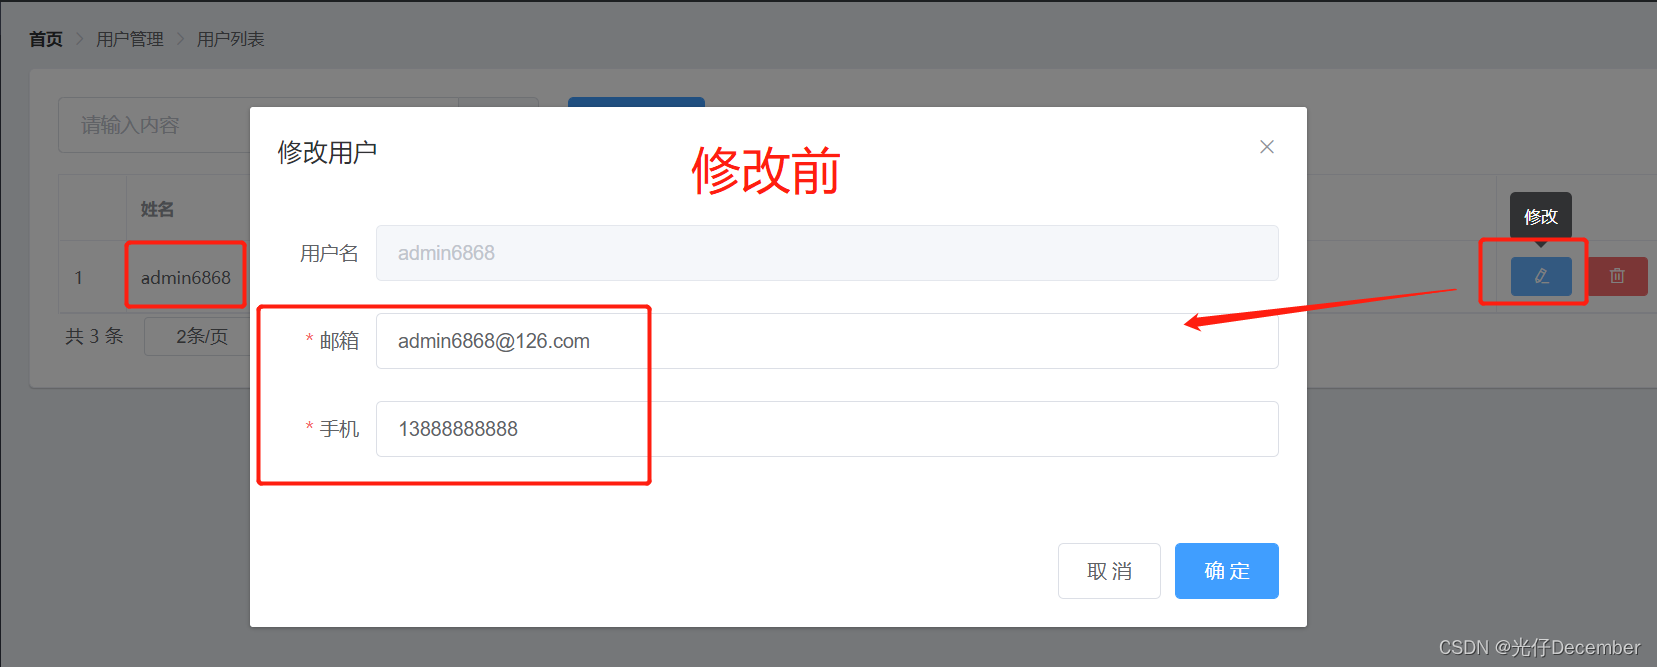
然后会弹出修改用户的对话框,当前用户的基本信息会加载出来(用户名只读):
我们可以修改允许修改的内容,然后点击“确定”按钮后,就完成修改用户信息了。
二、实现修改对话框的弹出
首先实现点击修改按钮弹出修改对话框,我们找到修改按钮为其添加一个click属性,指定名为“showEditDialog”的函数:
<el-table-column label="操作" width="200px">
    <template slot-scope="{}">
        <!-- 放置修改、删除和分配角色按钮 -->
        <el-tooltip effect="dark" content="修改" placement="top">
          <el-button type="primary" icon="el-icon-edit" size="mini" @click="showEditDialog()"></el-button>
        </el-tooltip>
        <el-tooltip effect="dark" content="删除" placement="top">
          <el-button type="danger" icon="el-icon-delete" size="mini"></el-button>
        </el-tooltip>
        <el-tooltip effect="dark" content="分配角色" placement="top">
          <el-button type="warning" icon="el-icon-setting" size="mini"></el-button>
        </el-tooltip>
    </template>
</el-table-column>
然后在template内最下方添加修改用户的Dialog对话框标签代码:
<!-- 修改用户的对话框 -->
<el-dialog title="修改用户" :visible.sync="editDialogVisible" width="50%" @close="editDialogClosed"
:close-on-click-modal='false'>
  <!-- 内容主体区 -->
  <el-form :model="editUserForm" :rules="editUserFormRules" ref="editUserFormRef" label-width="70px">
    <el-form-item label="用户名" prop="username">
      <el-input v-model="editUserForm.username" disabled></el-input>
    </el-form-item>
    <el-form-item label="邮箱" prop="email">
      <el-input v-model="editUserForm.email"></el-input>
    </el-form-item>
    <el-form-item label="手机" prop="mobile">
      <el-input v-model="editUserForm.mobile"></el-input>
    </el-form-item>
  </el-form>
  <!-- 底部区 -->
  <span slot="footer" class="dialog-footer">
    <el-button @click="editDialogVisible = false">取 消</el-button>
    <el-button type="primary" @click="editUser()">确 定</el-button>
  </span>
</el-dialog>
里面的“editDialogVisible”属性为“控制修改用户对话框的显示与隐藏”的参数,然后“editUserForm”是绑定的修改用户的表单对象,“editUserFormRules”是修改用户的表单规则校验对象,三个都需要在data中定义:
//上面代码省略
return {
    //获取用户列表的参数对象
    queryInfo: {
      query: "",
      pagenum: 1, //当前的页数
      pagesize: 2, //每页的数量
    },
    userList : [],
    total: 0,
    addDialogVisible: false, //控制添加用户对话框的显示与隐藏
    editDialogVisible: false, //控制修改用户对话框的显示与隐藏
    //添加用户的表单数据
    addUserForm: {},
    //修改用户的表单数据
    editUserForm: {},
    //修改表单的验证规则对象
    editUserFormRules: {
      email: [{required:true,message:'请输入邮箱',trigger:'blur'},{validator: checkEmail,trigger:'blur'}],
      mobile: [{required:true,message:'请输入手机号',trigger:'blur'},{validator: checkMobile,trigger:'blur'}]
    },
    //添加表单的验证规则对象
    addUserFormRules: {
      username: [{required:true,message:'请输入用户名',trigger:'blur'},
      {min:3,max:10,message:'用户名长度在3~10个字符',trigger:'blur'}],
      password: [{required:true,message:'请输入密码',trigger:'blur'},
      {min:6,max:15,message:'密码长度在6~15个字符',trigger:'blur'}],
      email: [{required:true,message:'请输入邮箱',trigger:'blur'},{validator: checkEmail,trigger:'blur'}],
      mobile: [{required:true,message:'请输入手机号',trigger:'blur'},{validator: checkMobile,trigger:'blur'}]
    }
};
然后在方法区定义editDialogClosed、showEditDialog函数:
//关闭编辑用户的对话框
editDialogClosed(){
  this.$refs.editUserFormRef.resetFields();
},
//展示编辑用户的对话框
showEditDialog(){
  this.editDialogVisible = true;
}
刷新页面,我们点击修改按钮,可以看到对话框已经出来了:
三、在修改对话框填充数据
上一步我们弹出了修改对话框,但是还没有获取改行用户的数据并显示出来,我们来实现它。
首先我们需要先拿到用户的ID,然后通过ID获取到当前行用户的信息。我们之前讲过,可以通过作用域插槽,接收到scope数据对象,通过“scope.row”就可以拿到这一行的数据信息。
我们修改操作区域,定义slot-scope="scope",然后通过“scope.row.id”拿到当前行的用户id,将其作为形参传递到showEditDialog方法中:
<el-table-column label="操作" width="200px">
    <template slot-scope="scope">
        <!-- 放置修改、删除和分配角色按钮 -->
        <el-tooltip effect="dark" content="修改" placement="top">
          <el-button type="primary" icon="el-icon-edit" size="mini" @click="showEditDialog(scope.row.id)"></el-button>
        </el-tooltip>
        <el-tooltip effect="dark" content="删除" placement="top">
          <el-button type="danger" icon="el-icon-delete" size="mini"></el-button>
        </el-tooltip>
        <el-tooltip effect="dark" content="分配角色" placement="top">
          <el-button type="warning" icon="el-icon-setting" size="mini"></el-button>
        </el-tooltip>
    </template>
</el-table-column>
方法中我们先打印一下用户ID,看看能不能出来:
//展示编辑用户的对话框
showEditDialog(id){
  this.editDialogVisible = true;
  console.log(id);
}
点击编辑按钮后,可以看到打印了当前行的ID:
用户ID拿到后,使用根据ID查询用户信息的接口:
我们在showEditDialog方法中使用包装后的axios请求它:
//展示编辑用户的对话框
async showEditDialog(id){
  const {data:res} = await this.$http.get('users/'+id);
  if(res.meta.status!=200){
      return this.$message.error('查询用户信息失败!');
  }
  this.editUserForm = res.data;
  this.editDialogVisible = true;
}
效果:
四、提交用户修改
修改用户信息的API接口:
上面我们在确定按钮上指定了一个“”函数:
<el-button type="primary" @click="editUser()">确 定</el-button>下面我们在方法区域定义该函数:
//点击按钮,修改用户信息
editUser(){
  this.$refs.editUserFormRef.validate(async valid =>{
      if(!valid) return;//校验没通过,返回
      //可以发起修改用户的网络请求
      const {data:res} = await this.$http.put('users/'+
      this.editUserForm.id,{
        email:this.editUserForm.email,
        mobile:this.editUserForm.mobile
      });
      if(res.meta.status!=200){
        return this.$message.error('修改用户失败!');
      }
      this.$message.success('修改用户成功!');
      // 隐藏修改用户的对话框
      this.editDialogVisible = false;
      //重新获取用户列表数据
      this.getUsersList();
  })
}
效果:

至此,我们的用户修改功能全部完成。
下一篇我们来讲解如何实现用户删除的操作。
参考:黑马程序员(www.itheima.com)Vue项目实战教学视频
转载请注明出处:https://blog.csdn.net/u013517797/article/details/122284499

前往低代码交流专区
更多推荐

 16
16 0
0- 0


 已为社区贡献39条内容

所有评论(0)