Vue3 + ts 记录使用axios(新手上路)
1. 首先使用命令安装axios依赖包:npm install axios --savenpm install vue-axios --save2. axios配置(包括了请求拦截器,响应拦截器):代码如下:request.ts:import axios, {AxiosInstance, AxiosRequestConfig, AxiosResponse} from 'axios';import
1. 首先使用命令安装axios依赖包:
npm install axios --save
npm install vue-axios --save
2. axios配置(包括了请求拦截器,响应拦截器):

代码如下:
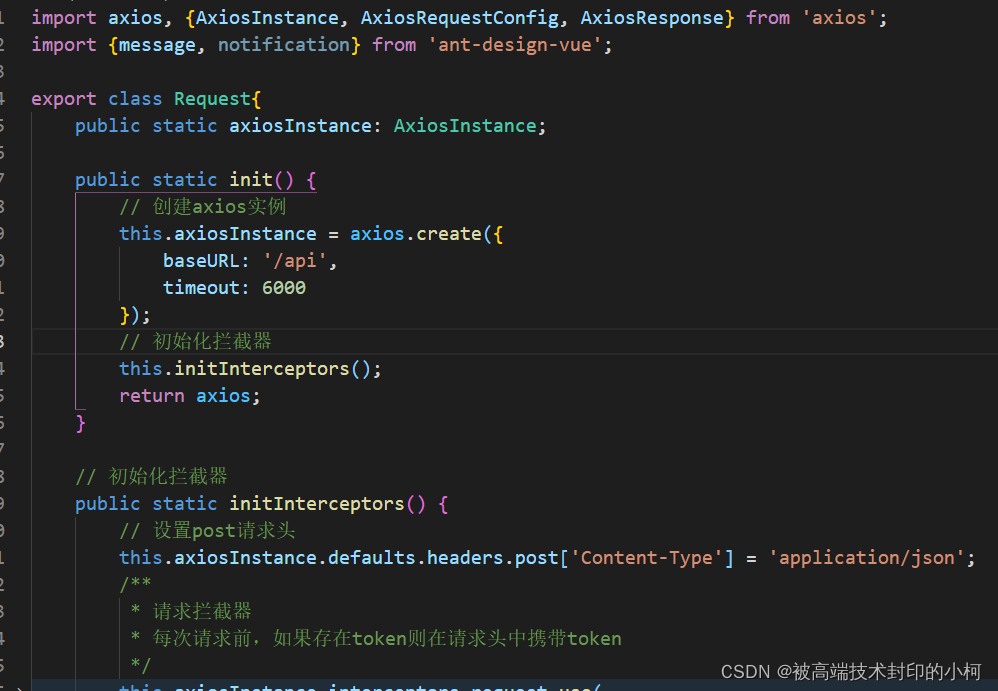
request.ts:
import axios, {AxiosInstance, AxiosRequestConfig, AxiosResponse} from 'axios';
import {message, notification} from 'ant-design-vue';
export class Request{
public static axiosInstance: AxiosInstance;
public static init() {
// 创建axios实例
this.axiosInstance = axios.create({
baseURL: '/api',
timeout: 6000
});
// 初始化拦截器
this.initInterceptors();
return axios;
}
// 初始化拦截器
public static initInterceptors() {
// 设置post请求头
this.axiosInstance.defaults.headers.post['Content-Type'] = 'application/json';
/**
* 请求拦截器
* 每次请求前,如果存在token则在请求头中携带token
*/
this.axiosInstance.interceptors.request.use(
(config: AxiosRequestConfig) => {
// const token = Vue.ls.get(ACCESS_TOKEN)
// if (token) {
// config.headers['Authorization'] = 'Bearer ' + token
// }
// 登录流程控制中,根据本地是否存在token判断用户的登录情况
// 但是即使token存在,也有可能token是过期的,所以在每次的请求头中携带token
// 后台根据携带的token判断用户的登录情况,并返回给我们对应的状态码
// if (config.headers.isJwt) {
// const token = localStorage.getItem('ACCESS_TOKEN');
// if (token) {
// config.headers.Authorization = 'Bearer ' + token;
// }
// }
return config;
},
(error: any) => {
console.log(error);
},
);
// 响应拦截器
this.axiosInstance.interceptors.response.use(
// 请求成功
(response: AxiosResponse) => {
// if (res.headers.authorization) {
// localStorage.setItem('id_token', res.headers.authorization);
// } else {
// if (res.data && res.data.token) {
// localStorage.setItem('id_token', res.data.token);
// }
// }
if (response.status === 200) {
// return Promise.resolve(response.data);
return response;
} else {
Request.errorHandle(response);
// return Promise.reject(response.data);
return response;
}
},
// 请求失败
(error: any) => {
const {response} = error;
if (response) {
// 请求已发出,但是不在2xx的范围
Request.errorHandle(response);
return Promise.reject(response.data);
} else {
// 处理断网的情况
// eg:请求超时或断网时,更新state的network状态
// network状态在app.vue中控制着一个全局的断网提示组件的显示隐藏
// 关于断网组件中的刷新重新获取数据,会在断网组件中说明
message.warn('网络连接异常,请稍后再试!');
}
});
}
/**
* http握手错误
* @param res 响应回调,根据不同响应进行不同操作
*/
private static errorHandle(res: any) {
// 状态码判断
switch (res.status) {
case 401:
break;
case 403:
break;
case 404:
message.warn('请求的资源不存在');
break;
default:
message.warn('连接错误');
}
}
}
注意: 此时的baseURL到时有用;
3. 将axios的配置挂载到全局变量:
由于是vue3 ,所以,挂载全局变量方法如下:
main.ts:

4. 调用:

由于在 request.ts中暴露出的是一个类,类中的axiosInstance使用axios.create初始化,所以,要使用axios中的get(),post()方法,需得用axiosInstance去访问。
5. 解决跨域,重定向:
vue.config.js:
module.exports = {
...
devServer: {
host: "0.0.0.0",
port: 10086,
https: false,
open: false, //配置自动启动浏览器
proxy: {
'/api':{
target: 'http://localhost:8080/',
changeOrigin: true,
ws: true,
pathRewrite: {
'^/api': ''
}
}
}
},
}
6. 测试:
调用接口的时候:浏览器f12--》network:

看见自己的接口为:
“http://localhost:10086/api/gbps-api/api/public/v1/dictionary/common-search-key”(红色的/api就是baseUrl加进去的,其目的就是让所有的接口有这个/api,待vue.config.js中识别到/api的时候,能让自己写的所有接口都跑代理)
由于在vue.config.js中配置代理,
'/api':{ ---->识别接口的api
target: 'http://localhost:8080/', --->识别到之后就会将原接口/api前面的转为这个target
changeOrigin: true, ------> 允许跨域
ws: true,
pathRewrite: { -----> 重写,,目的是要让自己的接口和后台需要的接口一致,由于后台没有/api这个东西,所以就要用‘’替换掉'/api'
'^/api': ''
}
}
所以,,,,看似我访问的是接口http://localhost:10086/api/gbps-api/api/public/v1/dictionary/common-search-key,,,其实我已经访问到了“http://localhost:8080/gbps-api/api/public/v1/dictionary/common-search-key“这个接口了。

为开发者提供学习成长、分享交流、生态实践、资源工具等服务,帮助开发者快速成长。
更多推荐


 0
0 0
0- 0


 已为社区贡献1条内容

所有评论(0)