ImageAI续-DeepStack(一) 使用Python快速简单实现人脸检测、人脸匹配、人脸比较
一. 简介ImageAI是一个python的库,它能使开发人员用简单几行代码构建具有深度学习和计算机视觉功能的应用程序和系统。它是由Moses Olafenwa和John Olafenwa两位开发并维护。具体git地址:https://github.com/OlafenwaMoses/ImageAI几年前介绍过ImageAI的使用方法,但是很多小伙伴都碰到了各种依赖包的版本等很多问题 导致无法正常
一. 简介
ImageAI是一个python的库,它能使开发人员用简单几行代码构建具有深度学习和计算机视觉功能的应用程序和系统。它是由Moses Olafenwa和John Olafenwa两位开发并维护。
具体git地址:https://github.com/OlafenwaMoses/ImageAI
几年前介绍过ImageAI的使用方法,但是很多小伙伴都碰到了各种依赖包的版本等很多问题 导致无法正常运行
今天再一次在git上看更新时 发现了官方将其打包 方便下载使用 并且取名DeepStack
文档:https://docs.deepstack.cc/index.html
我将用几篇文章一次来简单介绍一下DeepStack的使用
较ImageAI更加方便
二. 下载
官方提供了多种环境的下载方式
这里介绍CPU版本的两种方式
1. Linux 通过Docker
docker是近几年非常火的容器工具,它依赖于 Linux 内核环境。
这里不做过多介绍,网上可以找到安装教程。
docker pull deepquestai/deepstack
只需要将deepstack拉下来就可以 稍稍有点大 需要等待一会儿

2. Windows 安装包下载
地址:https://docs.deepstack.cc/windows/
正常下载安装包后点击安装即可
安装好后记得在环境变量中加入安装的地址
三. 启动
linux
docker run -e VISION-FACE=True -v localstorage:/datastore -p 8080:5000 deepquestai/deepstack
【说明】
-e VISION-FACE=True 开启有关face的api
-v localstorage:/datastore 指定DeepStack将数据存储在哪里
-p 8080:5000 指定了可以通过8081端口访问DeepStack
windows
deepstack --VISION-FACE True --PORT 8080
四. 使用
安装启动后即可通过python调用DeepStack
官方提供了两种方式1.通过url 2.通过发布的py包
如果需要使用py包 需要先进行下载
pip install deepstack-sdk --upgrade
接下来将介绍人脸检测 人脸匹配 人脸比较
两种方式我都会介绍
1. 人脸检测
1.1 通过url调用
import requests
from PIL import Image
import matplotlib.pyplot as plt
def useUrl():
host = "http://192.168.0.101:8080"
##load需要检测的图片
image_data = open("jz.jpg","rb").read()
image = Image.open("jz.jpg").convert("RGB")
## 调用http://192.168.0.101:8080/v1/vision/face 对图片中的人脸进行检测
response = requests.post(host+"/v1/vision/face",files={"image":image_data}).json()
## 打印检测出来的人脸
for face in response["predictions"]:
y_max = int(face["y_max"])
y_min = int(face["y_min"])
x_max = int(face["x_max"])
x_min = int(face["x_min"])
conf = face["confidence"]
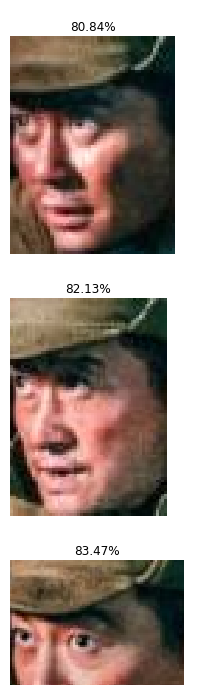
confstr = format(conf*100,'.2f') ## 人脸的概率
cropped = image.crop((x_min,y_min,x_max,y_max))
plt.imshow(cropped)
plt.axis('off')
plt.title(confstr+"%")
plt.show()
输入图片及结果

1.2 通过python sdk调用
from deepstack_sdk import ServerConfig, Face
def pythonsdk():
	## 连接DeepStack
    config = ServerConfig("http://192.168.0.101:8080")
    face = Face(config)

    ##检测图片中所有人脸
    response = face.detectFace("jz.jpg",output="jz_output.jpg")
这里的结果会显示在图片中

2. 人脸匹配
该功能需要事先准备好打了标签的人脸
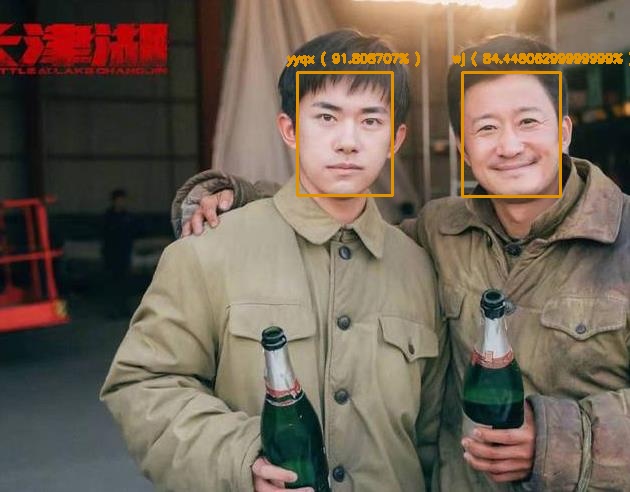
输入测试图片后 将会把图片中的人脸进行匹配
功能说明:你准备了很多吴京的照片 然后在其它吴京与别人的合影中能找出吴京
这里我使用了 吴京和易烊千玺的照片
[注:] 因为打标签的人脸只使用了两张 为了得到理想的展示结果 所以测试用的人脸与标签人脸越像越好
2.1 通过url调用
import requests
from PIL import Image
import matplotlib.pyplot as plt

def useUrl():
    host = "http://192.168.0.101:8080"
    ##/v1/vision/face/register 添加已知人脸
    user_image1 = open("wj1.jpg","rb").read()
    user_image2 = open("wj2.jpg","rb").read()

    response = requests.post(host+"/v1/vision/face/register",
    files={"image1":user_image1,"image2":user_image2},data={"userid":"Wu Jing"}).json()
    print("添加吴京",response)

    user_image1 = open("yy1.jpg","rb").read()
    user_image2 = open("yy2.jpg","rb").read()

    response = requests.post(host+"/v1/vision/face/register",
    files={"image1":user_image1,"image2":user_image2},data={"userid":"Yi Yangqianxi"}).json()
    print("添加易烊千玺",response)

    ##/v1/vision/face/list 打印当前可识别人脸
    faces = requests.post(host+"/v1/vision/face/list").json()
    print("当前可识别人脸:",faces["faces"])

    ##/v1/vision/face/recognize 检测图片中人脸
    image_data = open("wjtest.jpg","rb").read()
    image = Image.open("wjtest.jpg").convert("RGB")
    response = requests.post(host+"/v1/vision/face/recognize",
    files={"image":image_data},data={"min_confidence":0.4}).json()
    for face in response["predictions"]:
        userid = face["userid"]
        y_max = int(face["y_max"])
        y_min = int(face["y_min"])
        x_max = int(face["x_max"])
        x_min = int(face["x_min"])
        conf = face["confidence"]
        confstr = format(conf*100,'.2f')
        cropped = image.crop((x_min,y_min,x_max,y_max))
        plt.imshow(cropped)
        plt.axis('off')
        plt.title(userid+" "+confstr+"%")
        plt.show()

    ## /v1/vision/face/delete 删除人脸
    response = requests.post(host+"/v1/vision/face/delete",
    data={"userid":"Wu Jing"}).json()
    print("删除吴京",response)
    response = requests.post(host+"/v1/vision/face/delete",
    data={"userid":"Yi Yangqianxi"}).json()
    print("删除易烊千玺",response)


2.2 通过python sdk调用
from deepstack_sdk import ServerConfig, Face
def pythonsdk():
	## 连接DeepStack
	config = ServerConfig("http://192.168.0.101:8080")
    face = Face(config)
     ##添加已知人脸信息
    wj = ["wj1.jpg","wj2.jpg"]
    yy = ["yy1.jpg","yy2.jpg"]
    response = face.registerFace(images=wj,userid="wj")
    response = face.registerFace(images=yy,userid="yyqx")

    ## 打印当前可识别人脸
    response = face.listFaces()
    for face in response:
        print("当前可识别人脸:",face)

    ##检测图片中人脸
    response = face.recognizeFace(image=r"wjtest.jpg",output="face_output.jpg",min_confidence=0.5)

3. 人脸比较
该功能需要输入两张头像照片 输出两张的相似程度
3.1 通过url调用
import requests
from PIL import Image
import matplotlib.pyplot as plt

def useUrl():
    host = "http://192.168.0.101:8080"
    ## 人脸比较
    wj1 = open("wj.jpg","rb").read()
    wj2 = open("wj2.jpg","rb").read()
    yy1 = open("yy2.jpg","rb").read()

    response = requests.post(host+"/v1/vision/face/match",files={"image1":wj1,"image2":wj2}).json()
    print(response)

    response = requests.post(host+"/v1/vision/face/match",files={"image1":yy1,"image2":wj2}).json()
    print(response)


结果
{‘success’: True, ‘similarity’: 0.6551768, ‘duration’: 0} wj1 wj2
{‘success’: True, ‘similarity’: 0.5895447, ‘duration’: 0} yy1 wj2
3.2 通过python sdk调用
官方暂时没有提供
完整代码
import requests
from PIL import Image
import matplotlib.pyplot as plt

def useUrl():
    host = "http://192.168.0.101:8080"


    ##检测图片中所有人脸
    image_data = open("jz.jpg","rb").read()
    image = Image.open("jz.jpg").convert("RGB")

    response = requests.post(host+"/v1/vision/face",files={"image":image_data}).json()
    for face in response["predictions"]:
        y_max = int(face["y_max"])
        y_min = int(face["y_min"])
        x_max = int(face["x_max"])
        x_min = int(face["x_min"])
        conf = face["confidence"]
        confstr = format(conf*100,'.2f')
        cropped = image.crop((x_min,y_min,x_max,y_max))
        plt.imshow(cropped)
        plt.axis('off')
        plt.title(confstr+"%")
        plt.show()
    return


    ##添加已知人脸
    user_image1 = open("wj1.jpg","rb").read()
    user_image2 = open("wj2.jpg","rb").read()

    response = requests.post(host+"/v1/vision/face/register",
    files={"image1":user_image1,"image2":user_image2},data={"userid":"Wu Jing"}).json()
    print("添加吴京",response)

    user_image1 = open("yy1.jpg","rb").read()
    user_image2 = open("yy2.jpg","rb").read()

    response = requests.post(host+"/v1/vision/face/register",
    files={"image1":user_image1,"image2":user_image2},data={"userid":"Yi Yangqianxi"}).json()
    print("添加易烊千玺",response)

    ## 打印当前可识别人脸
    faces = requests.post(host+"/v1/vision/face/list").json()
    print("当前可识别人脸:",faces["faces"])

    ##检测图片中人脸
    image_data = open("wjtest.jpg","rb").read()
    image = Image.open("wjtest.jpg").convert("RGB")
    response = requests.post(host+"/v1/vision/face/recognize",
    files={"image":image_data},data={"min_confidence":0.4}).json()
    for face in response["predictions"]:
        userid = face["userid"]
        y_max = int(face["y_max"])
        y_min = int(face["y_min"])
        x_max = int(face["x_max"])
        x_min = int(face["x_min"])
        conf = face["confidence"]
        confstr = format(conf*100,'.2f')
        cropped = image.crop((x_min,y_min,x_max,y_max))
        plt.imshow(cropped)
        plt.axis('off')
        plt.title(userid+" "+confstr+"%")
        plt.show()

    ## 删除人脸
    response = requests.post(host+"/v1/vision/face/delete",
    data={"userid":"Wu Jing"}).json()
    print("删除吴京",response)
    response = requests.post(host+"/v1/vision/face/delete",
    data={"userid":"Yi Yangqianxi"}).json()
    print("删除易烊千玺",response)

    ## 人脸比较
    wj1 = open("wj1.jpg","rb").read()
    wj2 = open("wj2.jpg","rb").read()
    yy1 = open("yy2.jpg","rb").read()

    response = requests.post(host+"/v1/vision/face/match",files={"image1":wj1,"image2":wj2}).json()
    print(response)

    response = requests.post(host+"/v1/vision/face/match",files={"image1":yy1,"image2":wj2}).json()
    print(response)

from deepstack_sdk import ServerConfig, Face
def pythonsdk():
    config = ServerConfig("http://192.168.0.101:8080")
    face = Face(config)

    ##检测图片中所有人脸
    response = face.detectFace("jz.jpg",output="jz_output.jpg")

    ##添加已知人脸信息
    wj = ["wj1.jpg","wj2.jpg"]
    yy = ["yy1.jpg","yy2.jpg"]
    response = face.registerFace(images=wj,userid="wj")
    response = face.registerFace(images=yy,userid="yyqx")

    ## 打印当前可识别人脸
    response = face.listFaces()
    for face in response:
        print("当前可识别人脸:",face)

    ##检测图片中人脸
    response = face.recognizeFace(image=r"wjtest.jpg", output="face_output.jpg",min_confidence=0.5)

    ## 删除人脸
    response = face.deleteFace("wj")
    response = face.deleteFace("yyqx")

    ## 人脸比较
    ##未提供

useUrl()
pythonsdk()

CSDN联合极客时间,共同打造面向开发者的精品内容学习社区,助力成长!
更多推荐


 0
0 0
0- 0


 已为社区贡献1条内容

所有评论(0)