
elastalert
今天聊聊ES的告警,X-Pack提供了报警组件Alert,但是这个功能是需要付费,在寻求其他方案的时候,发现了ElastAlert,可以说这是一款为ES量身定制的告警组件,能够完美替代Alert提供的所有功能。今天就ElastAlert强大的告警功能和笔者实践过程中遇到的一些问题进行分享。概述ElastAlert是基于python2开发的一个告警框架,它主要有以下特点:成熟,Github上已有5k
git
https://github.com/Yelp/elastalert
今天聊聊ES的告警,X-Pack提供了报警组件Alert,但是这个功能是需要付费,在寻求其他方案的时候,发现了ElastAlert,可以说这是一款为ES量身定制的告警组件,能够完美替代Alert提供的所有功能。今天就ElastAlert强大的告警功能和笔者实践过程中遇到的一些问题进行分享。
概述
ElastAlert是基于python2开发的一个告警框架,它主要有以下特点:
网上已经有了相当多的基础介绍文章,但是笔者发现大多数文章的内容都是过时的,甚至官方文档经常还会展示一些弃用配置;还有虎头蛇尾的通病,往往不全面,经常对一些关键性的细节不提及;再者一些地方解释地不够清晰,导致歧义。笔者在搭建和测试过程中同时借鉴多篇文章,然后在反复尝试中最后才成功,这其中失败了很多次,浪费了很多时间,所以这篇文章借鉴了上面提到的种种问题,保证本文的全面性、细节性以及具体性。
软件环境
1 2 3 | Centos7 Elasticsearch 6.4.2 Kibana 6.4.2 |
ElastAlert安装
安装较为简单,但为了不虎头蛇尾还是做一个完整的步骤介绍:
克隆代码
1 | $ git clone https://github.com/Yelp/elastalert.git |
安装依赖
1 2 3 | $ cd elastalert $ python setup.py install $ pip install -r requirements.txt |
整体配置
1 2 | $ cp config.yaml.example config.yaml // 根据模板生成配置文件 $ vim config.yaml // 修改配置 |
主要修改几个必需的选项,比如rules_folder、es_host、es_port等,那些非必需没有特殊需求就不用更改了:
1 2 3 4 5 6 7 8 9 10 11 12 13 14 15 16 17 18 19 20 21 22 23 24 25 26 27 28 29 30 31 32 33 34 35 36 37 38 39 | # 用来加载rule的目录,默认是example_rules rules_folder: example_rules # 用来设置定时向elasticsearch发送请求 run_every: minutes: 1 # 用来设置请求里时间字段的范围 buffer_time: minutes: 15 # elasticsearch的host地址 es_host: 192.168.232.191 # elasticsearch 对应的端口号 es_port: 9200 # 可选的,es url前缀 #es_url_prefix:elasticsearch # 可选的,查询es的方式,默认是GET #es_send_get_body_as:GET # 可选的,选择是否用SSL连接es,true或者false #use_ssl: True #可选的,是否验证TLS证书,设置为true或者false,默认为- true #verify_certs: True # es认证的username和password #es_username: someusername #es_password: somepassword # elastalert产生的日志在elasticsearch中的创建的索引 writeback_index: elastalert_status # 失败重试的时间限制 alert_time_limit: days: 2 |
详情请参考文档:Rule Types and Configuration Options — ElastAlert 0.0.1 documentation
创建ElastAlert索引
可以在/usr/bin/目录下看到以下四个命令:
1 2 3 4 5 | $ ll /usr/bin/elastalert* -rwxr-xr-x 1 root root 399 Nov 20 16:39 /usr/bin/elastalert -rwxr-xr-x 1 root root 425 Nov 20 16:39 /usr/bin/elastalert-create-index -rwxr-xr-x 1 root root 433 Nov 20 16:39 /usr/bin/elastalert-rule-from-kibana -rwxr-xr-x 1 root root 419 Nov 20 16:39 /usr/bin/elastalert-test-rule |
elastalert-create-index会创建一个索引,ElastAlert会把执行记录存放到这个索引中,默认情况下,索引名叫elastalert_status。其中有4个_type,都有自己的@timestamp字段,所以同样也可以用kibana来查看这个索引的日志记录情况。elastalert-rule-from-kibana从Kibana3已保存的仪表盘中读取Filtering设置,帮助生成config.yaml里的配置。不过注意,它只会读取filtering,不包括queries。elastalert-test-rule测试自定义配置中的rule设置。
执行elastalert-create-index命令在ES创建索引,这不是必须的步骤,但是强烈建议创建。因为对于审计和测试很有用,并且重启ES不影响计数和发送alert.
1 | $ elastalert-create-index |
具体参见文档: setting-up-elasticsearch
Rule配置
rule配置算是ElastAlert最核心的功能了,支持11种告警规则,就不一一介绍了,选用一个最为普遍使用的告警规则frequency,告警方式也选用最普遍的email。
1 2 3 4 5 6 7 8 9 10 11 12 13 14 15 16 17 18 19 20 21 22 23 24 25 26 27 28 29 30 31 32 33 34 35 36 37 38 39 40 41 42 43 44 45 46 47 48 49 50 51 52 53 54 55 56 57 58 59 60 61 62 63 | # Alert when the rate of events exceeds a threshold
# (Optional)
# Elasticsearch host
es_host: 192.168.232.191
# (Optional)
# Elasticsearch port
es_port: 9200
# (OptionaL) Connect with SSL to Elasticsearch
#use_ssl: True
# (Optional) basic-auth username and password for Elasticsearch
#es_username: someusername
#es_password: somepassword
# (Required)
# Rule name, must be unique
name: Example frequency rule
# (Required)
# Type of alert.
# the frequency rule type alerts when num_events events occur with timeframe time
type: frequency
# (Required)
# Index to search, wildcard supported
index: metricbeat-*
# (Required, frequency specific)
# Alert when this many documents matching the query occur within a timeframe
num_events: 5
# (Required, frequency specific)
# num_events must occur within this amount of time to trigger an alert
timeframe:
hours: 4
# (Required)
# A list of Elasticsearch filters used for find events
# These filters are joined with AND and nested in a filtered query
# For more info: http://www.elasticsearch.org/guide/en/elasticsearch/reference/current/query-dsl.html
filter:
- query_string:
query: "system.process.cpu.total.pct: >10%" // field支持嵌套
smtp_host: smtp.163.com
smtp_port: 25
smtp_auth_file: /opt/elastalert/smtp_auth.yaml
#回复给那个邮箱
email_reply_to: xxx@163.com
##从哪个邮箱发送
from_addr: xxx@163.com
# (Required)
# The alert is use when a match is found
alert:
- "email"
# (required, email specific)
# a list of email addresses to send alerts to
email:
- "yyy@qq.com"
|
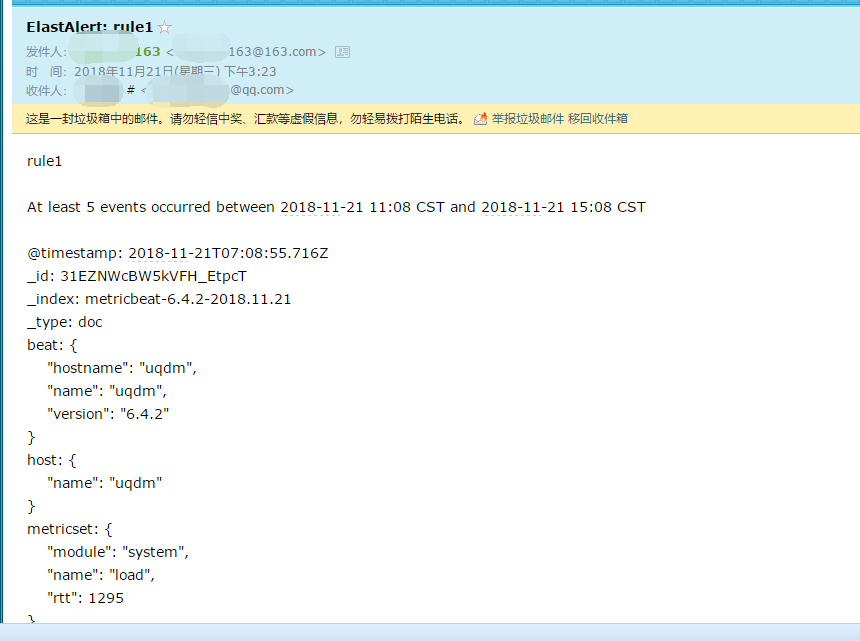
上述配置表示选择metricbeat作为告警索引,在4小时内将匹配过滤条件,当CPU使用百分比的值为10%超过5次后,即满足告警条件,然后发送邮件。
邮件配置
上述配置中已经展示了一部分邮件配置,主要有smtp host、smtp port、from addr和to_addr等。这里笔者选择一个网易163的邮箱作为发送邮箱,一个QQ邮箱作为接收邮件进行测试,所以smpt host应该为smtp.163.com。
1 2 3 4 5 6 7 8 9 10 11 12 13 14 15 | smtp_host: smtp.163.com smtp_port: 25 smtp_auth_file: /opt/elastalert/smtp_auth.yaml #回复给那个邮箱 email_reply_to: xxx@163.com ##从哪个邮箱发送 from_addr: xxx@163.com # (Required) # The alert is use when a match is found alert: - "email" # (required, email specific) # a list of email addresses to send alerts to email: - "yyy@qq.com" |
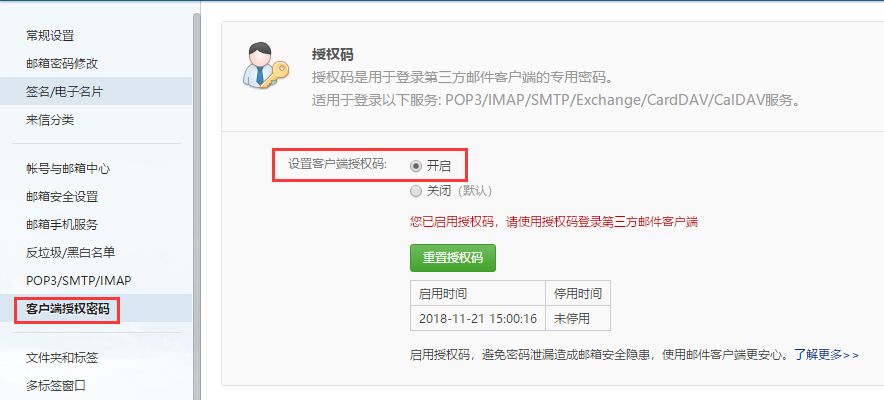
还有一个smtp_auth.yaml文件,这个里面记录了发送邮箱的账号和密码,163邮箱有授权码机制,所以密码处应该填写授权码(没有的话则需要开启)。
1 2 3 4 | #发送邮件的邮箱 user: xxx@163.com ##不是邮箱密码,是设置的POP3密码 password: xxx |
网易授权码设置如下图:
高级配置
避免重复告警
避免一定时间段中重复告警,可以配置realert和exponential_realert这两个选项:
1 2 3 4 5 6 7 8 9 | # 5分钟内相同的报警不会重复发送 realert: minutes: 5 # 指数级扩大 realert 时间,中间如果有报警, # 则按照5->10->20->40->60不断增大报警时间到制定的最大时间, # 如果之后报警减少,则会慢慢恢复原始realert时间 exponential_realert: hours: 1 |
聚合相同告警
1 2 3 4 5 6 7 | # 根据报警的内,将相同的报警安装 name 来聚合 aggregation_key: name # 聚合报警的内容,只展示 name 与 message summary_table_fields: - name - message |
告警内容格式化
可以自定义告警内容,内部是使用Python的format来实现的。
1 2 3 4 5 6 7 8 9 10 11 12 13 14 15 16 | alert_subject: "Error {} @{}"
alert_subject_args:
- name
- "@timestamp"
alert_text_type: alert_text_only
alert_text: |
### Error frequency exceeds
> Name: {}
> Message: {}
> Host: {} ({})
alert_text_args:
- name
- message
- hostname
- host
|
当然还有更多高级配置,详情请参考文档。
测试Rule
可以在运行rule之前先通过elastalert-test-rule命令来测试一下
1 | $ elastalert-test-rule ~/elastalert/example_rules/example_frequency.yaml |
详情参考文档:Running ElastAlert for the First Time — ElastAlert 0.0.1 documentation
运行Rule
启动elastalert服务,监听es,这里加了--rule example_frequency.yaml表示只运行example_frequency.yaml这一个rule文件,如果不加该选项则会运行rules_folder下所有rule文件,上面配置中的rules_folder为默认的example_rules。
1 | $ python -m elastalert.elastalert --verbose --rule example_frequency.yaml |
为了让服务后台运行并且可以达到守护进程的效果,在生产环境中笔者建议使用supervisor管理。
邮件效果图如下:
其他Rule
any:只要有匹配就报警;blacklist:compare_key字段的内容匹配上blacklist数组里任意内容;whitelist:compare_key字段的内容一个都没能匹配上whitelist数组里内容;change:在相同query_key条件下,compare_key字段的内容,在timeframe范围内 发送变化;frequency:在相同query_key条件下,timeframe范围内有num_events个被过滤出 来的异常;spike:在相同query_key条件下,前后两个timeframe范围内数据量相差比例超过spike_height。其中可以通过spike_type设置具体涨跌方向是-up、down、both。还可以通过threshold_ref设置要求上一个周期数据量的下限,threshold_cur设置要求当前周期数据量的下限,如果数据量不到下限,也不触发;flatline:timeframe范围内,数据量小于threshold阈值;new_term:fields字段新出现之前terms_window_size(默认30天)范围内最多的terms_size(默认50)个结果以外的数据;cardinality:在相同query_key条件下,timeframe范围内cardinality_field的值超过max_cardinality或者低于min_cardinality
摘自:ElastAlert介绍和安装-1
详细请参考文档:Rule Types and Configuration Options — ElastAlert 0.0.1 documentation
其他告警方式
除了email,还有jira、webhook等内置告警方式,由于笔者没有实践,就不一一赘述了。
第三方的微信和钉钉:
- 微信:https://github.com/anjia0532/elastalert-wechat-plugin
- 钉钉:https://github.com/xuyaoqiang/elastalert-dingtalk-plugin
也可以根据文档自己实现:Adding a New Alerter — ElastAlert 0.0.1 documentation
elastalert-kibana-plugin
elastalert-kibana-plugin是围绕elastalert做的一个kibana展示插件,可以在kibana上创建、编辑和删除告警,但是说实话这个插件还不是很好用,首先配置就有点麻烦,其次展示效果并不友好,提供配置rule的方式太专业化了,对小白或者一般用户来说要求稍高。
下载安装包
下载6.4.2的release安装包
1 | $ wget https://github.com/bitsensor/elastalert-kibana-plugin/releases/download/1.0.1/elastalert-kibana-plugin-1.0.1-6.4.2.zip |
本地安装插件
Kibana插件本地安装
1 | $ /usr/share/kibana/bin/kibana-plugin install file:///root/elastalert-kibana-plugin-1.0.1-6.4.2.zip |
本地安装前面需要加上file://,否则会默认为在线资源去解析url并下载
Unix:
1 | $ sudo bin/elasticsearch-plugin install file:///path/to/plugin.zip |
Windows:
假定需要安装的插件本地地址为C:\path\to\plugin.zip
1 | $ bin\elasticsearch-plugin install file:///C:/path/to/plugin.zip |
安装Server
上面安装的只是kibana的一个展示插件,插件内部并没有集成server,所以还需要再安装一个server,笔者之前因为没有做这一步,一直卡着,页面显示报错502 Bad Gateway,关键是官方文档也没说清楚一定要装这个。。
克隆仓库
1 2 | $ git clone https://github.com/bitsensor/elastalert.git elastalert-server $ cd elastalert-server |
这边我们先不用官网说的docker运行的方式,先用本地npm起服务的方式运行。
下载指定版本的npm
1 | $ nvm install "$(cat .nvmrc)" |
安装依赖
1 | $ npm install |
修改配置
这一步很重要,因为很多地方没有说的很清楚,包括docker运行方式在这一块也没说清楚。
1 | $ vim config/config.json |
默认的配置需要修改,尤其是elastalertPath和rulesPath中的path选项
elastalertPath表示的是我们最初安装的elastalert仓库的目录,也就是说elastalert-kibana-plugin运行需要三个仓库,分别是elastalert、elastalert-kibana-plugin、和elastalert-server,分别对应的是后端代码、前端代码、webserver,这也就是笔者之前提到的安装提到的安装麻烦所在了;
其次rulesPath中path选项表示运用elastalert-kibana-plugin插件创建告警后rule文件存放的目录,上面笔者在elastalert配置的rules_folder为example_rules,这里配置的path为rules,主要是因为elastalert-server目录下用的是这个,笔者也在elastalert项目中创建了个rules的目录,并将rules_folder配置进行同步,这个看个人喜好自定义即可。
1 2 3 4 5 6 7 8 9 10 11 12 13 14 15 16 17 18 19 | {
"appName": "elastalert-server",
"port": 3030,
"elastalertPath": "/root/elastalert",
"verbose": false,
"es_debug": false,
"debug": false,
"rulesPath": {
"relative": true,
"path": "/rules"
},
"templatesPath": {
"relative": true,
"path": "/rule_templates"
},
"es_host": "192.168.232.191",
"es_port": 9200,
"writeback_index": "elastalert_status"
}
|
起服务
1 | npm start |
容器方式
官网提供的命令依旧是很模糊,很多同学直接运行了,也没报错,但是也没正常运行,这是因为跟上面一样,下面这些目录都要对应修改,具体参考上面配置文件即可,最重要的还是要明白整体架构,三个项目各自的作用,知道原理就一目了然了,但不得不说如果官方文档描述地详细一点,大家也许会更容易地搞成功。
1 2 3 4 5 6 7 | docker run -d -p 3030:3030 \
-v `pwd`/config/elastalert.yaml:/opt/elastalert/config.yaml \
-v `pwd`/config/config.json:/opt/elastalert-server/config/config.json \
-v `pwd`/rules:/opt/elastalert/rules \
-v `pwd`/rule_templates:/opt/elastalert/rule_templates \
--net="host" \
--name elastalert bitsensor/elastalert:latest
|
总结
本文从elastalert的安装讲起,接着涉猎rule配置、email配置等环节,然后通过测试和运行来对rule文件进行验证,最后再详细介绍了elastalert-kibana-plugin的安装和用法。
总的来说,elastalert围绕es所提供的告警功能是很强大的,文中提供的案例只是冰山一角,大家感兴趣的可以多看看官方文档,elastalert的官方文档还是很全的。
至于elastalert-kibana-plugin这个插件,笔者认为一般般,配置过程稍显麻烦,其次功能很弱,跟后端手动修改配置文件没什么两样,也没有同名校验这些机制,相比而言,sentinl的UI就显得简单美观了,请听下回分解。
refer

瓜分20万奖金 获得内推名额 丰厚实物奖励 易参与易上手
更多推荐

 0
0 0
0- 0


 已为社区贡献4条内容

所有评论(0)