python画中秋月饼,用turtle海龟库画中秋月饼
turtle画中秋月饼效果图代码效果图代码都封装在函数里了,想改那一部分,取消原来的函数调用,然后自由加新的函数即可代码import turtlet = turtle.Pen()# 画笔一 用于画图t.speed(0)# 花纹颜色 F29407# 饼身颜色 F8B41A# 画 饼身部分def outfill_flower(flower_num: "花瓣数量", flower_color: "花瓣颜
本python画月饼的代码封装比较灵活,可以自由调用,不懂的地方可以留言交流
2022新录制的绘制视频,祝大家中秋快乐。 https://www.bilibili.com/video/BV1DP411V7T9/
绘制五星红旗的方法也分享给大家:站内文章链接:turtle绘制五星红旗
turtle画中秋月饼
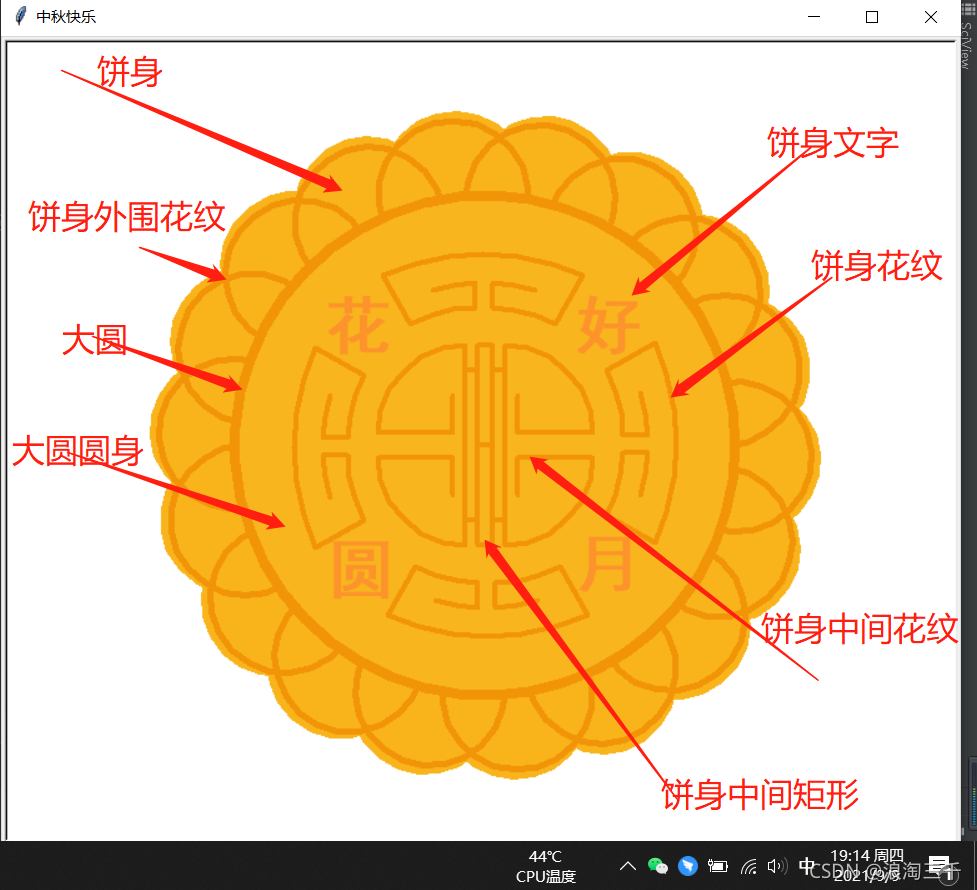
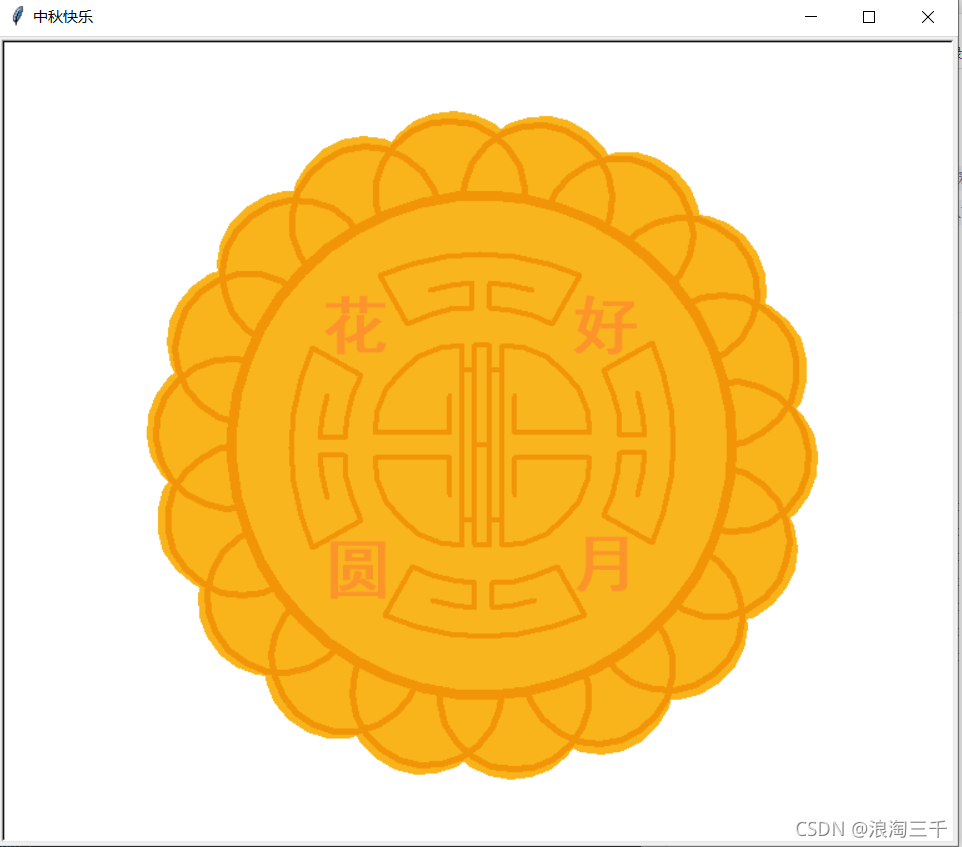
1、效果图

2、主要画图方法总结
单画笔一般初始代码:
import turtle # 导入海龟库
t = turtle.Pen() # 获取海龟画笔
…
turtle.done() # 结束绘制后 使画布能保留,不至于画完就自动关闭画面
注意点1:turtle.Pen() 的P是大写的 而且后面有个括号
注意点2:利用goto(x,y)方法移动画笔的时候,要先抬起画笔,避免留下痕迹。完事要落下画笔
注意点3:填充颜色设置后,要配合begin_fill() 和 end_fill() 才能填充画笔的起始闭合区域,但是画笔颜色和填充颜色是独立设置的
t.fillcolor(‘red’)
t.begin_fill()
t.circle(180)
t.end_fill()
| 功能代码 | 作用 | 使用方法 |
|---|---|---|
| 导入海龟画笔工具箱 | import turtle | |
| 从工具箱子获取海龟画笔 | t = turtle.Pen() | |
| speed(速度值) | 设置画笔速度1~9,0最快 | t.speed(0) |
| circle(半径) | 画圆 | t.circle(100) |
| circle(半径,弧度) | 画弧线 | t.circle(100,180) |
| circle(半径,弧度,边数) | 画圆内接多边形 | t.circle(100,180,6) |
| pencolor(‘颜色单词’) | 设置画笔颜色 | t.pencolor(‘red’) |
| color(颜色) | 设置画笔颜色 | t.color(‘red’) |
| fillcolor(‘颜色单词’) | 设置填充颜色 | t.fillcolor(‘skyblue’) |
| begin_fill() | 开始填充 | t.begin_fill() |
| end_fill() | 结束填充 | t.end_fill() |
| forward(距离) | 控制画笔前进 | t.forward(100) |
| goto(横向位置,纵向位置) | 控制画笔移动到指定位置 | t.goto(20,60) |
| penup() | 抬起画笔 | t.penup() |
| pendown() | 落下画笔 | t.pendown() |
| left(旋转角度) | 设置画笔左转 | t.left(20) |
| right(旋转角度) | 设置画笔右转 | t.right(30) |
| setheading(指向角度) | 设置画笔的指向,右是0,然后逆时针0-360递增 | t.setheading(270) |
| undo() | 撤销上一步操作 | t.undo() |
| write() | 写字 | t.write(‘杨老师编程’) |
| 修改字体大小 | t.write(‘真帅’,font=60) | |
| hideturtle() | 隐藏画笔的箭头 | t.hideturtle() |
| showturtle() | 显示画笔箭头 | t.showturtle() |
| done() | 结束绘制 | turtle.done() |
| 关闭画笔工具箱,但保留画面 | turtle.done() |
3、完整代码
代码都封装在函数里了,想改哪一部分,取消原来的函数调用,然后自由加新的函数即可
import turtle

t = turtle.Pen()  # 画笔一 用于画图
t.speed(0)


# 花纹颜色 #F29407
# 饼身颜色 #F8B41A

# 画 饼身部分
def outfill_flower(flower_num: "花瓣数量", flower_color: "花瓣颜色"):
    for i in range(flower_num):
        t.left(i * (360 // flower_num))
        t.color(flower_color)
        t.penup()
        t.forward(200)
        t.pendown()
        t.fillcolor(flower_color)
        t.begin_fill()
        t.circle(60)
        t.end_fill()
        t.penup()
        t.home()


# 画 饼身外围 花纹部分
def out_line_flower(flower_num: "花纹数量", flower_color: "花纹颜色"):
    for i in range(flower_num):
        t.pensize(5)
        t.left(i * (360 // 18))
        t.color(flower_color)
        t.penup()
        t.forward(192)
        t.pendown()
        t.circle(60)
        t.penup()
        t.home()


# 画内测的大圆 大圆的填充色比饼身略亮
def big_circle(circle_color: "大圆颜色", circle_fill_color: "大圆填充颜色", circle_size: "大圆半径"):
    t.goto(circle_size, 0)
    t.left(90)
    t.pendown()
    t.pensize(8)
    t.color(circle_color)
    t.fillcolor(circle_fill_color)
    t.begin_fill()
    t.circle(circle_size)
    t.end_fill()
    t.penup()
    t.home()


# 饼上印花文字 文字内容和坐标用字典存储
def write_font(text_content: "文本内容", text_color: "文本颜色", size: "文字大小"):
    t.color(text_color)
    for x in text_content:
        t.penup()
        t.goto(text_content[x])
        t.write(x, align='center', font=('simhei', size, 'bold'))
    t.penup()
    t.home()
    t.color('#F29407')


# 饼身中间矩形条纹部分
def body_center_line(width: "矩形宽度", height: "矩形高度"):
    t.penup()
    t.home()
    t.pensize(4)
    t.pendown()
    t.backward(width / 2)
    t.forward(width)
    t.left(90)
    t.forward(height)
    t.left(90)
    t.forward(width)
    t.left(90)
    t.forward(height * 2)
    t.left(90)
    t.forward(width)
    t.left(90)
    t.forward(height)
    t.penup()
    t.home()


# 矩形条纹两侧的四个花纹 画笔轨迹是一样的 所以只需要传入不同的初始位置和角度即可复用代码
def center_flower(start_point: "落笔位置", start_angle: "落笔朝向", angle_direction_change: "新朝向",
                  rectangle_height: "矩形高度", circle_direction: "花纹弧度"):
    t.penup()
    t.goto(start_point)
    t.pendown()
    t.setheading(start_angle)
    t.forward(10)
    t.setheading(angle_direction_change)
    t.forward(20)
    t.backward(rectangle_height * 2)
    t.forward(rectangle_height * 2)
    t.setheading(start_angle)
    t.circle(circle_direction * 70, 90)
    t.setheading(start_angle + 180)
    t.forward(60)
    t.setheading(angle_direction_change)
    t.forward(30)
    t.penup()
    t.home()


# 饼身上下左右的花纹
def out_flower(begin_x: "落笔横坐标", begin_y: "落笔纵坐标", start_angle: "落笔朝向"):
    t.penup()
    t.goto(begin_x, begin_y)
    t.pendown()
    t.setheading(start_angle)
    t.forward(20)
    t.right(90)
    t.circle(-100, 20)

    t.penup()
    t.goto(begin_x, begin_y)
    t.pendown()
    t.setheading(start_angle)
    t.right(90)
    t.circle(-100, 30)
    t.left(90)
    t.forward(45)
    t.left(95)
    t.circle(190, 50)
    t.left(95)
    t.forward(45)
    t.left(90)
    t.circle(-100, 31)
    t.setheading(start_angle)
    t.forward(20)
    t.left(90)
    t.circle(100, 20)
    t.penup()
    t.home()

# 以下代码开始调用各种功能
if __name__ == "__main__":
	# 设置画布名称
    t.screen.title('中秋快乐')
    # 画 饼身部分
    outfill_flower(18, '#F8B41A')
    # 画 饼身外围 花纹部分
    out_line_flower(18, '#F29407')
    # 画内测的大圆 大圆的填充色比饼身略亮
    # big_circle('#F29407','#F8B41A',200)
    big_circle('#F29407', '#F8B51D', 200)
    # 饼上印花文字 文字内容和坐标用字典存储
    text_content = {'花': (-100, 70), '好': (100, 70), '月': (100, -120), '圆': (-98, -125)}  # 圆字坐标最后向下微调了一下
    # write_font(text_content,'#F29407',40)
    write_font(text_content, '#FC932B', 40)
    # 饼身中间矩形条纹部分
    body_center_line(12, 80)
    # 矩形条纹两侧的四个花纹
    center_flower((6, 60), 0, 90, 80, -1)
    center_flower((6, -60), 0, -90, 80, 1)
    center_flower((-6, 60), 180, 90, 80, 1)
    center_flower((-6, -60), 180, -90, 80, -1)
    # 饼身上下左右的花纹
    out_flower(6, 110, 90)
    out_flower(-110, 6, 180)
    out_flower(-6, -110, 270)
    out_flower(110, -6, 360)
    # 可以再加点字
    # text_content2 = {'天': (-50, 30), '地': (50, 30), '仁': (50, -60), '和': (-50, -60)}  # 圆字坐标最后向下微调了一下
    # write_font(text_content2, '#F29407',30)

    # 隐藏画笔
    t.hideturtle()
    # 保持画布显示
    turtle.done()

为武汉地区的开发者提供学习、交流和合作的平台。社区聚集了众多技术爱好者和专业人士,涵盖了多个领域,包括人工智能、大数据、云计算、区块链等。社区定期举办技术分享、培训和活动,为开发者提供更多的学习和交流机会。
更多推荐


 11
11 0
0- 0


 已为社区贡献1条内容

所有评论(0)