
postgresql 创建分区表 以及拆分分区表(修改分区)
postgresql数据库 创建分区表 以及拆分分区表(修改分区)前言在日常维护啊数据库的过程中,往往发现一部分表由于日积月累的原因,表内的的数据量越来越大,会影响我们的查询效率,特别是往往只查询部分数据时(比如时间范围)查询会相当慢,那有没有解决办法吗?办法肯定有的,那就不得不说我们今天的主角了:分区表那什么是分区表?下面请听我一一讲解:一 什么是分区表?分区表就是根据分区策略,将数据数据分散到
postgresql 创建分区表 以及拆分分区表(修改分区)
本文使用的数据库是 postgresql 11.5
文章目录
前言
在日常维护啊数据库的过程中,往往发现一部分表由于日积月累的原因,表内的的数据量越来越大,会影响我们的查询效率,特别是往往只查询部分数据时(比如时间范围)查询会相当慢,那有没有解决办法吗?
办法肯定有的,那就不得不说我们今天的主角了:分区表 那什么是分区表?下面请听我一一讲解:
一 什么是分区表?
1.1 分区表的概念
分区表就是根据分区策略,将数据数据分散到不同的子表中,并通过父表建立关联关系,从而实现数据物理上的分区。
1.2 分区的好处
- 在某些情况下查询性能能够显著提升,特别是当那些访问压力大的行在一个分区或者少数几个分区时。划分可以取代索引的主导列、减小索引尺寸以及使索引中访问压力大的部分更有可能被放在内存中。
- 当查询或更新访问一个分区的大部分行时,可以通过该分区上的一个顺序扫描来取代分散到整个表上的索引和随机访问,这样可以改善性能。
- 如果需求计划使用划分设计,可以通过增加或移除分区来完成批量载入和删除。 执行ALTER TABLE DETACH PARTITION或者使用DROP TABLE 删除一个单独的分区都远快于一个批量操作。这些命令也完全避免了由批量DELETE造成的VACUUM负载。
- 很少使用的数据可以被迁移到便宜且较慢的存储介质上。
1.3 分区的类型
postgresql 11 以上数据库支持3种类型
- 范围划分
表被根据一个关键列或一组列划分为“范围”,不同的分区的范围之间没有重叠。例如,我们可以根据日期范围划分,或者根据特定业务对象的标识符划分。 - 列表划分
通过显式地列出每一个分区中出现的键值来划分表 - 哈希分区
通过为每个分区指定模数和余数来对表进行分区。每个分区所持有的行都满足:分区键的值除以为其指定的模数将产生为其指定的余数。
1.4 分区创建
- 原表数据结构
CREATE TABLE measurement ( city_id int not null, logdate date not null, peaktemp int, unitsales int);
- 创建主表(父表)
通过指定#PARTITION BY子句把measurement表创建为分区表,该子句包括分区方法(这个例子中是RANGE)以及用作分区键的列列表。
CREATE TABLE measurement ( city_id int not null, logdate date not null, peaktemp int, unitsales int) PARTITION BY RANGE (logdate);
- 创建子分区
 CREATE TABLE measurement_y2006m03 PARTITION OF measurement FOR VALUES FROM ('2006-03-01') TO ('2006-04-01');
-- ...
 CREATE TABLE measurement_y2007m11 PARTITION OF measurement FOR VALUES FROM ('2007-11-01') TO ('2007-12-01');
 CREATE TABLE measurement_y2007m12 PARTITION OF measurement FOR VALUES FROM ('2007-12-01') TO ('2008-01-01') TABLESPACE fasttablespace;
 CREATE TABLE measurement_y2008m01 PARTITION OF measurement FOR VALUES FROM ('2008-01-01') TO ('2008-02-01') WITH (parallel_workers = 4)
注意
每个分区的定义必须指定对应于父表的分区方法和分区键的边界。注意,如果指定的边界使得新分区的值会与已有分区中的值重叠,则会导致错误。向父表中插入无法映射到任何现有分区的数据将会导致错误,这种情况下应该手工增加一个合适的分区。
1.5 分区维护
- 删除分区
移除旧数据最简单的选择是删除掉不再需要的分区:
DROP TABLE measurement_y2006m02;
- 脱离主表
把分区从分区表中移除,但是保留它作为一个独立的表
ALTER TABLE measurement DETACH PARTITION measurement_y2006m02;
二 分区的应用
我们知道了啥是分区表,现在我们就实际应用一下,就如前面所说的,把一个大数据量的表该给分区表吧。
原表结构:
CREATE TABLE "hrmw"."tb_cs_fqb-1" (
  "id" varchar(36) COLLATE "pg_catalog"."default" NOT NULL,
  "code" varchar(36) COLLATE "pg_catalog"."default" NOT NULL,
  "calc_time" timestamp(0) NOT NULL,
  "linked" char(1) COLLATE "pg_catalog"."default" NOT NULL DEFAULT '0'::bpchar,
  "online" char(1) COLLATE "pg_catalog"."default" NOT NULL DEFAULT '0'::bpchar,
  "create_by" varchar(100) COLLATE "pg_catalog"."default" NOT NULL,
  "create_time" timestamp(6) NOT NULL,
  CONSTRAINT "tb_hrmw_moni_company_interval_copy1_pkey" PRIMARY KEY ("id")
)
;

ALTER TABLE "hrmw"."tb_cs_fqb-1"
  OWNER TO "postgres";

CREATE INDEX "index_tb_cs_fqb_calc_time-1" ON "hrmw"."tb_cs_fqb-1" USING btree (
  "calc_time" "pg_catalog"."timestamp_ops" ASC NULLS LAST
);
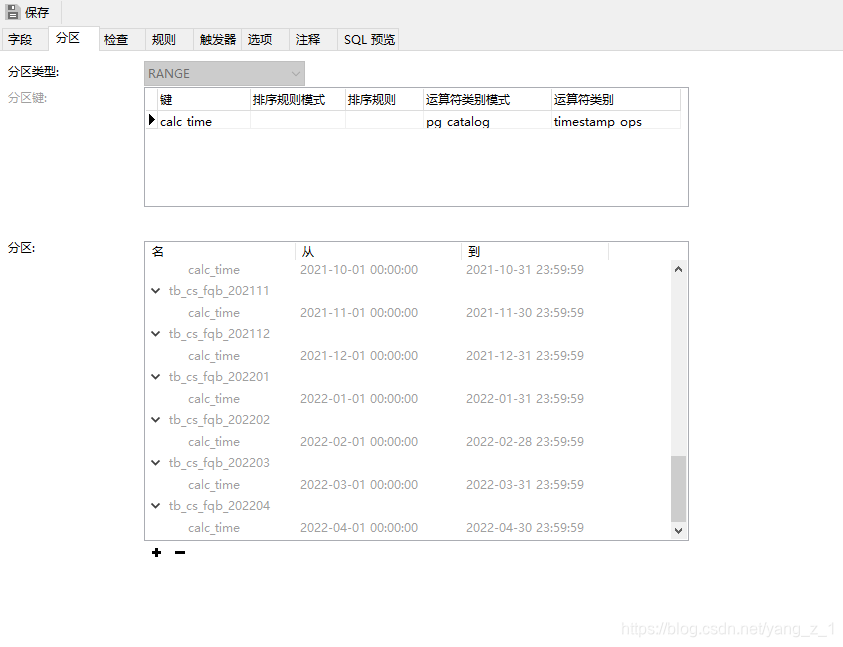
2.1. 创建分区表
创建一个跟原表表结构一样的分区表 , 因需求我们按照时间来进行分区(calc_time),按时间一月一个分区
 CREATE TABLE "hrmw"."tb_cs_fqb" (
  "id" varchar(36) COLLATE "pg_catalog"."default" NOT NULL,
  "code" varchar(36) COLLATE "pg_catalog"."default" NOT NULL,
  "calc_time" timestamp(0) NOT NULL,
  "linked" char(1) COLLATE "pg_catalog"."default" NOT NULL DEFAULT '0'::bpchar,
  "online" char(1) COLLATE "pg_catalog"."default" NOT NULL DEFAULT '0'::bpchar,
  "create_by" varchar(100) COLLATE "pg_catalog"."default" NOT NULL,
  "create_time" timestamp(6) NOT NULL,
  CONSTRAINT "tb_hrmw_moni_company_interval_copy1_pkey" PRIMARY KEY ("id","calc_time")
)partition by range (calc_time)
;

ALTER TABLE "hrmw"."tb_cs_fqb"
  OWNER TO "postgres";
2.2 创建子分区
按时间一月一个分区 ,从2020年5月到22年4月
create table tb_cs_fqb_202005 partition of tb_cs_fqb for values from ('2020-05-01 00:00:00') to ('2020-05-31 23:59:59');

create table tb_cs_fqb_202006 partition of tb_cs_fqb for values from ('2020-06-01 00:00:00') to ('2020-06-30 23:59:59');

create table tb_cs_fqb_202007 partition of tb_cs_fqb for values from ('2020-07-01 00:00:00') to ('2020-07-31 23:59:59');

create table tb_cs_fqb_202008 partition of tb_cs_fqb for values from ('2020-08-01 00:00:00') to ('2020-08-31 23:59:59');

create table tb_cs_fqb_202009 partition of tb_cs_fqb for values from ('2020-09-01 00:00:00') to ('2020-09-30 23:59:59');
create table tb_cs_fqb_202010 partition of tb_cs_fqb for values from ('2020-10-01 00:00:00') to ('2020-10-31 23:59:59');

create table tb_cs_fqb_202011 partition of tb_cs_fqb for values from ('2020-11-01 00:00:00') to ('2020-11-30 23:59:59');

create table tb_cs_fqb_202012 partition of tb_cs_fqb for values from ('2020-12-01 00:00:00') to ('2020-12-31 23:59:59');

create table tb_cs_fqb_202101 partition of tb_cs_fqb for values from ('2021-01-01 00:00:00') to ('2021-01-31 23:59:59');

create table tb_cs_fqb_202102 partition of tb_cs_fqb for values from ('2021-02-01 00:00:00') to ('2021-02-28 23:59:59');

create table tb_cs_fqb_202103 partition of tb_cs_fqb for values from ('2021-03-01 00:00:00') to ('2021-03-31 23:59:59');

create table tb_cs_fqb_202104 partition of tb_cs_fqb for values from ('2021-04-01 00:00:00') to ('2021-04-30 23:59:59');

create table tb_cs_fqb_202105 partition of tb_cs_fqb for values from ('2021-05-01 00:00:00') to ('2021-05-31 23:59:59');

create table tb_cs_fqb_202106 partition of tb_cs_fqb for values from ('2021-06-01 00:00:00') to ('2021-06-30 23:59:59');

create table tb_cs_fqb_202107 partition of tb_cs_fqb for values from ('2021-07-01 00:00:00') to ('2021-07-31 23:59:59');

create table tb_cs_fqb_202108 partition of tb_cs_fqb for values from ('2021-08-01 00:00:00') to ('2021-08-31 23:59:59');

create table tb_cs_fqb_202109 partition of tb_cs_fqb for values from ('2021-09-01 00:00:00') to ('2021-09-30 23:59:59');
create table tb_cs_fqb_202110 partition of tb_cs_fqb for values from ('2021-10-01 00:00:00') to ('2021-10-31 23:59:59');

create table tb_cs_fqb_202111 partition of tb_cs_fqb for values from ('2021-11-01 00:00:00') to ('2021-11-30 23:59:59');

create table tb_cs_fqb_202112 partition of tb_cs_fqb for values from ('2021-12-01 00:00:00') to ('2021-12-31 23:59:59');

create table tb_cs_fqb_202201 partition of tb_cs_fqb for values from ('2022-01-01 00:00:00') to ('2022-01-31 23:59:59');

create table tb_cs_fqb_202202 partition of tb_cs_fqb for values from ('2022-02-01 00:00:00') to ('2022-02-28 23:59:59');

create table tb_cs_fqb_202203 partition of tb_cs_fqb for values from ('2022-03-01 00:00:00') to ('2022-03-31 23:59:59');

create table tb_cs_fqb_202204 partition of tb_cs_fqb for values from ('2022-04-01 00:00:00') to ('2022-04-30 23:59:59');
2.3.给子分区加索引
CREATE INDEX order_idx_tb_cs_fqb_202108_calc_time ON tb_cs_fqb_202108 USING btree(calc_time);
CREATE INDEX order_idx_tb_cs_fqb_202107_calc_time ON tb_cs_fqb_202107 USING btree(calc_time);
CREATE INDEX order_idx_tb_cs_fqb_202106_calc_time ON tb_cs_fqb_202106 USING btree(calc_time);
CREATE INDEX order_idx_tb_cs_fqb_202105_calc_time ON tb_cs_fqb_202105 USING btree(calc_time);
CREATE INDEX order_idx_tb_cs_fqb_202104_calc_time ON tb_cs_fqb_202104 USING btree(calc_time);
CREATE INDEX order_idx_tb_cs_fqb_202103_calc_time ON tb_cs_fqb_202103 USING btree(calc_time);
CREATE INDEX order_idx_tb_cs_fqb_202102_calc_time ON tb_cs_fqb_202102 USING btree(calc_time);
CREATE INDEX order_idx_tb_cs_fqb_202101_calc_time ON tb_cs_fqb_202101 USING btree(calc_time);
2.4.插入数据
INSERT into "hrmw"."tb_cs_fqb"
SELECT * from "hrmw"."tb_cs_fqb-1"
直接用 INSERT 插入会很慢 ,也可以用COPY来导入数据
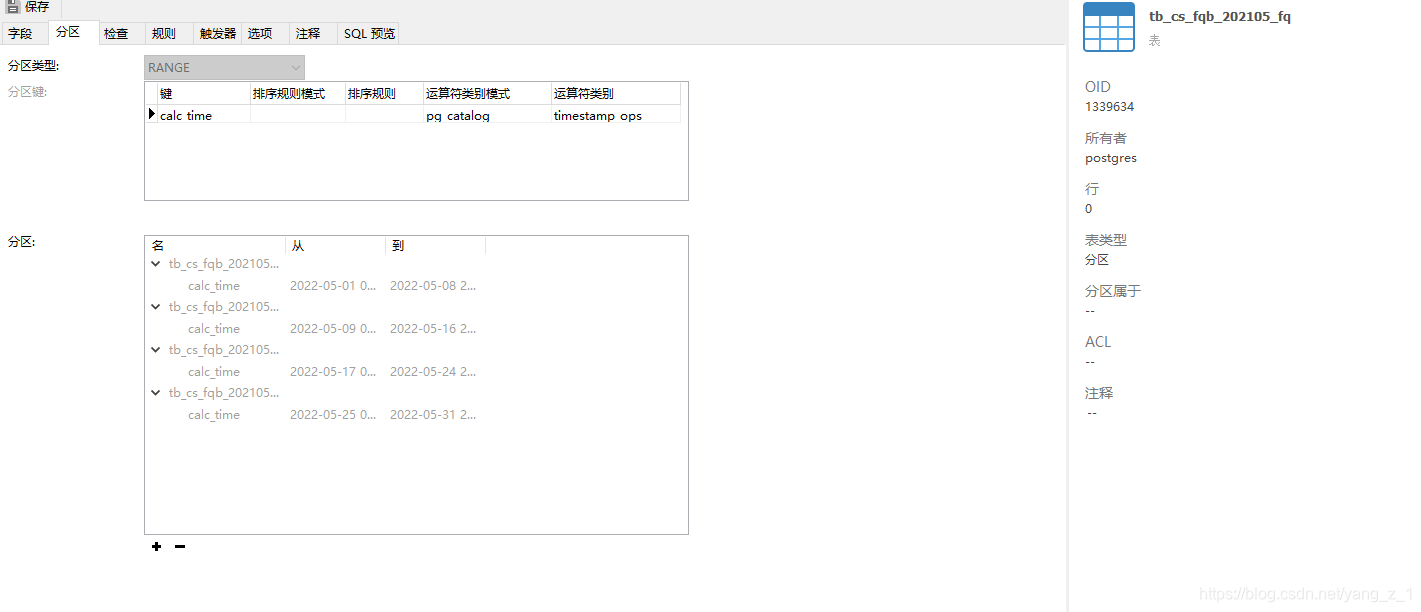
三 修改分区范围
现在我们又遇到了一个难题 ,由于数量剧增, 之前的分区(比如2021年5月份)的数据量变大了 ,达到了9千万的数据量,查询有变慢了 ,这样我们又需要更改分区了 ,把分区变为一个月4个分区。
那如何更改分区的范围呢?
我们以一个分区来举例
3.1 把子分区与主表脱离
ALTER TABLE 分区表名  DETACH PARTITION 子分区名;
ALTER TABLE tb_cs_fqb DETACH PARTITION tb_cs_fqb_202105;

3.2 创建新的分区表
- 创建分区表
CREATE TABLE "hrmw"."tb_cs_fqb_202105_fq" (
  "id" varchar(36) COLLATE "pg_catalog"."default" NOT NULL,
  "code" varchar(36) COLLATE "pg_catalog"."default" NOT NULL,
  "calc_time" timestamp(0) NOT NULL,
  "linked" char(1) COLLATE "pg_catalog"."default" NOT NULL DEFAULT '0'::bpchar,
  "online" char(1) COLLATE "pg_catalog"."default" NOT NULL DEFAULT '0'::bpchar,
  "create_by" varchar(100) COLLATE "pg_catalog"."default" NOT NULL,
  "create_time" timestamp(6) NOT NULL,
  CONSTRAINT "tb_hrmw_moni_company_interval_copy2_pkey" PRIMARY KEY ("id","calc_time")
)partition by range (calc_time)
;
- 添加子分区
create table tb_cs_fqb_202105_fq_1 partition of tb_cs_fqb_202105_fq for values from ('2022-05-01 00:00:00') to ('2022-05-8 23:59:59');
create table tb_cs_fqb_202105_fq_2 partition of tb_cs_fqb_202105_fq for values from ('2022-05-09 00:00:00') to ('2022-05-16 23:59:59');
create table tb_cs_fqb_202105_fq_3 partition of tb_cs_fqb_202105_fq for values from ('2022-05-17 00:00:00') to ('2022-05-24 23:59:59');
create table tb_cs_fqb_202105_fq_4 partition of tb_cs_fqb_202105_fq for values from ('2022-05-25 00:00:00') to ('2022-05-31 23:59:59');
- 添加索引
CREATE INDEX order_idx__tb_cs_fqb_202105_fq_202105_4_company_code ON tb_cs_fqb_202105_fq_4 USING btree(calc_time);

CREATE INDEX order_idx__tb_cs_fqb_202105_fq_202105_1_company_code ON tb_cs_fqb_202105_fq_1 USING btree(calc_time);

CREATE INDEX order_idx__tb_cs_fqb_202105_fq_202105_2_company_code ON tb_cs_fqb_202105_fq_2 USING btree(calc_time);
CREATE INDEX order_idx__tb_cs_fqb_202105_fq_202105_3_company_code ON tb_cs_fqb_202105_fq_3 USING btree(calc_time);
3.3 把新建的分区表关联到原先的分区表
ALTER TABLE tb_cs_fqb ATTACH PARTITION tb_cs_fqb_202105_fq FOR VALUES FROM ('2021-05-01 00:00:00') to ('2021-05-31 23:59:59');

3.4 插入数据
INSERT into "hrmw"."tb_cs_fqb_202105_fq"
SELECT * from "hrmw"."tb_cs_fqb_202105"
到这里就是改完了 完成我们的目标了 ,剩下的分区也是这种操作,合并分区也是一样的操作。

旨在为数千万中国开发者提供一个无缝且高效的云端环境,以支持学习、使用和贡献开源项目。
更多推荐


 32
32 0
0- 0


 已为社区贡献2条内容

所有评论(0)