
西电C语言程序设计实验之位图图像文件缩放
位图图像文件缩放编写一个程序,可以在命令行输入参数,完成指定文件的缩放,并存储到新文件,命令行参数如下:zoom file1.bmp 200 file2.bmp第一个参数为可执行程序名称,第二个参数为原始图像文件名,第三个参数为缩放比例(百分比),第四个参数为新文件名。声明:由于window上主要是24位图和256色8位图居多,所以这里的程序只编写了针对于这两种图片的算法,如果想实现其他位图的缩放
位图图像文件缩放
直接给上源码地址:xdu-exp-c,仅供参考哈,各位学弟学妹,能学到点什么是最关键的,有问题尽量先自己借助搜索引擎或 AI 帮你解决,解决不了可在 github 提 issue。
题目简介
编写一个程序,可以在命令行输入参数,完成指定文件的缩放,并存储到新文件,命令行参数如下:
zoom file1.bmp 200 file2.bmp
第一个参数为可执行程序名称,第二个参数为原始图像文件名,第三个参数为缩放比例(百分比),第四个参数为新文件名。
声明:
由于window上主要是24位图和256色8位图居多,所以这里的程序只编写了针对于这两种图片的算法,如果想实现其他位图的缩放,也很简单,只需要在一些位置进行对应的修改。
算法分析
最邻近插值算法
很简单,就是对新图中的每一个点(X,Y),通过压缩比例pzoom可以对应的找到原图所在点(x,y)的大致位置,然后对应字节拷贝过去即可。
双线性插值算法
较第一种方法准确一点的算法,大概就是对新图中的每一个点,通过压缩比例pzoom可以对应的找到原图对应的x1,y1,然后可以进一步获得邻近的x2=x1+1和y2=y1+1,由着四个值可以确定4个原图的点。然后根据权值思想先进行水平方向的插值找到两个点,后对这两点在竖直方向进行插值即可找到结果,再把对应字节拷贝过去即可。
图片解释:
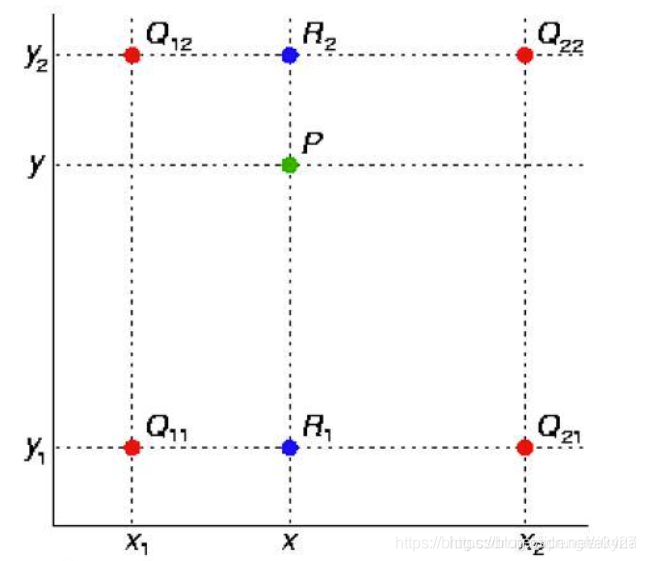
水平方向插值:
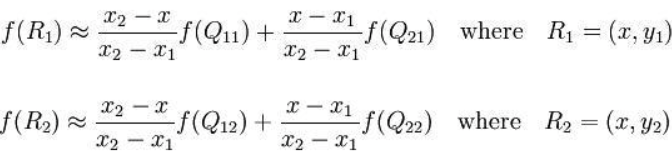
竖直方向插值:

知道这两个算法后就事半功倍了:
程序分析
定义bmp图片结构
这个需要先了解bmp图片四大件:文件头,信息头,调色板,位图数据,如果是24位则没有调色板。
先单独读取bmp图片文本标识符0x4d42,这个只能单独读取,读取文件头时不包含它,应该去掉或者注释掉。如下文件头结构所示:
1.文件头:
typedef struct tagBITMAPFILEHEADER {
	//unsigned short bfType;	  // 保存图片类型,读取时需要注释掉,文本标识符只能单独进行读写
    unsigned int   bfSize;        // 文件大小
    unsigned short bfReserved1;   // 保留,设置为0
    unsigned short bfReserved2;   // 保留,设置为0
    unsigned int   bfOffBits;     // 从文件头到实际的图像数据之间的字节的偏移量(没调色板的话是54)
}BITMAPFILEHEADER;
2.信息头:
typedef struct tagBITMAPINFOHEADER {
    unsigned int    biSize;          // 此结构体的大小
    unsigned int    biWidth;         // 图像的宽
    unsigned int    biHeight;        // 图像的高
    unsigned short  biPlanes;        // 颜色平面数 恒为1
    unsigned short  biBitCount;      // 一像素所占的位数 Windows系统有8,16,24
    unsigned int    biCompression;   // 说明图象数据压缩的类型,0为不压缩
    unsigned int    biSizeImage;     // 图像大小, 值等于上面文件头结构中bfSize-bfOffBits
    int             biXPelsPerMeter; // 说明水平分辨率,用像素/米表示 一般为0
    int             biYPelsPerMeter; // 说明垂直分辨率,用像素/米表示 一般为0
    unsigned int    biClrUsed;       // 说明位图实际使用的彩色表中的颜色索引数(设为0的话,则说明使用所有调色板项)
    unsigned int    biClrImportant;  // 说明对图象显示有重要影响的颜色索引的数目 如果是0表示都重要
}BITMAPINFOHEADER;
3.调色板:
typedef struct tagRGBQUAND{
	unsigned char r;
	unsigned char g;
	unsigned char b;
	unsigned char rgbReserved;
}RGBQUAND;
4.位图数据
位图数据则是一个一个的字节了,无需定义结构体,后面直接读取即可。
读取图片信息
//读取原图信息
BITMAPFILEHEADER fileHeader;	// 原图文件头
BITMAPINFOHEADER infoHeader;	// 原图消息头
fread(&fileHeader, sizeof(BITMAPFILEHEADER), 1, fp1);
fread(&infoHeader, sizeof(BITMAPINFOHEADER), 1, fp1);
int byte = infoHeader.biBitCount / 8;//每个像素的字节数
RGBQUAND *palette = (RGBQUAND*)malloc((int)pow(2, infoHeader.biBitCount) * 4);//分配调色板空间
if(infoHeader.biBitCount != 24)//如果是24位图的没有调色板
	fread(palette, sizeof(RGBQUAND), (int)pow(2, infoHeader.biBitCount), fp1);
得到原图宽高和修改后的宽高
AUfXpKH3HhwRznxTSrWvMJTaAXhT7W3s5i1fgxC5vaES
unsigned int oldWidth, oldHeight, newWidth, newHeight;
oldWidth = infoHeader.biWidth;
oldHeight = infoHeader.biHeight;
printf("Oldphoto's height:%d\n", oldHeight);
printf("Oldphoto's width:%d\n", oldWidth);
//图像显示不出来原因在于图像长或宽不是4的倍数 下面这一步可以保证得到的宽高是4的倍数
newHeight = ((int)(oldHeight * pzoom) + 3) / 4 * 4;
newWidth = ((int)(oldWidth * pzoom) + 3) / 4 * 4;
printf("Newphoto's height:%d\n", newHeight);
printf("Newphoto's width:%d\n", newWidth);
unsigned int oldsize = oldWidth * oldHeight * byte, newsize = newWidth * newHeight * byte;
获取原图位图数据
这里需要先让文件指针指向位图数据开始的字节(54),如果有调色板需要加上分配调色板所需要的空间。
//获取原图位图数据
unsigned char *sourceData = (unsigned char*)malloc(oldsize);
if(infoHeader.biBitCount == 24){//无调色板时
	fseek(fp1, 54, SEEK_SET);//文件指针指向文件的第54个字节
	fread(sourceData, oldsize, 1, fp1);
}else if(infoHeader.biBitCount == 8){//有调色板是要加上分配调色板所需要的空间
	fseek(fp1, 1078, SEEK_SET);//文件指针指向文件的第54+2^8*4=1078个字节
	fread(sourceData, oldsize, 1, fp1);
}
修改两个header的数据并把修改后的header(及调色板信息)写入新图片中**
//修改两个header的数据并把修改后的header(及调色板信息)写入新图片中
infoHeader.biWidth = newWidth;
infoHeader.biHeight = newHeight;
if(infoHeader.biBitCount == 24){
	fileHeader.bfSize = 54 + newsize;
	infoHeader.biSizeImage = newsize;
}else if(infoHeader.biBitCount == 8){
	fileHeader.bfSize = 1078 + newsize;
	infoHeader.biSizeImage = newsize;
}
fwrite(&fileType, sizeof(unsigned short), 1, fp2);
fwrite(&fileHeader, sizeof(BITMAPFILEHEADER), 1, fp2);
fwrite(&infoHeader, sizeof(BITMAPINFOHEADER), 1, fp2);
if(infoHeader.biBitCount!=24)	fwrite(palette,sizeof(RGBQUAND),pow(2,infoHeader.biBitCount),fp2);
进行图片缩放
最邻近插值算法:
//使用最邻近差值算法进行图片缩放
unsigned int x, y;						//原图所在像素点的宽高
unsigned int X, Y; 						//新图所在像素点的宽高
unsigned char *pDestination; 			//修改像素的位置(即字节偏移量)
unsigned char *pSource;					//获取像素的位置(即字节偏移量)
unsigned char *destinationData = (unsigned char*)malloc(newsize);//开好新图片的位图数据所需空间
for(Y = 0; Y < newHeight; Y++){
	y = Y / pzoom;
	pDestination = destinationData + Y * newWidth * byte;
	pSource = sourceData + y * oldWidth * byte;
	for(X = 0; X < newWidth; X++){
		x = X / pzoom;
		memcpy(pDestination + X * byte, pSource + x * byte, byte);
	}
}
双线性插值算法:
再次提醒,由于window上主要是24bit图和256色8位图居多,所以这里的程序只编写了针对于这两种图片的算法,如果想实现其他位图的缩放,可以进行对应的修改。
关键点分析:
对于8位图的算法:
*(pDestination + X*byte) = *(pSource1 + x1*byte) * (1-p) * (1-q) +
					 	  *(pSource1 + x2*byte) * p * (1-q) +
					 	  *(pSource2 + x1*byte) * (1-p) * q +
						  *(pSource2 + x2*byte) * p * q;
pSource1和pSource2分别对应于y1,y2高度下的两个位置,q为y1离Y/pzoom的距离,p为x1离X/pzoom的距离,对y1高度,在水平方向进行插值就是
*(pSource1+x1*byte) * (1-p)*(1-q) + *(pSource1+x2*byte) * p*(1-q)
同理:对y2高度,在水平方向进行插值:
*(pSource2 + x1*byte) * (1-p) * q + *(pSource2 + x2*byte) * p * q;
这两个东西相加就相当于在竖直方向进行插值了!
另外,由于是8位位图,这里byte=1,所以只有一个位置进行插值。
如果是24位位图,则理所应当的要在三个位置进行插值了。
//使用双线性差值法进行图片缩放
	double p,q;
	unsigned int x1, y1, x2, y2;				//原图所在像素点的宽高
	unsigned int X, Y;
 	unsigned char *pDestination; 				//修改像素的位置(即字节偏移量)
	unsigned char *pSource1,*pSource2;			//获取像素的位置(即字节偏移量)
	unsigned char *destinationData = (unsigned char*)malloc(newsize);//开好新图片的位图数据所需空间
	for(Y = 0; Y < newHeight; Y++){
		y1 = Y / pzoom;
		y2 = Y / pzoom + 1;
		q = Y / pzoom - y1;
		pDestination = destinationData + Y * newWidth * byte;
		pSource1 = sourceData + y1 * oldWidth * byte;
		pSource2 = sourceData + y2 * oldWidth * byte;
		for(X = 0; X < newWidth; X++){
	 		x1 = X / pzoom;
	 		x2 = X / pzoom + 1;
	 		p = X / pzoom - x1;
	 		if(byte == 3){
			*(pDestination + X*byte) = *(pSource1 + x1*byte) * (1-p) * (1-q) +
									   *(pSource1 + x2*byte) * p * (1-q) +
									   *(pSource2 + x1*byte) * (1-p) * q +
									   *(pSource2 + x2*byte) * p * q;

			*(pDestination + X*byte+1) = *(pSource1 + x1*byte+1) * (1-p) * (1-q) +
										 *(pSource1 + x2*byte+1) * p * (1-q) +
										 *(pSource2 + x1*byte+1) * (1-p) * q +
										 *(pSource2 + x2*byte+1) * p * q;

			*(pDestination + X*byte+2) =*(pSource1 + x1*byte+2) * (1-p) * (1-q) +
									 	*(pSource1 + x2*byte+2) * p * (1-q) +
										*(pSource2 + x1*byte+2) * (1-p) * q +
										*(pSource2 + x2*byte+2) * p * q;
			}
			else if(byte == 1){
				*(pDestination + X*byte) = *(pSource1 + x1*byte) * (1-p) * (1-q) +
										   *(pSource1 + x2*byte) * p * (1-q) +
										   *(pSource2 + x1*byte) * (1-p) * q +
										   *(pSource2 + x2*byte) * p * q;
			}
		}
	}
将位图数据写入新的图片并进行后续处理
fwrite(destinationData, newsize, 1, fp2);
printf("success!\n");
free(destinationData);
free(sourceData);
free(palette);
fclose(fp1);
fclose(fp2);
效果显示
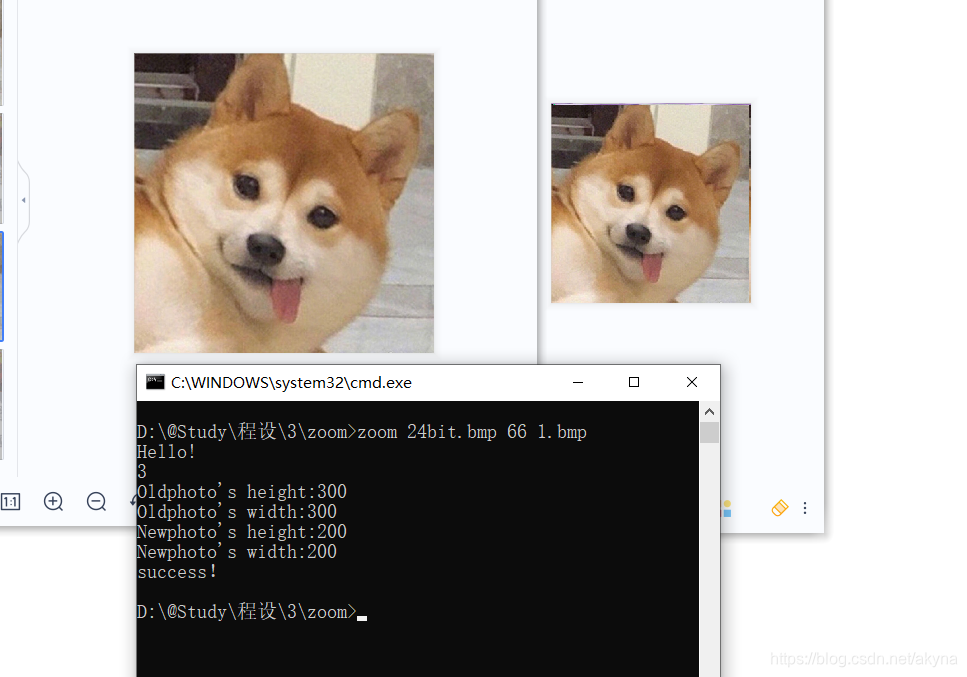
24位图缩小
缩小到原来的0.66倍
(2) 24位位图放大:
放大到原来的2.33倍:
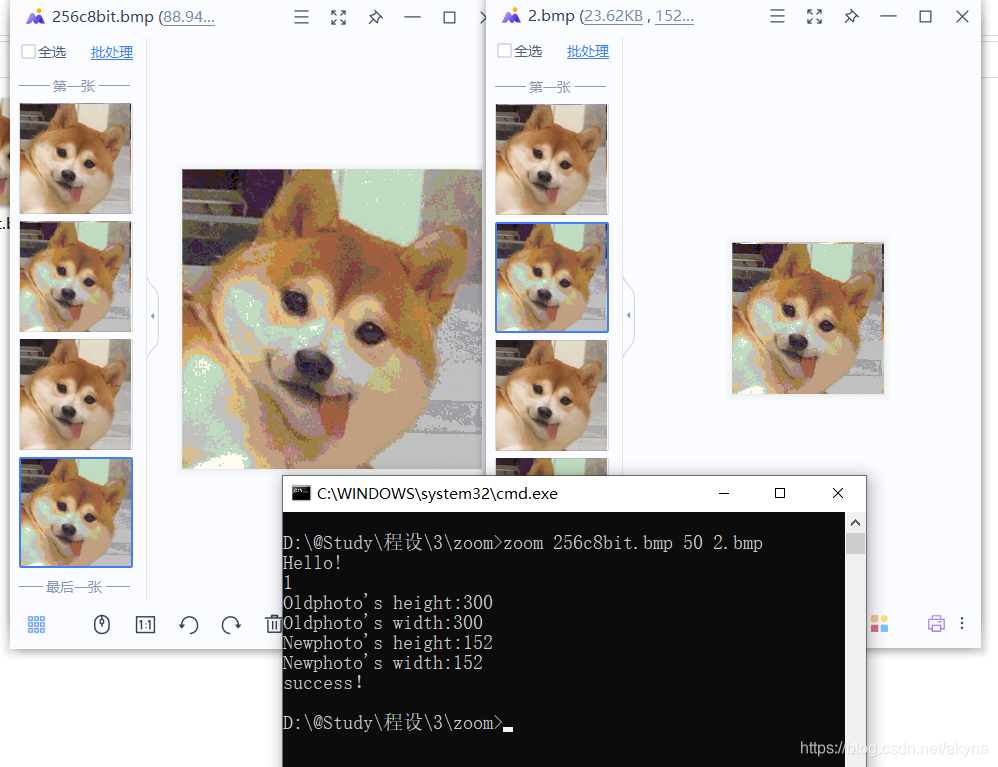
 (3) 256色8位位图缩小:
缩小到原来的一半:
256色8位位图放大
放大到原来的1.69倍:

后记
完整源码详见我的github项目:xdu-exp-c。

瓜分20万奖金 获得内推名额 丰厚实物奖励 易参与易上手
更多推荐


 34
34 0
0- 0


 已为社区贡献1条内容

所有评论(0)