多边形扩展和收缩(凸多边形和凹多边形)
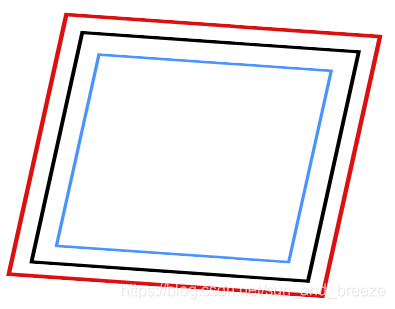
目录背景介绍:知识积累:思路点拨:代码区域:背景介绍:如下图所示,黑色是原多边形,红色是扩展的多边形,蓝色是收缩的多边形。这是最终的效果。PS:楼主使用的是ES6的语法,地图是高德地图API知识积累:使用的是高中所学的向量的知识和三角公式知识。向量:设:a = (a1, a2); b = (b1, b2)a · b = a1 * b1 + a2 * b2 = |a| |b| cos<a, b
·
背景介绍:
如下图所示,黑色是原多边形,红色是扩展的多边形,蓝色是收缩的多边形。这是最终的效果。
PS:楼主使用的是ES6的语法,地图是高德地图API
知识积累:
使用的是高中所学的向量的知识和三角公式知识。
对于向量:
- 设二维向量:a = (a1, a2); b = (b1, b2);
- 设三维向量:OA = (x1, y1, z1); OB = (x2, y2, z2);
- 向量点乘积:a · b = a1 * b1 + a2 * b2 = |a| |b| cos<a, b>
- 向量单位化:a 单位化后的 na = (a1 / Math.sqrt(a1 * a1 + a2 * a2), a1 / Math.sqrt(a1 * a1 + a2 * a2))
- 向量叉乘积:
二维: a X b = (a1 * b2) - (a2 * b1)
三维:OA X OB = (y1 * z2 - y2 * z1, x2 * z1 - x1 * z2, x1 * y2 - x2 * y1) - 半角公式:

思路点拨:
- 用一个数组paths表示要操作的多边形。其中paths的格式为:[[117.14589,36.659714],[117.145278,36.658952],[117.14626,36.658505],[117.147017,36.659628]]
- 需要将paths的经纬度换成像素坐标。原因:如果使用经纬度和要扩展(收缩)大小做对比会有单位不统一的问题。解决方案:使用map.lnglatToPixel将经纬度换成像素坐标;使用map.pixelToLngLat将像素坐标转换成经纬度坐标。
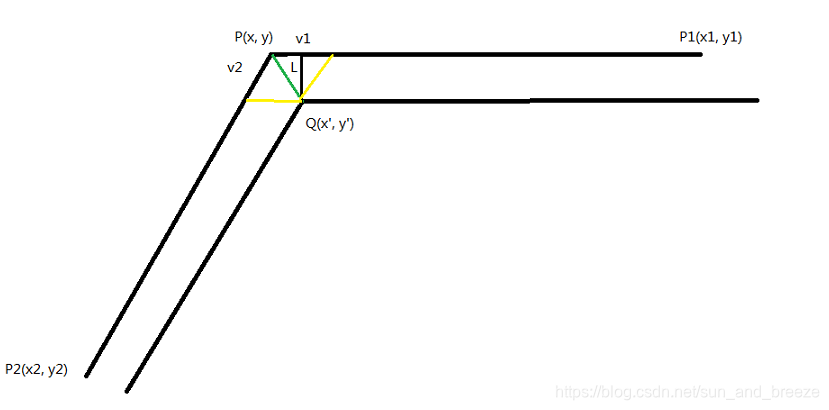
- 如上图所示,PP1 = (x1 - x, y1 - y); PP2 = (x2 - x, y2 - y); 令vx1 = x1 - x;vy1 = y1 - y;vx2 = x2 - x;vy2 = y2 - y;则 PP1 = (vx1, vy1); PP2 = (vx2, vy2);
- 把PP1 和 PP2 单位化后,就得到了v1 = (vx1 / n1, vy1 / n1) 和 v2 = (vx2 / n2, vy2 / n2)。其中n1 = norm(vx1, vy1);n2 = norm(vx2, vy2)
- PQ = v1 + v2 = (vx1 / n1 + vx2 / n2, vy1 / n1 + vy2 / n2)。设 vx = vx1 / n1 + vx2 / n2;vy = vy1 / n1 + vy2 / n2,则PQ = (vx, vy)。还需要对PQ做单位化,则PQ = (vx / n, vy / n),其中n = norm(vx, vy)。
- 根据向量点乘积的含义,可以得到cos<v1, v2> = (vx1 * vx2 + vy1 * vy2) / (n1 * n2);
- |PQ| = L / sin(<v1, v2> / 2) 经化简可得 L / Math.sqrt(1 - (v1x * v2x + v1y * v2y) / 2)
- 根据上述所说,就可以得到完整的PQ,现在加上P点坐标,就可以得到Q点坐标。
- 处理完成后,记得将像素坐标转成经纬度坐标。
- 在处理凹多边形时,需要使用叉乘积。用来判断是两向量的夹角是凹角还是凸角。
若叉乘积 < 0,向量夹角为 凹角;若叉乘为OP1 X OP2,则 P1 - O - P2 为顺时针。
若叉乘积 > 0,向量夹角为 凸角;若叉乘为OP1 X OP2,则 P1 - O - P2 为逆时针。
若叉乘积 = 0,向量夹角为 平角;若叉乘为OP1 X OP2,则 P1 - O - P2 在一条直线上。
因此在计算PQ 方向的时候,若为凸角, PQ = PP1 + PP2;若为凸角,PQ = P1P + P2P。无论是凸角还是凹角,|PQ| 是 恒定不变的,都为:|PQ| = L / Math.sqrt(1 - (v1x * v2x + v1y * v2y) / 2)
代码区域:
废话不多说,下面是完整代码(ES6),地图使用的是高德地图
/**
 * 计算多边形的外延
 * 算法详情可移步:https://blog.csdn.net/sun_and_breeze/article/details/107517088 去看
 * @param {*} map 高德地图map对象
 * @param {*} zoom 地图缩放比例
 * @param {*} scale 地图比例尺. 高德地图可以通过map.getScale()来获取。含义:表示当前屏幕距离一米代表实际距离多少米
 * @param {*} paths 多边形顶点数组。PS:下面代码中是按照多边形顶点逆时针排列的顺序进行处理的,如果你的顶点数组是顺时针,那么是用reverse方法倒过来即可。
 * @param {*} extra 外延大小。为正: 向外扩; 为负: 向内缩
 * @return 扩展或缩小后的多边形顶点数组
 */
export const calcPolygonExtra = (map, zoom, scale, paths, extra) => {
  if (!zoom) return
  const norm = (x, y) => Math.sqrt((x * x) + (y * y))

  const len = paths.length
  // 获取实际1m对应像素是多少
  const extraPixel = (extra / scale) * getDPI() * 1000
  let polygon = []
  for (let i = 0; i < len; i++) {
    const point = map.lnglatToPixel(paths[i], zoom) // P 点
    const point1 = map.lnglatToPixel(paths[i === 0 ? len - 1 : i - 1], zoom) // P1 点
    const point2 = map.lnglatToPixel(paths[i === len - 1 ? 0 : i + 1], zoom) // P2 点

    // 向量PP1
    const vectorX1 = point1.x - point.x // 向量PP1 横坐标
    const vectorY1 = point1.y - point.y // 向量PP1 纵坐标
    const n1 = norm(vectorX1, vectorY1) // 向量的平方根 为了对向量PP1做单位化
    let vectorUnitX1 = vectorX1 / n1 // 向量单位化 横坐标
    let vectorUnitY1 = vectorY1 / n1 // 向量单位化 纵坐标

    // 向量PP2
    const vectorX2 = point2.x - point.x // 向量PP2 横坐标
    const vectorY2 = point2.y - point.y // 向量PP2 纵坐标
    const n2 = norm(vectorX2, vectorY2) // 向量的平方根 为了对向量PP1做单位化
    let vectorUnitX2 = vectorX2 / n2 // 向量单位化 横坐标
    let vectorUnitY2 = vectorY2 / n2 // 向量单位化 纵坐标

    // PQ距离
    const vectorLen = -extraPixel / Math.sqrt((1 - ((vectorUnitX1 * vectorUnitX2) + (vectorUnitY1 * vectorUnitY2))) / 2)

    // 根据向量的叉乘积来判断角是凹角还是凸角
    if (((vectorX1 * vectorY2) + (-1 * vectorY1 * vectorX2)) < 0) {
      vectorUnitX2 *= -1
      vectorUnitY2 *= -1
      vectorUnitX1 *= -1
      vectorUnitY1 *= -1
    }

    // PQ的方向
    const vectorX = vectorUnitX1 + vectorUnitX2
    const vectorY = vectorUnitY1 + vectorUnitY2
    const n = vectorLen / norm(vectorX, vectorY)
    const vectorUnitX = vectorX * n
    const vectorUnitY = vectorY * n

    const polygonX = vectorUnitX + point.x
    const polygonY = vectorUnitY + point.y
    const polygonLngLat = map.pixelToLngLat(new window.AMap.Pixel(polygonX, polygonY), zoom)

    polygon[i] = [polygonLngLat.getLng(), polygonLngLat.getLat()]
  }

  return polygon
}

/**
 * 获取屏幕DPI的算法。屏幕每一毫米对应多少像素。
 */
const getDPI = () => {
  let dpi
  if (window.screen.deviceXDPI !== undefined) {
    dpi = window.screen.deviceXDPI
    // arrDPI[1] = window.screen.deviceYDPI
  } else {
    let tmpNode = document.createElement('DIV')
    tmpNode.style.cssText = 'width:1mm;position:absolute;left:0px;top:0px;z-index:99;visibility:hidden'
    document.body.appendChild(tmpNode)
    dpi = parseInt(tmpNode.offsetWidth, 0)
    // arrDPI[1] = parseInt(tmpNode.offsetHeight, 0)
    tmpNode.parentNode.removeChild(tmpNode)
  }
  return dpi
}

CSDN联合极客时间,共同打造面向开发者的精品内容学习社区,助力成长!
更多推荐


 8
8 0
0- 0


 已为社区贡献1条内容

所有评论(0)