远程访问服务器JupyterLab的配置方法
其实就是在服务器运行JupyterLab,然后在本地浏览器访问环境及工具服务器:Ubuntu 16.04本机:Mac OS Catalina 10.15.3Royal TSX基本步骤服务器安装JupyterLab这里推荐直接安装Anaconda,安装好后可以通过命令jupyter lab打开测试一下。生成密码$ pythonPython 3.7.3 (defau...
·
其实就是在服务器运行JupyterLab,然后在本地浏览器访问
环境及工具
- 服务器:Ubuntu 16.04
- 本机:Mac OS Catalina 10.15.3
- Royal TSX
基本步骤
-
服务器安装JupyterLab
这里推荐直接安装Anaconda,安装好后可以通过命令jupyter lab打开测试一下。 -
生成密码
$ python
Python 3.7.3 (default, Mar 27 2019, 22:11:17)
[GCC 7.3.0] :: Anaconda, Inc. on linux
Type "help", "copyright", "credits" or "license" for more information.
>>> from notebook.auth import passwd
>>> passwd()
Enter password:
Verify password:
'sha1:xxxxxxxxxxxxxxxxxxxxxxxxxxxxxxxxxxxxxxxxxxxxxxxxxxxxxxxxxxxxxx'
此处的密码可由自己随意设定
- 生成并修改配置文件
3.1 生成配置文件
jupyter notebook --generate-config
3.2 修改配置文件
$ vim ~/.jupyter/jupyter_notebook_config.py  # ~为自己的路径
Writing default config to: /YourHomePath/.jupyter/jupyter_notebook_config.
做修改如下:
- 允许远程访问
- 不使用本地浏览器打开
- 允许所有IP访问
- 配置密码(这个非必要,之后会解释)
c.NotebookApp.allow_remote_access = True
c.NotebookApp.open_browser = False
c.NotebookApp.ip='*'
c.NotebookApp.password = 'sha1:xxxxxxxxxxxxxxxxxxxxxxxxxxxxxxxxxx'
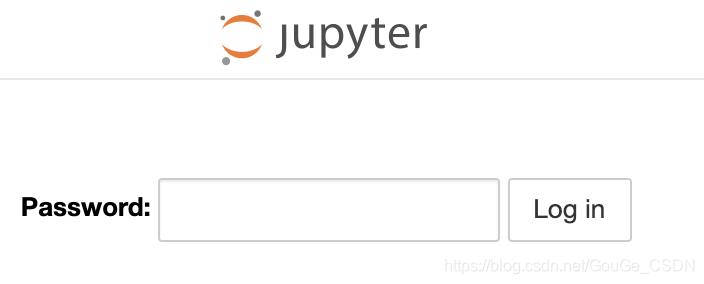
保存并退出后,通过命令jupyter lab打开,此时系统会提示如下(此时配置了上文提到的密码c.NotebookApp.password):

在浏览器输入ip:8890,按要求输入密码即可。
如果之前没有配置c.NotebookApp.password,打开jupyterlab后会提示如下:

在浏览器输入ip:8890,会提示如下界面,需要输入给出的token值。


CSDN联合极客时间,共同打造面向开发者的精品内容学习社区,助力成长!
更多推荐


 14
14 0
0- 0


 已为社区贡献1条内容

所有评论(0)