
神经网络学习小记录20——ResNet50模型的复现详解
神经网络学习小记录20——ResNet50模型的复现详解学习前言什么是残差网络什么是ResNet50模型ResNet50网络部分实现代码图片预测学习前言最近看yolo3里面讲到了残差网络,对这个网络结构很感兴趣,于是了解到这个网络结构最初的使用是在ResNet网络里。什么是残差网络Residual net(残差网络):将靠前若干层的某一层数据输出直接跳过多层引入到后面数据层的输入部分。...
神经网络学习小记录20——ResNet50模型的复现详解
学习前言
最近看yolo3里面讲到了残差网络,对这个网络结构很感兴趣,于是了解到这个网络结构最初的使用是在ResNet网络里。

什么是残差网络
Residual net(残差网络):
将靠前若干层的某一层数据输出直接跳过多层引入到后面数据层的输入部分。
意味着后面的特征层的内容会有一部分由其前面的某一层线性贡献。
其结构如下:

深度残差网络的设计是为了克服由于网络深度加深而产生的学习效率变低与准确率无法有效提升的问题。
什么是ResNet50模型
ResNet50有两个基本的块,分别名为Conv Block和Identity Block,其中Conv Block输入和输出的维度是不一样的,所以不能连续串联,它的作用是改变网络的维度;Identity Block输入维度和输出维度相同,可以串联,用于加深网络的。
Conv Block的结构如下:

Identity Block的结构如下:

这两个都是残差网络结构。
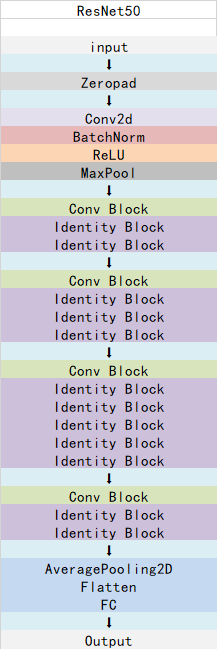
总的网络结构如下:
这样看起来可能比较抽象,还有一副很好的我从网上找的图,可以拉到最后面去看哈,放前面太占位置了。
ResNet50网络部分实现代码
#-------------------------------------------------------------#
#   ResNet50的网络部分
#-------------------------------------------------------------#
from __future__ import print_function

import numpy as np
from keras import layers

from keras.layers import Input
from keras.layers import Dense,Conv2D,MaxPooling2D,ZeroPadding2D,AveragePooling2D
from keras.layers import Activation,BatchNormalization,Flatten
from keras.models import Model

from keras.preprocessing import image
import keras.backend as K
from keras.utils.data_utils import get_file
from keras.applications.imagenet_utils import decode_predictions
from keras.applications.imagenet_utils import preprocess_input


def identity_block(input_tensor, kernel_size, filters, stage, block):

    filters1, filters2, filters3 = filters

    conv_name_base = 'res' + str(stage) + block + '_branch'
    bn_name_base = 'bn' + str(stage) + block + '_branch'

    x = Conv2D(filters1, (1, 1), name=conv_name_base + '2a')(input_tensor)
    x = BatchNormalization(name=bn_name_base + '2a')(x)
    x = Activation('relu')(x)

    x = Conv2D(filters2, kernel_size,padding='same', name=conv_name_base + '2b')(x)

    x = BatchNormalization(name=bn_name_base + '2b')(x)
    x = Activation('relu')(x)

    x = Conv2D(filters3, (1, 1), name=conv_name_base + '2c')(x)
    x = BatchNormalization(name=bn_name_base + '2c')(x)

    x = layers.add([x, input_tensor])
    x = Activation('relu')(x)
    return x


def conv_block(input_tensor, kernel_size, filters, stage, block, strides=(2, 2)):

    filters1, filters2, filters3 = filters

    conv_name_base = 'res' + str(stage) + block + '_branch'
    bn_name_base = 'bn' + str(stage) + block + '_branch'

    x = Conv2D(filters1, (1, 1), strides=strides,
               name=conv_name_base + '2a')(input_tensor)
    x = BatchNormalization(name=bn_name_base + '2a')(x)
    x = Activation('relu')(x)

    x = Conv2D(filters2, kernel_size, padding='same',
               name=conv_name_base + '2b')(x)
    x = BatchNormalization(name=bn_name_base + '2b')(x)
    x = Activation('relu')(x)

    x = Conv2D(filters3, (1, 1), name=conv_name_base + '2c')(x)
    x = BatchNormalization(name=bn_name_base + '2c')(x)

    shortcut = Conv2D(filters3, (1, 1), strides=strides,
                      name=conv_name_base + '1')(input_tensor)
    shortcut = BatchNormalization(name=bn_name_base + '1')(shortcut)

    x = layers.add([x, shortcut])
    x = Activation('relu')(x)
    return x


def ResNet50(input_shape=[224,224,3],classes=1000):

    img_input = Input(shape=input_shape)
    x = ZeroPadding2D((3, 3))(img_input)

    x = Conv2D(64, (7, 7), strides=(2, 2), name='conv1')(x)
    x = BatchNormalization(name='bn_conv1')(x)
    x = Activation('relu')(x)
    x = MaxPooling2D((3, 3), strides=(2, 2))(x)

    x = conv_block(x, 3, [64, 64, 256], stage=2, block='a', strides=(1, 1))
    x = identity_block(x, 3, [64, 64, 256], stage=2, block='b')
    x = identity_block(x, 3, [64, 64, 256], stage=2, block='c')

    x = conv_block(x, 3, [128, 128, 512], stage=3, block='a')
    x = identity_block(x, 3, [128, 128, 512], stage=3, block='b')
    x = identity_block(x, 3, [128, 128, 512], stage=3, block='c')
    x = identity_block(x, 3, [128, 128, 512], stage=3, block='d')

    x = conv_block(x, 3, [256, 256, 1024], stage=4, block='a')
    x = identity_block(x, 3, [256, 256, 1024], stage=4, block='b')
    x = identity_block(x, 3, [256, 256, 1024], stage=4, block='c')
    x = identity_block(x, 3, [256, 256, 1024], stage=4, block='d')
    x = identity_block(x, 3, [256, 256, 1024], stage=4, block='e')
    x = identity_block(x, 3, [256, 256, 1024], stage=4, block='f')

    x = conv_block(x, 3, [512, 512, 2048], stage=5, block='a')
    x = identity_block(x, 3, [512, 512, 2048], stage=5, block='b')
    x = identity_block(x, 3, [512, 512, 2048], stage=5, block='c')

    x = AveragePooling2D((7, 7), name='avg_pool')(x)

    x = Flatten()(x)
    x = Dense(classes, activation='softmax', name='fc1000')(x)

    model = Model(img_input, x, name='resnet50')

    model.load_weights("resnet50_weights_tf_dim_ordering_tf_kernels.h5")

    return model
图片预测
建立网络后,可以用以下的代码进行预测。
if __name__ == '__main__':
    model = ResNet50()
    model.summary()
    img_path = 'elephant.jpg'
    img = image.load_img(img_path, target_size=(224, 224))
    x = image.img_to_array(img)
    x = np.expand_dims(x, axis=0)
    x = preprocess_input(x)

    print('Input image shape:', x.shape)
    preds = model.predict(x)
    print('Predicted:', decode_predictions(preds))
预测所需的已经训练好的ResNet50模型可以在https://github.com/fchollet/deep-learning-models/releases下载。非常方便。
预测结果为:
Predicted: [[('n01871265', 'tusker', 0.41107917), ('n02504458', 'African_elephant', 0.39015812), ('n02504013', 'Indian_elephant', 0.12260196), ('n03000247', 'chain_mail', 0.023176488), ('n02437312', 'Arabian_camel', 0.020982226)]]
ResNet50模型的完整的结构图如下:


旨在为数千万中国开发者提供一个无缝且高效的云端环境,以支持学习、使用和贡献开源项目。
更多推荐


 184
184 0
0- 0


 已为社区贡献45条内容

所有评论(0)