怎么做:计算校验和用 Python
你好,世界。
今天我开始了一个名为“如何做事”的新系列,其中将包含简单而必要的教程,介绍我们任何人作为软件工程师和生活中都需要的基本知识。
在今天的文章中,我们将讨论校验和。
1.首先我们将回答校验和实际上是什么的问题
2.其次我们将讨论使用什么校验和
- 最后我们将编写一个程序来帮助我们计算校验和
所以让我们开始吧。
什么是_校验和_?
要了解什么是_Checksums_,我们需要查看它们主要用于信息安全的领域。信息安全是一个巨大的信息学领域,我们都应该听说过并且应该了解一点。信息安全有三个主要目标。
这些是为了确保我们的世界有以下几点:
-
机密性(数据隐私)
-
完整性(数据的正确性和完好性)
-
可用性(各种数据和信息的可访问性)
校验和有助于我们确保文件或数据的完整性,因为它对于创建它的文件(数据)是唯一的。不久,校验和是从具有已知哈希函数的文件(数据)中计算出来的值。散列算法或散列函数在数学上是单向函数。在这些函数下,我们基本上理解了一个函数,您可以在其中计算相同的值 x 始终与函数中的正常结果相同的结果 y 但您不能从 y 和函数本身重新计算 x。每个数据都得到一个完全不同的校验和,彼此之间只有细微的差别。所以有人可以把它描述为文件的指纹。可以使用许多不同的哈希算法。最常见的是_Message-Digest Algorithm 5_ (MD5) 和_Secure-Hash-Algorithm-256_ (SHA-256)。但是也有很多不同的类型,所以你也会听到来自 SHA-1 的一些东西等等。如果您有兴趣了解更多关于它们的信息,您可以阅读网络中的 Hash_algorithms 许多不同的学术表。只需搜索它们。
_Checksums_有什么用?
Checksums 用于确保 Integrity 信息安全的一个目标。由于 Checksum 对于每条数据都是唯一的,因此可以使用它来查看是否有任何数据被更改或损坏。
举个例子可能更容易理解:
如果您访问 (Kali Linux) 的官方网站并导航到下载,您会发现类似这样的内容。

在下载按钮旁边,您会看到一个带有文本“sum”的按钮。当您单击此按钮时,该站点将向您显示您可以在那里下载的数据的_Checksum_:
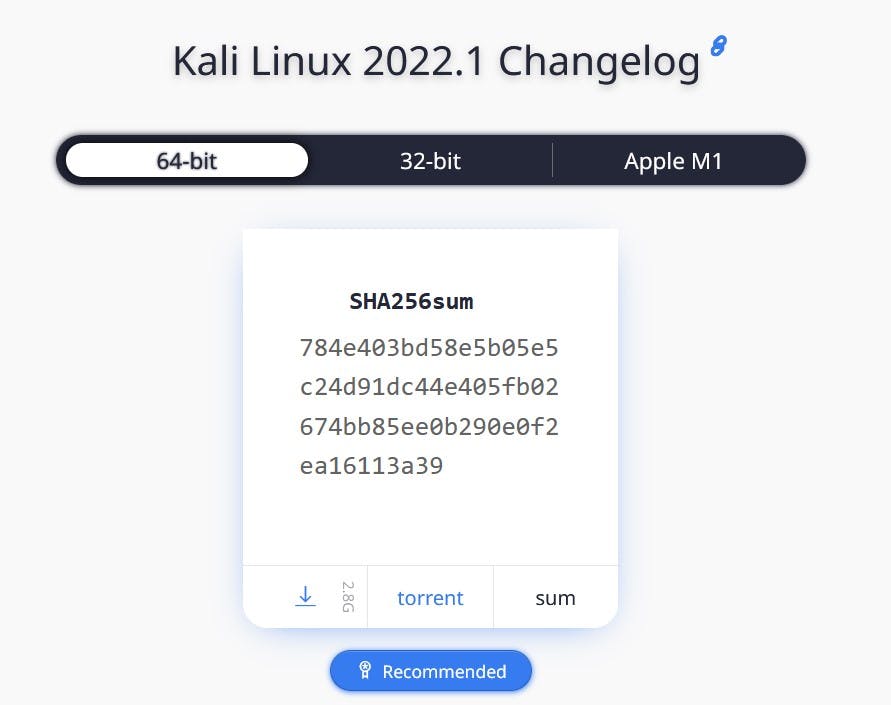
在这张图片中,我们可以看到 Kali 使用 SHA-256 算法来计算其数据的_Checksum_,这是非常安全的。现在,从有人点击下载到下载数据,很多事情都可能出错。因此,如果您想查看您刚刚下载的数据是否已损坏,甚至是否存在恶意软件,您只需计算它的_Checksum_,并将其与 Kali 编写的_Checksum_ 进行比较,即数据的_Checksum_。如果相同,那么恭喜一切都很好。你实际上下载了你想要的数据。如果 Checksums 不一样,并且您使用了与写入相同的哈希算法,那么数据有问题,您应该摆脱它。
这就是 Checksums 的用法,别忘了不要轻易使用散列算法,使用 SHA-256 之类的东西。
用 Python 计算 Checksums
我们如何在 Python 中计算 Checksum。幸运的是,我们不需要自己实现复杂的哈希函数。已经包含了一个非常好的在 Python 中使用哈希函数的库,称为 hashlib。
所以首先要做的是导入库:
import hashlib
现在我们可以定义一个以文件名(文件路径)为参数的函数,以读取模式打开文件。
def calculate_md5_checksum(filename):
    with open(filename, 'rb') as file:
基本上我们在 hashlib-Library 上调用 Hash-Functions。所以我们然后用_'hashlib.HASH-FUNCTION'_读取文件。在这里,我们可以使用我们现在需要的所有哈希算法。我将在这个例子中使用 MD5-Hash-Algorithm。在返回 Checksum 之前,我们需要做的最后一件事是将其转换为十六进制数。最后我全部用大写字母写,但你可以省略。我只是为了美学。
我们在一个看起来像这样的函数中得出结论:
#Filename as path to data
def calculate_md5_checksum(filename):
    with open(filename, 'rb') as file:
        return hashlib.md5(file.read()).hexdigest().upper()
基本上这就是所有的魔法,所以它很容易。接下来我制作了一个 GUI 界面并添加了最常见的哈希算法。
制作 GUI 界面
我将使用 Tkinter 制作 GUI 界面,Tkinter 是 Python 中用于创建窗口和 GUI 界面的最佳库之一。
因此,首先我们将导入所有需要的库并设置主窗口,并创建两个标签,为用户提供有关如何使用该程序的信息:
import tkinter
from tkinter import ttk
from tkinter import filedialog

#Setup: tkinter-Window
main = tkinter.Tk()
main.title("Calculate Checksum")
main.resizable(False, False)
widthWindow = 600
heightWindow = 400
main.geometry(f'{widthWindow}x{heightWindow}')

#Setup: Information-Labels
infoLabel = tkinter.Label(main, text="Here you can calculate the Checksum of a file to see if it's legit and not broken.", font='Helvetica 10 bold')
selectAlgorithmLabel = tkinter.Label(main, text="1. Select the Hash-Algorithm you want to use to calculate the checksum of your file:")

#Mainloop
main.mainloop()
由于 mainloop()- 方法,窗口保持打开状态,直到我们手动关闭它。注意我还导入了_'ttk'_。这是 tkinter 的扩展,我们现在需要使用更多小部件和样式选项来创建下拉菜单。在此下拉菜单中,您可以选择要使用的哈希算法类型。在 tkinter 中,我们可以使用名为 Combobox 的元素创建一个下拉菜单:
#Setup: Selection Combobox/Dropdown Menu
hashAlgorithms = ['MD5', 'SHA1', 'SHA256', 'SHA224', 'SHA384', 'SHA512'] #A list of all options in the dropdown menu
comboboxVar = tkinter.StringVar() #Define the type of variable
comboboxVar.set('MD5') #Set the standardized option to MD5
comboboxHashAlgorithms = ttk.Combobox(main, textvariable=comboboxVar, values=hashAlgorithms)
接下来我们需要创建一个可以用来计算的按钮以及一个退出按钮,这样我们就有办法退出窗口并中断 mainloop() 进程。我还创建了用户单击以选择文件的按钮。最后我创建了标签,如果选择了文件,您可以显示,如果没有选择任何文件,则标签表示用户选择文件:
#Setup: Functional Label
fileLabel = tkinter.Label(main, text="No file chosen")
errorLabel = tkinter.Label(main, text="YOU NEED TO CHOSE A FILE")

selectFileButton = tkinter.Button(main, text='Select File', width=25, command=select_file)
calculateButton = tkinter.Button(main, text='Calculate Checksum', width=25, bg="green", fg="white", command=calculate)
exitButton = tkinter.Button(main, text='Exit', width=25, bg="red", fg="white", command=main.destroy)
然后我们将所有元素放在它们在窗口中的位置上。我将在这里使用 place()- 方法。当然你可以使用 pack() 或 grid()。如果你想。我只是喜欢具有相对 x 和 y 值的位置系统,因为您喜欢结构化的覆盖:
#Placing Elements
infoLabel.place(relx=0.5, rely=0.1, anchor="center")
selectAlgorithmLabel.place(relx=0 , rely=0.2)
comboboxHashAlgorithms.place(relx=0.5 , rely=0.3, anchor="center")
selectFileLabel.place(relx=0 , rely=0.4)
selectFileButton = tkinter.Button(main, text='Select File', width=25, command=select_file).place(relx=0.5 , rely=0.5, anchor="center")
fileLabel.place(relx=0.5, rely=0.6)
calculateButton = tkinter.Button(main, text='Calculate Checksum', width=25, bg="green", fg="white", command=calculate)
calculateButton.place(relx=0.5 , rely=0.7, anchor="center")
errorLabel.place_forget() #Making the errorLabel invisible
exitButton = tkinter.Button(main, text='Exit', width=25, bg="red", fg="white", command=main.destroy).place(x=(widthWindow/2)-100 ,y=heightWindow-30)
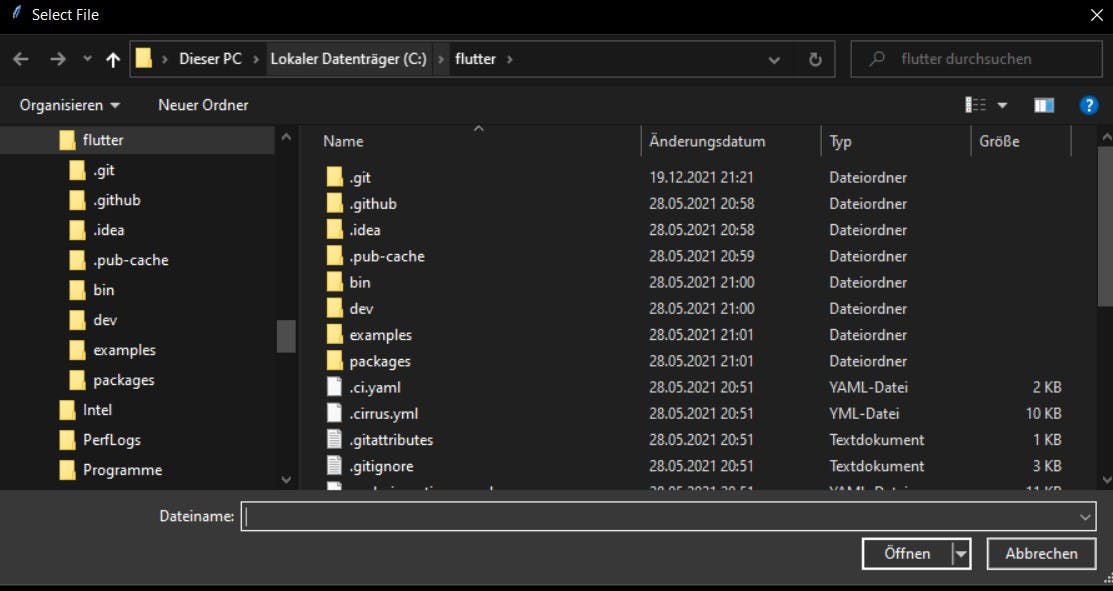
所以最后我们为 selectFileButton 和 calculateButton 创建了两个函数。 exitButton 的函数显然是_main.destroy_,所以我们可以关闭窗口。 selectFileButton 调用的函数使用在程序开头导入的文件对话框。文件对话框打开一个窗口,您可以在其中选择一个文件,并返回我保存在变量中的文件路径。因为从按钮调用的函数中交换或返回变量很复杂,所以我选择仅将整个路径显示为窗口上的信息,以便能够通过函数之间的标签文本传递路径(因为显然我需要在 calculate()-Function 中的路径,以便我可以调用文件上的哈希算法)。所以我还编辑了标签的文本(之前创建的)以显示文件路径,如果没有选择它,它会显示默认文本“未选择文件”:
def select_file():
    file = filedialog.askopenfilename(parent=main, title='Select File')
    fileLabel.config(text=str(f'File chosen: {file}'))
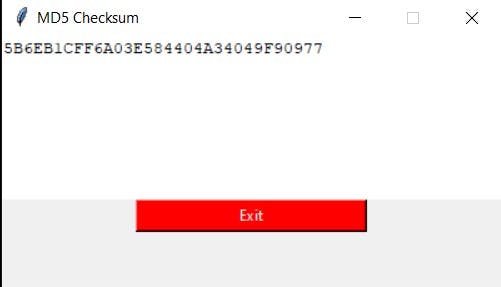
最后但并非最不重要的一点是,我们需要一个将上述所有内容结合起来并使用所选哈希算法计算所选文件的_Checksum_的函数,我刚刚将其称为_calculate()。首先,我们得到标签的文本,我们放在所选文件的路径中(#1),我们想要 Checksum 并通过检查文本是否仍然与默认文本相同来检查文件是否被选中(#2) .如果是这种情况,我们会显示 errorLabel 来告诉用户选择一个文件(#3)。如果用户选择了一个文件,我们只需使 errorLabel 不可见(#4)(如果它已经存在,它就保持不可见)并通过将我们在 fileLabel 中显示的路径之前的信息文本拆分并仅获取路径来获取文件路径(# 5)。现在我们通过获取 Combobox (#6) 的输入来获得哈希算法,并通过调用所选哈希算法的函数来计算 Checksum。最后,我们像以前一样打开一个新的 tkinter 窗口(这次命名为 root)(#7),并将标题设置为用户使用和选择的 Hash-Algorithm(#8)。在这里,我们创建一个文本,在其中插入计算出的 Checksum (#9)。为什么我们这次使用 'tkinter.Text' 小部件?那是因为您不能将文本从标签中复制出来,但可以从文本中复制出来。我们希望用户能够复制_Checksum,以便用户可以将其与另一个_Checksum_ 进行比较。我们现在创建一个 exitButton,这样带有 Checksum 的窗口可以关闭到:
def calculate():
    text = fileLabel.cget("text") #1
    if text == "No file chosen" or text == "File chosen: ": #2
        errorLabel.place(relx=0.5, rely=0.8, anchor="center") #3
    else:
        errorLabel.place_forget() #4
        filepath = text.split(": ")[1] #5
        hashAlgoritm = comboboxVar.get() #6
        if hashAlgoritm == "MD5":
            checksum = calculate_md5_checksum(filepath)
        elif hashAlgoritm == "SHA1":
            checksum = calculate_sha1_checksum(filepath)
        elif hashAlgoritm == "SHA256":
            checksum = calculate_sha256_checksum(filepath)
        elif hashAlgoritm == "SHA224":
            checksum = calculate_sha224_checksum(filepath)
        elif hashAlgoritm == "SHA384":
            checksum = calculate_sha384_checksum(filepath)
        elif hashAlgoritm == "SHA512":
            checksum = calculate_sha512_checksum(filepath)
        root = tkinter.Tk() #7
        root.title(f'{hashAlgoritm} Checksum') #8
        root.resizable(False, False)
        widthWindow = 400
        heightWindow = 200
        root.geometry(f'{widthWindow}x{heightWindow}')
        displayChecksum = tkinter.Text(root, height=8, borderwidth=0)
        displayChecksum.insert(1.0, checksum) #9
        displayChecksum.pack()
        displayChecksum.configure(state="disabled")
        exitButton2 = tkinter.Button(root, text='Exit', width=25, bg="red", fg="white", command=root.destroy)
        exitButton2.pack()
        root.mainloop()
我们以普通窗口的布局结束,如下所示:

显示 Checksum 的窗口如下所示:
顺便说一句,文件对话框是这样的:
我这里还有最后的完整代码,所有的东西都结合在一起了:
import hashlib
import tkinter
from tkinter import ttk
from tkinter import filedialog

#Filename as path to data
def calculate_md5_checksum(filename):
    with open(filename, 'rb') as file:
        return hashlib.md5(file.read()).hexdigest().upper()

def calculate_sha1_checksum(filename):
    with open(filename, 'rb') as file:
        return hashlib.sha1(file.read()).hexdigest().upper()

def calculate_sha256_checksum(filename):
    with open(filename, 'rb') as file:
        return hashlib.sha256(file.read()).hexdigest().upper()

def calculate_sha224_checksum(filename):
    with open(filename, 'rb') as file:
        return hashlib.sha224(file.read()).hexdigest().upper()

def calculate_sha384_checksum(filename):
    with open(filename, 'rb') as file:
        return hashlib.sha384(file.read()).hexdigest().upper()

def calculate_sha512_checksum(filename):
    with open(filename, 'rb') as file:
        return hashlib.sha512(file.read()).hexdigest().upper()

def select_file():
    file = filedialog.askopenfilename(parent=main, title='Select File')
    fileLabel.config(text=str(f'File chosen: {file}'))

def calculate():
    text = fileLabel.cget("text")
    if text == "No file chosen" or text == "File chosen: ":
        errorLabel.place(relx=0.5, rely=0.8, anchor="center")
    else:
        filepath = text.split(": ")[1]
        hashAlgoritm = comboboxVar.get()
        if hashAlgoritm == "MD5":
            checksum = calculate_md5_checksum(filepath)
        elif hashAlgoritm == "SHA1":
            checksum = calculate_sha1_checksum(filepath)
        elif hashAlgoritm == "SHA256":
            checksum = calculate_sha256_checksum(filepath)
        elif hashAlgoritm == "SHA224":
            checksum = calculate_sha224_checksum(filepath)
        elif hashAlgoritm == "SHA384":
            checksum = calculate_sha384_checksum(filepath)
        elif hashAlgoritm == "SHA512":
            checksum = calculate_sha512_checksum(filepath)
        root = tkinter.Tk()
        root.title(f'{hashAlgoritm} Checksum')
        root.resizable(False, False)
        widthWindow = 400
        heightWindow = 200
        root.geometry(f'{widthWindow}x{heightWindow}')
        displayChecksum = tkinter.Text(root, height=8, borderwidth=0)
        displayChecksum.insert(1.0, checksum)
        displayChecksum.pack()
        displayChecksum.configure(state="disabled")
        exitButton2 = tkinter.Button(root, text='Exit', width=25, bg="red", fg="white", command=root.destroy)
        exitButton2.pack()
        root.mainloop()


#Setup: tkinter-Window
main = tkinter.Tk()
main.title("Calculate Checksum")
main.resizable(False, False)
widthWindow = 600
heightWindow = 400
main.geometry(f'{widthWindow}x{heightWindow}')

#Setup: Information-Labels
infoLabel = tkinter.Label(main, text="Here you can calculate the Checksum of a file to see if it's legit and not broken.", font='Helvetica 10 bold')
selectAlgorithmLabel = tkinter.Label(main, text="1. Select the Hash-Algorithm you want to use to calculate the checksum of your file:")
selectFileLabel = tkinter.Label(main, text="2. Select the File you want the checksum of:")

#Setup: Selection Combobox/Dropdown Menu
hashAlgorithms = ['MD5', 'SHA1', 'SHA256', 'SHA224', 'SHA384', 'SHA512']
comboboxVar = tkinter.StringVar()
comboboxVar.set('MD5')
comboboxHashAlgorithms = ttk.Combobox(main, textvariable=comboboxVar, values=hashAlgorithms)

#Setup: Functional Label
fileLabel = tkinter.Label(main, text="No file chosen")
errorLabel = tkinter.Label(main, text="YOU NEED TO CHOSE A FILE")

#Placing Elements
infoLabel.place(relx=0.5, rely=0.1, anchor="center")
selectAlgorithmLabel.place(relx=0 , rely=0.2)
comboboxHashAlgorithms.place(relx=0.5 , rely=0.3, anchor="center")
selectFileLabel.place(relx=0 , rely=0.4)
selectFileButton = tkinter.Button(main, text='Select File', width=25, command=select_file).place(relx=0.5 , rely=0.5, anchor="center")
fileLabel.place(relx=0, rely=0.6)
calculateButton = tkinter.Button(main, text='Calculate Checksum', width=25, bg="green", fg="white", command=calculate)
calculateButton.place(relx=0.5 , rely=0.7, anchor="center")
errorLabel.place_forget()
exitButton = tkinter.Button(main, text='Exit', width=25, bg="red", fg="white", command=main.destroy).place(x=(widthWindow/2)-100 ,y=heightWindow-30)

#Mainloop
main.mainloop()
将其转换为 EXE 文件
总而言之,我使用了 auto-py-to-exe,它为您提供了一个很酷的 UI,您可以使用它来将 py-File 转换为 exe。
要首先使用它,您需要安装:
pip install pyinstaller
然后你需要安装:
pip install auto-py-to-exe
如果现在你想启动 auto-py-to-exe,你只需要输入:
auto-py-to-exe
在您的控制台中,现在 auto-py-to-exe 打开一个您可以使用的 UI。
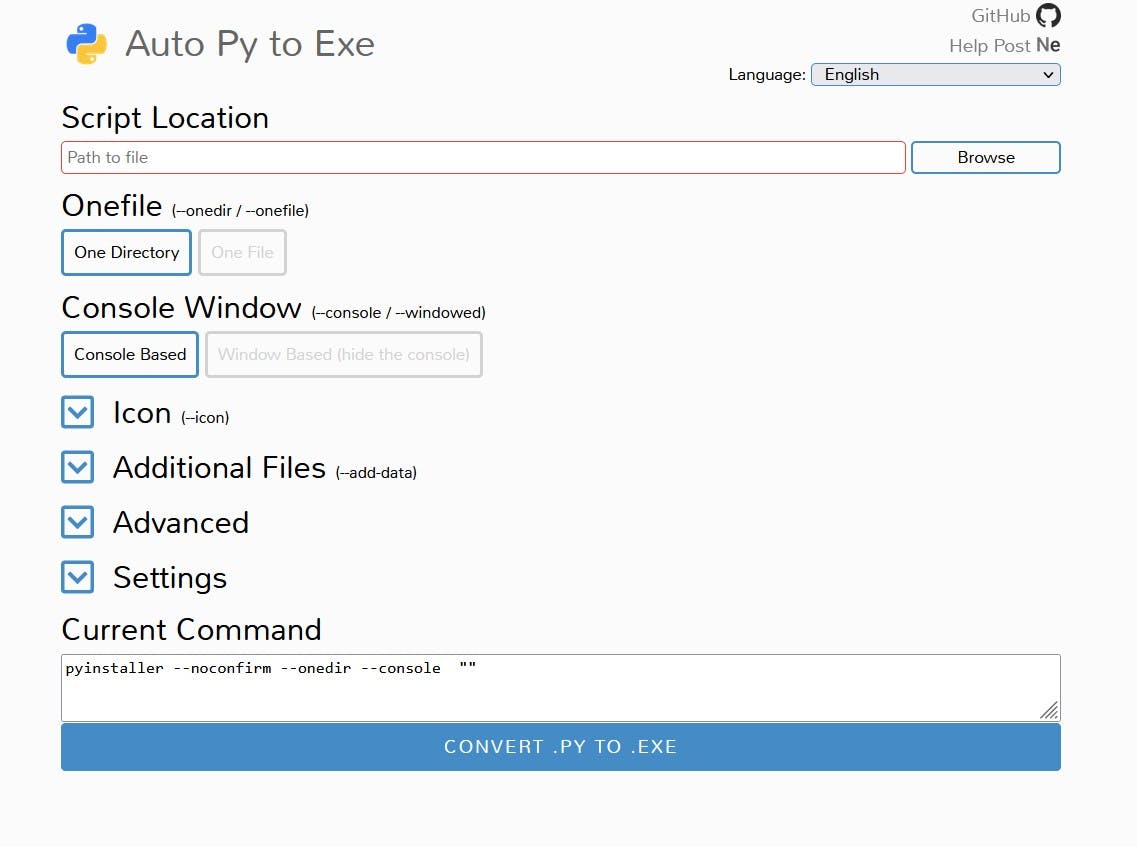
注意:在底部您可以看到“当前命令”。事实上,pyinstaller 库是将 py-Files 转换为 exe-Files 的库,但 auto-py-to-exe 会为您采样所有内容,因此您无需了解有关 pyinstaller 的所有内容,只需单击 exe 的属性-File 和 auto-py-to-exe 为您完成剩下的工作。
结论
总而言之,这就是一切。您可以通过编写更酷、更好的 UI 并将所有东西放在正确和更好的地方来像练习一样提高 Python 技能。只需在程序上玩一点,看看一切是如何工作的,并在 Python 上变得更好。
希望这篇文章很有趣或有帮助。
再见
哦,人类 DA。

Python社区为您提供最前沿的新闻资讯和知识内容
更多推荐

 0
0 0
0- 0


 已为社区贡献126445条内容

所有评论(0)