
眨眼检测和计数器 Mediapipe 眼动追踪第 1 部分和第 2 部分
如何使用计算机视觉算法检测眨眼,我将在这篇博文中简要介绍一下,简而言之,我们必须确定 Closed Eyes 和 Open Eyes in 之间的区别图像(帧) 代码库 你可以在 GitHubRepository上找到源代码,但这里我是简单的代码片段。 我们需要什么开始 蟒蛇 媒体管道 当您安装 mediapipe 时,它有一些要求,例如 OpenCV、NumPy 等,对于图像处理,我们需要 O
如何使用计算机视觉算法检测眨眼,我将在这篇博文中简要介绍一下,简而言之,我们必须确定 Closed Eyes 和 Open Eyes in 之间的区别图像(帧)
代码库
你可以在 GitHubRepository上找到源代码,但这里我是简单的代码片段。
我们需要什么开始
-
蟒蛇
-
媒体管道
当您安装 mediapipe 时,它有一些要求,例如 OpenCV、NumPy 等,对于图像处理,我们需要 OpenCV,无需单独安装,因为它已经与 mediapipe 一起提供
如果您想了解Mediapipe
媒体管道中的### 模型
-
Face mesh(这里我们要使用)
-
人脸检测
-
多手跟踪
-
自分段
-
全身姿势估计
-
更多
安装Mediapipe
# Windows machine

pip install mediapipe

# Linux or mac

pip3 install mediapipe
地标检测(Face Mesh)
我们的主要焦点是眼睛,为了提取眼睛,我们需要眼睛的界标,因为 mediapipe 为我们提供标准化值的界标,我们需要将它们转换为像素,或相对于图像平面的坐标。这是一个简单的函数,它什么都不做,只是将归一化为像素坐标
归一化为坐标
在 Face Mesh 中,我们得到 468 个路标,因此必须遍历每个路标,我们将获得 x 和 y 值,为了进行转换,我们需要将宽度乘以 x,将高度乘以 y,结果将是像素坐标,将它们存储在每个地标的 Tuples(x,y) 坐标列表中。
def landmarksDetection(img, results, draw=False):
    img_height, img_width= img.shape[:2]
    # list[(x,y), (x,y)....]
    mesh_coord = [(int(point.x * img_width), int(point.y * img_height)) for point in results.multi_face_landmarks[0].landmark]

    if draw :
        [cv.circle(img, p, 2, (0,255,0), -1) for p in mesh_coord]

    # returning the list of tuples for each landmark
    return mesh_coord
该函数接受三个参数
-
Img 图像(帧),垫子(NumPy)
-
结果 这些是 mediapipe 提供的 468 个标准化地标
-
draw 它决定是否要在每个地标上画一个圆圈。
Returns 元组列表包含每个地标的图像坐标。
关于地标检测的 YouTube 视频
https://youtu.be/-jFobb6ARc4
眨眼检测
为了检测眨眼,我们必须考虑几件事,首先,这是一张图像,它向您展示了闭眼和睁眼之间的区别,并绘制了地标。 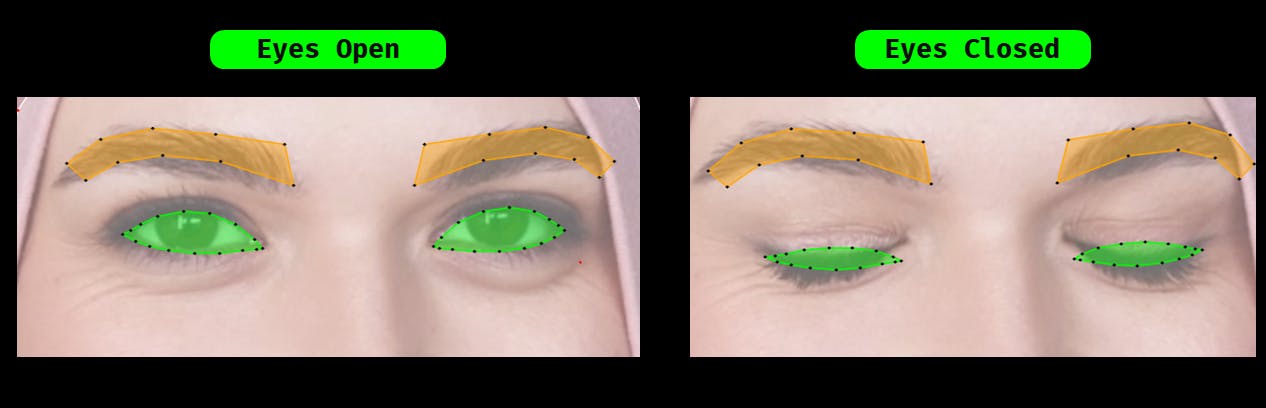
聚焦眼睛时,清晰显示,睁眼时,眼睛的宽度和高度标志最大,但当它关闭时,它们对眼睛的宽度没有影响,但眼睛的高度会发生变化,即over catch ,我们将以此为目标,检测眨眼。我们将找到欧几里得距离,而不是高度和宽度。一朵云之所以叫欧几里得距离,是因为当我们把头稍微倾斜一点时,眼睛的宽度和高度会相应地变化,为了避免这种情况,必须找到距离,形成一个点另一个点。
我们将找到垂直和水平距离的比率,这使我们能够检测眨眼。
# Euclaidean distance
def euclaideanDistance(point, point1):
    x, y = point
    x1, y1 = point1
    distance = math.sqrt((x1 - x)**2 + (y1 - y)**2)
    return distance
首先,我们将选择地标,从眼睛的地标中,让我在图像中向您展示,首先。

在上图中,用地标在眼睛上画两条线,表示两个地标之间的距离,水平和垂直,当眼睛睁开时,垂直距离达到最大值,而水平保持不变,另一方面,眼睛是关闭然后垂直距离接近最小值,
    # Right eyes
    # horizontal line
    rh_right = landmarks[right_indices[0]]
    rh_left = landmarks[right_indices[8]]
    # vertical line
    rv_top = landmarks[right_indices[12]]
    rv_bottom = landmarks[right_indices[4]]
在这些代码片段中,为右眼选择地标,以查找点之间的距离,如上图所示。
眨眼检测器功能
此函数选择眼睛的水平点和垂直点的界标,并借助欧几里得距离求出点之间的距离,并通过将水平距离除以垂直距离来计算每个点的眨眼率,这使我们可以检测眨眼。
# Blinking Ratio
def blinkRatio(img, landmarks, right_indices, left_indices):
    # Right eyes
    # horizontal line
    rh_right = landmarks[right_indices[0]]
    rh_left = landmarks[right_indices[8]]
    # vertical line
    rv_top = landmarks[right_indices[12]]
    rv_bottom = landmarks[right_indices[4]]
    # draw lines on right eyes
    # cv.line(img, rh_right, rh_left, utils.GREEN, 2)
    # cv.line(img, rv_top, rv_bottom, utils.WHITE, 2)

    # LEFT_EYE
    # horizontal line
    lh_right = landmarks[left_indices[0]]
    lh_left = landmarks[left_indices[8]]

    # vertical line
    lv_top = landmarks[left_indices[12]]
    lv_bottom = landmarks[left_indices[4]]
    # Finding Distance Right Eye
    rhDistance = euclaideanDistance(rh_right, rh_left)
    rvDistance = euclaideanDistance(rv_top, rv_bottom)
    # Finding Distance Left Eye
    lvDistance = euclaideanDistance(lv_top, lv_bottom)
    lhDistance = euclaideanDistance(lh_right, lh_left)

    # Finding ratio of LEFT and Right Eyes
    reRatio = rhDistance/rvDistance
    leRatio = lhDistance/lvDistance
    ratio = (reRatio+leRatio)/2
    return ratio
该函数接受三个参数
-
Img 图像(帧),垫子(NumPy)
-
landmarks 是由路标检测器功能返回的网格_coords
-
right_indices 这些只是 Face Mesh、Right Eyes 上的地标
-
left_indices 这些只是 Face Mesh 上的界标,Left Eyes Returns 双眼的组合比率,这使我们能够检测眨眼
眨眼检测器视频教程
https://youtu.be/XIJD43rbI-4
就这些了,有什么问题欢迎评论,我很乐意回复。

ModelScope旨在打造下一代开源的模型即服务共享平台,为泛AI开发者提供灵活、易用、低成本的一站式模型服务产品,让模型应用更简单!
更多推荐
 0
0 0
0- 0


 已为社区贡献27143条内容

所有评论(0)