
我如何使用 Medusa 从头开始创建 Nuxt.js 电子商务商店第 2 部分:添加购物车功能
简介
当您建立店面时,电子商务购物车是必不可少的。它允许客户将商品添加到他们的购物车,以便他们以后可以购买。客户还可以随时编辑购物车中的商品。
Medusa是一个开源的无头商务平台,只需几个命令,您就可以通过其 API 构建数字商务。它为您提供了使用您选择的前端框架从头开始实现自己的店面所需的灵活性。
本教程是围绕使用 Medusa 从头开始创建 Nuxt.js 电子商务店面的系列教程的一部分。第一部分解释了如何使用 Nuxt.js 建立一个原型店面,将其与 Medusa 服务器链接,并添加产品和产品详细信息页面。
在本指南中,您将学习如何为您的 Nuxt.js 店面设置购物车流程。更具体地说,它包括以下内容:
-
允许用户选择其区域的下拉菜单。
-
弹出式购物车,让用户快速查看购物车中的内容。
-
从产品详细信息页面将产品添加到购物车。
-
一个购物车页面,用于列出购物车中的产品,具有编辑功能。
您可以在这个 GitHub 存储库中找到这部分的最终代码。
先决条件
本教程假设您已经学习了本系列的第 1 部分。如果还没有,您可以使用第一部分分支](https://github.com/carpad88/nuxtjs-starter-medusa/tree/part-01/products-list)克隆 GitHub 存储库[并从那里继续。
设置区域选择
您需要做的第一件事是设置允许选择区域的下拉菜单。当客户选择一个地区时,他们的购物车将更新以显示产品价格以及为该地区设置的货币。
默认情况下,美杜莎服务器带有两个区域,因此有两种货币(美元和欧元)。
要使所有数据的店面同步,您将使用存储来管理应用程序状态。幸运的是,Nuxt 提供了一个开箱即用的商店。要激活它,请转到店面项目的根目录并创建一个名为store的新文件夹(如果它尚不存在)。
然后,使用以下内容创建文件store/index.js:
const REGION = 'medusa_region'
const COUNTRY = 'medusa_country'

export const state = () => ({
  country: undefined,
  region: undefined,
  regions: []
})

export const mutations = {
  UPDATE_REGION (state, payload) {
    state.region = payload.region
    state.country = payload.country || payload.region.countries[0]
    localStorage.setItem(REGION, JSON.stringify(state.region))
    localStorage.setItem(COUNTRY, JSON.stringify(state.country))
  },
  SET_REGIONS (state, regions) {
    state.regions = regions
  }
}

export const actions = {
  async initializeRegions ({ commit }) {
    const { data: { regions } } = await this.$axios('/regions')
    commit('SET_REGIONS', regions)

    if (localStorage) {
      const regionJSON = localStorage.getItem(REGION)
      const countryJSON = localStorage.getItem(COUNTRY)

      if (regionJSON && countryJSON) {
        const region = JSON.parse(regionJSON)
        const country = JSON.parse(countryJSON)
        commit('UPDATE_REGION', {
          region,
          country
        })
      } else {
        commit('UPDATE_REGION', { region: regions[0] })
      }
    }
  },

    updateRegion ({ state, commit, dispatch }, payload) {
      commit('UPDATE_REGION', payload)
    }
}
⚠️ 要以这种形式使用 axios:
this.$axios('/regions'),您需要将nuxt.config.js中的 axios 基本 URL 更新为http://localhost:9000/store,通过此更新,您无需在每次需要向 Medusa 服务器发出请求时预先添加/store。
在此文件中,您设置应用程序的初始状态。在state函数中,您定义变量来存储客户选择的country和region,以及稍后将使用的regions数组,以在下拉列表中显示所有可用区域。
mutations对象负责更新应用程序状态。因此,每当您需要更新某些内容时,您都会提交一个在后台更新状态的突变。
最后,您有actions对象,它允许您进行一些逻辑,例如,从 API 检索一些数据,然后提交一个突变以使用从 API 检索的数据更新状态。
在initializeRegions操作中,您向 Medusa 服务器发出请求以检索店面可用的所有区域,然后提交SET_REGIONS突变以更新区域状态。
接下来,您检查本地存储是否包含客户的country和region以使用该数据提交UPDATE_REGION突变。否则,您使用regions数组中的第一个区域提交突变。
创建区域下拉组件
下一步是添加在导航栏中显示区域的组件。
使用以下内容创建文件components/Dropdowns/Regions.vue:
<template>
  <div class="relative text-left">
    <div v-if="$store.state.region">
      <button
        class="inline-flex justify-center w-full px-4 py-2 bg-white text-sm font-medium text-gray-700 hover:text-gray-600 flex items-center"
        @click="showRegionsMenu = !showRegionsMenu"
      >
        <span class="mr-1">{{ $store.state.country.display_name }} / {{ $store.state.region.currency_code.toUpperCase() }}</span>
        <svg
          xmlns="http://www.w3.org/2000/svg"
          width="20"
          height="20"
          viewBox="0 0 24 24"
        ><path fill="currentColor" d="m12 13.172l4.95-4.95l1.414 1.414L12 16L5.636 9.636L7.05 8.222z" /></svg>
      </button>
    </div>

    <div
      v-if="$store.state.regions.length > 0 && showRegionsMenu"
      class="origin-top-right absolute right-0 mt-2 w-56 px-6 py-2 rounded-md shadow-lg bg-white ring-1 ring-black ring-opacity-5 focus:outline-none"
    >
      <ul class="border-b border-ui last:border-b-0">
        <li v-for="(region) in $store.state.regions" :key="region.id" class="not-last:border-b border-gray-300">
          <button
            v-for="country in region.countries"
            :key="country.id"
            class="block py-3 text-sm w-full text-left text-gray-500 hover:text-black not-last:border-b border-gray-300"
            @click="$store.dispatch('updateRegion', {region: region, country: country})"
          >
            {{ country.display_name }} / {{ region.currency_code.toUpperCase() }}
          </button>
        </li>
      </ul>
    </div>
  </div>
</template>

<script>
export default {
  name: 'RegionsPopOver',
  data () {
    return {
      showRegionsMenu: false
    }
  }
}
</script>
在这个组件中,您有一个带有showRegionsMenu属性的按钮来切换下拉区域的可见性。然后,您使用$store.state.regions访问商店中可用的所有区域并循环访问它们以列出所有区域的国家/地区。
最后,对于每个国家/地区,您都有一个按钮,每次客户单击它时都会发送操作$store.dispatch('updateRegion', {region: region, country: country}),从而更新客户区域。
要实际使用该组件,请打开components/App/Navbar.vue下的文件,并将“USA / USD”按钮的div容器替换为以下内容:
<div class="hidden lg:flex">
    <!-- THIS IS THE NEW COMPONENT -->
  <dropdowns-regions />

    <!-- ADD BEFORE THIS -->
    <div class="relative inline-block text-left">
    <div>
      <button
        class="inline-flex justify-center w-full px-4 py-2 text-sm font-medium text-gray-700 hover:text-gray-600"
        type="button"
      >
        Account
      </button>
    </div>
  </div>
</div>
要查看实际的下拉菜单,您需要创建一个 Nuxt 插件,该插件在每次访问您的店面或客户刷新页面时调用initializeRegions操作。
转到您的店面项目的根目录并创建具有以下内容的文件plugins/nuxtInit.client.js:
export default async function (context) {
  await context.store.dispatch('initializeRegions', context)
}
接下来,打开您的nuxt.config.js并使用以下内容更新plugins属性:
plugins: [
  { src: '~/plugins/nuxtInit.client.js', mode: 'client' }
],
测试区域下拉菜单
确保您的 Medusa 服务器正在运行。然后,使用以下命令启动 Nuxt.js 服务器:
yarn dev
转到网址http://localhost:3333。您应该在“帐户”旁边的导航栏中找到以“国家/货币”形式指定的区域。单击它,您将看到一个下拉列表,其中包含不同的国家和货币可供选择。

无论您从下拉列表中选择什么项目,该区域都会立即在店面更新。但是,如果您查看主页底部产品的价格,您会看到现在货币与下拉菜单中选择的地区不同步。一旦您在下一节中实施购物车,这将得到解决。
实现购物车流程
在本节中,您将实现与购物车流程相关的所有功能。这包括设置商店来管理购物车、在购物车中添加或删除产品的组件、用于显示购物车中产品的快速摘要的购物车弹出框组件以及客户可以详细了解购物车页面的购物车页面。购物车中的物品和购物车总数。
初始化购物车
与您对区域所做的类似,您首先需要一个初始化程序,它允许您从本地存储中检索购物车 ID(如果存在)。否则,您向您的 Medusa 服务器发出请求,为客户创建一个新的购物车。
打开store/index.js,在文件开头添加以下内容:
const CART_ID = 'cart_id'
然后在actions对象中添加initializeCart函数:
export const actions = {
  ...,

  async initializeCart ({ state, commit }) {
    const existingCartId = localStorage ? localStorage.getItem(CART_ID) : undefined

    if (existingCartId) {
      try {
        const { data: { cart } } = await this.$axios(`/carts/${existingCartId}`)

        if (!cart.completed_at) {
          commit('cart/SET_CART', cart)
        }
      } catch (e) {
        localStorage.removeItem(CART_ID)
      }
    } else {
      const { cart } = await this.$axios.$post('/carts', { region_id: state.region.id, country_code: state.country.country_code })
      commit('cart/SET_CART', cart)
    }
  },
}
该动作首先检查localStorage中是否保存有cart_id。如果是这样,它将从 Medusa 服务器检索购物车,如果购物车尚未完成,它将提交SET_CART突变以将其加载到店面的状态。
如果本地存储中没有存储任何购物车,那么它将创建一个新的并提交SET_CART突变以将购物车设置为当前店面状态。
接下来,您需要创建一个命名空间模块来管理购物车状态、getter、突变和操作。
使用以下内容创建文件store/cart.js:
export const state = () => ({
  cart: {
    items: []
  }
})

export const getters = {
  items: state => state.cart.items,
  cartCurrencyCode: state => state.cart.region.currency_code
}

export const mutations = {
  SET_CART (state, cart) {
    state.cart = cart
    localStorage.setItem('cart_id', cart.id)
  }
}

export const actions = {
  async updateCart ({ state, commit }, payload) {
    const { cart } = await this.$axios.$post(`/carts/${state.cart.id}`, { ...payload })
    commit('SET_CART', cart)
  },

  async addItem ({ state, commit }, item) {
    let cartId = state.cart.id

    if (!cartId) {
      const { cart: newCart } = await this.$axios.$post('/carts')
      commit('SET_CART', newCart)
      cartId = newCart.id
    }

    const { cart: updateCart } = await this.$axios.$post(`/carts/${cartId}/line-items`, { ...item })
    commit('SET_CART', updateCart)
  },

  async removeItem ({ state, commit }, itemId) {
    const { cart } = await this.$axios.$delete(`/carts/${state.cart.id}/line-items/${itemId}`)
    commit('SET_CART', cart)
  },

  async updateQuantity ({ state, commit }, item) {
    const { cart } = await this.$axios.$post(`/carts/${state.cart.id}/line-items/${item.id}`, { quantity: item.quantity })
    commit('SET_CART', cart)
  }
}
在state函数中,您在一个空的项目数组中为购物车设置初始状态,以避免在呈现店面页面时出现错误。稍后,当购物车被初始化或从 Medusa 服务器检索时,状态将使用来自购物车端点](https://docs.medusajs.com/api/store/cart/retrieve-a-cart)的[响应进行更新。
在getters对象中,您设置了两个 getter 以从购物车状态获取一些嵌套属性。您可以将此视为获取状态对象中特定属性的快捷方式。
接下来是mutations对象,它只有负责更新购物车内状态的突变。
最后是actions对象,它有四个功能:第一个是更新购物车属性;第二个是将商品添加到购物车;第三个是将从购物车中删除项目;第四是更新购物车中的物品数量。所有这些功能都会向您的 Medusa 服务器上的特定端点发出请求。
让购物车商店正常工作的最后一步是使用以下内容更新plugins/nuxtInit.client.js文件:
export default async function (context) {
  await context.store.dispatch('initializeRegions', context)
  await context.store.dispatch('initializeCart', context)
}
通过此更新,您可以调度每当客户访问店面或刷新店面页面时运行的initializCart操作。
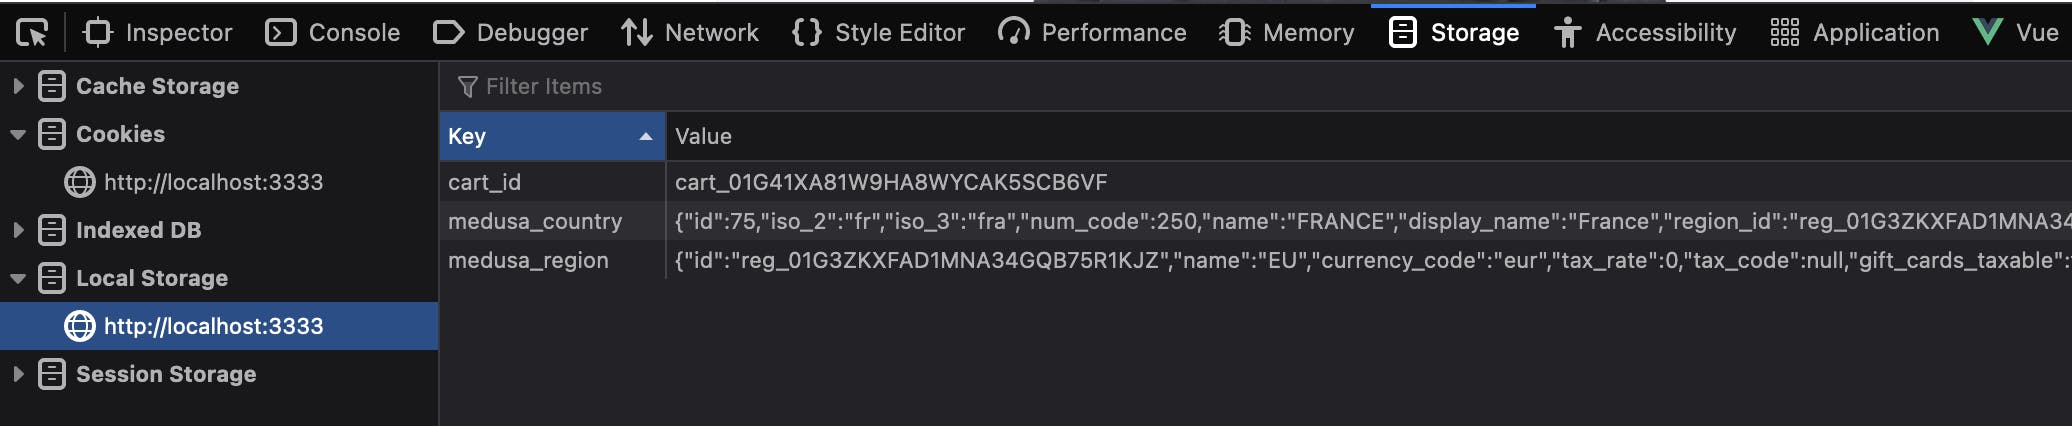
转到您的店面主页并刷新页面。然后,打开 Web 检查器并单击 Storage 选项卡。您应该在本地存储下看到带有 ID 作为值的cart_id键。
实现将商品添加到购物车
下一步是添加负责将产品添加到购物车的组件。
使用以下内容创建文件components/QuantitySelector.vue:
<template>
  <div class="flex items-center rounded-md px-4 py-2 shadow">
    <button @click="$emit('decrement', quantity - 1)">
      –
    </button>
    <span class="w-8 text-center">{{ quantity }}</span>
    <button @click="$emit('increment', quantity + 1)">
      +
    </button>
  </div>
</template>

<script>
export default {
  name: 'QuantitySelector',
  props: {
    quantity: {
      type: Number,
      default: 1
    }
  }
}
</script>
该组件只接收一个当前数量的道具,它有两个按钮负责向其父容器发送事件以调用函数来增加或减少当前项目的数量。
接下来,打开pages/products/_id.vue文件。并在数据对象中添加这三个属性:
data () {
  return {
    ...
    quantity: 1,
    variant_id: null,
    lowestPrice: {}
  }
},
quantity属性用于存储产品数量;variant_id用于设置客户选择的变体的 id,而lowestPrice顾名思义,是为了获得该产品的最低价格。
然后,在打开的script标签之后导入mapActions:
<script>
import { mapActions } from 'vuex'

//...
并将data属性之后的所有内容替换为以下内容:
async fetch () {
  try {
    const { product } = await this.$axios.$get(`/products/${this.$route.params.id}`)
    this.product = product
    this.imageToShow = this.product.images[0].id
    this.filterLowestPrice()
  } catch (e) {
    // eslint-disable-next-line no-console
    console.log('The server is not responding')
  }
},

computed: {
  currencyCode () {
    return this.$store.state.region.currency_code || 'usd'
  }
},
watch: {
  currencyCode () {
    this.filterLowestPrice()
  }
},
methods: {
  ...mapActions({
    addItem: 'cart/addItem'
  }),
    increment () {
    this.quantity += 1
  },
  decrement () {
    if (this.quantity > 1) { this.quantity -= 1 }
  },
  updateSelectedOptions (value) {
    const variant = this.product.variants.reduce((acc, cur) => {
      return [...acc, {
        variantId: cur.id,
        options: cur.options.map(o => o.value)
      }]
    }, []).filter((variant) => {
      return Object.values(value).sort().join('__') === variant.options.sort().join('__')
    })

    this.variant_id = variant[0].variantId
  },
  filterLowestPrice () {
    this.lowestPrice = this.product.variants
      .reduce((prices, cur) => {
        return [...prices, ...cur.prices.filter(price => price.currency_code === this.currencyCode)]
      }, [])
      .sort((a, b) => a.amount - b.amount)[0]
  }
}
首先,计算属性currencyCode用于从商店中检索与客户选择的区域匹配的当前货币代码。
接下来,您有一个观察者负责跟踪货币代码可能具有的任何更新。例如,如果客户选择其他区域,则观察者会检测到此更改并运行filterLowestPrice()函数来设置您之前添加的data属性中的lowestPrice。
在methods对象中,您可以找到mapActions助手。这使您可以使用在购物车商店但在组件内创建的操作addItem。此操作的作用是向您的 Medusa 服务器发送请求,以将商品添加到购物车。
increase和decrease函数负责更新之前添加的quantity属性。
updateSelectedOptions函数用于设置客户为该产品选择的特定variant_id。
最后,filterLowestPrice函数根据所选货币代码过滤产品价格以获取最低价格。
接下来,您需要添加一个实用程序函数来格式化产品价格。使用以下内容创建文件utils/format-price.js:
export const formatPrice = (amount, currencyCode, quantity = 1) => {
  return (amount / 100 * quantity).toFixed(2) +
    ' ' +
    currencyCode.toUpperCase()
}
该函数接受三个参数:金额、货币代码和数量;然后,它根据数量计算总金额并返回带有货币代码的格式化字符串。
返回pages/products/_id.vue并将“添加到购物袋”按钮下方的数量组件替换为quantity-selector组件:
<div class="inline-flex mt-12">
  <button class="btn-ui mr-2 px-12" @click="addItem({variant_id, quantity})">
    Add to bag
  </button>

    <!-- THIS IS THE NEW COMPONENT -->
  <quantity-selector
    :quantity="quantity"
    @increment="increment"
    @decrement="decrement"
  />
</div>
此外,将显示价格的部分替换为以下内容:
<p v-if="lowestPrice.currency_code" class="text-lg mt-2 mb-4">
  {{ formatPrice(lowestPrice.amount, lowestPrice.currency_code) }}
</p>
确保在script部分导入formatPrice并在methods属性中添加方法:
<script>
import { formatPrice } from '~/utils/format-price'

export default {
  ...

  methods: {
        ...
    formatPrice // <--------------------------- ADD HERE
  }
}
</script>
接下来,您需要创建一个新组件,以显示可供客户选择的产品选项。
使用以下内容创建文件components/Products/Options.vue:
<template>
  <div>
    <div v-for="option in filteredOptions" :key="option.id" class="mt-6">
      <div class="text-sm">
        <p class="font-medium mb-2">
          {{ option.title }}
        </p>
        <div>
          <button
            v-for="value in option.values"
            :key="value.id"
            :class="value.value === currentOptions[option.id] ? 'bg-gray-500 text-white' : 'bg-gray-200 text-black'"
            class="inline-flex items-center justify-center rounded-sm text-xs h-12 w-12 mr-2 last:mr-0 hover:bg-gray-500 hover:text-white"
            @click="updateOption(option.id, value.value )"
          >
            {{ value.value }}
          </button>
        </div>
      </div>
    </div>
  </div>
</template>,

<script>
export default {
  name: 'ProductOptions',
  props: {
    options: {
      type: Array,
      default () { return [] }
    }
  },
  data () {
    return {
      currentOptions: { }
    }
  },
  computed: {
    filteredOptions () {
      return this.options.map((option) => {
        option.values = option.values.reduce((acc, curr) => {
          if (!acc.find(val => val.value === curr.value)) {
            return [...acc, { ...curr }]
          }
          return acc
        }, [])

        return option
      })
    }
  },
  watch: {
    options (val) {
      this.currentOptions = val.reduce((acc, curr) => {
        return { ...acc, [curr.id]: curr.values[0].value }
      }, {})
      this.$emit('updateSelectedOptions', this.currentOptions)
    }
  },
  methods: {
    updateOption (optionId, value) {
      this.currentOptions[optionId] = value
      this.$emit('updateSelectedOptions', this.currentOptions)
    }
  }
}
</script>
此组件呈现可用于特定产品的所有选项。它收到一个带有所有选项的道具。它还有一个 data 属性来存储当前选择的选项。
此外,它还有一个计算属性filteredOptions过滤选项以避免重复。 watcher 用于在组件第一次渲染时更新currentOptions属性。
updateOption函数将选中的选项设置为currentOptions属性,然后使用当前选项的值向其父容器发出updateSelectedOptions事件。
现在,回到pages/products/_id.vue并搜索之前循环选项的 div。它应该在产品描述的下方。
将其替换为您刚刚创建的Options组件:
<p class="font-light">
  {{ product.description }}
</p>

<!-- THIS IS THE NEW COMPONENT -->
<products-options
  :options="product.options"
  @updateSelectedOptions="updateSelectedOptions"
/>
完成将商品添加到购物车功能的最后一件事是更新pages/products/_id.vue中的“Add to bag” 按钮。将按钮替换为以下内容:
<button class="btn-ui mr-2 px-12" @click="addItem({variant_id, quantity})">
  Add to bag
</button>
每当客户单击按钮时,您就运行addItem函数。
测试加入购物车功能
要对其进行测试,请转到您的店面产品页面,然后单击产品。您应该看到产品详细信息页面。
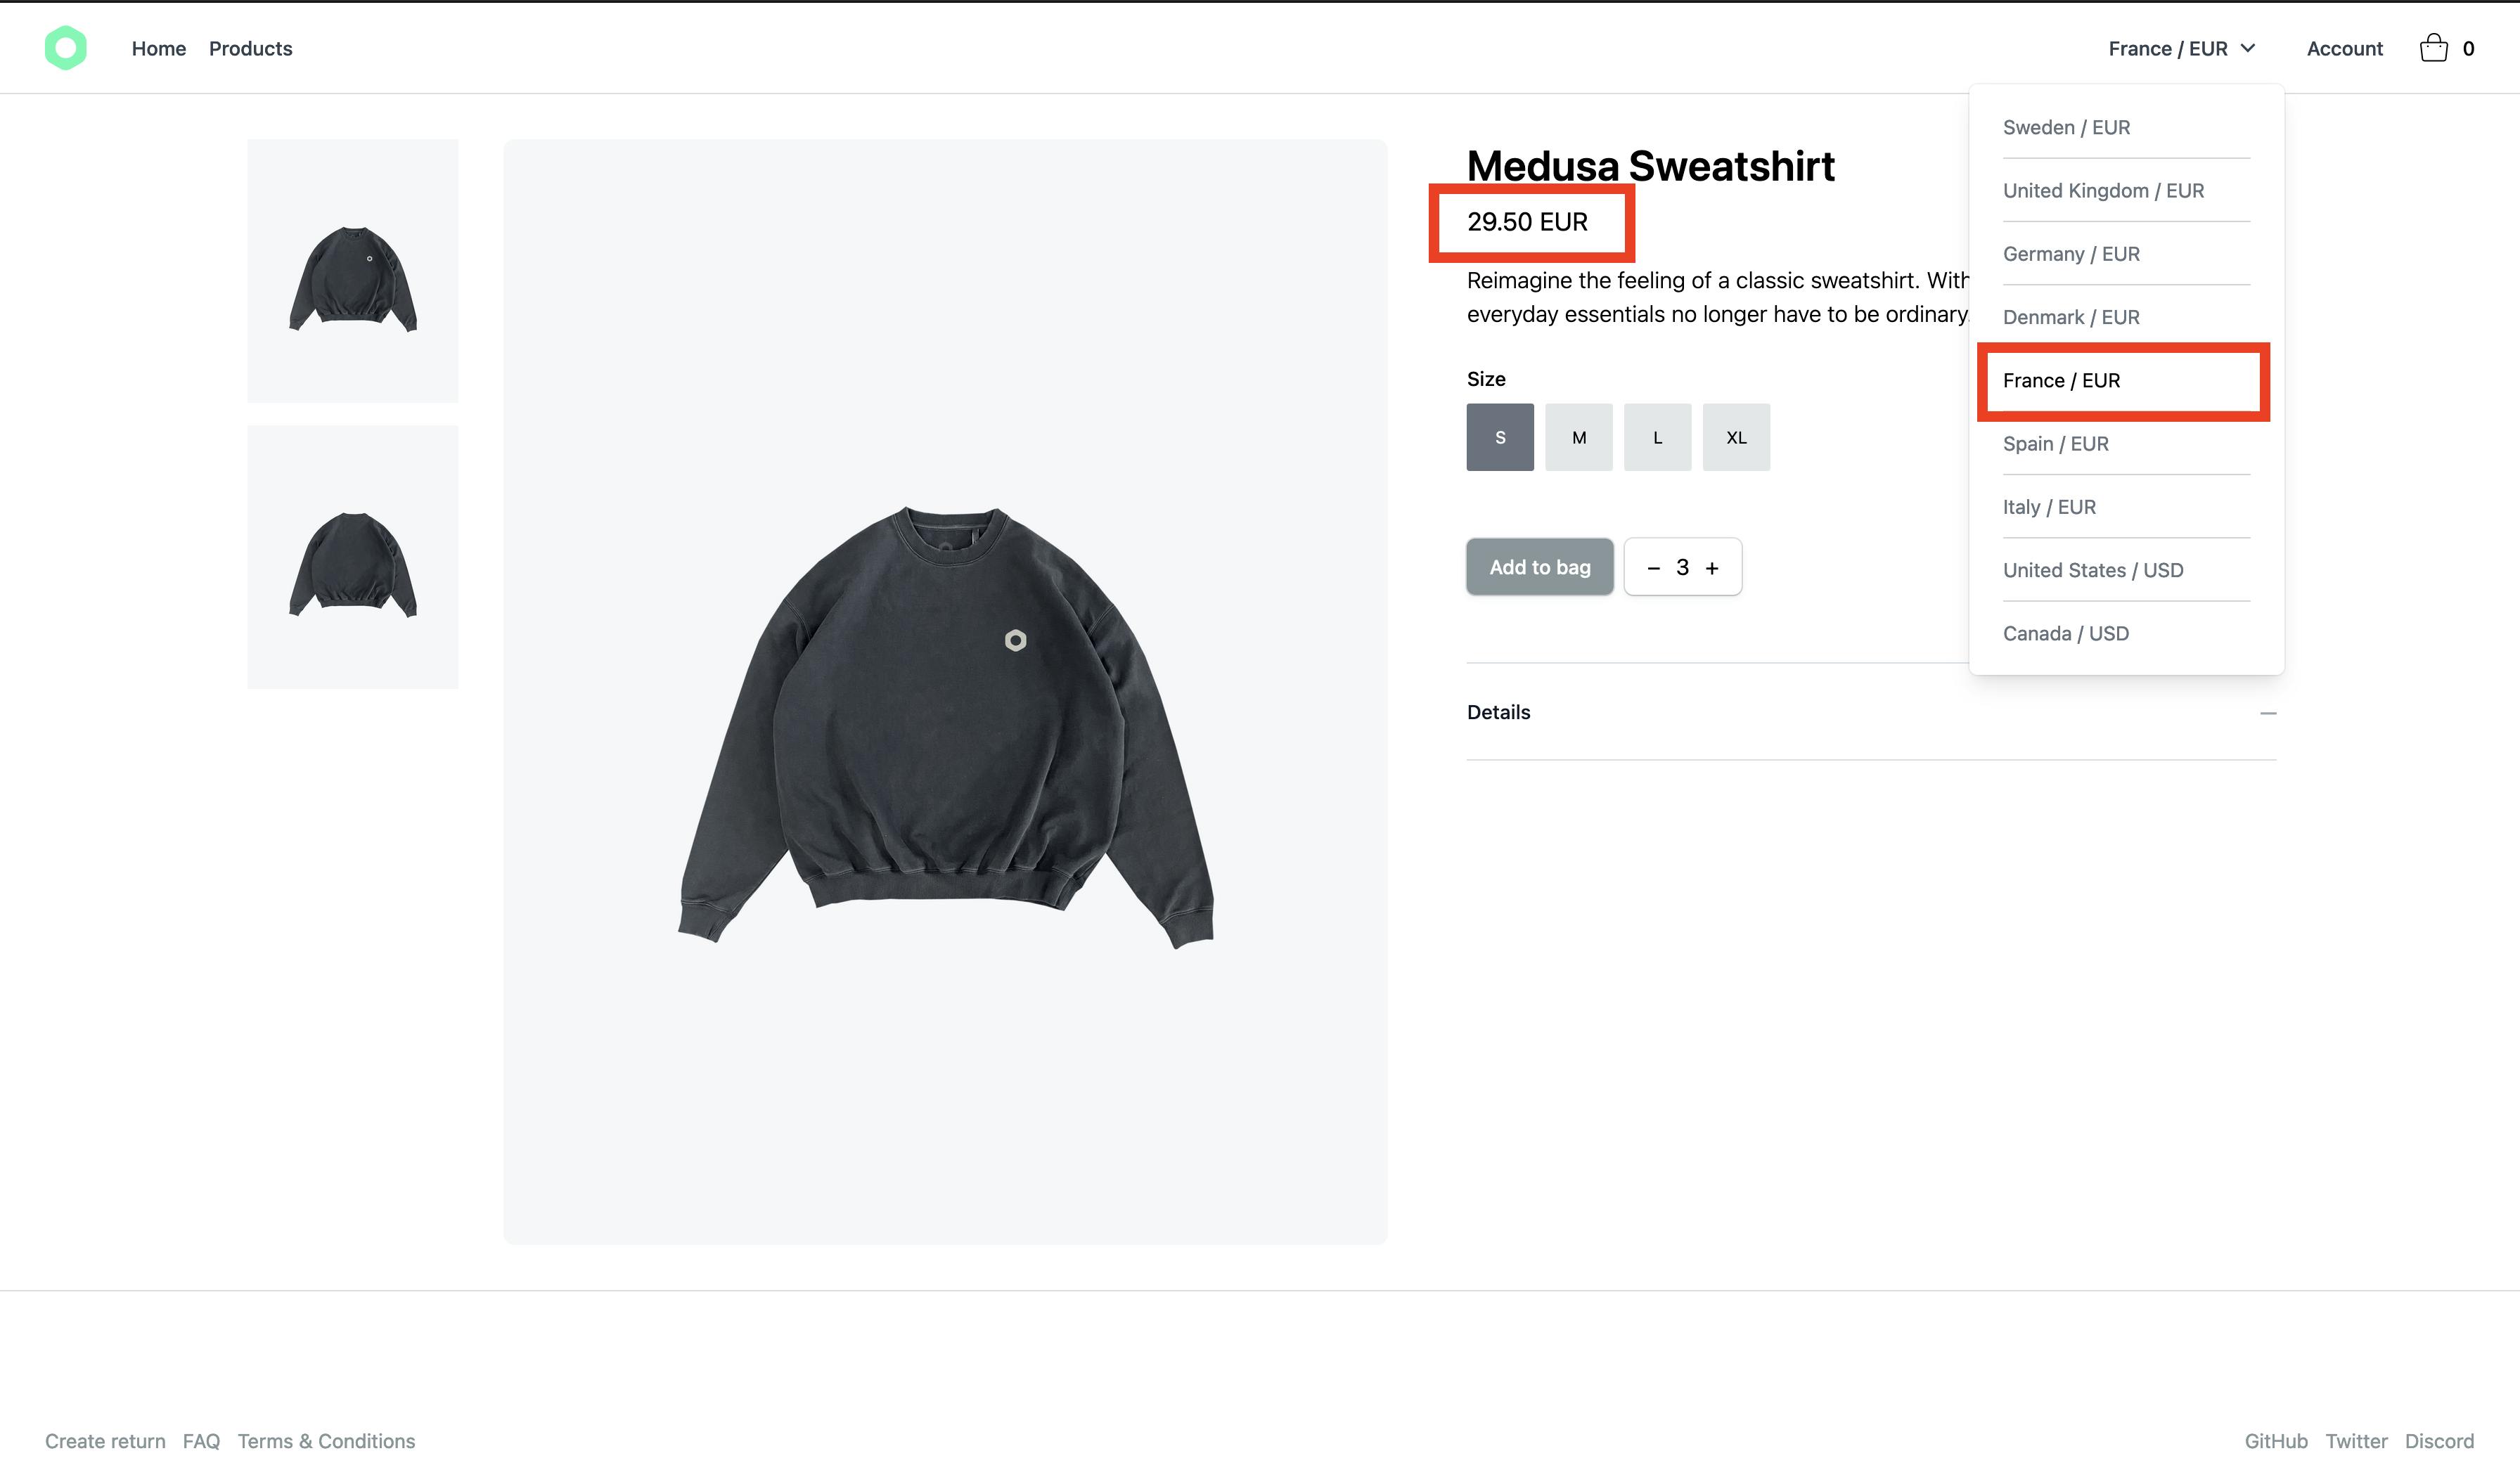
尝试从区域下拉列表更改为另一个区域,您应该会看到产品价格和货币代码立即更新,与所选区域匹配。
此外,如果您单击 plus 数量按钮,您应该会看到数量是如何增加的。另一方面,如果您点击减数量按钮,数量会减少。
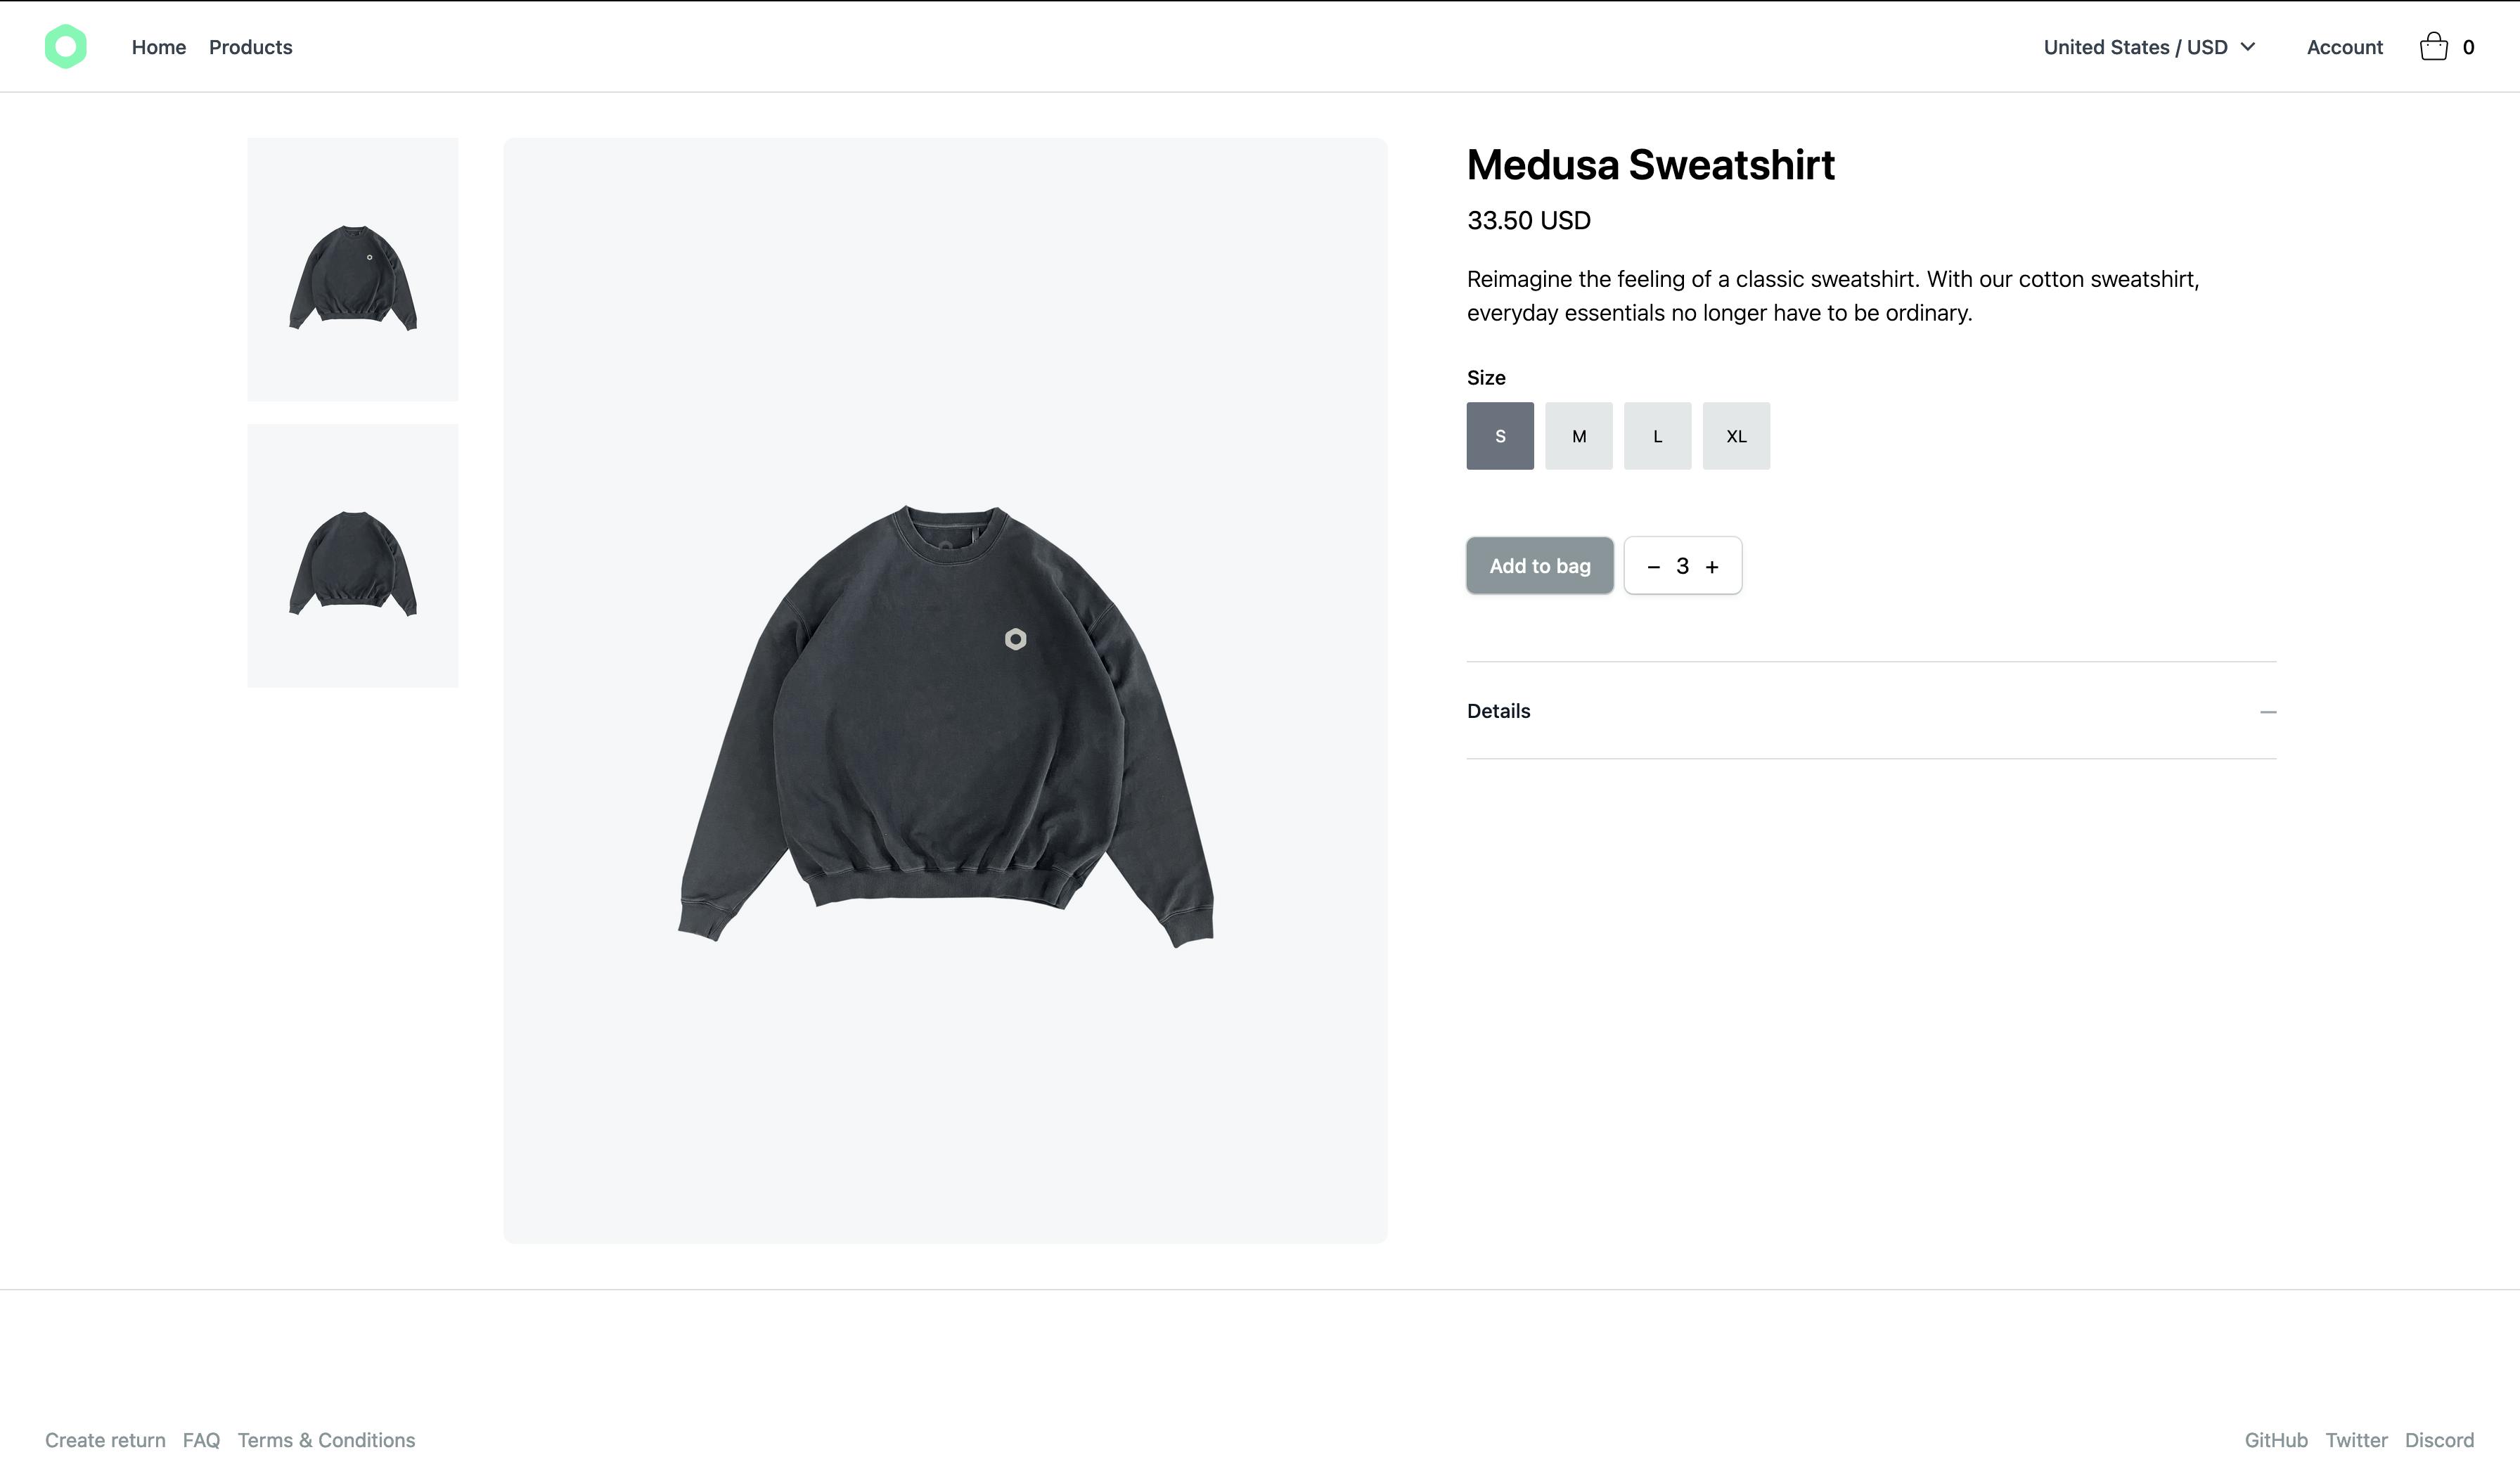
最后,如果您单击 Add to bag 按钮,根据上面显示的示例,一个 Medusa Sweatshirt Size S 将被添加到购物车中。
在接下来的部分中实施购物车弹出框后,您将能够看到添加到购物车的产品。
更新 ProductCart 组件
在添加购物车弹出框之前,您应该更新ProductCard组件以使用新创建的format-price实用程序函数。
将文件components/ProductCard.vue移动到components/Products目录下,重命名为Card.vue。完整路径现在应该是components/Products/Card.vue。
然后,打开Card.vue组件并将呈现价格的p元素替换为以下内容:
<p class="text-sm font-semibold text-gray-900">
  from {{ formatPrice(lowestPrice.amount, lowestPrice.currency_code) }}
</p>
记得在script标签开头导入函数,并将其添加到methods对象中:
<script>
import { formatPrice } from '~/utils/format-price'

export default {
  ...

  methods: {
        ...
    formatPrice // <--------------------------- ADD HERE
  }
}
</script>
最后,替换计算的lowestPrice属性以从购物车商店获取货币代码:
computed: {
  lowestPrice () {
    return this.item.variants
      .reduce((prices, cur) => {
        return [...prices, ...cur.prices.filter(price => price.currency_code === this.$store.getters['cart/cartCurrencyCode'])]
      }, [])
      .sort((a, b) => a.amount - b.amount)[0] || { amount: 1, currency_code: 'usd' }
  }
},
接下来,打开store/index.js并将updateRegion操作更新为以下内容:
export const actions = {
  ...
  updateRegion ({ state, commit, dispatch }, payload) {
    commit('UPDATE_REGION', payload)
    dispatch('cart/updateCart', {
      region_id: state.region.id
    })
  }
}
使用此代码,您可以在客户更改其区域时调度cart/updateCart操作。
现在,您需要更新之前用于使用更新后的Card组件的ProductCard。
打开pages/index.vue,将<ProductCard />组件替换为新的<products-card/>组件:
<div class="grid grid-cols-4 gap-8 ">
    <!--- before this component was ProductCard --->
  <products-card
    v-for="product in products"
    :key="product.id"
    :item="product"
  />
</div>
同样打开pages/products/index.vue,将<ProductCard />组件替换为新的<products-card/>组件:
<div
  v-if="products.length"
  class="grid grid-cols-4 gap-8 "
>
    <!--- before this component was ProductCard --->
  <products-card
    v-for="product in products"
    :key="product.id"
    :item="product"
  />
</div>
要进行测试,请转到您的 products 页面,然后从该地区的下拉列表中选择一个使用不同货币的不同国家/地区。您应该会看到产品价格立即更新。
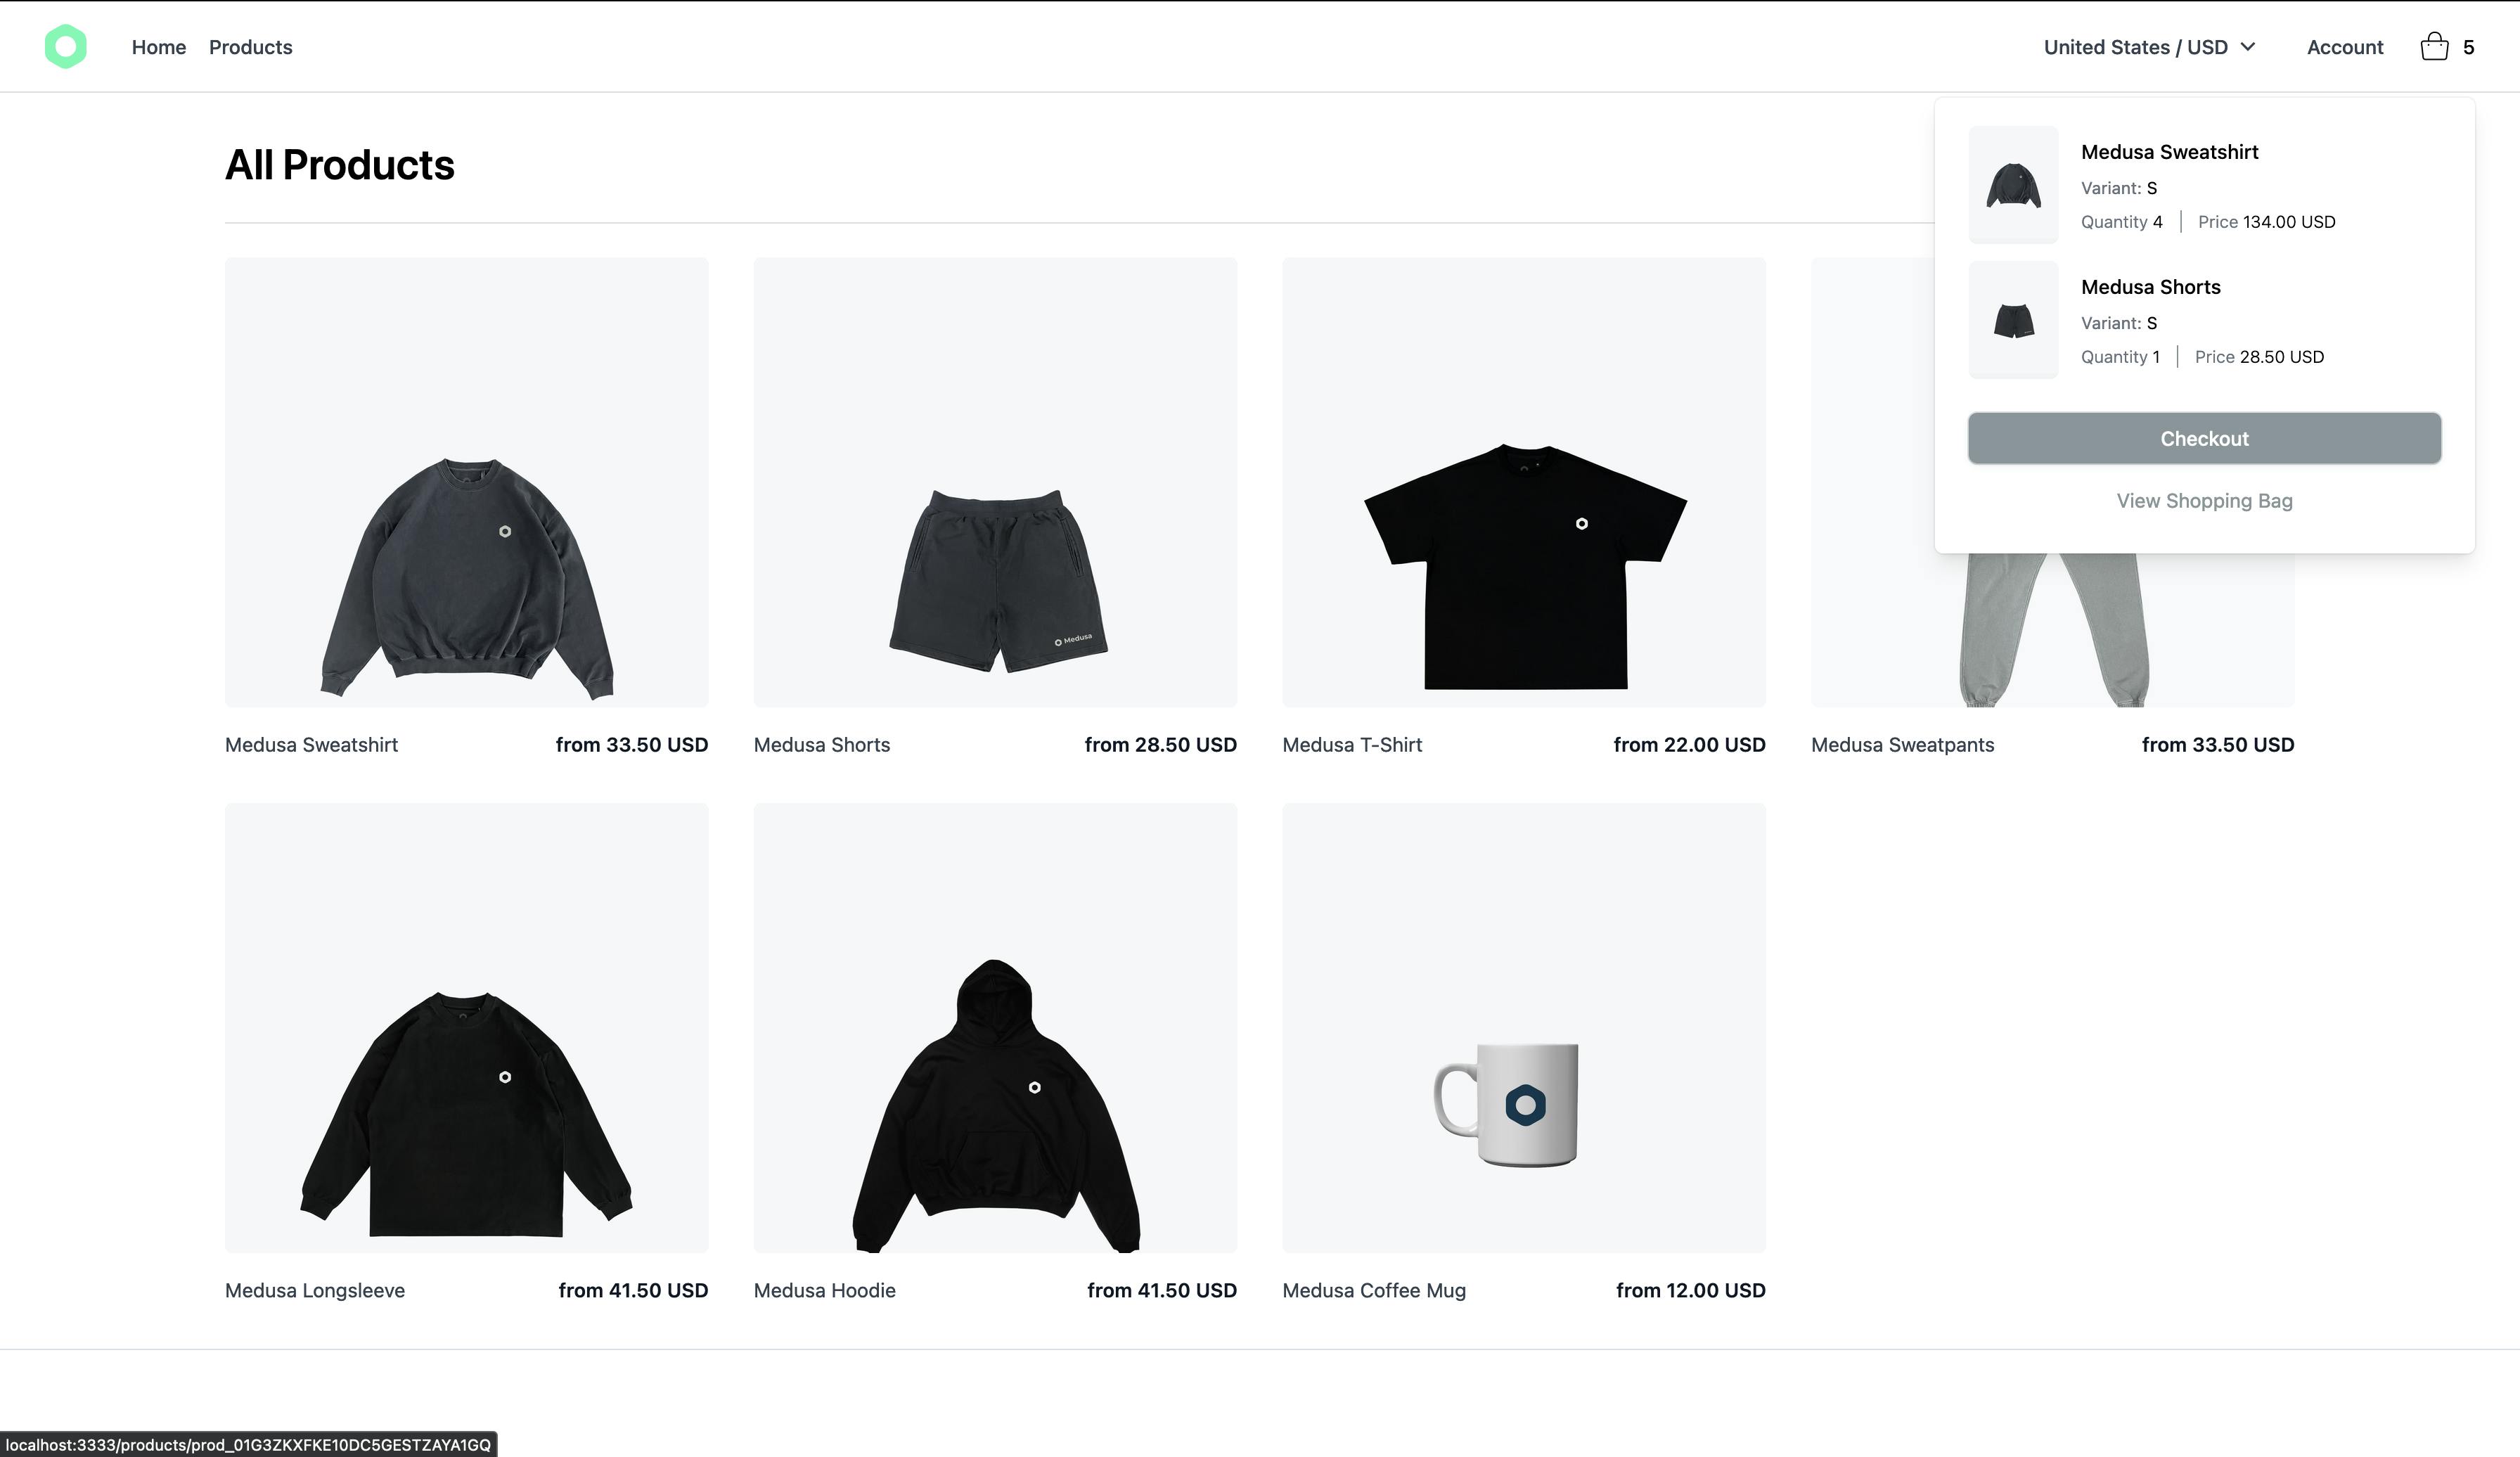
添加购物车弹出框
为了让客户看到他们的购物车中有什么,您将实现一个购物车弹出框,显示购物车中产品列表的快速摘要。
新建一个文件components/Dropdowns/CartPopoverItem.vue,内容如下:
<template>
  <li class="flex">
    <div class="overflow-hidden rounded-md mr-4 bg-gray-100">
      <img class="w-16 h-auto" :src="item.thumbnail" :alt="item.title">
    </div>
    <div class="flex flex-col justify-between py-2 space-y-2">
      <div>
        <p class="font-medium text-sm">
          {{ item.title }}
        </p>
        <p class="text-xs mt-2">
          <span class="text-gray-500">Variant:</span> {{ item.description }}
        </p>
      </div>
      <div class="flex items-center font-light text-xs">
        <p>
          <span class="text-gray-500">Quantity</span>
          <span>{{ item.quantity }}</span>
        </p>
        <div class="w-px h-4 bg-ui-dark mx-3" />
        <p>
          <span class="text-gray-500">Price</span>
          <span>
            {{ formatPrice(item.unit_price, cartCurrencyCode, item.quantity) }}
          </span>
        </p>
      </div>
    </div>
  </li>
</template>

<script>
import { formatPrice } from '@/utils/format-price'

export default {
  name: 'CartPopoverItem',
  props: {
    item: {
      type: Object,
      default () {
        return {
          title: 'Item added',
          description: 'Description item',
          quantity: 1,
          unit_price: 9.5,
          thumbnail: ''
        }
      }
    }
  },
  computed: {
    cartCurrencyCode () {
      return this.$store.state.cart.cart.region.currency_code
    }
  },
  methods: {
    formatPrice
  }

}
</script>
该组件用于显示每个购物车项目。它接收一个产品作为道具,并将其呈现在显示产品标题、选择的变体、数量和总金额的下拉列表中。
接下来,使用以下内容创建文件components/Dropdowns/CartPopover.vue:
<template>
  <div class="relative inline-block text-left">
    <div id="cartButton">
      <button
        class="inline-flex items-center justify-center w-full py-2 bg-white text-sm font-medium hover:opacity-1/2"
        @click="showCart = !showCart"
      >
        <svg width="40" height="41" viewBox="0 0 40 41" fill="none" xmlns="http://www.w3.org/2000/svg">
          <path
            fill-rule="evenodd"
            clip-rule="evenodd"
            d="M14.9968 16.2273C14.9921 16.1189 14.9888 16.0004 14.9877 15.8734C14.9826 15.2497 15.0333 14.4053 15.2648 13.551C15.4962 12.6975 15.9164 11.8043 16.6719 11.123C17.4366 10.4333 18.5016 10 19.9419 10C21.3822 10 22.4472 10.4333 23.212 11.123C23.9674 11.8043 24.3877 12.6975 24.619 13.551C24.8506 14.4053 24.9012 15.2497 24.8961 15.8734C24.8951 16.0004 24.8917 16.1189 24.887 16.2273H27.8836C29.0776 16.2273 30.0056 17.2667 29.8708 18.4531L28.7344 28.4531C28.6196 29.4638 27.7644 30.2273 26.7472 30.2273H13.1366C12.1194 30.2273 11.2643 29.4638 11.1494 28.4531L10.013 18.4531C9.87822 17.2667 10.8062 16.2273 12.0002 16.2273H14.9968ZM23.8859 16.2273C23.8912 16.1186 23.8951 15.9971 23.8962 15.8652C23.9008 15.2957 23.8535 14.5493 23.6538 13.8126C23.454 13.0752 23.1098 12.3775 22.5422 11.8656C21.984 11.3622 21.1673 11 19.9419 11C18.7165 11 17.8999 11.3622 17.3416 11.8656C16.774 12.3775 16.4299 13.0752 16.23 13.8126C16.0303 14.5493 15.983 15.2957 15.9877 15.8652C15.9888 15.9971 15.9926 16.1186 15.9979 16.2273H23.8859ZM12.0002 17.2273H27.8836C28.4806 17.2273 28.9446 17.747 28.8772 18.3402L27.7408 28.3402C27.6834 28.8455 27.2558 29.2273 26.7472 29.2273H13.1366C12.628 29.2273 12.2004 28.8455 12.143 28.3402L11.0066 18.3402C10.9392 17.747 11.4032 17.2273 12.0002 17.2273ZM15.4874 20.0455C15.8388 20.0455 16.1237 19.7605 16.1237 19.4091C16.1237 19.0576 15.8388 18.7727 15.4874 18.7727C15.1359 18.7727 14.851 19.0576 14.851 19.4091C14.851 19.7605 15.1359 20.0455 15.4874 20.0455ZM25.0328 19.4091C25.0328 19.7605 24.7479 20.0455 24.3965 20.0455C24.045 20.0455 23.7601 19.7605 23.7601 19.4091C23.7601 19.0576 24.045 18.7727 24.3965 18.7727C24.7479 18.7727 25.0328 19.0576 25.0328 19.4091Z"
            fill="black"
          /></svg>
        <span>{{ countItems }}</span>
      </button>
    </div>

    <div
      v-if="showCart"
      id="cartPopover"
      class="origin-top-right absolute right-0 mt-2 w-96 px-6 py-4 rounded-md shadow-lg bg-white ring-1 ring-black ring-opacity-5 focus:outline-none"
    >
      <div class="py-1">
        <div v-if="items.length === 0" class="flex justify-center">
          <p>Your cart is empty </p>
        </div>

        <div v-else>
          <ul class="py-2 first:pt-0 space-y-3">
            <dropdowns-cart-popover-item v-for="item in items" :key="item.id" :item="item" />
          </ul>

          <div class="flex flex-col mt-4">
            <div>
              <div>
                <button class="btn-ui font-medium px-4 py-2 mb-2 text-sm w-full">
                  Checkout
                </button>
              </div>
            </div>
            <div>
              <nuxt-link to="/shopping-bag">
                <button class="text-ui-dark py-2 text-sm w-full">
                  View Shopping Bag
                </button>
              </nuxt-link>
            </div>
          </div>
        </div>
      </div>
    </div>
  </div>
</template>

<script>
import { mapGetters } from 'vuex'

export default {
  name: 'CartPopover',
  data () {
    return {
      showCart: false
    }
  },
  computed: {
    ...mapGetters({ items: 'cart/items' }),
    countItems () {
      return this.items.reduce((sum, i) => sum + i.quantity, 0)
    }
  }
}
</script>
在此组件中,您可以显示购物车中有多少产品。当客户点击导航栏中的购物袋图标时,会使用CartPopoverItem组件呈现购物车中的产品摘要。
此外,还呈现了 View Shopping Bag 和 Checkout 2 个按钮。
使用映射到购物车商店中创建的cart/itemsgetter 的mapGetters帮助程序检索项目列表。
要查看这两个组件的运行情况,您需要将它们添加到导航栏。
打开components/App/Navbar.vue,将当前的静态购物袋按钮替换为账户按钮后面的<dropdowns-cart-popover />:
<div class="flex items-center justify-end">
  <div class="hidden lg:flex">
    <dropdowns-regions />

    <div class="relative inline-block text-left">
      <div>
        <button
          class="inline-flex justify-center w-full px-4 py-2 text-sm font-medium text-gray-700 hover:text-gray-600"
          type="button"
        >
          Account
        </button>
      </div>
    </div>
  </div>

    <!-- ADD HERE -->
  <dropdowns-cart-popover />
</div>
测试购物车弹出框
要测试购物车弹出框,请返回您的店面并尝试单击导航栏中的购物袋图标。您应该看到当前在购物车中的产品。
在下一部分中,您将实现购物车页面,该页面将允许您修改商品的数量或从购物车中删除商品。
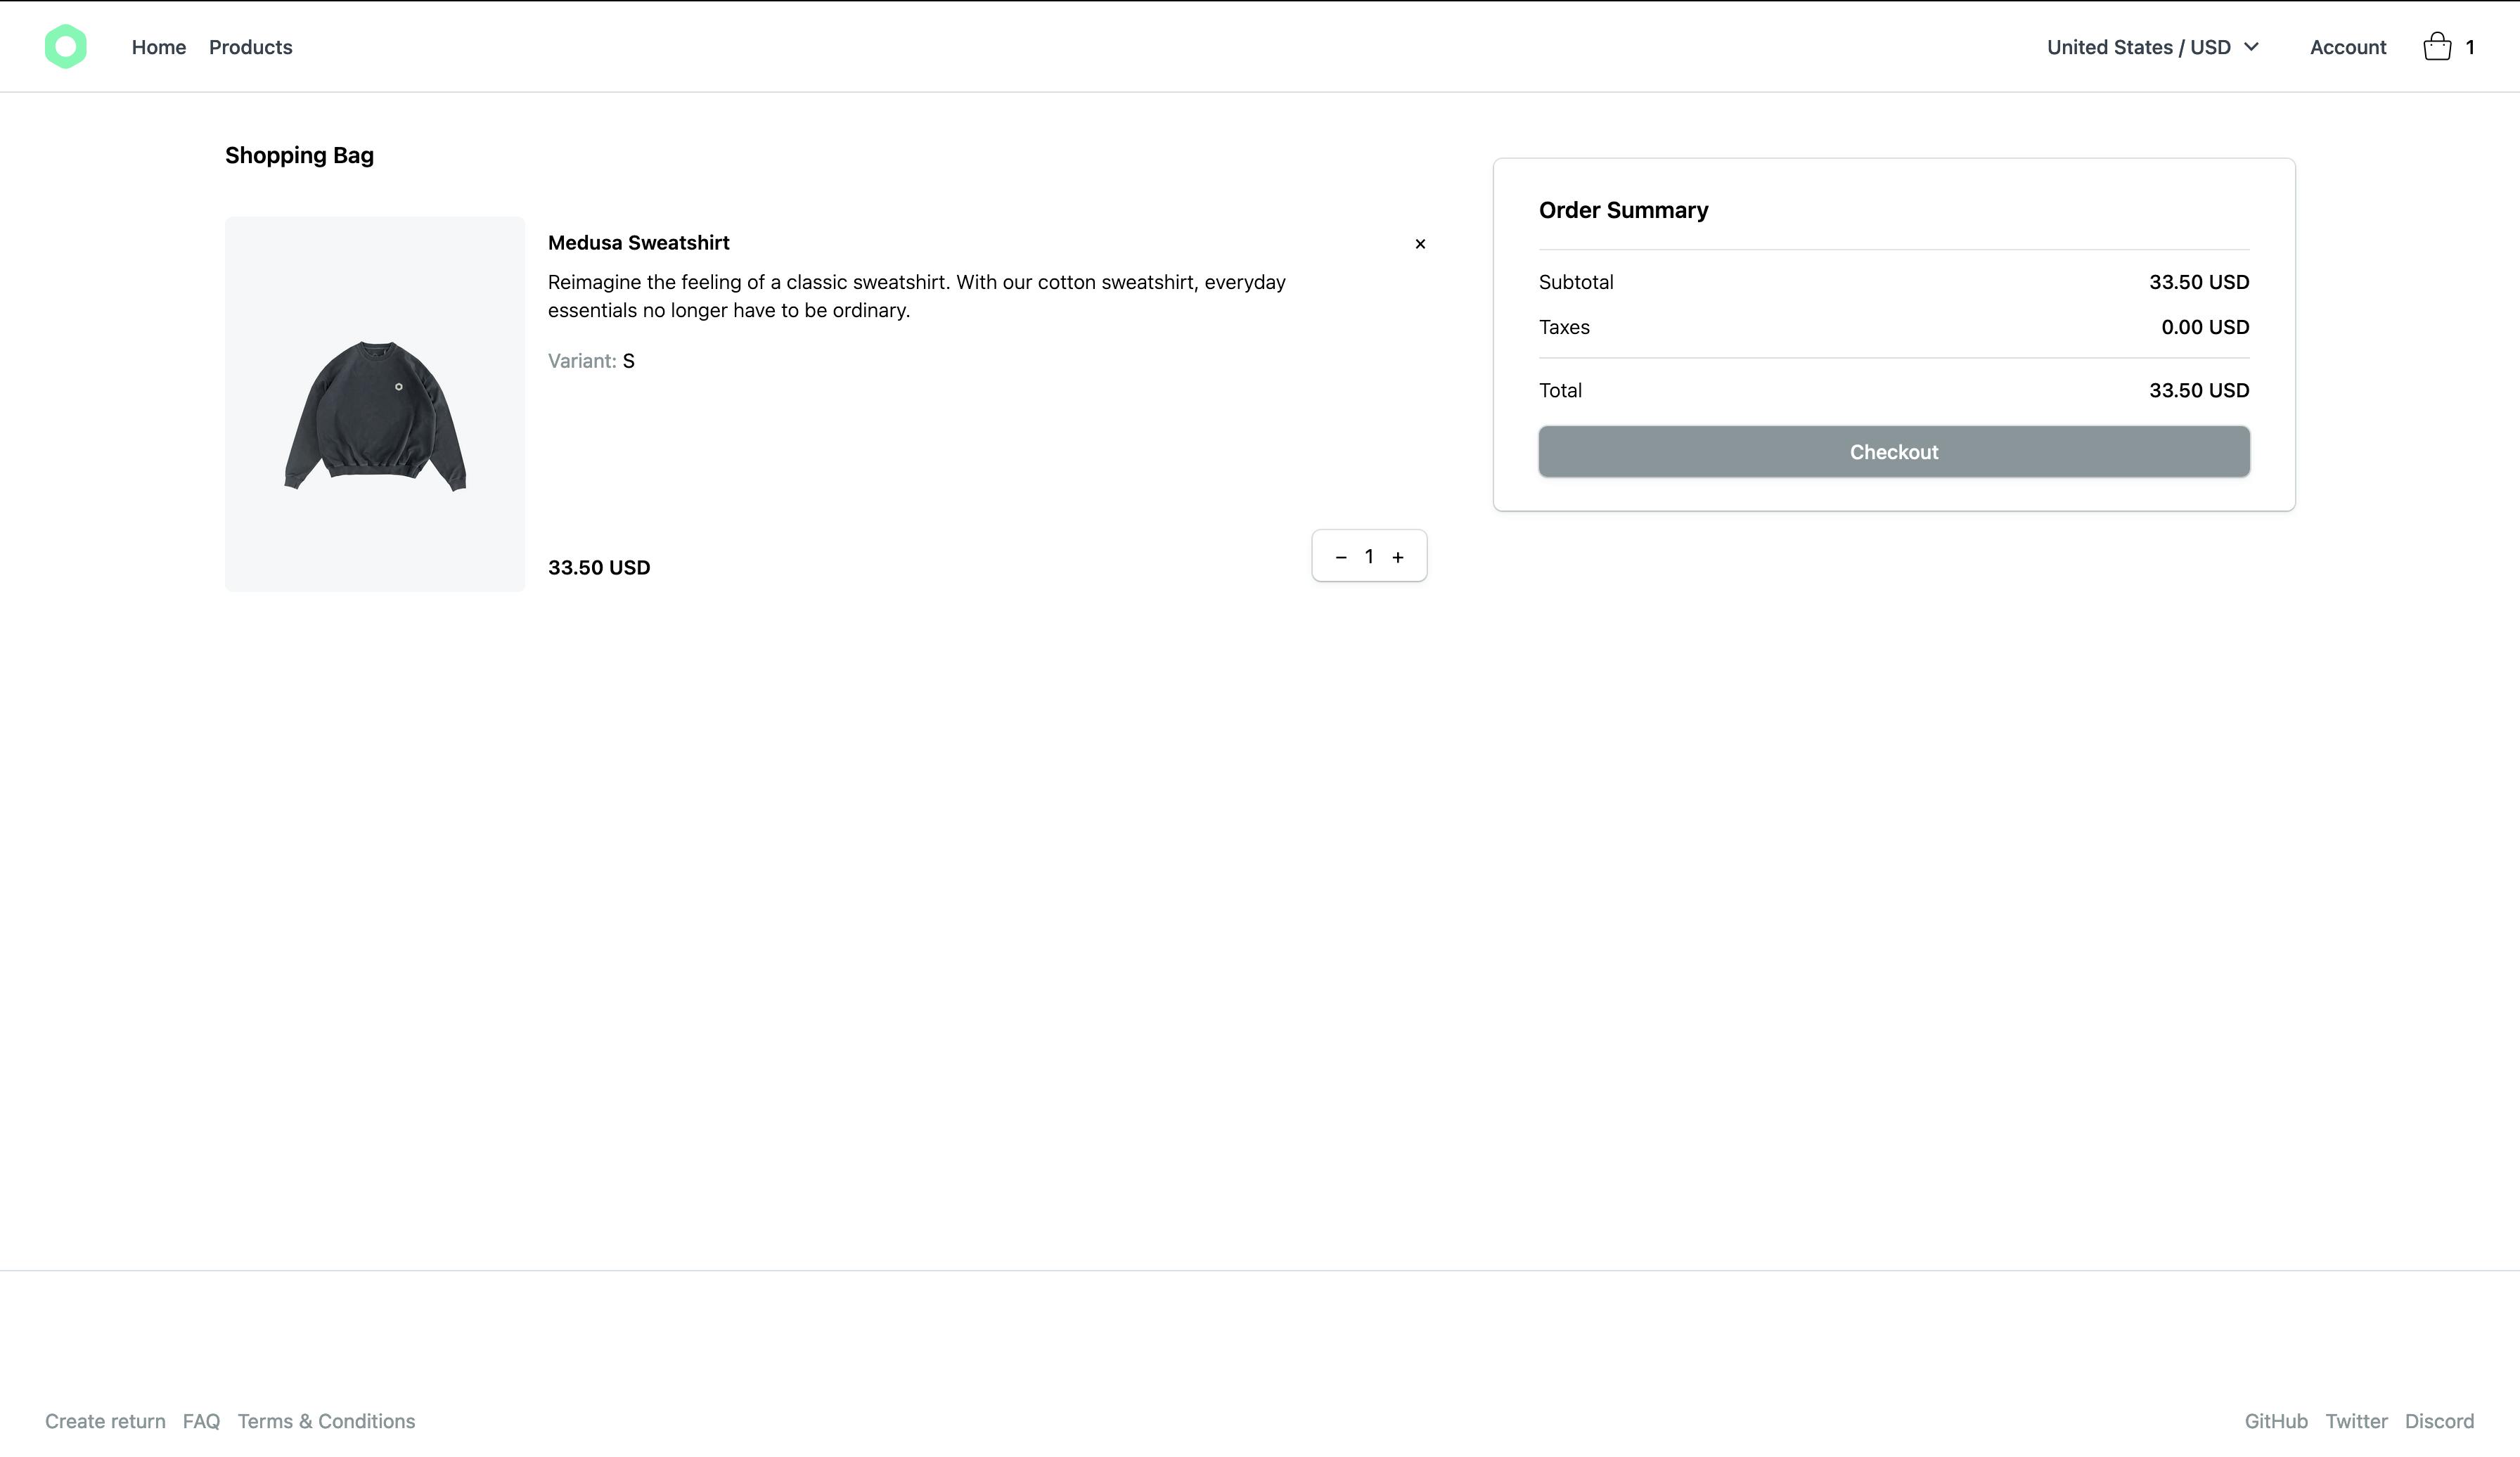
购物车页面
此页面上有两个组件。第一个是产品列表,第二个是购物车总数的摘要。
要实现第一个组件,请创建具有以下内容的文件components/ShoppingBag/CartItem.vue:
<template>
<div class="flex mb-6 last:mb-0">
<div class="bg-ui rounded-md overflow-hidden mr-4 max-w-1/4">
<img
class="h-auto w-full object-cover"
:src="item.thumbnail"
:alt="item.title"
>
</div>
<div class="flex text-sm flex-grow py-2">
<div class="flex flex-col justify-between w-full flex-grow">
<div class="flex flex-col">
<p class="font-semibold mb-2">
{{ item.title }}
</p>
<p class="lg:block mb-4 hidden font-light">
{{ item.variant.product.description }}
</p>
<p>
<span class="text-ui-dark">Variant:</span> {{ item.description }}
</p>
</div>
<p class="font-semibold">
{{ formatPrice(item.unit_price, cartCurrencyCode, item.quantity) }}
</p>
</div>
<div class="flex flex-col justify-between">
<div class="flex justify-end w-full">
<button @click="deleteItem">
×
</button>
</div>
<quantity-selector
:quantity="item.quantity"
@increment="updateQuantity"
@decrement="updateQuantity"
/>
</div>
</div>
</div>
</template>
<script>
import { formatPrice } from '~/utils/format-price'
export default {
name: 'CartItem',
props: {
item: {
type: Object,
default () {
return {}
}
}
},
computed: {
cartCurrencyCode () {
return this.$store.state.cart.cart.region.currency_code
}
},
methods: {
formatPrice,
updateQuantity (quantity) {
this.$store.dispatch('cart/updateQuantity', { id: this.item.id, quantity })
},
deleteItem () {
this.$store.dispatch('cart/removeItem', this.item.id)
}
}
}
</script>
使用此组件,您可以呈现购物车中的所有产品。
<quantity-selector />组件负责更新产品的数量。它调用updateQuantity函数,该函数在购物车商店中调度cart/updateQuantity操作。然后,此操作向您的 Medusa 服务器发送请求以更新项目数量。
删除按钮将商品从购物车中删除。
要实现购物车总计组件,请创建具有以下内容的文件components/ShoppingBag/CartReview.vue:
<template>
  <div class="bg-white rounded-md shadow px-8 py-6 w-full sticky top-28">
    <h3 class="font-semibold mb-4">
      Order Summary
    </h3>

    <div class="my-4 border-t bt-gray-100">
      <div class="font-light text-sm space-y-3 mt-3">
        <div class="flex items-center justify-between mb-2">
          <p>Subtotal</p>
          <p class="font-medium">
            {{ formatPrice(cart.subtotal, currencyCode ) }}
          </p>
        </div>

        <div v-if="shippingTotal" class="flex items-center justify-between mb-2">
          <p>Shipping</p>
          <p class="font-medium">
            {{ formatPrice(shippingTotal, currencyCode) }}
          </p>
        </div>

        <div class="flex items-center justify-between mb-2">
          <p>Taxes</p>
          <p class="font-medium">
            {{ formatPrice(cart.tax_total, currencyCode) }}
          </p>
        </div>

        <div class="h-px w-full bg-ui-medium mb-2" />

        <div class="flex items-center justify-between">
          <p>Total</p>
          <p class="font-medium">
            {{ formatPrice(cart.total, currencyCode) }}
          </p>
        </div>
      </div>
    </div>

    <div>
      <button class="btn-ui w-full">
        Checkout
      </button>
    </div>
  </div>
</template>

<script>
import { formatPrice } from '@/utils/format-price'

export default {
  computed: {
    cart () {
      return this.$store.state.cart.cart
    },
    currencyCode () {
      return this.cart.region.currency_code
    },
    shippingTotal () {
      return this.cart.shipping_total || 0
    }
  },
  methods: {
    formatPrice
  }
}
</script>
此组件显示购物车的总数,包括小计、运费总额(如果购物车有此信息)、税额以及购物车上所有产品的总数。
现在您已经完成了组件,您可以创建购物车页面。
使用以下内容创建文件pages/shopping-bag/index.vue:
<template>
  <div class="container mx-auto p-8">
    <div class="flex relative flex-col-reverse lg:flex-row">
      <div class="flex flex-col lg:mr-12 lg:w-3/5">
        <div class="mb-8">
          <h1 class="font-semibold">
            Shopping Bag
          </h1>
        </div>
        <div class="w-full">
          <shopping-bag-cart-item
            v-for="item in items"
            :key="item.id"
            :item="item"
          />
        </div>
      </div>
      <div class="relative w-full mb-8 lg:mb-0 lg:w-2/5">
        <shopping-bag-cart-review />
      </div>
    </div>
  </div>
</template>

<script>
import { mapGetters } from 'vuex'

export default {
  name: 'ShoppingBag',
  computed: {
    ...mapGetters({ items: 'cart/items' })
  }
}
</script>
最繁重的工作已经在之前创建的组件中实现,因此在此页面上您只是在使用它们。
您使用mapGetters帮助程序检索购物车中的项目。然后,<shopping-bag-cart-item />组件循环遍历所有项目并呈现它们。
<shopping-bag-cart-review />组件显示购物车总数的评论。
测试车页面
转到您的店面产品页面,然后单击导航栏中的包图标。然后,点击查看购物袋按钮。您将被重定向到购物车页面。
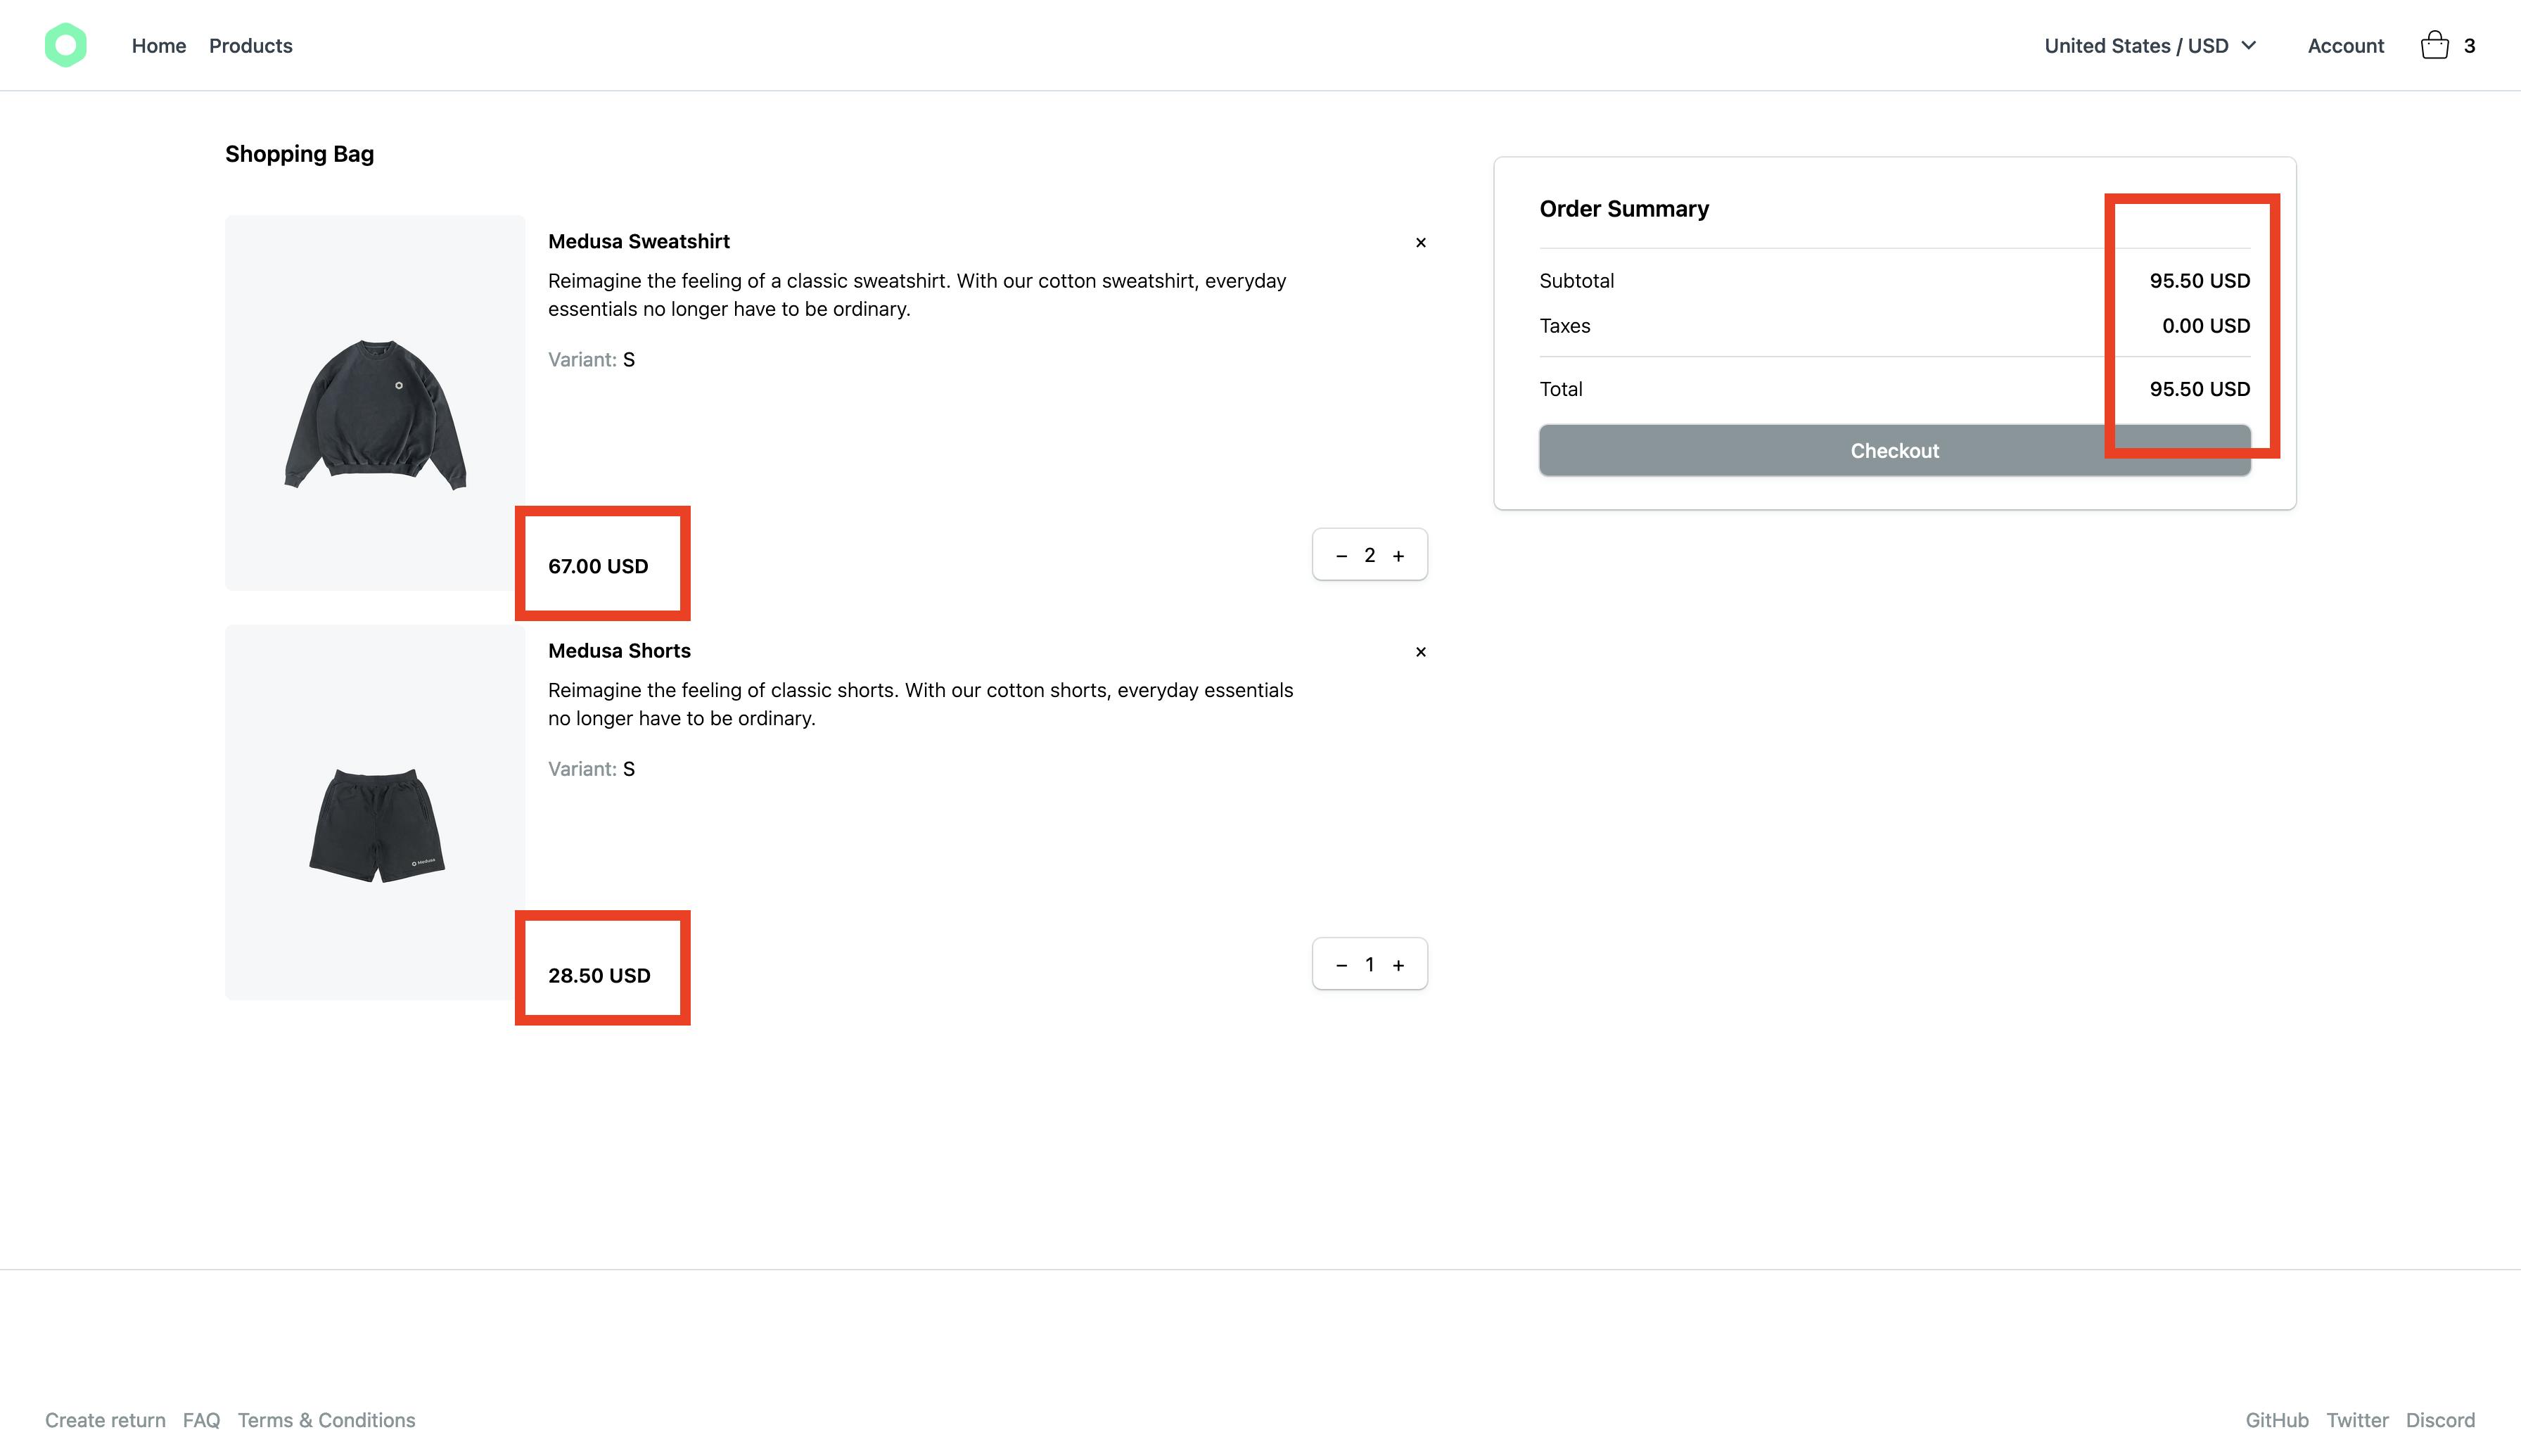
如您所见,卡片上的价格与购物车总计摘要中的总计同步。
尝试测试您添加的不同功能,包括更改数量或删除项目。这一切都应该按预期工作。
下一步是什么?
本系列的下一部分将介绍添加结帐流程以下订单。它还包括添加Stripe作为付款方式。
您可以参考以下资源在 Nuxt.js 电子商务店面中实现其他功能:
-
使用Stripe 插件将 Stripe 设置为付款方式。
-
添加客户登录和个人资料,为客户提供管理数据的方式。
-
使用Algolia 插件将产品搜索引擎添加到您的店面。
如果您有任何与美杜莎相关的问题或疑问,请随时通过Discord与美杜莎团队联系。

ModelScope旨在打造下一代开源的模型即服务共享平台,为泛AI开发者提供灵活、易用、低成本的一站式模型服务产品,让模型应用更简单!
更多推荐
 0
0 0
0- 0


 已为社区贡献27131条内容

所有评论(0)