在 Gitlab 上为 Rails 6+ 设置 CI/CD 的完整指南
在 Gitlab 上为 Rails 进行持续集成/部署
[ ](https://res.cloudinary.com/practicaldev/image/fetch/s--wK2vft7t--/c_limit%2Cf_auto%2Cfl_progressive%2Cq_auto%2Cw_880/http://blog.heyzimo。 com/assets/images/pipline_green.png)
在这篇博文中,我们将通过必要的步骤来按顺序设置 Gitlab
如果一切正常,运行 Rails 构建、测试和部署。
我将特别关注rails system test以及如何使它们起作用。
我们将使用 Heroku 来部署我们的登台应用程序。
我们将实现什么?
构建阶段
构建将包含:
-
安装依赖
-
数据库设置
-
预编译资产(资产和 webpacker)
测试台
集成测试
在这个阶段,我们将运行所有的集成测试,基本上转向
跑:
bundle exec rails test
系统测试
这是我们 CI 中最令人兴奋和最重要的部分。
系统测试在测试需要大量使用的复杂 UI 方面非常有用
Javascript(Vue 应用程序的 React)并与Google Map Places等外部服务交互。
系统测试将通过像普通用户一样在我们的应用程序上单击和填写输入来模仿普通用户。
这个阶段执行的主要命令是bundle exec rails test:system。
在这种情况下,交互的事实是使用容器嵌入Selenium Chrome browser来运行真实的浏览器来获取和测试我们的前端。
部署阶段
这是一个简单的步骤,我们将把我们的应用程序部署到登台环境中。
GITLAB-CI
Gitlab 向所有人提供(我们应该感谢他们所做的所有工作
已完成)定义如何测试/部署代码的配方
以及这些任务所需的所有服务。
所有指令都存储在我们回购根目录中的.gitlab-ci中。
这为我们提供了一种集中且简单的方式来管理我们的源代码和
我们的持续集成为FREE。
工作原理
CI 遵循以下简单步骤:
-
引导您在
.gitlab-ci中指定的一个或多个容器,即services -
将你的 repo 复制到主容器中。
3.运行所有想要的脚本
使用缓存加速CI
Gitlab 允许我们缓存文件夹和文件并将它们用于下一个作业。
无需重新编译所有依赖项,甚至无需下载它们。
在我们的例子中,缓存所有gems和node_modules将为我们节省几分钟。
使用工件来调试我们的测试
当系统测试失败时,测试会将screenshots保存在temp文件夹中。
artifacts使我们能够保存这些文件并将它们与工作联系起来。
当我们想要调试失败的系统测试时,这将帮助我们很多。
做吧
1\。构建
准备构建容器
构建将在容器中执行,所以我们应该有一个容器
所有需要的依赖都捆绑在里面。
对于现代 Rails 应用程序,我们应该包括:
-
红宝石
-
节点 + 纱线
-
一些系统库
这里是dockerfile
FROM ruby:2.4.3

RUN curl -sS https://dl.yarnpkg.com/debian/pubkey.gpg | apt-key add -
RUN curl -sL https://deb.nodesource.com/setup_8.x | bash -
RUN echo "deb https://dl.yarnpkg.com/debian/ stable main" | tee /etc/apt/sources.list.d/yarn.list
RUN apt-get update -qqy && apt-get install  -qqyy yarn nodejs postgresql postgresql-contrib libpq-dev cmake

RUN rm -rf /var/lib/apt/lists/*
进入全屏模式 退出全屏模式
容易耶!
构建容器
docker build .
Sending build context to Docker daemon  2.048kB
Step 1/6 : FROM ruby:2.6.5
2.6.5: Pulling from library/ruby
16ea0e8c8879: Pull complete
50024b0106d5: Pull complete
ff95660c6937: Pull complete
9c7d0e5c0bc2: Pull complete
29c4fb388fdf: Pull complete
069ad1aadbe0: Pull complete
e7188792d9dd: Pull complete
bae7e74440d1: Pull complete
Digest: sha256:2285f291f222e1b53d22449cc52bad2112f519bcce60248ea1c4d5e8f14c7c04
Status: Downloaded newer image for ruby:2.6.5
 ---> 2ff4e698f315
Step 2/6 : RUN curl -sS https://dl.yarnpkg.com/debian/pubkey.gpg | apt-key add -
 ---> Running in abb67e50af3e
Warning: apt-key output should not be parsed (stdout is not a terminal)
OK
Removing intermediate container abb67e50af3e
 ---> 461e2dd2134d
Step 3/6 : RUN curl -sL https://deb.nodesource.com/setup_8.x | bash -
 ---> Running in 414f508a391c

## Installing the NodeSource Node.js 8.x LTS Carbon repo...

.....
Processing triggers for libc-bin (2.28-10) ...
Removing intermediate container af1183021a8d
 ---> 603cab5f6952
Step 6/6 : RUN rm -rf /var/lib/apt/lists/*
 ---> Running in 53c5950a25c1
Removing intermediate container 53c5950a25c1
 ---> 42b50699301e
Successfully built 42b50699301e
进入全屏模式 退出全屏模式
标记它
docker tag 42b50699301e registry.gitlab.com/[ORG]/[REPO]/[CONTAINER]:v1
进入全屏模式 退出全屏模式
现在,我们应该发布这个容器以使 GitlabCI 能够使用它。
Gitlab为我们提供一个容器注册中心!再次免费!
所以我们只需要将这个容器推送到项目注册表中。
首先,您应该登录到 gitlab 注册表
docker login registry.gitlab.com
# use your gitlab credential
进入全屏模式 退出全屏模式
和推
docker push registry.gitlab.com/[ORG]/[REPO]/[CONTAINER]:v1 # v1 is my version tag
进入全屏模式 退出全屏模式
如果你有ADSL互联网连接,上传速度很差,你可以去
小睡一下 ;)
一旦推送完成,我们就可以进行下一步了。
构建脚本
这是 gitlab-ci 文件中的主要构建部分
image: "registry.gitlab.com/[ORG]/[REPO]/[CONTAINER]:v1"

variables:
  LC_ALL: C.UTF-8
  LANG: en_US.UTF-8
  LANGUAGE: en_US.UTF-8
  RAILS_ENV: "test"
  POSTGRES_DB: test_db
  POSTGRES_USER: runner
  POSTGRES_PASSWORD: ""

# cache gems and node_modules for next usage
.default-cache: &default-cache
  cache:
    untracked: true
    key: my-project-key-5.2
    paths:
      - node_modules/
      - vendor/
      - public/

build:
  <<: *default-cache
  services:
    - postgres:latest
  stage: build
  script:
  - ruby -v
  - node -v
  - yarn --version
  - which ruby
  - gem install bundler  --no-ri --no-rdoc
  - bundle install  --jobs $(nproc) "${FLAGS[@]}" --path=vendor
  - yarn install
  - cp config/database.gitlab config/database.yml
  - RAILS_ENV=test bundle exec rake db:create db:schema:load
  - RAILS_ENV=test bundle exec rails assets:precompile
进入全屏模式 退出全屏模式
所以我们使用之前创建的镜像来托管构建。
我们应该在项目中添加一个config/database.gitlab来替换原来的
数据库配置并使用自定义主机和凭据连接到 postgres
由 Gitlab CI 启动的容器。
  services:
    - postgres:latest
进入全屏模式 退出全屏模式
阅读此行时,Gitlab 将启动一个数据库容器(postgres)和
将使用之前定义的变量来设置数据库
  POSTGRES_DB: test_db
  POSTGRES_USER: runner
  POSTGRES_PASSWORD: ""
进入全屏模式 退出全屏模式
config/database.gitlab将告诉我们的 rails 应用程序如何连接到
数据库,所以在应用程序启动之前,database.yml将被替换为
定制一个。
test:
  adapter: postgresql
  encoding: unicode
  pool: 5
  timeout: 5000
  host: postgres
  username: runner
  password: ""
  database: test_db
进入全屏模式 退出全屏模式
2\。集成测试脚本
这个不需要多解释
integration_test:
  <<: *default-cache
  stage: test
  services:
    - postgres:latest
    - redis:alpine
  script:
    - gem install bundler  --no-ri --no-rdoc
    - bundle install  --jobs $(nproc) "${FLAGS[@]}" --path=vendor
    - cp config/database.gitlab config/database.yml
    - bundle install --jobs $(nproc) "${FLAGS[@]}" --path=vendor
    - RAILS_ENV=test bundle exec rake db:create db:schema:load
    - RAILS_ENV=test bundle exec rails assets:precompile
    - bundle exec rake test
进入全屏模式 退出全屏模式
3.系统测试脚本
使系统测试成为可能的基础设施非常有趣。
要运行测试,我们应该启动浏览器(在容器中)并获取页面
来自 rails 服务器(来自其他容器)。
[ ](https://res.cloudinary.com/practicaldev/image/fetch/s--WAIm9-LI--/c_limit%2Cf_auto%2Cfl_progressive%2Cq_auto%2Cw_880/http:// blog.heyzimo.com/assets/images/system_tests.png)
system_test:
  <<: *default-cache
  stage: test
  services:
    - postgres:latest
    - redis:alpine
    - selenium/standalone-chrome:latest
  script:
    - gem install bundler  --no-ri --no-rdoc
    - bundle install  --jobs $(nproc) "${FLAGS[@]}" --path=vendor
    - cp config/database.gitlab config/database.yml
    - export selenium_remote_url="http://selenium__standalone-chrome:4444/wd/hub/"
    - bundle install  --jobs $(nproc) "${FLAGS[@]}" --path=vendor
    - RAILS_ENV=test bundle exec rake db:create db:schema:load
    - RAILS_ENV=test bundle exec rails assets:precompile
    - bundle exec rake test:system
  artifacts:
    when: on_failure
    paths:
      - tmp/screenshots/
进入全屏模式 退出全屏模式
我们应该告诉 capybara 使用正确的IP而不是localhost,因为这里我们有浏览器
和服务器在两个不同的容器中。
在environment/test.rb中,添加这些行
  net = Socket.ip_address_list.detect{|addr| addr.ipv4_private? }
  ip = net.nil? ? 'localhost' : net.ip_address
  config.domain = ip
  config.action_mailer.default_url_options = { :host => config.domain }

  Capybara.server_port = 8200
  Capybara.server_host = ip
进入全屏模式 退出全屏模式
我们应该告诉系统测试在哪里可以找到chrome driver来控制浏览器,更新application_system_test_case.rb
require "test_helper"
require "socket"


def prepare_options
  driver_options = {
    desired_capabilities: {
      chromeOptions: {
        args: %w[headless disable-gpu disable-dev-shm-usage] # preserve memory & cpu consumption
      }
    }
  }

  driver_options[:url] = ENV['selenium_remote_url'] if ENV['selenium_remote_url']

  driver_options
end

class ApplicationSystemTestCase < ActionDispatch::SystemTestCase
  driven_by :selenium, using: :chrome, screen_size: [1400, 1400],
            options: prepare_options
end
进入全屏模式 退出全屏模式
rails system test会截图保存到tmp/screenshots
[ ](https://res.cloudinary.com/practicaldev/image/fetch/s--EOMHKdcW--/c_limit%2Cf_auto%2Cfl_progressive%2Cq_auto%2Cw_880/http://blog. heyzimo.com/assets/images/screenshots.png){:classu003d"img-responsive"}
如您所见,屏幕截图已存储并附加到作业,Neat!
4\。暂存部署
如果build和tests阶段成功,这将部署我们的代码。
deploy_staging:
  stage: deploy
  variables:
    HEROKU_APP_NAME: YOUR_HEROKU_APP_NAME
  dependencies:
    - integration_test
    - system_test
  only:
    - master
  script:
    - gem install dpl
    - dpl --provider=heroku --app=$HEROKU_APP_NAME --api-key=$HEROKU_API_KEY
进入全屏模式 退出全屏模式
HEROKU_API_KEY存储在项目设置中的安全位置
[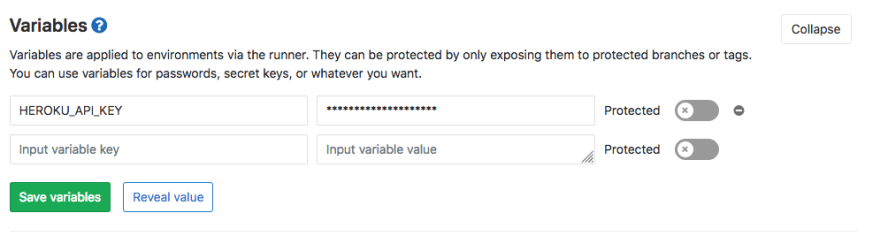 ](https://res.cloudinary.com/practicaldev/image/fetch/s--zla4N2Rb--/c_limit%2Cf_auto%2Cfl_progressive%2Cq_auto%2Cw_880/http://blog.heyzimo .com/assets/images/gitlab_variables.png)
有关这方面的更多信息,请转到Gitlab 变量文档
结论
Gitlab是一个了不起的项目,提供了一个非常好的地方,一切都在这里
很好的集成,增强了编码体验。
最后,我们希望迁移到Google compute engine将提供一个
更好的项目稳健性和更少的问题。
Gitlab 万岁!!
干杯!
这是完整的Gitlab CI文件

云原生社区为您提供最前沿的新闻资讯和知识内容
更多推荐
 0
0 0
0- 0


 已为社区贡献35526条内容

所有评论(0)