使用 Python Azure Functions 和 SignalR 构建无服务器物联网解决方案
在上关注我 Twitter,项目源代码,Powerpoint 幻灯片,PDF 幻灯片
解决方案概述
[ ](https://res.cloudinary.com/practicaldev/image/fetch/s--ArEcQdSf--/c_limit%2Cf_auto%2Cfl_progressive%2Cq_auto%2Cw_880/https://raw.githubusercontent. com/gloveboxes/Go-Serverless-with-Python-Azure-Functions-and-SignalR/master/docs/resources/solution-architecture.png)
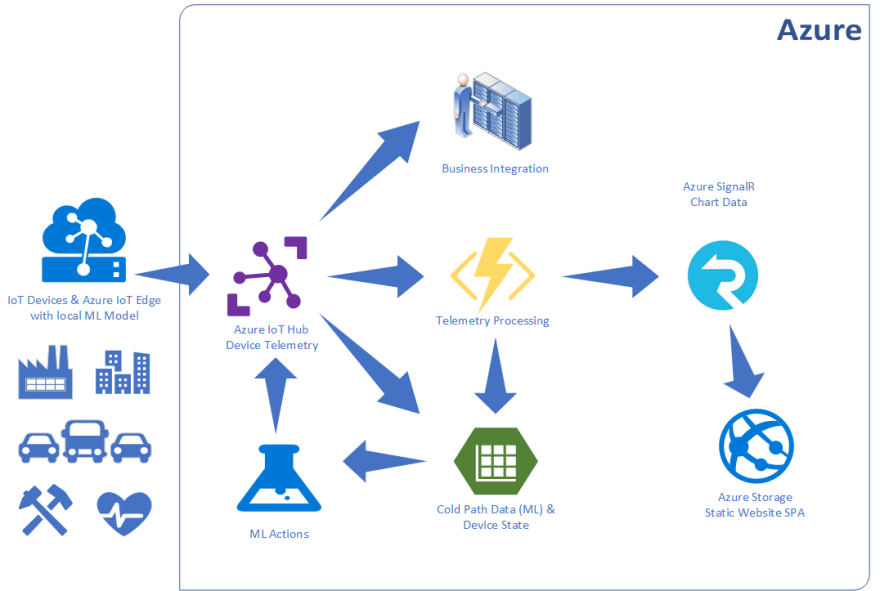
此解决方案图概述了典型的 IoT 解决方案。Azure IoT Hub负责互联网规模、安全、与设备和后端服务的双向通信。
遥测可以由 Azure IoT 中心路由到各种服务,也可以存储到Apache Avro或 JSON 格式,用于审计、集成或驱动机器学习过程等目的。
这篇文章采用了这个场景的一部分,是关于通过 Python Azure Functions 和 Azure SignalR 直接通过无服务器处理来自 Azure IoT Hub 的遥测数据,以实现近乎实时的仪表板。
Azure 服务
此解决方案中使用了以下 Azure 服务,并在免费层中提供:Azure IoT Hub、Azure Functions、Azure SignalR、Azure 存储、10006100610Azure 网站
您可以注册免费 Azure 帐户,如果您是学生,请务必注册Azure for Students,无需信用卡。
开发Python Azure Functions
从哪里开始
查看Azure Functions Python 工作者指南。有关于以下主题的信息:
-
创建你的第一个 Python 函数
-
开发者指南
-
绑定 API 参考
-
使用 VS Code 开发
-
在 Linux 上使用自定义 docker 映像创建 Python 函数
解决方案组件(包含在此 GitHub 存储库中)
-
Python Azure 函数。此 Azure 函数处理批量遥测,然后校准和验证遥测,并更新设备状态 Azure 存储表,然后将遥测传递给 Azure SignalR 服务以进行近乎实时的 Web 客户端更新。
-
Azure SignalR .NET Core Azure 函数(用 C# 编写,直到 Python SignalR 绑定可用)。此 Azure 函数负责将遥测数据传递给 SignalR 服务以发送到 SignalR Web 客户端仪表板。
3.网络仪表板。此单页 Web 应用程序作为静态网站托管在 Azure 存储上。所以它也是无服务器的。
设计注意事项
乐观并发
首先,了解事件中心触发器缩放以及如何启动其他函数实例来处理事件很有用。
我想在设备状态表中维护设备发送遥测数据的次数。该解决方案实现Azure Storage/CosmosDB Optimistic Concurrency。
乐观并发 (OCC)假设多个事务可以频繁完成而不会相互干扰。在运行时,事务使用数据资源而不获取这些资源上的锁。在提交之前,每个事务都验证没有其他事务修改它已读取的数据。 OCC 一般用于数据争用较少的环境。
如果有多个函数实例更新并且发生冲突,我已经实现了指数退避并添加了一个随机因子以允许重试。
Pseudo code: random(occBase, min(occCap, occBase * 2 ^ attempt))
def calcExponentialFallback(attempt):
    base = occBase * pow(2, attempt)
    return random.randint(occBase, min(occCap, base)) / 1000.0
从我有限的测试来看,指数退避是有效的。
遥测处理
“updateDeviceState”首先检查实体是否已经在存储表中。如果实体存在,则调用 merge_entity 将使用“etag”。如果 etag 在合并时与存储中实体的 etag 匹配,则对 merge_entity 的调用成功。
def updateDeviceState(telemetry):
    mergeRetry = 0

    while mergeRetry < 10:
        mergeRetry += 1

        try:
            # get existing telemetry entity
            entity = table_service.get_entity(
                deviceStateTable, partitionKey, telemetry.get('deviceId', telemetry.get('DeviceId')))
            etag = entity.get('etag')
            count = entity.get('Count', 0)
        except:
            entity = {}
            etag = None
            count = 0

        count += 1

        updateEntity(telemetry, entity, count)
        calibrator.calibrateTelemetry(entity)

        if not validateTelemetry(entity):
            break

        try:
            if etag is not None:    # if etag found then record existed
                # try a merge - it will fail if etag doesn't match
                table_service.merge_entity(
                    deviceStateTable, entity, if_match=etag)
            else:
                table_service.insert_entity(deviceStateTable, entity)

            return entity

        except:
            interval = calcExponentialFallback(mergeRetry)
            logging.info("Optimistic Consistency Backoff interval {0}".format(interval))
            time.sleep(interval)

    else:
        logging.info('Failed to commit update for device {0}'.format(
            entity.get('DeviceId')))
遥测校准优化
您可以在设备上或云端校准数据。我更喜欢校准云端。校准数据可以通过 Azure 函数数据绑定加载,但我更喜欢延迟加载校准数据。可能有很多校准数据,因此在触发功能时一次加载所有数据没有意义。
def getCalibrationData(deviceId):
    if deviceId not in calibrationDictionary:
        try:
            calibrationDictionary[deviceId] = table_service.get_entity(
                calibrationTable, partitionKey, deviceId)
        except:
            calibrationDictionary[deviceId] = None

    return calibrationDictionary[deviceId]
遥测验证
物联网解决方案应验证遥测以确保数据在合理范围内,以允许传感器出现故障。
def validateTelemetry(telemetry):
    temperature = telemetry.get('Celsius')
    pressure = telemetry.get('hPa')
    humidity = telemetry.get('Humidity')

    if temperature is not None and not -40 <= temperature <= 80:
        return False
    if pressure is not None and not 600 <= pressure <= 1600:
        return False
    if humidity is not None and not 0 <= humidity <= 100:
        return False
    return True
Azure SignalR 集成
没有服务端 Azure SignalR SDK。若要将遥测数据从事件中心触发器 Azure 函数发送到仪表板 Web 客户端,您需要调用绑定到 SignalR 服务的 HTTP Azure 函数。然后,此 SignalR Azure 函数通过 SignalR 发送遥测数据,就好像数据来自客户端应用程序一样。
Azure SignalR 集成的流程如下:
-
Web 客户端对 'negotiate' 进行 REST 调用,除其他外,SignalR 'Hubname' 被返回给客户端。
-
Web 客户端然后对“getdevicestate”进行 REST 调用,此 HTTP 触发器从设备状态表中检索所有设备的状态。数据通过 SignalR 通过调用“negotiate”返回的相同“Hubname”返回给客户端。
-
当新的遥测通过 IoT 中心到达时,“EnvironmentEventTrigger”触发器触发,遥测在设备状态表中更新,并对“SendSignalRMessage”进行 REST 调用,并将遥测发送到所有在 'Hubname' 频道上侦听的 SignalR 客户端。
[ ](https://res.cloudinary.com/practicaldev/image/fetch/s--1sCJccYb--/c_limit%2Cf_auto%2Cfl_progressive%2Cq_auto%2Cw_880/https://raw.githubusercontent.com/ gloveboxes/Go-Serverless-with-Python-Azure-Functions-and-SignalR/master/docs/resources/service-side-signalr.png)
设置概览
此实验室在 Azure 上使用免费服务。需要设置以下内容:
-
Azure IoT Hub 和 Azure IoT 设备
-
Azure SignalR 服务
-
部署 Python Azure Function
-
部署 SignalR .NET Core Azure Function
第 1 步:按照 Raspberry Pi 模拟器指南设置 Azure IoT Hub
虽然在 Python 中 Azure Functions 处于预览阶段,但它们仅在有限的位置提供。目前,“westus”和“westeurope”。我建议您在其中一个位置创建所有项目资源。
设置树莓派模拟器
[ ](https://res.cloudinary.com/practicaldev/image/fetch/s--QOkeHfbG--/c_limit%2Cf_auto%2Cfl_progressive%2Cq_auto%2Cw_880/https://docs.microsoft .com/en-us/azure/iot-hub/media/iot-hub-raspberry-pi-web-simulator/3_banner.png%3FWT.mc_id%3Ddevto-blog-dglover)
步骤 2:创建 Azure 资源组
az 组创建
az group create -l westus -n enviromon-python
步骤 3:创建 Azure 信号服务
-
az signalr create创建 Azure SignalR 服务
-
az signalr key list返回 SignalR .NET Core Azure 函数所需的连接字符串。
az signalr create -n <Your SignalR Name> -g enviromon-python --sku Free_DS2 --unit-count 1
az signalr key list -n <Your SignalR Name> -g enviromon-python
第 4 步:创建存储帐户
az 存储帐户创建
az storage account create -n enviromonstorage -g enviromon-python -l westus --sku Standard_LRS --kind StorageV2
第五步:克隆项目
git clone https://github.com/gloveboxes/Go-Serverless-with-Python-Azure-Functions-and-SignalR.git
第 6 步:部署 SignalR .NET Core Azure 函数
cd  Go-Serverless-with-Python-Azure-Functions-and-SignalR

cd dotnet-signalr-functions

cp local.settings.sample.json local.settings.json

code .
第七步:更新local.settings.json
{
    "IsEncrypted": false,
    "Values": {
        "AzureWebJobsStorage": "<The Storage Connection String for enviromonstorage>",
        "FUNCTIONS_WORKER_RUNTIME": "dotnet",
        "StorageConnectionString":"<The Storage Connection String for enviromonstorage>",
        "AzureSignalRConnectionString": "<The SignalR Coonection String from Step 3>"
    },
    "Host": {
        "LocalHttpPort": 7071,
        "CORS": "http://127.0.0.1:5500,http://localhost:5500,https://azure-samples.github.io",
        "CORSCredentials": true
    }
}
第 8 步:部署 SignalR .NET Core Azure 函数
- 在 Visual Studio 中打开一个终端窗口。从主菜单中,选择查看 -> 终端
2.部署Azure函数
func azure functionapp publish --publish-local-settings <Your SignalR Function Name>
func azure functionapp list-functions <Your SignalR Function Name>
Functions in mysignal-signalr:
    getdevicestate - [httpTrigger]
        Invoke url: https://mysignal-signalr.azurewebsites.net/api/getdevicestate

    negotiate - [httpTrigger]
        Invoke url: https://mysignal-signalr.azurewebsites.net/api/negotiate

    SendSignalrMessage - [httpTrigger]
        Invoke url: https://mysignal-signalr.azurewebsites.net/api/sendsignalrmessage?code=DpfBdeb9TV1FCXXXXXXXXXXXXX9Mo8P8FPGLia7LbAtZ5VMArieo20Q==
** 您需要将 SendSignalrMessage Invoke url 复制并粘贴到方便的地方。
步骤 9:使用 Visual Studio Code 打开 Python Functions 项目
切换到克隆到项目的目录,切换到 iothub-python-functions 目录,然后启动 Visual Studio Code。
从 Linux 和 macOS 上的终端,或 Windows 上的 Powershell。
cd  Go-Serverless-with-Python-Azure-Functions-and-SignalR

cd iothub-python-functions

cp local.settings.sample.json local.settings.json

code .
第十步:更新local.settings.json
{
  "IsEncrypted": false,
  "Values": {
    "FUNCTIONS_WORKER_RUNTIME": "python",
    "AzureWebJobsStorage": "<The Storage Connection String for enviromonstorage>",
    "IoTHubConnectionString": "<The IoT Hub Connection String>",
    "PartitionKey": "<Storage Partition Key - arbitrary - for example the name of city/town>",
    "StorageConnectionString": "<The Storage Connection String for enviromonstorage>",
    "SignalrUrl": "<SendSignalrMessage Invoke URL>"
  }
}
第十一步:部署Python Azure Function
- 在 Visual Studio 中打开一个终端窗口。从主菜单中,选择查看 -> 终端
2.部署Azure函数
func azure functionapp publish enviromon-python --publish-local-settings --build-native-deps
步骤 12:为 Azure 存储启用静态网站
Dashboard 项目包含静态网站项目。
按照 Azure 存储](https://docs.microsoft.com/en-us/azure/storage/blobs/storage-blob-static-website?WT.mc_id=devto-blog-dglover)中的[静态网站托管指南进行操作。
此示例使用的页面是 enviromon.html。请务必修改网页 javascript 中的“apiBaseUrl”url 以指向您的 SignalR Azure 函数实例。
将仪表板项目的内容复制到静态网站。
步骤 13:为 SignalR .NET Core Azure 功能启用 CORS
az functionapp cors 添加
az functionapp cors add -g enviromon-python -n <Your SignalR Function Name> --allowed-origins <https://my-static-website-url>
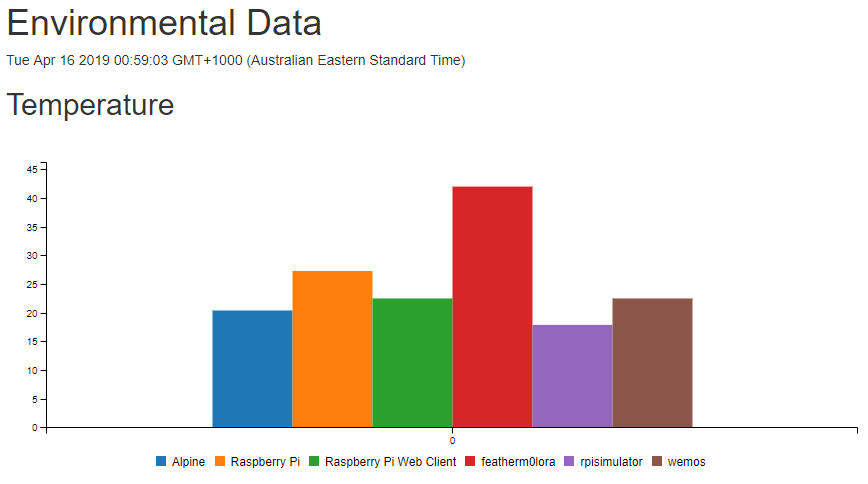
步骤 14:启动仪表板
从您的网络浏览器,导航到https://your-start-web-site/enviromon.html
来自 Raspberry Pi 模拟器的遥测数据将显示在仪表板上。
[ ](https://res.cloudinary.com/practicaldev/image/fetch/s--vg9eeqjs--/c_limit%2Cf_auto%2Cfl_progressive%2Cq_auto%2Cw_880/https://raw.githubusercontent.com /gloveboxes/Go-Serverless-with-Python-Azure-Functions-and-SignalR/master/docs/resources/dashboard.png)

云原生社区为您提供最前沿的新闻资讯和知识内容
更多推荐
 0
0 0
0- 0


 已为社区贡献35528条内容

所有评论(0)