

Have you ever needed a self-signed certificate and had to google how to create one ? That’s over now. Here you will learn how to easily create a self-signed certificate and even your own certificate chain with OpenSSL or SSL Toolkit.
I will compare both tools in each step of the workflow. At the end you can decide which tool is more intuitive.
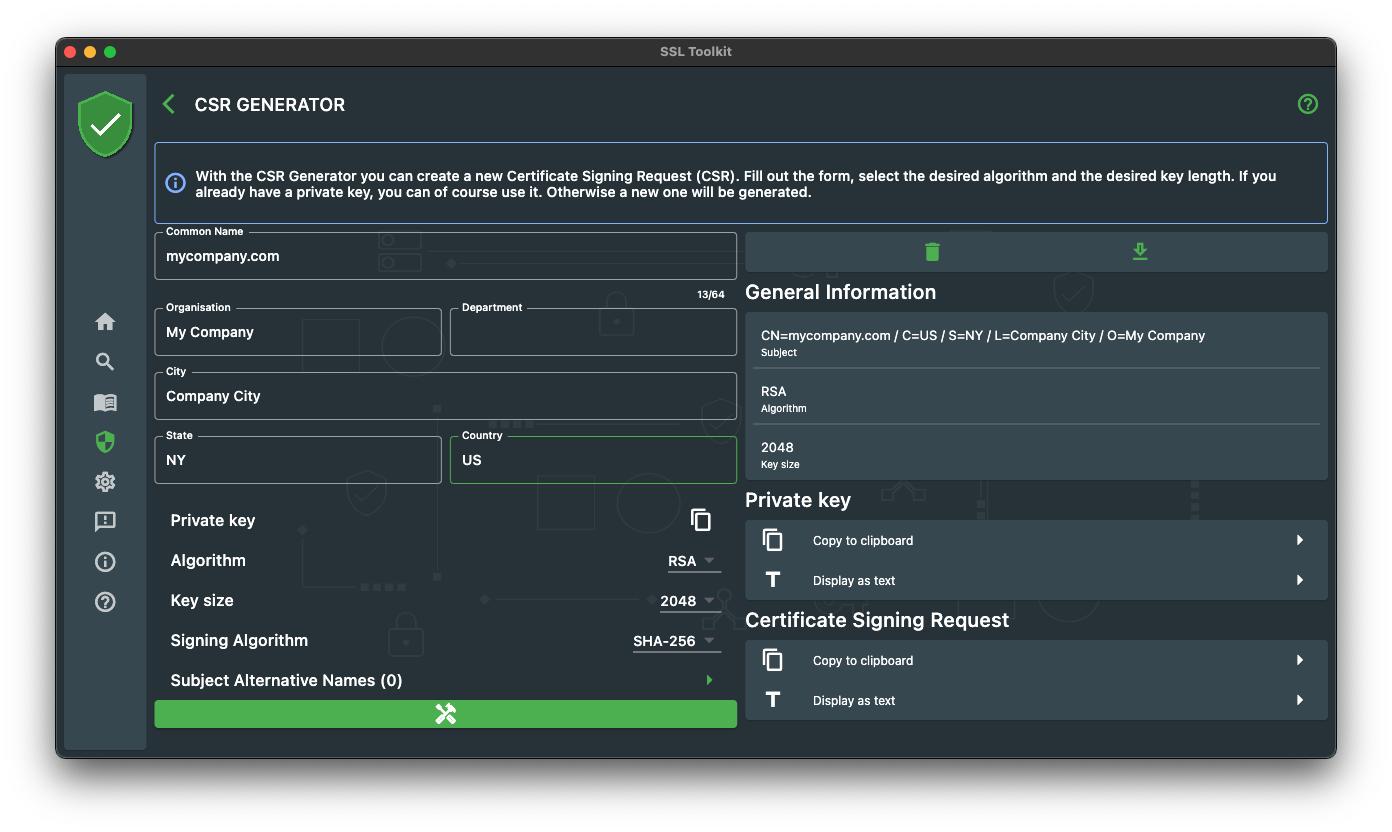
Step one, we need a Certificate Signing Request
A Certificate Signing Request, or CSR, is a request to issue a certificate. The CSR contains all the information that is to be seen later in the certificate, the so-called distinguished names, abbreviated DN.
With OpenSSL we can use the “req” command to create a new CSR.
openssl req -new -newkey rsa:2048 -sha256 -nodes -out mycompany_com.csr -keyout mycompany_com.key -subj “/C=US/ST=NY/L=Company City/O=My Company/CN=mycompany.com”
Within SSL Toolkit we can use the CSR Generator. Fill out the form, hit generate and you are ready for the next step!
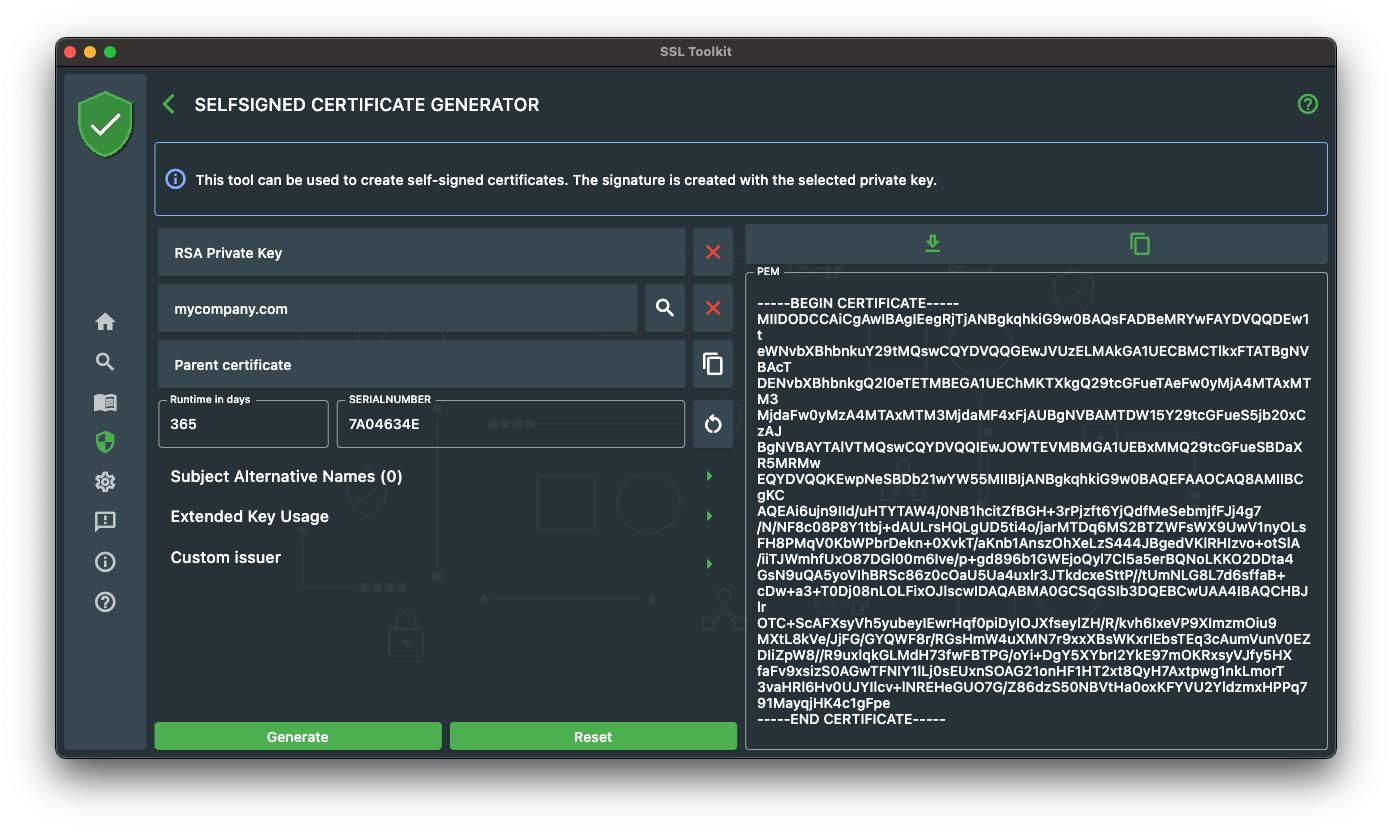
Step two, generate the self signed certificate
We can now use the generated CSR and private key to generate our self signed certificate.
openssl req -x509 -key mycompany_com.key -in mycompany_com.csr -out mycompany_com.pem -days 365 -set_serial 1
Within SSL Toolkit we can use the Selfsigned Certificate Generator. Fill out the form, select, the previously generated CSR, set a value for runtime and the serial number and hit generate.
Now that we have a self-signed certificate, we go on and take this a bit further by generating our own certificate chain.
A certificate chain is a simple chain of different certificates where each certificate has a parent certificate ( The issuer ) that was used to sign the certificate. A chain normally consists of 3 certificates :
Root Certificate -> Intermediate Certificate -> End Certificate
But in the end it does not matter how many “intermediate certificates” you put in your chain. To demonstrate on how to generate a chain, we will create a “Root Certificate” and use this to sign our self-signed certificate, so we will have a chain of two certificates in the end.
Step one and two again, we need a CSR and a self-signed certificate
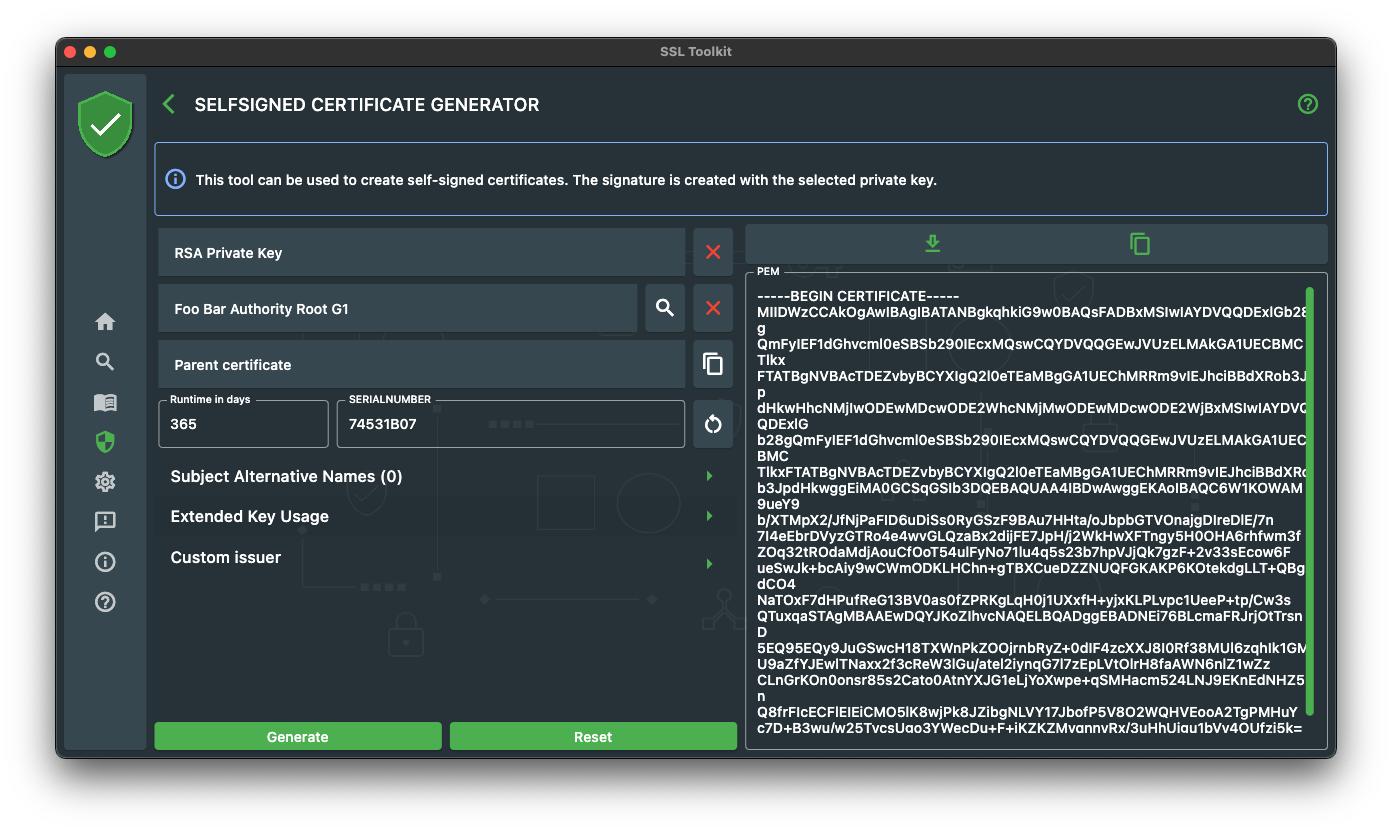
Now we want to create the Root Certificate first. Let’s generate the CSR.
openssl req -new -newkey rsa:2048 -sha256 -nodes -out foobar_root_g1.csr -keyout foobar_root_g1.key -subj “/C=US/ST=NY/L=Foo Bar City/O=Foo Bar Authority/CN=Foo Bar Authority Root G1”
Within SSL Toolkit we use the CSR Generator again.

Once the CSR and private key is generated we can go on to generate our Root Certificate.
openssl req -x509 -key foobar_root_g1.key -in foobar_root_g1.csr -out foobar_root_g1.pem -days 365
Once again in the SSL Toolkit, use the Self Signed Generator tool to create the Root Certificate.
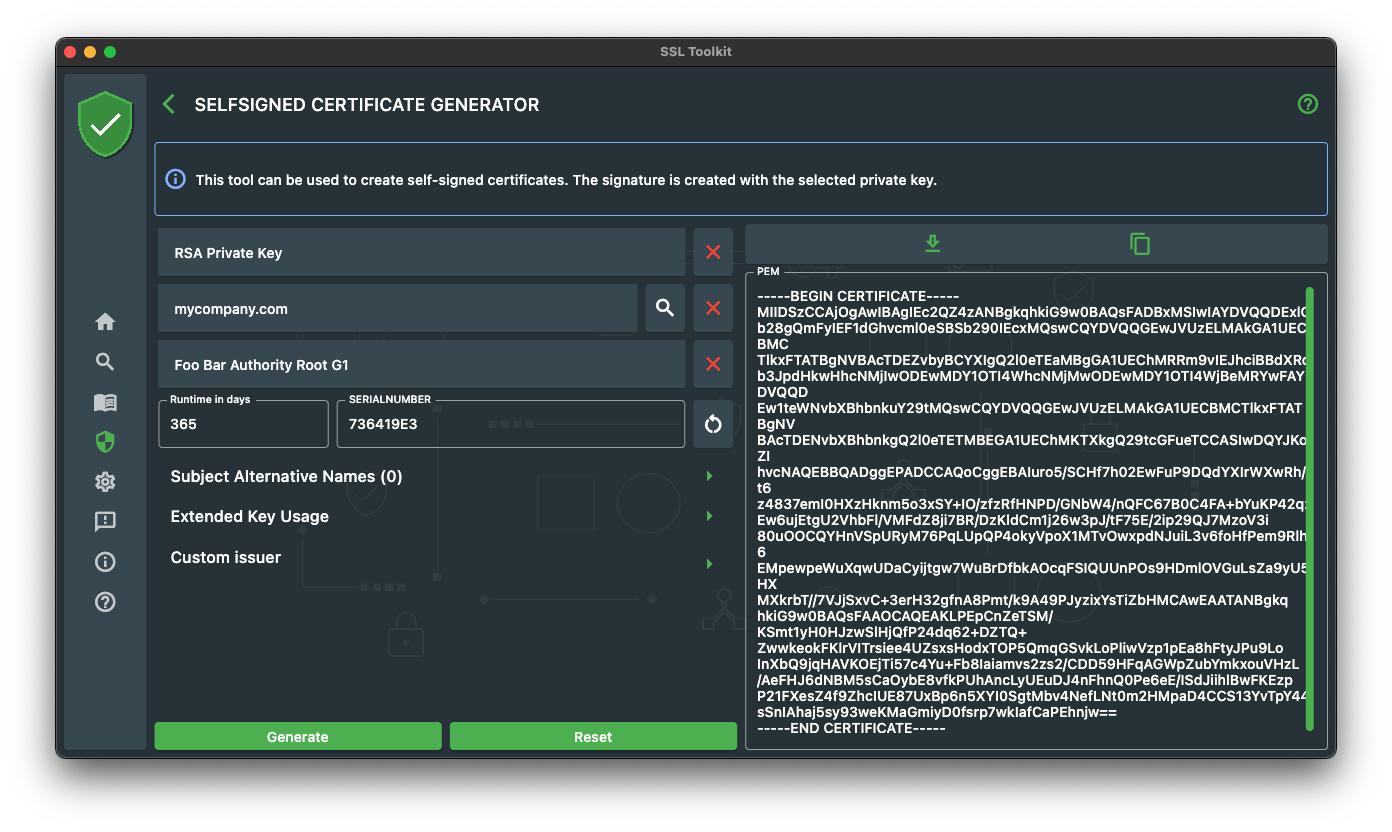
Now comes the tricky part. We want our self-signed certificate to have the following characteristics :
- The Root Certificate should be the issuer
- The certificate should be signed by the Root Certificate private key
To achieve that, we have to set the issuer information to match the subject information of the Root Certificate and sign the self-signed certificate with the private key of the root certificate. With OpenSSL we have to use the “ca” command. But before we can use the “ca” command we have to setup some configuration file and folder structure :
Generate a new file ca.config that contains the following information :
[ ca ]
default_ca = CA_default # The default ca section[ CA_default ]
dir = foobar_authority # top dir
database = $dir/index.txt # index file.
new_certs_dir = $dir/newcerts # new certs dircertificate = $dir/cacert.pem # The CA cert
serial = $dir/serial # serial no file
rand_serial = yes
private_key = $dir/private/cakey.pem# CA private key
RANDFILE = $dir/private/.rand # random number filedefault_days = 365 # how long to certify for
default_crl_days= 30 # how long before next CRL
default_md = md5 # md to usepolicy = policy_any # default policy
email_in_dn = no # Don’t add the email into cert DNname_opt = ca_default # Subject name display option
cert_opt = ca_default # Certificate display option
copy_extensions = none # Don’t copy extensions from request[ policy_any ]
countryName = supplied
stateOrProvinceName = optional
organizationName = optional
organizationalUnitName = optional
commonName = supplied
emailAddress = optional
After that we have to create a certain folders and files :
// Directories
mkdir foobar_authority
mkdir foobar_authority/newcerts// Files
touch foobar_authority/index.txt
touch foobar_authority/serial// Insert content to serial file
echo 00 > foobar_authority/serial
Now we are ready to create the certificate with the following “ca” command.
openssl ca -keyfile foobar_root_g1.key -in mycompany_com.csr -out mycompany_com.pem -days 365 -cert foobar_root_g1.pem -config ca.config
Quite a lot of work to do, just to sign a certificate with another certificate, isn’t it ?
Now let’s see how this works within SSL Toolkit!
Now back again in the Self Signed Generator and I can promise that this will be much easier. First of all we search the CSR for the self-signed we want to generate. Now we have to do the following tasks:
- Replace the private key with the one from the Root Certificate.
- Place the Root Certificate on the corresponding input or use the Custom Issuer option to define the issuer data.
Now we fill out the runtime, set a serialnumber and click on generate.
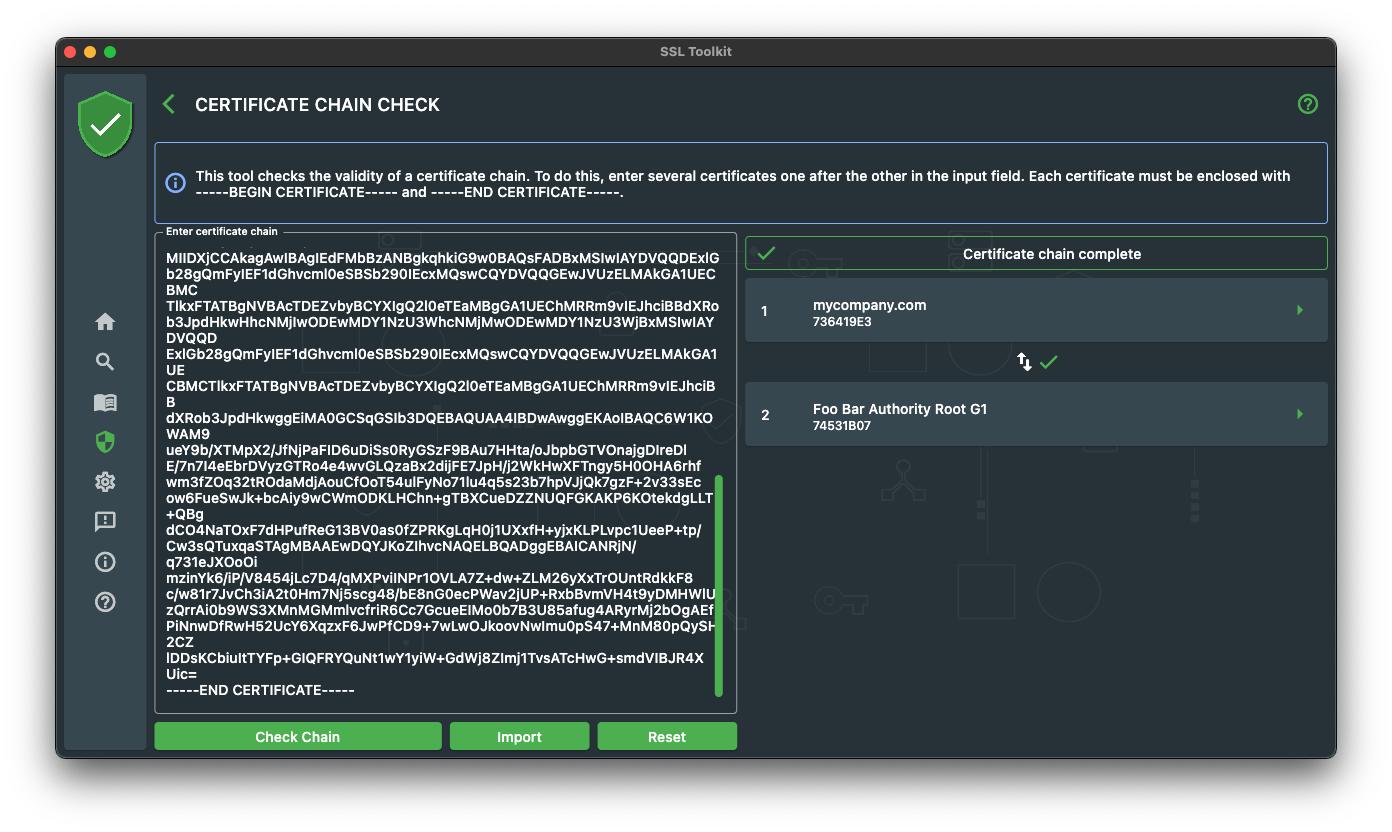
To check whether the certificate chain is correct, we can use the Certificate Chain Check tool within SSL Toolkit.
As you can see, there are quite a few steps to do and it is possible with OpenSSL and SSL Toolkit. But in the end, the OpenSSL commands like “req” and “ca” are too heavy. They offer a lot of different options that are not always necessary and it can be complicated which option is needed for a certain situation, due to the fact that the commands can be used for many different things. For example the “req” command can be used to create a CSR, self-signed certificate and to print CSR information.
So in the end it is up to you which tool to use. If you are looking for a easy to use user interface, I recommend to try SSL Toolkit.
About SSL Toolkit
SSL Toolkit is a multi-platform app supporting you in your daily work with SSL certificates. It is available on all major stores and offers the full core set of features on every platform!
- Google Play Store: https://play.google.com/store/apps/details?id=de.feuerbergsoftware.ssl_checker
- App Store: https://apps.apple.com/de/app/ssl-toolkit/id1547278785
- Windows Store: https://www.microsoft.com/store/apps/9NC62BNKNDVX


 已为社区贡献13070条内容

所有评论(0)