In the last post which you can check here, we looked into paperspace and the steps to get started. In this post we will setup the paperspace project from scratch. We will see how to storage all the packages/credentials in the persistent storage and not lose the data every time we shut down the machine.
We will start by creating a new machine using fast.ai as a runtime, let the workspace URL remain empty and start the notebook.
Create a new notebook and delete the workspace URL while creating the notebook.

As we all know python is a scripting language and we will use python to automate stuff
You can read the Documentation of the paperspace gradient.

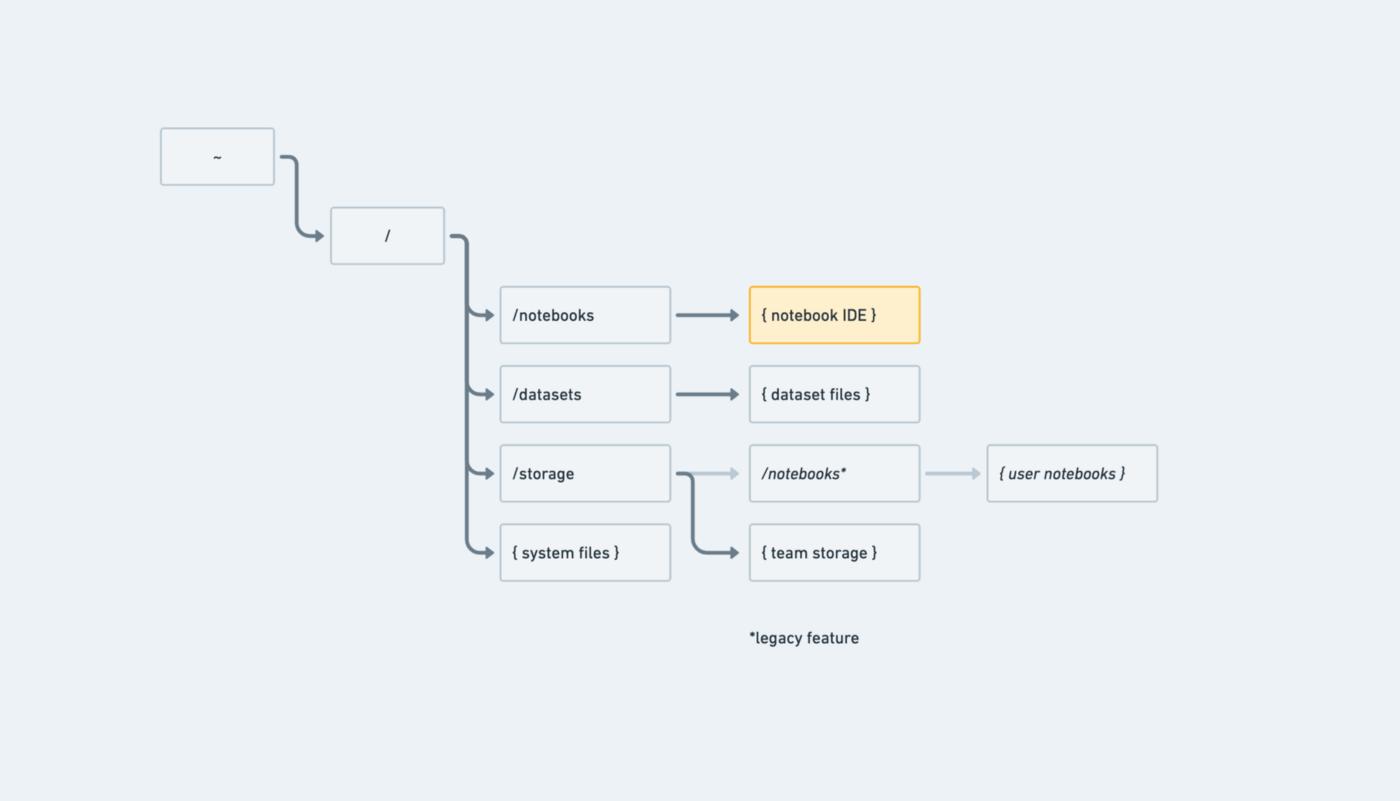
Storage— Shared persistent storage directory accessible to your entire team. Available at `/storage`. Data can be shared between users on a team and between notebooks that belong to users on a team. Access to shared persistent storage must be done through code, either via the notebook terminal or via a code cell within a notebook, as there is currently no way to access shared persistent storage from the GUI.
File manager — Files are available in the normal IDE sidebar. This corresponds to the directory located at `/notebooks`. This is also persistent storage but is limited to the current notebook. So if we delete this notebook, it’s gone.

In the last post, we installed a package with pip. Whereas paperspace installs packages using conda. The question is will this mess up things? The answer to this question is no. The place where you need to use conda/mamba is the stuff that uses the GPU. Especially, for PyTorch or TensorFlow. Conda/mamba has a way of installing the CUDA toolkit requirements so that we don’t need to worry about installing the CUDA SDK separately. Conda maintains the CUDA versions as they need to mesh properly with the PyTorch version.
Our goal is to install some packages and then the next time we start the notebook, we want that installed package.
Let’s upgrade the fastcore package:
pip install -U — user fastcore
--user flag installs the package in the home directory
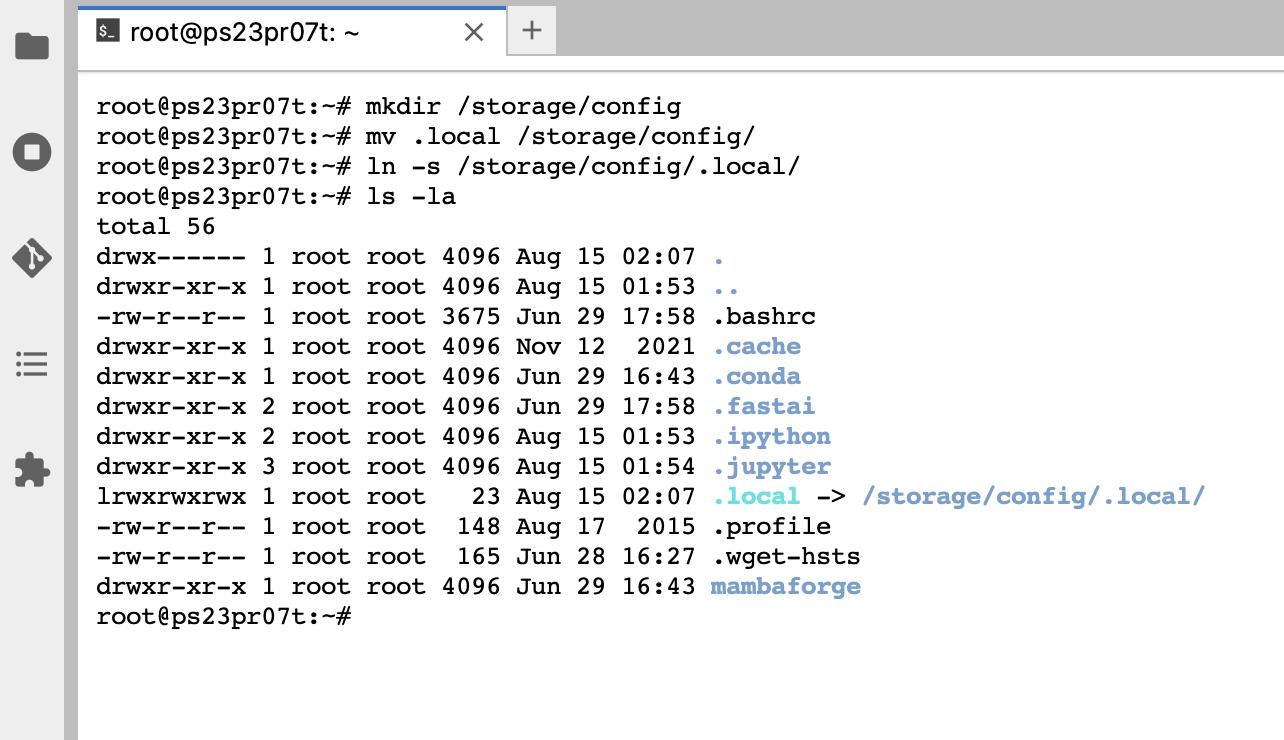
These packages are installed in a folder called .local under the home directory. So next time when we start a notebook, we want the .local folder to be there. To that, we need to move that under the persistent storage which is /storage. We can do this by the following commands:
mkdir /storage/config
mv .local /storage/config
Tips:
- To delete commands on the right side of the cursor in the terminal, enter ctrl + U
- To delete commands on the left side of the cursor in the terminal, enter ctrl + K
Now, I want to symlink it back to the home directory (default in the below command). So we don’t have to mention it explicitly.
ln -s /storage/config/.local/
Now, when we try to see the home directory’s contents, the .local is just the pointer to /storage/config/.local/ but acts like a normal folder.

ls .local
which means you can now import `fastcore` and take a look at the version. This is one we installed.
Tips:
- This takes you to the root directory
cd /
- This takes you to the home directory
cd
In the future, when we install any package it will be stored in /storage/config/.local as we have created a symlink back to the original .local. The only thing we need to do the next time we start the notebook is to symlink it back to .local.
For something this simple, you can just create a bash script.
To edit any files, there are two ways:
- Use jupyter GUI (but you need to symlink /storage/ back to /notebooks/ to use the editor)
- Use Vim editor [recommended]
In paperspace, there is a special file that runs when we start the machine and that special file is called pre-run.sh.
NOTE — We create the file pre-run.sh and paperspace runs the run.sh at the start of initiating the machine which includes code to run the pre-run.sh
We modify pre-run.sh in the following way:
#!/usr/bin/env bashcd
rm -rf .local
ln -s /storage/config/.local/
NOTE
Suppose we try to run the pre-run.sh it will error out with permission denied error. So you need to add the executable permission to this file.
chmod u+x pre-run.sh
We usually do not modify the permission in the above way. We do the following:
chmod 744 pre-run.sh
💡 The 744 means:
- 7 is read, write and execute for the user,
- 4 is read for the group
- 4 is read for everyone
You can check out chmod commands in detail here.
So if you look for the permissions for the pre-run.sh now:
rwx → 4 + 2 + 1 = 7
r-- → 4 + 0 + 0 = 4
r-- → 4 + 0 + 0 = 4
Now, you can run the script:
./pre-run.sh
Let’s re-start the machine and see if we can create a symlink back from /storage/config/.local to .local.

This is done!
In the same way, we can do this for other packages/files such as AWS credentials, Kaggle’s username/key for the API, .gitconfig, etc.
Now, let’s store the ssh keys from scratch. We will not use the ssh-keygen this time but we will upload the ssh keys we already have with us.
Create a .ssh folder under the home directory where we will store the ssh private and public keys.
mkdir .ssh
cd .ssh
Upload the private and public keys in the /storage and move the keys to .ssh
Let’s change the permissions on the directory and the ssh keys.
# read + write + execute — user | no permissions — everyone
chmod 700 .# read + write — user | no permissions — everyone
chmod 600 id_rsa# read + write — user | read — everyone
chmod 644 id_rsa.pub
You can test these keys by ssh into github.com:
ssh git@github.com
Use -v in order to make it more verbose
Now, you need to include .ssh into the /storage/config
mv .ssh /storage/config/
Now, to symlink it back we have to update the pre-run.sh
#!/usr/bin/env bashcd
rm -rf .local
ln -s /storage/config/.local/rm -rf .ssh
ln -s /storage/config/.ssh/
and run the pre-run.sh
/storage/pre-run.shls -la
Test it by SSH-ing into github.com,
ssh git@github.com
It still works!
You can re-start the machine again and open the terminal.
ls -a
You can reach out to me on Linkedin or Twitter. I will be happy to connect and share insights. Thank you.


 已为社区贡献20428条内容

所有评论(0)